PowerPac PPSM445 User manual

24
Model: PPSM445
200774-24

PARTS & DESCRIPTION
LIST OF COMPONENTS
Accessory Dough Hook, Flat Beater, Wire Whisk (see below)4.
Attachment Hub Attachment for inserting Accessories. Holds the Accessory
solidly in position during rotatory movement.
3.
Pouring Shield Transparent plastic shield which can be attached to the
Bowl to stop ingredients splattering out of the Bowl and to
facilitate the addition of new ingredients.
2.
Motor Head Upper part of the appliance, responsible for rotating the
Accessories.
1.
Bowl Stainless-steel Bowl; capacity 5 litres. Ideal for holding both
large and small quantities of ingredients.
5.
Bowl Base Base with slots in which to insert the Bowl and which then
lock it into position.
6.
Base
Lower part of the appliance, responsible for providing a
stable foundation to prevent the appliance from toppling
during operation. Contains the Bowl Base, Head
Raising/Lowering Release Button and ON/OFF & Speed Knob.
7.
Head
Raising/Lowering
Release Button
Button which releases the Motor Head to position it in one
of its two possible configurations (raised or lowered
position).
8.
ON/OFF &
Speed Knob
Knob for speed selection. The‘0’ position corresponds to the
‘OFF’position (appliance off). To start the appliance, position
the knob on one of the 12 available speeds
(positions 1 – 12), depending on the type of mixing required.
9.
Dough Hook For slowly combining, mixing and kneading leavened
dough type mixtures including bread, pasta, pizza, etc.
10.
Flat Beater For combining, mixing, and starting all mixing procedures.
For preparing cake batters and pastries, biscuits, icing, etc.
and for other, thicker batters and mixes.
11.
Wire Whisk For beating, mixing, whisking, whipping ingredients such as
butter, eggs, cream, etc. Also ideal for preparing creams,
custards, sauces, etc.
12.
1
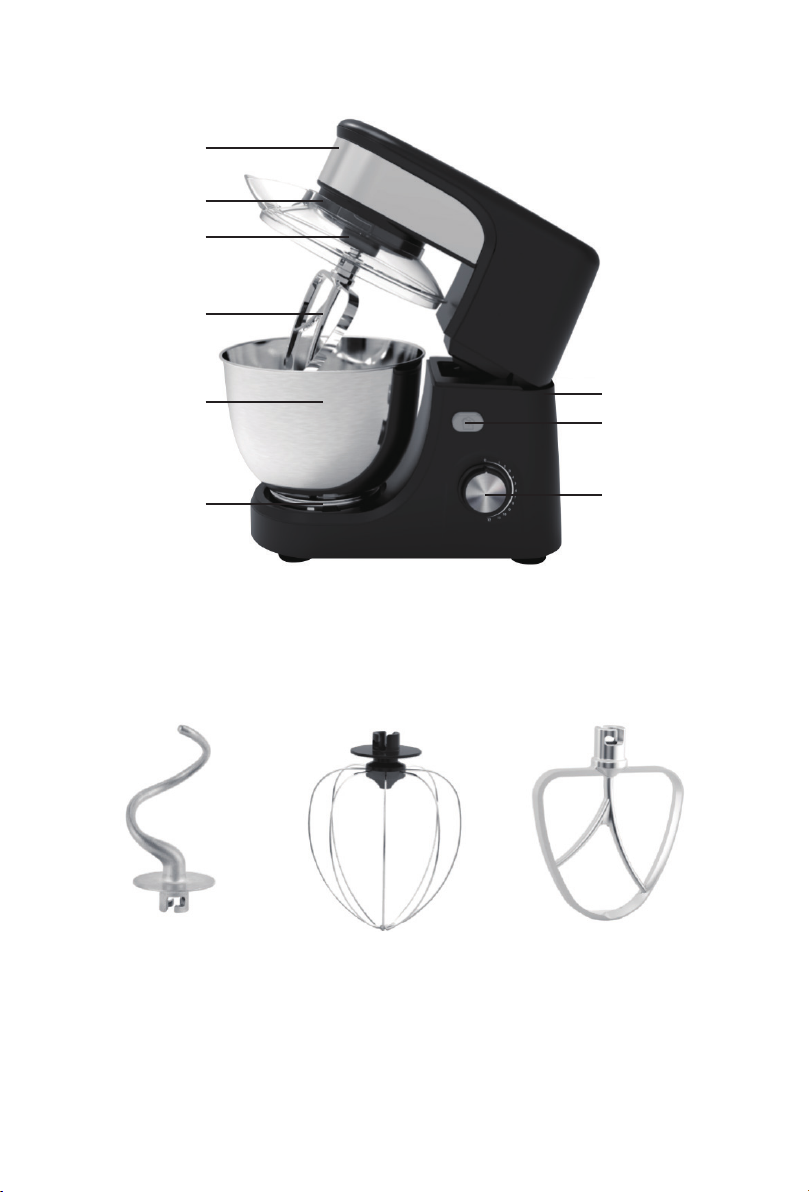
Motor Head (1)
Pouring Shield (2)
Attachment Hub (3)
Accessories
(8) Head
Raising/Lowering
Release Button
(9) ON/OFF &
Speed Knob
(7) Base
Accessory (4)
Bowl (5)
Bowl Base (6)
(11) Wire Whisk(10) Dough Hook (12) Flat Beater
2

ATTENTION :
Read this booklet carefully as it contains important instructions for a safe installation,
use and maintenance.
Important instructions to be kept for future reference.
The following basic precautions should always be followed when using electrical
appliances:
1.
2.
3.
4.
5.
6.
7.
8.
9.
10.
11.
12.
Read all instructions before using the appliance.
This appliance must be used only for the purpose it was expressly designed; any
use NOT complying with the instructions contained in the manual is considered
inappropriate and dangerous. The manufacturer is NOT responsible for possible
damages caused by the inappropriate and/or unreasonable use.
This appliance is NOT suitable to be used in an explosive environment (in the
presence of flammable substances such as gas, vapour, mist or dust, in atmospheric
conditions when, after ignition, the combustion is spread in the air). Items
containing these substances should never be placed in the appliance, and never be
used to clean the appliance in order to avert the risk of fire or explosion.
The packing materials (plastic bags, expanded polystyrene, etc.) must be kept out
of the reach of children or disabled persons since they represent potential sources
of danger.
The installation/assembly of the appliance will be made in accordance with the
indications of the manufacturer. A wrong procedure may cause damages to persons,
animals or objects, for which the manufacturer cannot be considered responsible.
Place and use the appliance on a horizontal and stable surface.
Before use, check the integrity of the appliance and power cable. In case you are not
sure, contact a qualified person. If the power cable is damaged, it must be replaced
by the manufacturer or its service agent or a qualified technician in order to avoid a
shock hazard.
Before powering the appliance make sure the rating (voltage and frequency)
corresponding to the grid and the socket is suitable for the plug of the appliance,
and that the wall socket is properly grounded.
DO NOT power the appliance using multiple sockets. If possible, avoid the use of
adapters and/or extension cables; if their use is absolutely necessary, use only
materials in compliance with the current safety regulations and according to the
electrical parameters of the adapters.
The appliance must NOT be switched on using external timers and/or other remote
control appliances which are not specified in this manual.
Only use original components & accessories provided by the manufacturer. Any
non-original components & accessories NOT recommended by the manufacturer
may cause injuries to persons or damage to the appliance.
During use and storage, the appliance must be kept at a safe distance from heat
sources (open flame, ovens, heaters, stoves, etc.) or any flammable and/or
potentially explosive substances.
WARNINGS
3

Clean the Motor Head and Base with a damp cloth and wash the Bowl, the
Pouring Shield and accessories you wish to use with water & detergent with a
non-abrasive sponge. DO NOT use metal scouring pads. The Bowl & accessories
may be cleaned in the dishwasher but NOT the Pouring Shield. The Motor Head
and Base may NOT be immersed in water. Dry the components thoroughly and
place them in their working positions.
Place the appliance on a flat, dry surface. Assemble the appliance and accessories
according to the instructions listed in the section (“How to Use”) below. Check
that the Bowl is correctly positioned and locked into the Bowl Base before you
start using the appliance with its accessories.
Before adding ingredients, make sure the accessories are in place and are running
smoothly.
overload the Bowl by filling it past the MAX volume indicated;
cover the appliance during functioning;
obstruct totally nor partially the accessory;
allow hands, hair, clothing, curtains, spatulas and any other objects to come into
contact with the appliance’s motor, accessories and Bowl to avoid personal injury
or damage to the machine when the appliance is in operation;
place the appliance in the microwave oven or refrigerator for freezing, so as to
avoid breaking or damaging it;
place foods or liquids which are hotter than 60°C, or use boiling water for cleaning;
use the Wire Whisk to process very hard ingredients such as coffee beans,
soybeans, rice, ice cubes or other frozen foods;
remove accessories while the appliance is in operation;
release or remove the Bowl while the appliance is operating
operate the appliance for more than 10 minutes without interruption. Let the
appliance rest for 5 minutes between processing cycles. After 3 processing cycles,
allow an interval of 30 minutes to let the appliance cool down before the next use,
so as to prolong its service life. DO NOT allow the appliance to idle while in
operation;
press the Head Raising/Lowering Release Button or turn the ON/OFF & Speed
Knob too hard so as to avoid any damage;
leave the appliance unsupervised during operation.
13.
14.
15.
16.
If you are using the appliance for the first time, you should:
a.
b.
c.
Make sure to remove any label or protective sheet which may prevent its proper
functioning.
DO NOT:
•
•
•
•
•
•
•
•
•
•
•
•
Before plugging & unplugging the appliance, turn the ON/OFF & Speed Knob to ‘0’
(OFF). Plug and unplug the power cable holding it firmly with dry hands. Always
unplug the power cable to avoid overheating and avoid stretching it (DO NOT pull
it, tug it or use it to drag the appliance to which is connected).
During operation, DO NOT touch the appliance with wet body parts, and it is
recommended to have between you and the standing surface, an isolating element
(for example, wearing shoes with rubber soles).
DO NOT soak the Motor Head & Base in water or other liquids, wash it under the tap,
or let any liquid flow into the internal casing of the appliance to prevent electric
shock. In case of accidental fall in water, DO NOT try to take it out, but first of all
unplug immediately the power cable from the socket.
4

17.
18.
19.
20.
21.
22.
23.
24.
25.
26.
27.
28.
29.
Place the appliance at a proper distance from the objects or surrounding walls
making sure that its functioning will not cause accidental damages. There should
be at least 10 cm of free space from the back, left & right sides, and at least 30 cm
from the top of the appliance. Never put things on top of the Motor Head.
The appliance should NOT be placed on a surface or in the vicinity of objects which
can be damaged by heat, such as carpets or plastics. When using the appliance, the
surface that the appliance is placed upon may become hot. If the appliance is
operated on wooden furniture, use a protective pad to prevent damage to delicate
finishes.
Avoid placing the power cable on abrasive or sharp surfaces or in positions where it
can be damaged easily.
Always remember to unplug the power cable of the appliance if it is NOT used for a
long period, or before changing accessories, storing, cleaning or performing any
maintenance operation. Remember that the accessories may still be moving after
the power cable is unplugged!
Avoid carrying out operations which are NOT specified in this manual (such as
disassembling and/or altering).
In case of malfunction or anomaly during the functioning, switch off the appliance
immediately, turn off the power and check the cause of the anomaly, if possible,
with the support of a qualified person.
In the event the mixing of the food items produce bubbles, stop the operation
immediately and wait until the production of bubbles ceases before resuming
mixing.
Wash the Bowl, Pouring Shield, accessories & other utensils after usage to avoid
build-up of bacteria.
If smoke is observed coming out of the appliance, unplug the power cable
immediately.
This appliance is intended to be used in households and similar applications,
such as:
• Staff kitchen areas in shops, offices and other working environments;
• Dormitories;
• By clients in hotels, motels and other residential environments;
• Bed and breakfast type environment.
DO NOT use or store the appliance outdoors. Store and use the appliance only
indoors, or in any case, protected from weathering such as rain, direct radiation of
the sun and dust.
This appliance can be used by children aged from 8 years and above and persons
with reduced physical, sensory or mental capabilities or lack of experience and
knowledge if they have been given supervision or instruction concerning use of the
appliance in a safe way and understand the hazards involved. Children shall NOT
play with the appliance. Cleaning and user maintenance shall NOT be made by
children unless they are older than 8 and supervised. Keep the appliance and its
cord out of reach of children less than 8 years.
Save these instructions.
5

1.
2.
3.
4.
5.
6.
7.
8.
9.
10.
11.
12.
13.
14.
15.
16.
Clean the Motor Head and Base with a damp cloth and wash the Bowl, the Pouring
Shield and accessories you wish to use with water & detergent with a non-abrasive
sponge. DO NOT use metal scouring pads. The Bowl & accessories may be cleaned
in the dishwasher but NOT the Pouring Shield. The Motor Head and Base may NOT
be immersed in water. Dry the components thoroughly and place them in their
working positions.
When operating the appliance, DO NOT allow hands, hair, clothing, curtains,
spatulas and any other objects to come into contact with the appliance’s motor,
accessories and Bowl to avoid personal injury or damage to the machine.
DO NOT use the Wire Whisk to mix hard foods, such as coffee beans, ice cubes,
sugar, cereals, chocolate etc.
Place the appliance on a flat, stable and dry surface.
Press the Head Raising/Lowering Release Button.
Hold down the Head Raising/Lowering Release Button and raise the Motor Head,
accompanying its movement with your hand.
Insert the Bowl in the Bowl Base. Turn the Bowl clockwise until it locks into place.
Select the accessory required based on the type of mixing to be performed.
Insert the accessory in the Attachment Hub and push it upwards. Keep pressing the
accessory upwards and turn it anticlockwise until the pin locks fully into place.
Add the ingredients to the Bowl. When adding ingredients, always pour them onto
the edge of the Bowl and not directly onto the moving accessory.
Reduce the speed when you add dry or liquid ingredients to stop them splattering
or being ejected from the Bowl. Increase the speed again when they have been
mixed in.
Position the Pouring Shield on the Bowl if required, with the opening facing
outwards.
To close, bring the Motor Head down by pressing the Head Raising/Lowering
Release Button, and then tilt the motor head backwards slightly until it releases.
Keep the Head Raising/Lowering Release Button pressed down and lower the
Motor Head, accompanying its movement with your hand.
Check that the ON/OFF & Speed Knob is positioned on ‘0’ (OFF).
Plug (and unplug) the power cable with dry hands and hold it firmly.
Select the required speed (from 1 – 12) using the ON/OFF & Speed Knob to start the
appliance and begin mixing the ingredients.
advice: Turn on the appliance at a low speed until all the ingredients are mixed, and
then increase the speed on the basis of the required operation.
DO NOT operate the appliance for more than 10 minutes without interruption.
Let the appliance rest for 5 minutes between processing cycles. After 3 processing
cycles, allow an interval of 30 minutes to let the appliance cool down before the
next use, so as to prolong its service life. DO NOT allow the appliance to idle while
in operation.
HOW TO USE
6

HOW TO CLEAN AND MAINTAIN
1.
2.
3.
4.
5.
6.
Before cleaning, please make sure the blades have stopped running.
Clean the Motor Head and Base with a damp cloth and wash the Bowl, the Pouring
Shield and accessories you wish to use with water & detergent with a non-abrasive
sponge. DO NOT use metal scouring pads. The Bowl & accessories may be cleaned
in the dishwasher but NOT the Pouring Shield. The Motor Head and Base may NOT
be immersed in water.
DO NOT use a steel wire sponge, abrasive cleaners or corrosive liquids such as
gasoline or acetone to clean the appliance.
Use a wet cloth to wipe the Motor Head and Base. DO NOT immerse it in water or
other liquids, and avoid spraying water, in order to avoid damage or leakage.
Wash the Dough Hook, Wire Whisk & Flat Beater, Bowl, spatula and any utensils
immediately after usage to avoid build-up of bacteria.
Ensure that the accessories are clean & dry, and placed in dry and well ventilated
storage. Avoid direct sunlight.
17.
1.
2.
3.
4.
5.
(only if a Jam occurs: DO NOT continue operation if the accessory is jammed. Switch
the appliance off and unplug the power cable. Lift the accessory out of the Bowl
and clear the jam if needed. Perform steps 12–16 again.)
When you have finished using the mixer:
Position the ON/OFF & Speed Knob on‘0’ (OFF) and remove the plug from the
socket.
Press the Head Raising/Lowering Release Button to raise the Motor Head.
Push the attached accessory upwards slightly and turn it clockwise to unlock it from
the pin. Extract the accessory from the Attachment Hub.
Remove the Pouring Shield, if it is on the Bowl.
Remove the Bowl from its Bowl Base by turning it anticlockwise to release it.
Note: Always unplug the power cable once you have completed the mixing.
A common occurrence involves persons inadvertently pressing the switch with the
Bowl removed. Thus, flinging ingredients onto clothes and surroundings.
7

Suggestions
1.
2.
3.
Add all the dry ingredients into the bowl and turn the ON/OFF & Speed Knob to
speed 1 for 30 seconds.
Pour in the water.
Switch to speed 3 – 4 and continue kneading (not exceeding 3 minutes in duration)
until one smooth dough ball is formed
Accessory
Recipes
Ingredients
Dough Hook
Bread dough
500 g flour / 300 ml warm water
1.
2.
3.
Add all the dry ingredients into the bowl and turn the ON/OFF & Speed Knob to
speed 1 for 30 seconds.
Add the cold butter into the dry ingredients and gradually increase the speed from
1 to 3.
Add 1 tablespoon iced water at a time to the mixture until it forms crumbly dough,
about 3 min.
(If the dough doesn’t hold together, add a little more water and mix it for a longer
time. Do not add too much water. Otherwise, it will make the crust tough.)
Accessory
Recipes
Ingredients
:
:
:
:
:
:
Beater
Pie pastry
340 g all-purpose flour, plus extra for rolling
227 g cold unsalted butter, cut into 2 cm inch cubes
1 teaspoon salt
1 teaspoon sugar
6 – 8 tablespoon ice water
1.
2.
Whisk the egg whites with speed 12 (about 3 minutes in duration) until soft peaks
are formed.
Gradually add the sugar while processing with speed 4 (about 2 minutes in
duration) until firm peaks are formed.
Accessory
Recipes
Ingredients
:
:
:
Flat Beater
Meringue
4 egg whites
1 cup (200 grams) superfine or caster sugar
8

PROBLEM SOLVING
PROBLEM POSSIBLE CAUSES HOW TO SOLVE
The motor
will not start
The appliance
vibrates
The accessory
hits the bottom
of the Bowl
The accessory
is struggling to
turn inside the
Bowl
The motor has overheated.
The plug is not properly
inserted in the power
socket.
Disconnect the appliance from the
electric mains and leave the motor to
cool.
Insert the plug into the
power socket.
Do not use adaptors or extensions.
The power cable is
defective.
Have the power cable replaced at an
Authorised Service Centre.
Lack of power.
Check that the house main breaker is on.
The Motor Head had been
raised during operation.
The safety lock system had operated.
Move the ON/OFF & Speed Knob to ‘0’
(OFF), press and hold down the Head
Raising/Lowering Release Button to
release the Motor Head and lower it.
The appliance is not resting
on a stable surface.
Place the appliance on a flat, stable
surface.
The anti-slip rubber feet
are worn.
Have them replaced at an Authorised
Service Centre.
The speed used is too high
or the load is excessive.
Set a lower speed and ensure the Bowl
has not been overfilled.
The Bowl has not been
correctly locked into the
Bowl Base.
Check that the Bowl is correctly locked
into the Bowl Base.
The Attachment Hub has
come loose over time.
Have the appliance checked and
adjusted at an Authorised Service
Centre.
The dough mixture is too
thick and is stopping the
accessory from turning.
Add water or other liquid to loosen the
dough mixture.
The Bowl is too full. Remove half the Bowl’s contents and
work it separately.
The accessory is not
correctly locked into
position.
Move the ON/OFF & Speed Knob to 0’
(OFF), press and hold down the Head
Raising/Lowering Release Button to
raise the Motor Head and check that
the accessory is correctly locked into
position in the Attachment Hub.
9

PPSM445
MODEL
220-240V ~ 50/60Hz
VOLTAGE
600W
WATTS(W)
SPECIFICATION
The manufacturer provides warranty in accordance with the legislation of the
customer’s own country of residence, with a minimum of 1 year, starting from the date
on which the appliance is sold to the end user.
The warranty covers defects in material and workmanship.
The repairs under warranty may only be carried out by an authorised service centre.
When making a claim under the warranty, the original bill of purchase (with purchase
date clearly indicated) must be submitted.
The warranty will not apply in cases of:
•
•
•
•
•
•
normal wear and tear
if the steps (as laid out in the section regarding Warnings) have not been observed
e.g. overloading of the appliance, use of non-approved accessories
if the appliance has not been properly maintained, if force has been used against it
or if it has been damaged in any other way
damage caused by non-observance of the user manual or non-compliance with the
installation instructions
errors or faults owing to defects in the distribution system
if the appliance has been repaired or modified or changed in any way or by any
person not properly authorised
WARRANTY
This appliance, along with all other electronic appliances, should, when it is no longer
capable of functioning, be disposed with the least possible environmental damage
according to the local regulations in your area. In most cases you can discard the
appliance at your local recycling center.
DISPOSAL: Do not dispose this product as unsorted municipal waste. Collection of
such waste separately for special treatment is necessary.
ENVIRONMENTAL TIP
10

Table of contents
Other PowerPac Kitchen Appliance manuals

PowerPac
PowerPac My Choise MC165 User manual

PowerPac
PowerPac PPMC708 User manual

PowerPac
PowerPac PPRC113 User manual

PowerPac
PowerPac PPMC385 User manual

PowerPac
PowerPac PPMC688 User manual

PowerPac
PowerPac PP3405 User manual

PowerPac
PowerPac PP3403A User manual

PowerPac
PowerPac PPEC815 User manual

PowerPac
PowerPac PPIN617 User manual

PowerPac
PowerPac PPMC677 User manual


