manuals.online logo
Brands
  1. Home
  2. •
  3. Brands
  4. •
  5. Prem-I-Air
  6. •
  7. Heater
  8. •
  9. Prem-I-Air N10Turbo User manual

Prem-I-Air N10Turbo User manual

L. SERVICE & WARRANTY
Do not operate the unit with a damaged cord or plug, after the unit malfunctions, or
has been dropped or damaged. Return the product to an authorised service facility
for examination and repair to avoid a hazard.
For your conveniencerecord the complete model number and product name (located
on the Product Identification Plate), the date you purchased the product and your
purchase receipt as proof of purchase.
To ensure your product is covered by warranty, the complete faulty product together
with your purchase receipt should be returned to your retailer.
This product has been manufactured to comply with EEC Directives 2006/95/EG and
89/336/EEC.
Waste electrical products should not be disposed of with household waste. Please
recycle where facilities exist. Check with your Local Authority or retailer for recycling
advice.
EHS, Manchester, M17 1RN
EHS 08/07
CONVECTOR HEATER
MODEL
N10Turbo
Please read this instruction manual before operating and
keep safe for future reference
ONE (1) YEAR LIMITED WARRANTY
Save This Warranty Information
EHS (International) Ltd. Guarantees this product free from defects
in materials and workmanship for a period of one (1) year.
Should this unit be operated under conditions other than those
recommended, at voltages other than the voltage indicated on the
unit, or any attempts made to service or modify the unit, will render
this WARRANTY VOID. The product you buy may sometimes
differ slightly from illustration. This warranty is in addition to, and
does not affect, your statutory rights
Should you have a problem with this product, please call our Help
Desk on: (0870) 742 5021.
A. IMPORTANT SAFETY INSTRUCTIONS
PLEASE READ ALL INSTRUCTIONS CAREFULLY BEFORE USING THIS
PRODUCT.
Use this heater only as described in this manual. Any other use not recommended
by the manufacturer may cause a fire or electrical shock.
When using electrical appliances, basic safety precautions should always be
followed:
1. Before operating the heater remove the unit from its packaging and check it is in
good condition.
2. This heater is hot when in use. To avoid burns, do not let bare skin touch hot
surfaces. Always use handles when moving this heater. Keep flammable
material, such as furniture, pillows, bedding, papers, clothes and curtains at
least 3 foot (0.9 m) from the front of the heater and at least 1 feet (0.3 m) away
from the sides and rear.
3. The surfaces of this heater are hot whilst in operation. Always allow a cool down
period before moving it to another location. Keep all flammable materials well
away from the heater.
4. In order to avoid overheating, DO NOT COVER the heater.
5. Extreme caution is necessary when any heater is used by or near children or
pets and whenever the heater is left operating and unattended.
6. Always unplug heater when not in use.
7. Do not operate any heater with a damaged cord or plug, after the heater
malfunctions, has been dropped or damaged in any manner. Return the heater
to an authorised service facility for examination and repair.
8. Do not use outdoors. This heater is not intended for use in wet or damp locations.
Never locate heater where it may fall into a bathtub or other water container.
9. Do not run cord under carpeting. Do not cover cord with rugs or runners. Arrange
cord away from an area where it may be tripped over.Do not use this heater with
a programmer, timer or any other device that switches the heater on
automatically, since a fire risk exists if the heater is covered or positioned
incorrectly.
10. To disconnect heater, turn switches to the off position and remove plug from the
power socket. Pull only by the plug. Never pull on the cord.
11. Do not place the heater on soft surfaces. Always place on a flat level surface.
12. Do not use this heater in the immediate surroundings of a bath, a shower or a
swimming pool.
13. Do not insert or allow objects to enter any ventilation or exhaust opening as this
may cause an electric shock or fire, or damage the heater.
14. A heater has hot and arcing or sparking parts inside. It must not be used in
potentially dangerous locations such as flammable, explosive, chemical-laden
or wet atmosphere
15. Do not let children play with the packaging, for example plastic bags.
16. Check the household voltage to ensure it matches the appliance's rating
plate specification.
17. Avoid the use of an extension cord as it could overheat and cause a fire.
READ & SAVE THESE IMPORTANT INSTRUCTIONS
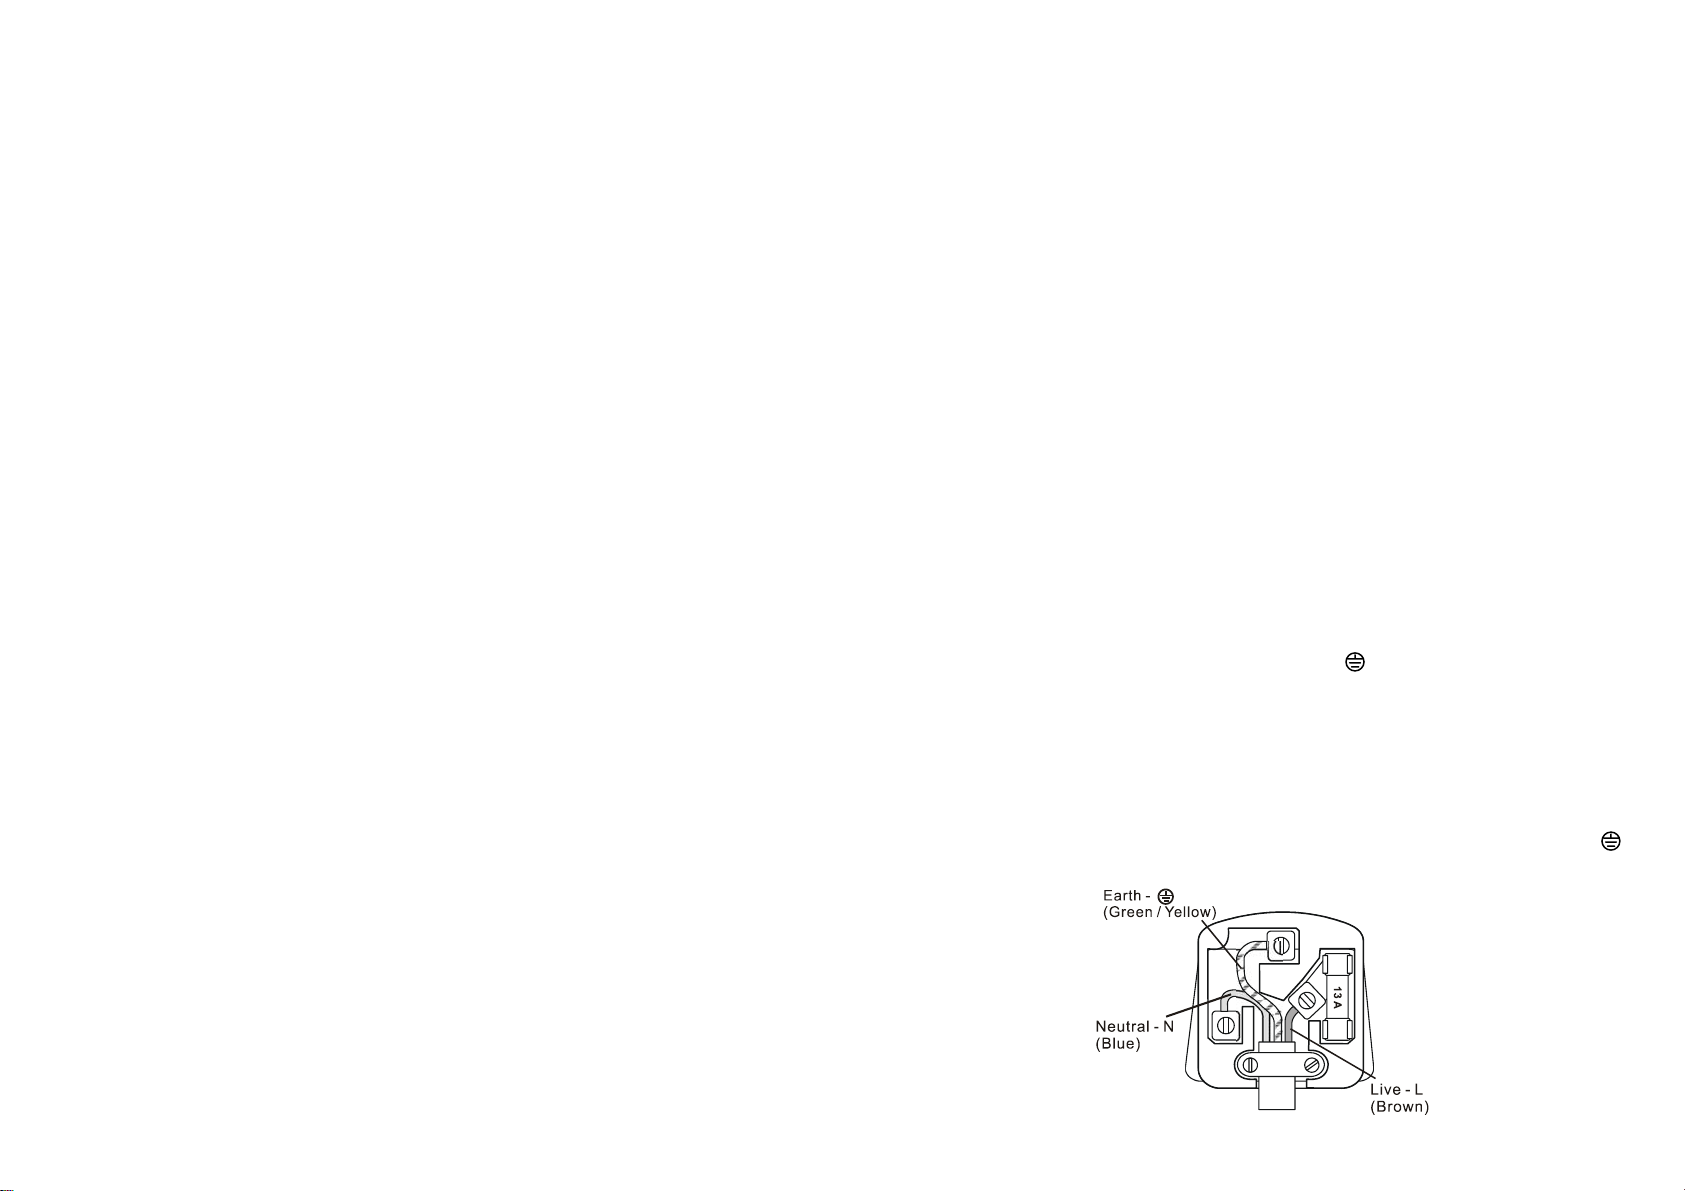
B. BS PLUG WIRING
Wiring Instructions: Should it be necessary to change the plug please
note the wires in the mains lead are coloured in accordance with the
following code: BLUE - NEUTRAL
BROWN - LIVE
GREEN AND YELLOW - EARTH
As the colours of the wires in the mains lead of this appliance may not
correspond with the coloured markings identifying the terminals in your plug,
proceed as follows:
1. The BLUE wire is the NEUTRAL and must be connected to the terminal
which is marked with the letter Nor coloured BLACK.
2. The BROWN wire is the LIVE and must be connected to the terminal which
is marked with the letter Lor coloured RED.
3. The GREEN/YELLOW is the EARTH and must be connected to the
terminal which is marked with the letter Eor or coloured GREEN OR
GREEN/YELLOW.
4. Always ensure that the cord grip is positioned and fastened correctly.
If a 13A (BS 1363) fused plug is used it must be fitted with a 13A fuse. If in
doubt consult a qualified electrician.
Wiring for a 13 Amp Plug (BS1363)
Please note. The Earth Terminal is marked with the letter Eor Earth Symbol
C. PARTS DESCRIPTION
Switch Panel
D. PRE-OPERATING INSTRUCTIONS
1. Carefully remover your heater from the box.
(please save the carton for off-season storage).
2. Do not use without feet fitted.
When operating, the distance between the radiator and the wall and any other
objects must be at least 3 foot (0.9 m) from the front of the heater and keep them
at least 1 feet (0.3 m) away from the sides and rear
3. Make sure the unit is in the off position before plugging the heater into the power
socket and unwind the power cord from the cord bracket.
5. Place the heater on firm level surface in the upright position.
6. Avoid overloading the circuit. Do not use other high wattage appliances in the
same power socket. Never use a multi-point adaptor in conjunction with this
appliance.
Caution:
Do not cover or use to dry clothes.
The surface of this heater is hot when in operation.
E. FEET ASSEMBLY INSTRUCTIONS
FIG 1 FIG 2 FIG 3
Do not operate the heater without the feet attached to the bottom of the
unit.
Parts: 2 feet, 4 fixing screws
1. Place the convector on a flat level surface or table.
2. Align the two holes on the feet with the pre-drilled holes on the unit (fig 1 &
2) and secure in place with of the fixed screws (fig 3).
F. WALL MOUNTING INSTRUCTIONS
If feet are already assembled, remove them before fitting the wall brackets.
The brackets must be securely fitted to the wall, which must be 10cm minimum
thickness and no other objects, such as curtains or cabinets should be above
the heater, once fitted.
Upper bracket
Holding Hole
Lower bracket
Holding Hole
Upper mounted bracket
Upper sliding bracket
Lower bracket
1. Drill two holes 470mm apart from each other for the upper brackets.
2. Insert two raw plugs into the two holes.
3. Securely fix the two upper brackets into the wall using the two provided
screws.
POSITIONPIN
POSITIONHOLE
FIXEDSCREW
4. Insert the two lower brackets into the holding holes on the heater.
5. Hang the heater by fitting the two holes at the top of the heater onto the two upper
brackets. Loosen the upper brackets fixing screws, pull sliding bracket in the
lowest position and then tighten the brackets fixing screws.
G. OPERATING INSTRUCTIONS
Caution: This is heater is hot while in operation. It should not be operated
unless it is placed in an upright position. Remove all packaging material from
the heater.
1. Select an indoor location for theheater away from electrical power cords, curtains
and other furnishing. DO not place the heater directly beneath an electrical outlet
or against paperboard or low-density fibreboard.
2. Push the power switch to off and turn the thermostat to low before plugging in the
radiator.
3. Plug the heater into the power sockets and push the power switch to on.
4. There are two indicator light switches, which allow you to set your desired power
levels. ‘I’ is for 800W, ‘II’ is for 1200W. To set the third power setting, 2000W,
press both switches (II & I).
5. There is an indicator light switch, which enables you to turn on/off the turbo fan.
“” is for turning on the turbo, ”OFF” is for turning off the turbo.
6. The operating temperature is selected by adjustment of the thermostat.
7. To determine the correct operating temperature for you conditions, when
you first switch the unit on set the thermostat to the maximum position.
When the unit reaches the required temperature, slowly turn down the
thermostat, until the unit switches off. The temperature will now be kept
constant. When the temperature falls the unit will come on again.
H. SAFETY OVERHEAT SHUT OFF
A thermal overload protector is built in to prevent overheating. When a potential
overheat temperature is reached, the heater will be automatically shut off. It can
only resume operation when the userresets the unit.
I. RESET THE HEATER
1. Push the Power Switch to the OFF position.
2. Unplug the heater and wait 5-10 minutes for the unit to cool down.
3. Inspect and remove any objects on or adjacent to the heater that may
cause high temperature.
4. After 5-10 minutes, plug the unit in again and operate normally.
NOTE: IF YOU EXPERIENCE A PROBLEM WITH YOUR HEATER, PLEASE
SEE THE WARRANTY FOR INSTRUCTIONS. PLEASE DO NOT ATTEMPT
TO OPEN OR REPAIR THE HEATER YOURSELF. DOING SO MAY VOID
THE WARRANTY AND COULD CAUSE DAMAGE OR PERSONAL INJURY.
J. CLEANING
Before cleaning turn the heater turn off and unplug from the power supply. To
clean use a soft cloth to wipe off any dust. If the heater is very dirty use a damp
cloth and wipe dry. Do not use any cleaning detergents, sprays or other
chemicals, as they will damage the heater. Store in the original packaging in a
ventilated dry area, during off season use.
Caution: Do not allow water to run into the interior of the heater as this could
cause a fire or electric shock. DO NOT attempt to repair this heater yourself.
K. SPECIFICATIONS
Model Power Voltage N.W. kg G.W. kg
N10Turbo 2000W 230V~ 50Hz 4.00 5.20
Loosen the upper brackets fixing screw,
pull sliding bracket in the lowest position,
and then tighten the upper brackets fixing screw.
Brackets fixing screw
1 2 3
4 5

Other Prem-I-Air Heater manuals

Prem-I-Air EH1558 User manual

Prem-I-Air

Prem-I-Air EH1558 User manual

Prem-I-Air C307 User manual

Prem-I-Air

Prem-I-Air C307 User manual

Prem-I-Air EH1526 User manual

Prem-I-Air

Prem-I-Air EH1526 User manual

Prem-I-Air EH1442 User manual

Prem-I-Air

Prem-I-Air EH1442 User manual

Prem-I-Air HQH2000H User manual

Prem-I-Air

Prem-I-Air HQH2000H User manual

Prem-I-Air EH1530 User manual

Prem-I-Air

Prem-I-Air EH1530 User manual

Prem-I-Air EH1566 User manual

Prem-I-Air

Prem-I-Air EH1566 User manual

Prem-I-Air PFH0130R User manual

Prem-I-Air

Prem-I-Air PFH0130R User manual

Prem-I-Air EH1404 User manual

Prem-I-Air

Prem-I-Air EH1404 User manual

Prem-I-Air EHO154 User manual

Prem-I-Air

Prem-I-Air EHO154 User manual

Prem-I-Air EH1842 User manual

Prem-I-Air

Prem-I-Air EH1842 User manual

Prem-I-Air EH1674 User manual

Prem-I-Air

Prem-I-Air EH1674 User manual

Prem-I-Air N10T24 User manual

Prem-I-Air

Prem-I-Air N10T24 User manual

Prem-I-Air EH1710 User manual

Prem-I-Air

Prem-I-Air EH1710 User manual

Prem-I-Air EH1844 User manual

Prem-I-Air

Prem-I-Air EH1844 User manual

Prem-I-Air EH1892 User manual

Prem-I-Air

Prem-I-Air EH1892 User manual

Prem-I-Air EH1369 User guide

Prem-I-Air

Prem-I-Air EH1369 User guide

Prem-I-Air EH1710 User manual

Prem-I-Air

Prem-I-Air EH1710 User manual

Prem-I-Air EH1436 User manual

Prem-I-Air

Prem-I-Air EH1436 User manual

Prem-I-Air EH1794 User manual

Prem-I-Air

Prem-I-Air EH1794 User manual

Prem-I-Air HT2007 User manual

Prem-I-Air

Prem-I-Air HT2007 User manual

Prem-I-Air EH1372 User manual

Prem-I-Air

Prem-I-Air EH1372 User manual

Prem-I-Air EH1712 User manual

Prem-I-Air

Prem-I-Air EH1712 User manual

Prem-I-Air EH0209 User manual

Prem-I-Air

Prem-I-Air EH0209 User manual

Popular Heater manuals by other brands

Infiniton HBS-201B User instructions

Infiniton

Infiniton HBS-201B User instructions

Bionaire BCH9300 instruction manual

Bionaire

Bionaire BCH9300 instruction manual

L.B. White I-3 Owner's manual and instructions

L.B. White

L.B. White I-3 Owner's manual and instructions

Webasto Air Top Evo 3900 Series Workshop manual

Webasto

Webasto Air Top Evo 3900 Series Workshop manual

STIEBEL ELTRON CWM 500 P Operation and installation

STIEBEL ELTRON

STIEBEL ELTRON CWM 500 P Operation and installation

Jumbo Ayce EHP-180 Original instructions

Jumbo

Jumbo Ayce EHP-180 Original instructions

TPI 2900/D SERIES installation instructions

TPI

TPI 2900/D SERIES installation instructions

MEI PTC 4020 instruction manual

MEI

MEI PTC 4020 instruction manual

Calienta 10530083 manual

Calienta

Calienta 10530083 manual

Daikin Altherma EKRTCTRL1 installation manual

Daikin

Daikin Altherma EKRTCTRL1 installation manual

Thermo-bug 2.0 basic operating manual

Thermo-bug

Thermo-bug 2.0 basic operating manual

Sunbeam 9100020009040 owner's guide

Sunbeam

Sunbeam 9100020009040 owner's guide

AKO H 290 S Assembly and operating instructions

AKO

AKO H 290 S Assembly and operating instructions

Webasto Dual Top ST 6 installation instructions

Webasto

Webasto Dual Top ST 6 installation instructions

Immergas JULIUS 11 ERP Instruction and recommendation booklet

Immergas

Immergas JULIUS 11 ERP Instruction and recommendation booklet

Holmes HCH5250 owner's guide

Holmes

Holmes HCH5250 owner's guide

flowair LEO FS Series Operation manual

flowair

flowair LEO FS Series Operation manual

Webasto SUBARU Legacy User instructions

Webasto

Webasto SUBARU Legacy User instructions

manuals.online logo
manuals.online logoBrands
  • About & Mission
  • Contact us
  • Privacy Policy
  • Terms and Conditions

Copyright 2025 Manuals.Online. All Rights Reserved.