Prevue Hendryx Hampton Deluxe F075 User manual

CUSTOMER SUPPORT
For assistance or replacement parts,
please contact Prevue Pet Products:
PHONE 1 (312) 243-3624
ONLINE www.prevuepet.com
EMAIL customerservice@prevuepet.com
F075—03/23—A4.1 M de in Chin for Prevue Pet Products, Inc., 224 N M plewood Ave, Chic go IL 60612 USA • 1 [312] 243-3624 • www.prevuepet.com • customerservice @ prevuepet.com
Hampton Deluxe
Divided Breeding Cage
PARTS LIST
Instructions online at www.prevuepet.com
F075
MODEL #
]C6
]C5
]C4
]B
]F
]L
]R
]C3
]C2
]C1
]T
]G
]T
]G
]D
Hex Screw
18 pcs +1
Corner Bracket
4 pcs
Endcap
8 pcs
Allen wrench
1 pcs
Plastic Connector
4 pcs
HARDWARE
INCLUDED:
KE :
B= BACK Panel
R=RIGHT Side Panel
C=CORE Center Parts
F=FRONT Panel
L=LEFT Side Panel
G=GRILLE
T=TRAY
D=DI IDER
These parts are
interchangeable:
L=R
C1 = C2
C3 = C4 = C5
Gs are the same
Ts are the same
⁕
CUPS
PERCHES
PERCHES
CUPS
F075—03/23—A4.2 For more wonderful c ges, toys, nd ccessories for c ts, birds, chickens, r bbits, ferrets, dogs nd sm ll nim ls, visit www.prevuepet.com
1PIECES
2PIECES
CUSTOMER SUPPORT
For assistance or replacement parts,
please contact Prevue Pet Products:
PHONE 1 (312) 243-3624
ONLINE www.prevuepet.com
EMAIL customerservice@prevuepet.com
Hampton Deluxe
Divided Breeding Cage
ASSEMBL
Instructions online at www.prevuepet.com
F075
MODEL #
]B
]L
]R
]F
x 8
x 10
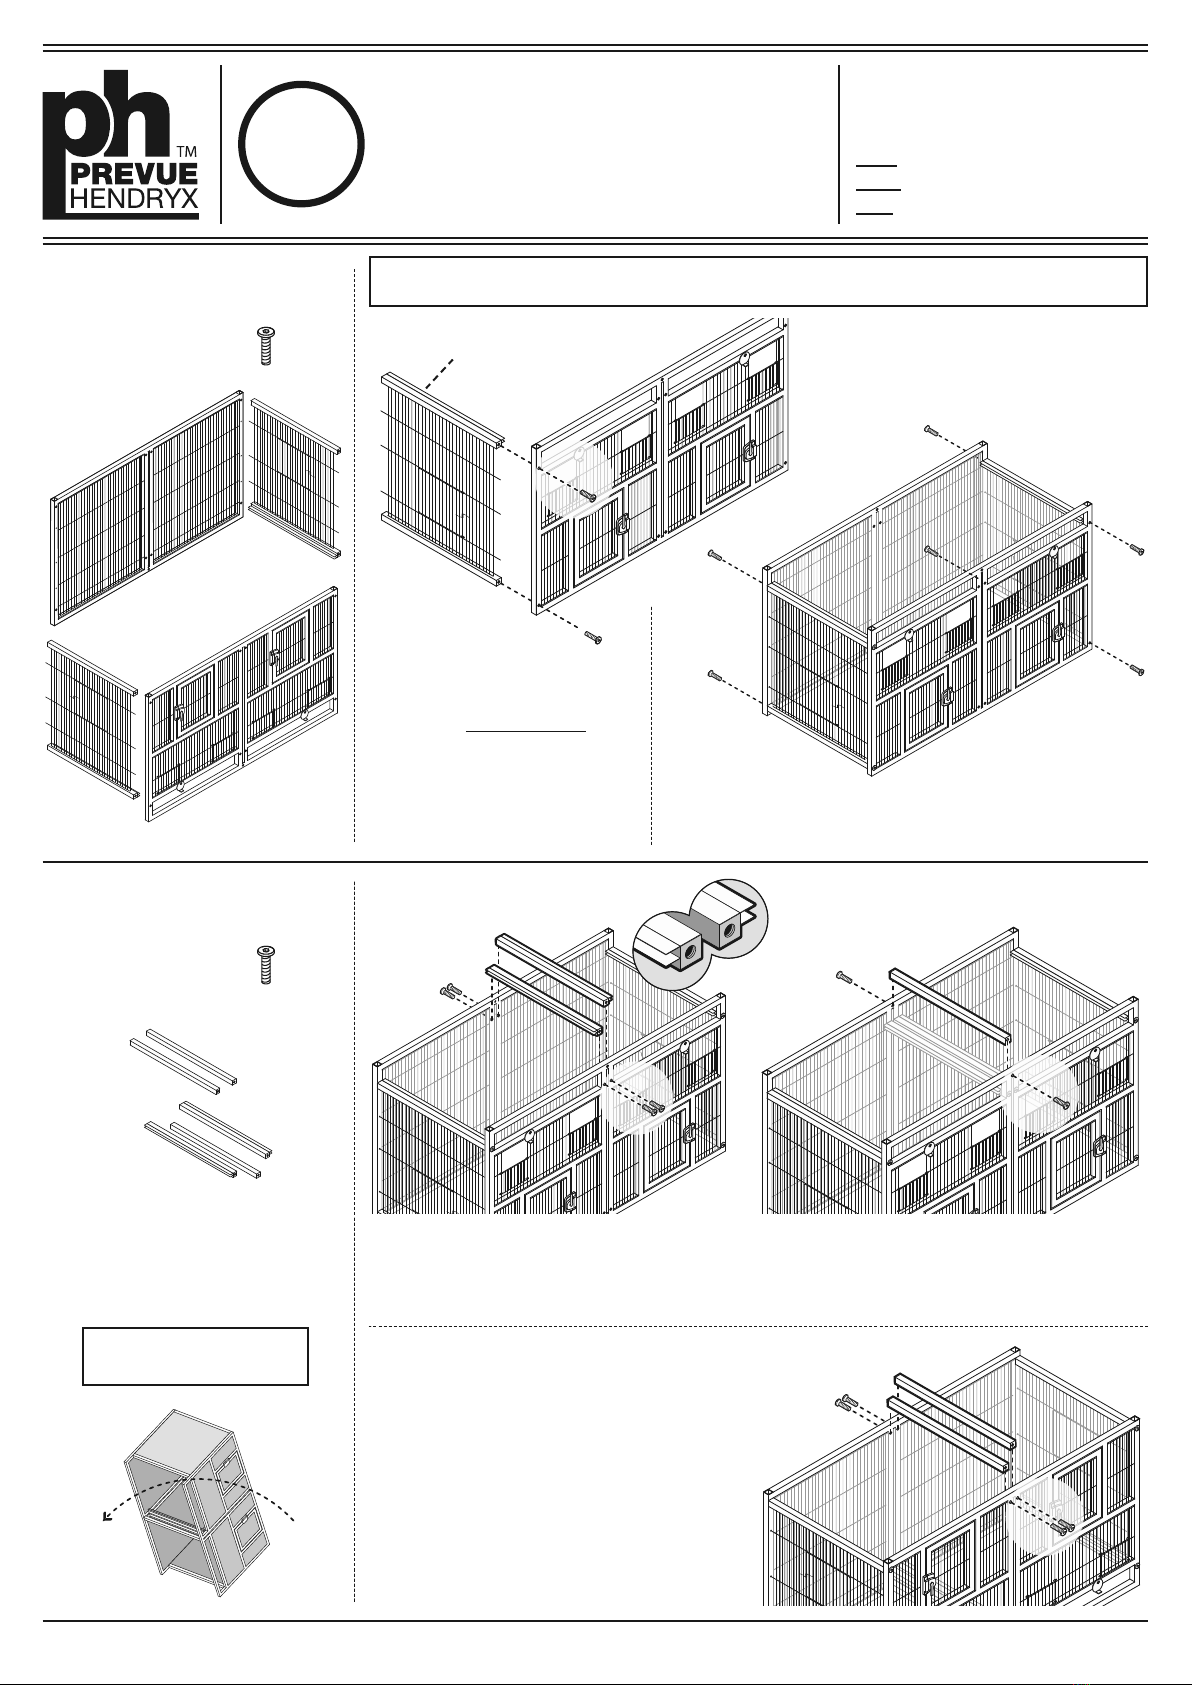
NOTE : To sta t, the cage body will be assembled UPSIDE DOWN fo ease of assembly.
Grille/tray tracks
face the interior
Turn the front p nel and right
side p nel upside-down.
Guide the extended wires on
the side panel into the holes
along the inside frame of the
front panel.
Secure the panels together
with hex screws.
Install the two remaining
squ re r ils. Secure the rails
with hex screws.
Add the b ck p nel and left side p nel in the same
method, securing all panels together with hex screws.
]R
]C1
]C2
]C3
]C4
]C5
Flip the cage body up ight
With the cage body still upside down, install
the two tr y ch nnel r ils. Orient the
channels as shown in the detail, and attach
with hand-tightened hex screws.
After the tray channel rails are attached,
install a squ re r il with hex screws.
Tighten all screws with the hex key.

3PIECES
4PIECES
F075—03/23—A4.3 M de in Chin for Prevue Pet Products, Inc., 224 N M plewood Ave, Chic go IL 60612 USA • 1 [312] 243-3624 • www.prevuepet.com • customerservice @ prevuepet.com
Leave the center divider
grille out for full-cage use,
or slip it in place to divide
the cage interior into two
separate spaces.
Insert the slotted ends of the
perches on a vertical wire
and resting on a horizontal
wire or frame rail.
Slide the cup doors up and
insert the food/w ter cups.
The closed door holds the
cup in place.
Rotate the grille/tr y lock
out of the way and slide the
grille into the top channels
and the tr y into the bottom
channels for each cage side.
Set the roof p nel into place.
Back the corner screws out
and slip corner br ckets
over the corners (see detail).
Tighten the screws to secure
the brackets on the corners.
Tap the end c ps into each
frame corner — top and
bottom — to finish off the
assembly.
grilles and
trays are
interchangeable
CUPS
BRACKETS
END CAPS
PERCHES
]G
]G
]T
]T
]D
Assembly completed. {
]C6

F070+F075—03/23—A4.4 For more wonderful c ges, toys, nd ccessories for c ts, birds, chickens, r bbits, ferrets, dogs nd sm ll nim ls, visit www.prevuepet.com
1. REMOVE ENDCAPS
From the top unit, remove
the footer endcaps.
From the bottom unit,
remove the top endcaps.
2. REMOVE HEX SCREWS
From the bottom unit,
remove the four top corner
hex screws.
3. INSERT PLASTIC
CONNECTOR POSTS
Into the frame corners
of the bottom unit, insert
the plastic connectors,
following the INSTALLATION
TIP at the top of the page.
4. REPLACE HEX SCREWS
On the bottom unit, replace
the hex screws in each
corner, making sure to keep
the corner brackets in place.
5. STACK THE UNITS
After all corner connectors
and corner brackets are
installed securely, slide the
frame corners of the top unit
over the connector posts
on the bottom unit.
• Three cage units can
be stacked safely.
• Do not exceed three
stacked cages.
INSTALLATION TIP :
Use the allen w ench to keep the plastic
connecto f om going too deeply into the
f ame, and to align the holes in the post
and f ame.
TOOLS NEEDED :
An allen w ench and maybe
a sc ewd ive o plie s to
help in emoving endcaps.
CUSTOMER SUPPORT
For assistance or replacement parts,
please contact Prevue Pet Products:
PHONE 1 (312) 243-3624
ONLINE www.prevuepet.com
EMAIL customerservice@prevuepet.com
HOW TO STACK
ASSEMBLED UNITS
Instructions online at www.prevuepet.com
Hampton Deluxe Cages
1PIECES
x 4
F070
MODEL #
F075
MODEL #
+
Other Prevue Hendryx Farm Equipment manuals

Prevue Hendryx
Prevue Hendryx 91340 User manual

Prevue Hendryx
Prevue Hendryx Prevue Pet Products 465 User manual

Prevue Hendryx
Prevue Hendryx 4701 User manual

Prevue Hendryx
Prevue Hendryx Prevue Pet Products 465 User manual

Prevue Hendryx
Prevue Hendryx 7324 User manual

Prevue Hendryx
Prevue Hendryx ECONO-1614 User manual

Prevue Hendryx
Prevue Hendryx Hampton Deluxe F070 User manual
Popular Farm Equipment manuals by other brands

Schaffert
Schaffert Rebounder Mounting instructions

Stocks AG
Stocks AG Fan Jet Pro Plus 65 Original Operating Manual and parts list

Cumberland
Cumberland Integra Feed-Link Installation and operation manual

BROWN
BROWN BDHP-1250 Owner's/operator's manual

Molon
Molon BCS operating instructions

Vaderstad
Vaderstad Rapid Series instructions


