6
2245 PRIMUS EasyLight, Lantern
GEBRUIKSAANWIJZING
NL 2245 PRIMUS EasyLight, Lantern
ISTRUZIONI PER L’USO
IT
BELANGRIJK: Bestudeer deze gebruiksaanwijzing
zorgvuldig en leer het toestel goed kennen voordat u het
op een gases aansluit. Lees de gebruiksaanwijzing ook
later regelmatig door om oplettend te blijven. Bewaar deze
gebruiksaanwijzing voor toekomstig gebruik.
WAARSCHUWING: Uitsluitend voor gebruik buitenshuis!
Zorg voor voldoende ventilatie. Dit gastoestel verbruikt
zuurstof en dient daarom alleen in goed geventileerde
ruimten te worden gebruikt. Zorg voor extra ventilatie als er
meer gastoestellen en/of andere gasverbruikers bij worden
geplaatst.
1. INLEIDING
1.1 Dit gastoestel is alleen geschikt voor de Primus-
gases 2202 en 2207.
1.2 Het kan gevaarlijk zijn dit gastoestel aan te sluiten op
andere soorten gaspatronen.
1.3 Gasverbruik: 25 g/h 0,9 oz/h / ca. 0,3 kW butaan bij
een druk van 1 bar.
1.4 Grootte afsluitklep: 0,12 mm, 723070 Butaan.
1.5 Dit gastoestel voldoet aan de eisen van EN 521/
Z21.73-2000/CSA 11.1-2000.
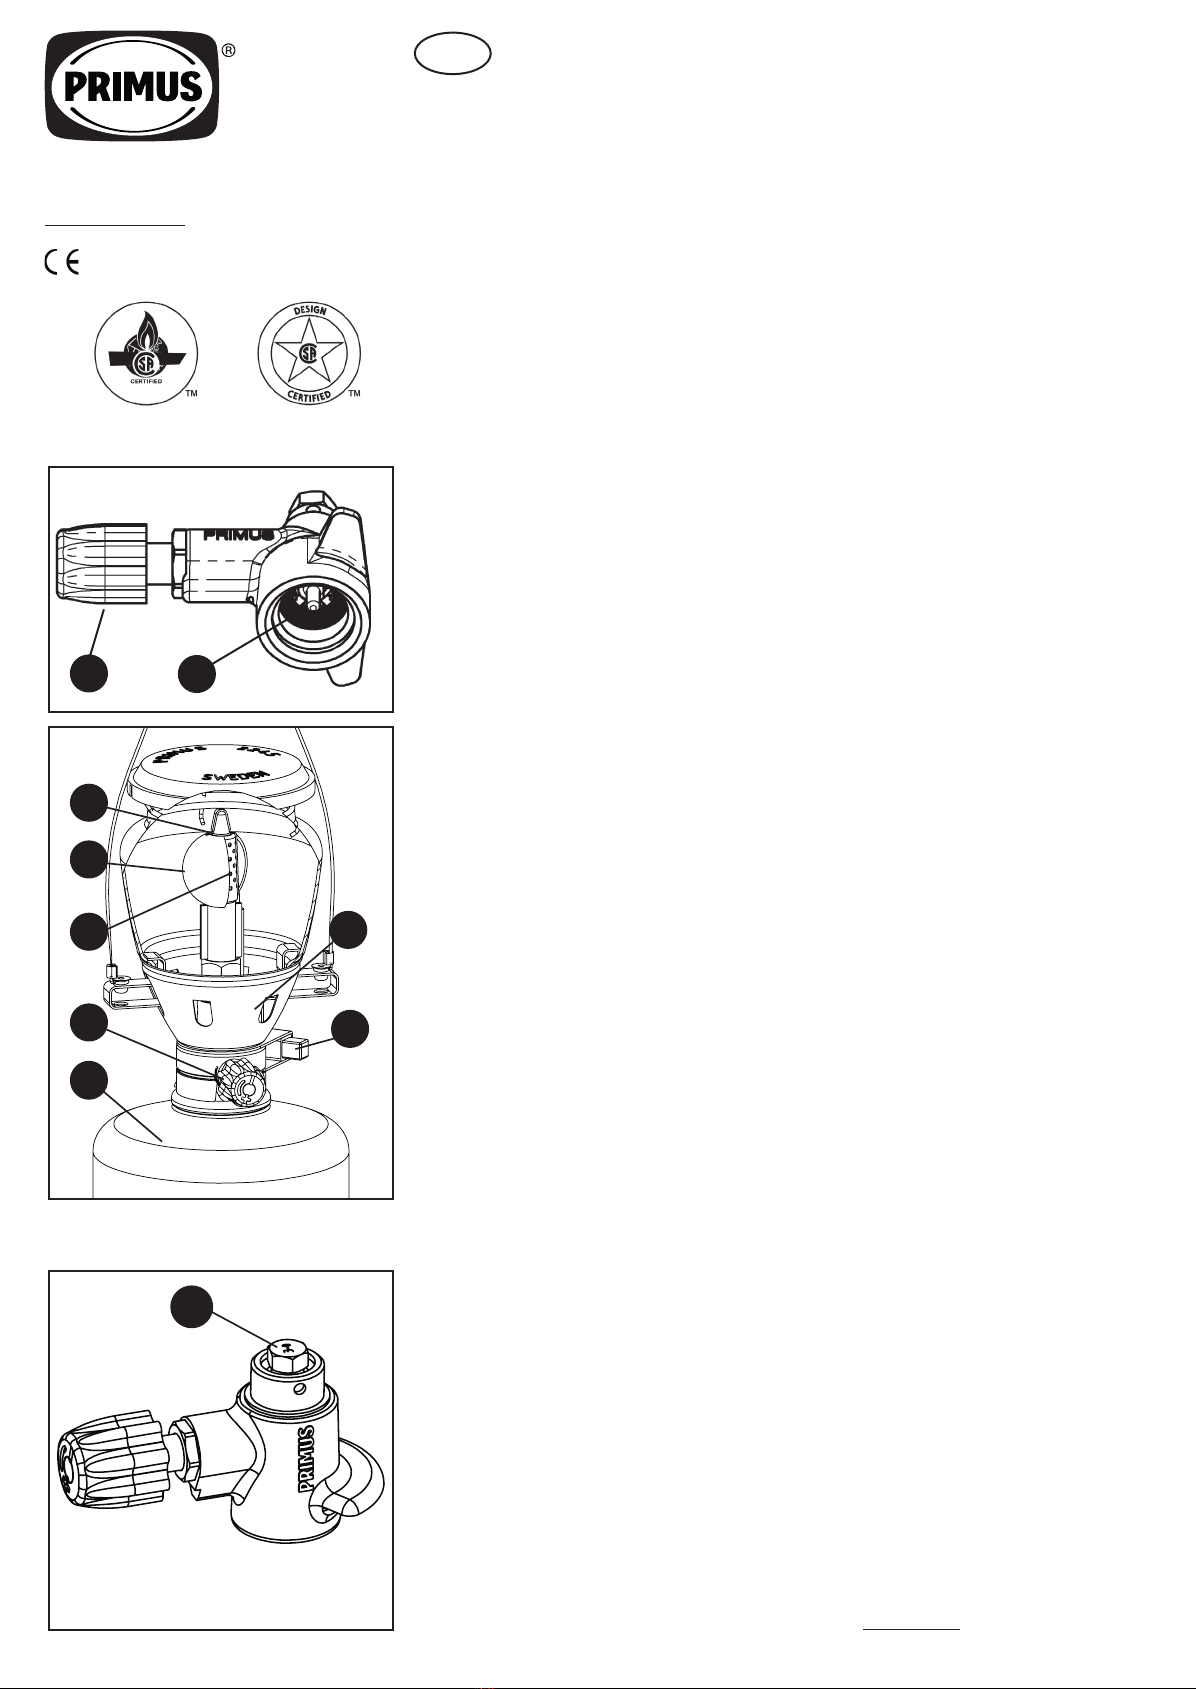
2. VEILIGHEIDSINFORMATIE (Fig. 1)
2.1 Zorg ervoor dat de dichtingen van het gastoestel (1)
correct op hun plaats zitten en in goede staat zijn
voordat u de gaspatroon aansluit.
2.2 Gebruik het gastoestel alleen in goed geventileerde
ruimten. Opmerking: Dit gastoestel wordt alleen
aanbevolen voor gebruik buitenshuis.
2.3 Plaats het gastoestel op een vlakke ondergrond.
2.4 Zorg ervoor dat zich in de buurt van het toestel geen
brandbare voorwerpen bevinden. Zie punt 5.6.
2.5 Vervangen of aansluiten van de gaspatroon dient op
een veilige plaats te gebeuren, altijd buitenshuis en uit
de buurt van elke ontstekingsbron zoals open vuur,
waakvlammen of elektrische vuren. Blijf ook uit de
buurt van andere personen.
2.6 Controleren van het gastoestel mag uitsluitend
buitenshuis gebeuren. Controleren op lekkage mag
nooit gebeuren met een open vlam. Gebruik zeepsop
of gelijkaardig.
2.7 Gebruik nooit een gastoestel met een beschadigde
of versleten pakking en gebruik geen lekkend,
beschadigd of slecht werkend gastoestel.
2.8 Laat een brandend gastoestel nooit onbeheerd achter.
2.9 Wees voorzichtig wanneer u het toestel verplaatst,
zodat er geen opakkerende vlammen vrijkomen.
Dit is heel belangrijk wanneer u een nieuwe cassette
gebruikt.
3. HANTEREN VAN HET GASTOESTEL
3.1 Raak nooit verhitte delen van het gastoestel aan,
tijdens of direct na het gebruik.
3.2 Bewaren: Schroef altijd de gaspatroon van het
gastoestel als dit niet wordt gebruikt. Bewaar de
gastank op een droge en veilige plaats, in een
omgeving zonder hittebronnen.
3.3 Maak geen misbruik van het gastoestel en gebruik het
niet voor andere dan de beoogde doeleinden.
3.4 Behandel het toestel omzichtig. Laat het niet vallen.
4. MONTEREN VAN HET GASTOESTEL (fig. 2)
4.1 Controleer of de regelknoppen (2) goed gesloten zijn
(door ze zo ver mogelijk met de klok mee te draaien).
4.2 Houd de patroon (3) rechtop tijdens het aansluiten op
de klep.
4.3 Plaats de klep recht op de gaspatroon, zie g. 2.
4.4 Schroef de gaspatroon voorzichtig op de klep tot
deze de O-ring van de klep raakt. Zorg ervoor
dat de schroefdraad niet scheef wordt getrokken
tijdens het aansluiten op de gaspatroon. N.B.: De
gaspatroon mag alleen met handkracht
op de aansluitklep worden geschroefd. Bij
te hard vastschroeven kan de gaspatroon
beschadigd worden.
4.5 Zorg ervoor dat de afdichting van het gas volledig
is. Dit mag alleen buitenshuis worden gecontroleerd.
Controleren op lekkage mag nooit met een open
vlam gebeuren. Gebruik zeepsop of gelijkwaardig, en
breng dat aan op de voegen en aansluitingen van het
toestel. Bij lekkage worden belletjes gevormd rond de
plaats waar het lek zit. Als u twijfelt, of als u gas ruikt
of hoort, steek dan het gastoestel niet aan. Schroef
de gaspatroon los en breng het toestel terug naar uw
lokale Primus-verdeler.
4.6 Afbranden van het gloeikousje voor gebruik: verwijder
de kap en het glas van de lantaarn. Zorg ervoor dat het
gloeikousje (6) goed in de groeven (7) van
de branderbuis (4) zit; d.w.z dat het grotere uiteinde op
de onderste groef van de buis en het kleine uiteinde op
de bovenste groef zit. Ga na of het gloeikousje gelijkmatig
rond de branderbuis zit. Brand het gloeikousjes af met
een lucifer of aansteker en draai hierbij de regelknop (2)
open. Laat het gloeikousje enkele minuten branden tot
het de vorm van een wit ‘ei’ heeft aangenomen.
4.7 Nadat het gloeikousje geheel is afgebrand de gasknop
dichtdraaien en het lantaarnglas terugzetten.
4.8 De lantaarn is nu klaar voor gebruik.
OPMERKING: Na het afbranden is het gloeikousje
erg bros, zorg ervoor dat u het niet beschadigt. Een
beschadigd gloeikousje kan leiden tot een slechte
verbranding en kan eveneens de lichtverspreiding van
de lantaarn verminderen. Reservegloeikousjes zijn
verkrijgbaar bij uw lokale verdeler.
5. GEBRUIK VAN HET TOESTEL
5.1 Het toestel moet tijdens het gebruik altijd op een
stevige ondergrond staan.
5.2 Draai de regelknop (2) tegen de klok in en ontsteek
onmiddellijk de brander (5) door de trekker (8) omlaag
te duwen. Als de brander niet ontbrandt, duw dan
verschillende malen op de trekker tot deze toch wordt
ingeschakeld.
5.3 Stel de grootte van de vlam in door te draaien aan de
regelknop (2).
5.4 Het toestel mag alleen rechtopstaand worden
gebruikt. Verplaats nooit een brandend toestel. Er
kan dan een akkerende vlam ontstaan voordat het
toestel warm genoeg is of als het toestel te abrupt is
verplaatst.
5.5 Zorg er na gebruik voor dat de klep goed gesloten is
(door de regelknop zo ver mogelijk met de klok mee te
draaien).
5.6 Ophangkabel voor vervoerdoeleinden. Indien men
de lantaarn ophangt aan een plafond of gelijkaardig,
moet een afstand van minstens 500 mm in
acht worden genomen tussen de lantaarn en
ontvlambaar materiaal, ZONIET kan er brand
uitbreken!
6. VERVANGEN VAN GASPATROON
6.1 Sluit de klep volledig. Zorg ervoor dat de vlam gedoofd
is en dat er geen ander open vuur in de buurt is. Neem
het apparaat buitenshuis op een plaats waar zich geen
andere mensen bevinden. Schroef de patroon van de
klep af en vervang de oude cassette door een nieuwe
Primus-cassette. Controleer altijd de O-ring in het
toestel. Wanneer deze gebarsten of versleten is moet
u de ring vervangen. Let op dat u de schroefdraad niet
scheef trekt en schroef deze alleen met handkracht
vast zoals beschreven onder punt 4.
7. ONDERHOUD
7.1 Als de gasdruk door een bepaalde oorzaak
vermindert, of als het gas niet kan worden ontstoken,
controleer dan of er nog gas in de patroon zit (3). Als
dit wel het geval is, controleer dan of het mondstuk (9)
niet verstopt is.
7.2 Reinigen van mondstuk: Draai de regelknop (2)
volledig uit en schroef de gaspatroon (3) los.
7.3 Schroef de twee kleine schroeven (10) op de zijkant
van de lantaarn en hef het lantaarngedeelte (11)
voorzichtig van het klephuis.
7.31 Let op dat de brander niet wordt vervormd. Oefen
geen druk uit op de brander.
7.4 Schroef het mondstuk (9) los van de klep met een 6
mm-moersleutel.
7.5 Blaas door de kleine opening aan de voorkant om het
mondstuk schoon te maken. Gebruik geen naald of
gelijkaardig voorwerp voor het reinigen. De opening
kan hierdoor beschadigd worden zodat het gastoestel
gevaarlijk in gebruikt wordt.
7.6 Zet het mondstuk weer op zijn plaats en schroef
het goed vast zodat het veilig gesloten is. Sluit de
gaspatroon weer aan zoals beschreven onder punt 4.
Controleer de voegen met lauw zeepsop voor extra
veiligheid. Als er belletjes ontstaan is de afdichting niet
goed genoeg.
7.7 Duw het lantaarngedeelte (11) op het klephuis en
maakt het vast met de twee kleine schroeven (10).
8. INSPECTIES EN ONDERHOUD
8.1 Controleer altijd of de O-ring correct is geplaatst en in
goede staat verkeert. Controleer dit altijd voordat het
gastoestel wordt gemonteerd. Vervang versleten of
beschadigde O-ringen.
8.2 Nieuwe O-afdichtringen zijn verkrijgbaar bij uw lokale
verdeler.
9. SERVICE EN REPARATIES
9.1 Als een eventueel defect niet kan worden verholpen
met behulp van deze aanwijzingen, dient u het toestel
naar uw lokale verdeler te brengen.
9.2 Probeer nooit zelf andere onderhouds- en
reparatiewerkzaamheden uit te voeren dan hier
beschreven.
9.3 Breng nooit wijzigingen aan het toestel aan, omdat
er dan gevaar kan optreden bij het gebruik van het
toestel.
10. RESERVEONDERDELEN EN TOEBEHOREN
10.1 Gebruik uitsluitend originele onderdelen en toebehoren
van het merk Primus. Wees voorzichtig bij het
monteren van reserveonderdelen en toebehoren en
raak geen hete onderdelen aan.
10.2 Patronen vervangen: Gebruik voor dit toestel
uitsluitend Primus-gaspatronen 2202, 2207.
10.3 Reserveonderdelen
732070 Mondstuk
732440 O-ring
730850 Piëzoaansteker
730800 Gloeikousje 3-pak
721490 Mat lantaarnglas
10.4 Als u moeite hebt om aan reserveonderdelen of
accessoires te komen, stel u dan in verbinding met de
distributeur in uw land, zie: www.primus.eu
IMPORTANTE: Leggere attentamente le seguenti
istruzioni prima di montare la cartuccia del gas
sull’apparecchio. Consultare periodicamente le istruzioni
per essere sempre certi di usare l’apparecchio nel modo
migliore e più sicuro. Conservare queste istruzioni per future
necessità.
ATTENZIONE: Utilizzare questo apparecchio solo
all’aperto. Questo apparecchio a gas consuma ossigeno
e non va usato in ambienti chiusi, per evitare pericoli per la
salute e la vita delle persone.
1. INTRODUZIONE
1.1 Per questo apparecchio a gas usare solo cartucce
Primus art. 2202 e 2207.
1.2 L’impiego di altre cartucce a gas può essere
pericoloso.
1.3 Consumo di gas: 25 g/h / 0,9 oz/h / 0,3 kW butano
a 1 bar di pressione.
1.4 Dimensioni dell’ugello: 0,12 mm per butano art.
732070.
1.5 Questo apparecchio è conforme alla norma EN 521 /
Z21.73-2000/CSA 11.1-2000.
2. INFORMAZIONI PER UN USO SICURO (fig. 1)
2.1 Controllare che le guarnizioni dell’apparecchio (1)
siano integre e montate correttamente prima di
collegare la cartuccia di gas.
2.2 Usare l’apparecchio solo all’aperto!
2.3 Posizionare l’apparecchio su una supercie piana.
2.4 Controllare che non vi siano oggetti inammabili nelle
vicinanze. Vedere punto 5.6.
2.5 Eseguire il montaggio o la sostituzione della cartuccia
in luogo sicuro, all’aperto e non in vicinanza di altre
persone. Assicurarsi che non vi siano amme libere,
amme pilota o stufe elettriche nelle vicinanze.
2.6 L’eventuale ricerca di perdite nell’apparecchio dovrà
essere eseguita solo all’aperto. Non eseguire mai
questo tipo di controllo con amme libere. Usare
invece acqua saponata o metodi simili.
2.7 Non usare l’apparecchio se la guarnizione è
danneggiata o usurata, se perde, se è danneggiato o
se funziona male.
2.8 Non lasciare mai l’apparecchio acceso incustodito.
2.8 Evitare lo sviluppo di amme, maneggiando
l’apparecchio con attenzione. Ciò è particolarmente
importante quando si utilizza una cartuccia nuova.
3. USO DELL’APPARECCHIO A GAS
3.1 Non toccare mai le parti calde dell’apparecchio
mentre è acceso o subito dopo averlo spento.
3.2 Conservazione: svitare sempre la cartuccia del gas
dall’apparecchio quando questo non viene usato. La
cartuccia va conservata in luogo fresco e asciutto,
lontano da fonti di calore.
3.3 Non usare impropriamente l’apparecchio, per usi
diversi da quelli a cui è destinato.
3.4 Maneggiare l’apparecchio con cura. Non lasciarlo
cadere.
4. MONTAGGIO DELL’APPARECCHIO A GAS (fig. 2)
4.1 Controllare che il rubinetto (2) sia chiuso (girandolo
completamente in senso orario).
4.2 Per collegare la cartuccia alla valvola, tenere la
cartuccia (3) rivolta verso l’alto.
4.3 Posizionare la valvola esattamente sopra la cartuccia
(vedere g. 2).
4.4 Avvitare delicatamente la valvola sulla cartuccia
nché questa non entra in contatto con la
guarnizione della valvola. Durante questa operazione,
curare che le due lettature scorrano parallele.
Avvitare solo con le mani. Un eccessivo
serraggio potrebbe danneggiare la valvola.
4.5 Controllare la perfetta tenuta dell’apparecchio.
L’eventuale ricerca di perdite nell’apparecchio dovrà
essere eseguita solo all’aperto. Non eseguire mai
questo tipo di controllo con amme libere. Usare
invece acqua saponata o metodi simili. Applicare
intorno alle connessioni e ai raccordi. La presenza di
perdita sarà rilevata dalla formazione di bolle intorno
all’area interessata. In caso di dubbio o se si sente
un odore o un rumore che rivelano una fuoriuscita
di gas, non accendere l’apparecchio. Svitare la
cartuccia e riconsegnare l’apparecchio al rivenditore
di zona.
4.6 Combustione della calza prima dell’uso: Togliere il
cappuccio e il vetro dalla lampada. Controllare che la
calza (6) sia sui bulbi (7) del tubo del bruciatore (4), vale
a dire con l’estremità più grande sul bulbo inferiore e
quella più piccola sul bulbo superiore. Controllare che la
calza sia infilata uniformemente intorno al tubo. Bruciare
la calza accendendola all´intorno con un accendino o un
fiammifero agire sul rubinetto (2), lasciandola bruciare
un paio di minuti fino a quando non diventa “bianca”.
4.7 Dopo aver bruciato la lampada completamente,
rimontare il cestello e il vetro della lampada.
52285_klippt.indd 6 2020-02-25 10:42