Psiber CableMaster 600 User manual
CableMaster
600/650
Quick Start Guide
Kurzanleitung
Guide de Démarrage Rapide
Netzwerkkabel aller Kategorien
Koaxialkabel
Telefonkabel
CAT 3/5e/6/6a
Coax
Telephone Cable
Câbles de toutes les catégories
Câbles coaxiaux
Câbles téléphoniques

English
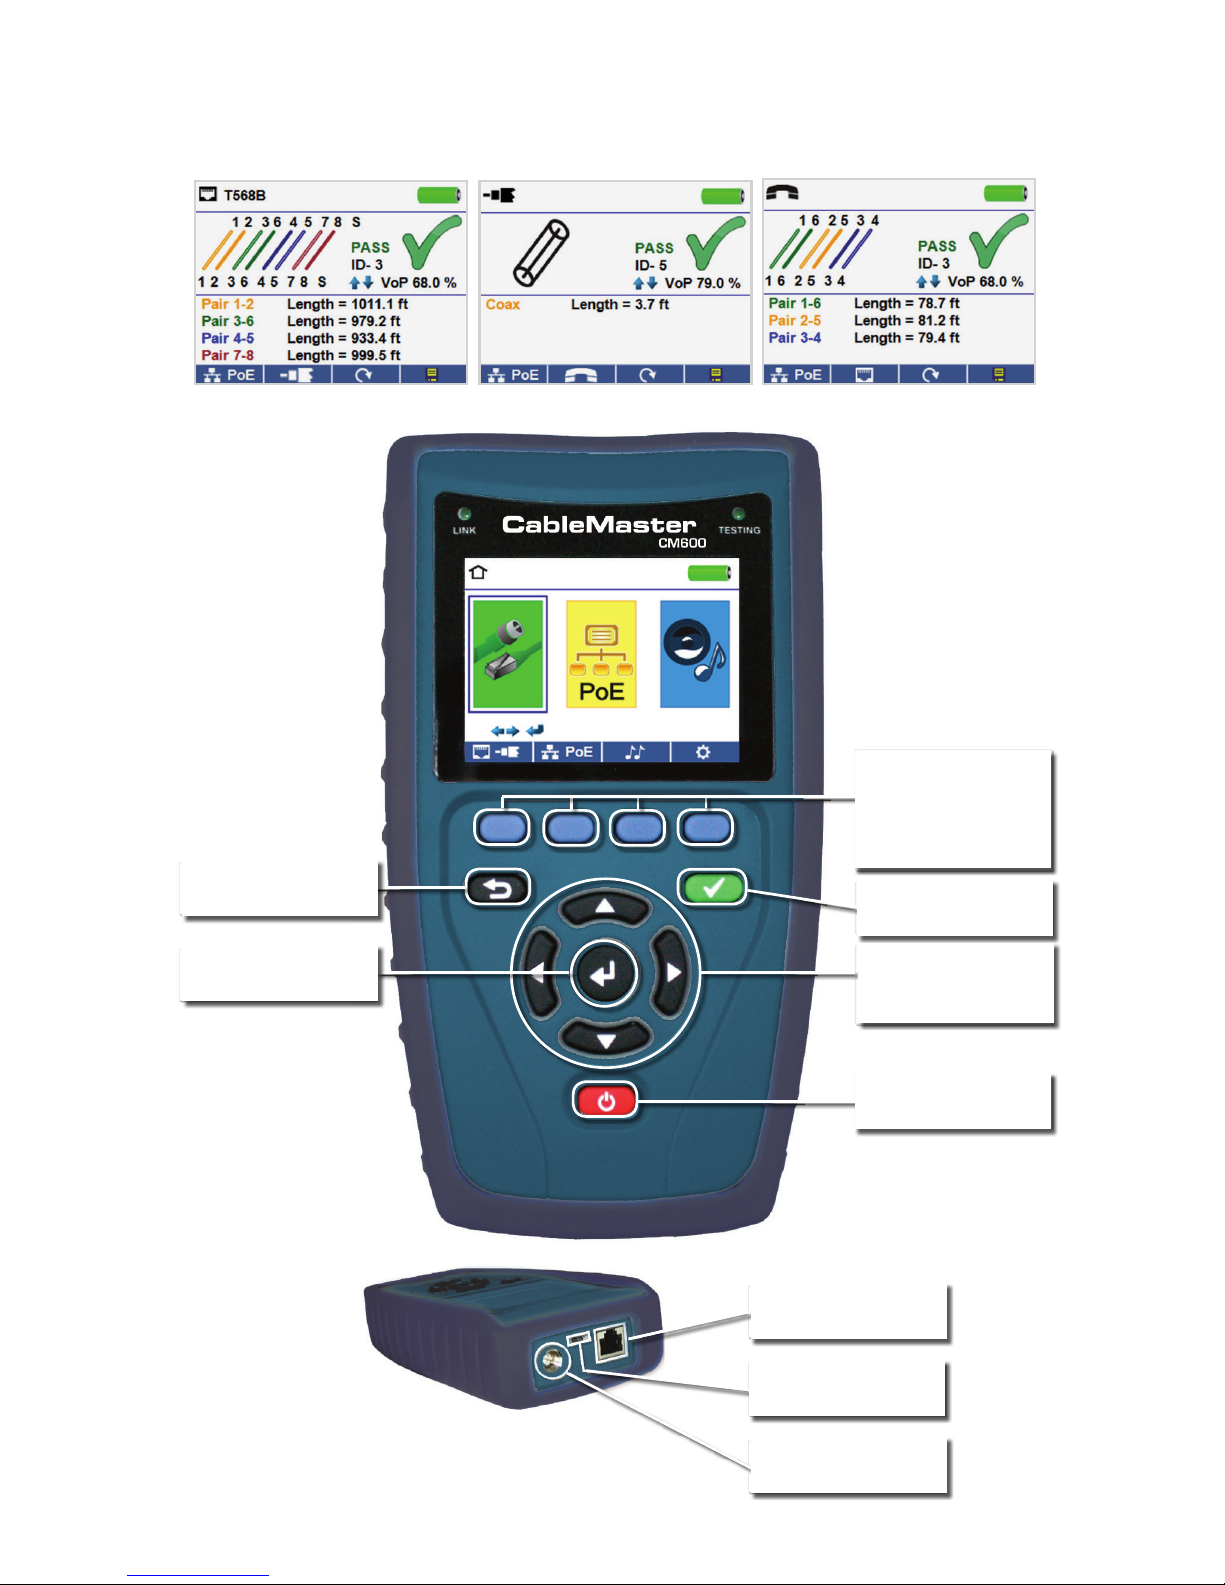
Soft keys perform the
function on the display
above each button.
Test
Direction cursors to
move in LCD display
On/Off
RJ45 jack
Micro USB Port
F-connector Jack
Back
Enter
Network Cable Test Coax Cable Test Telephone Cable Test

English
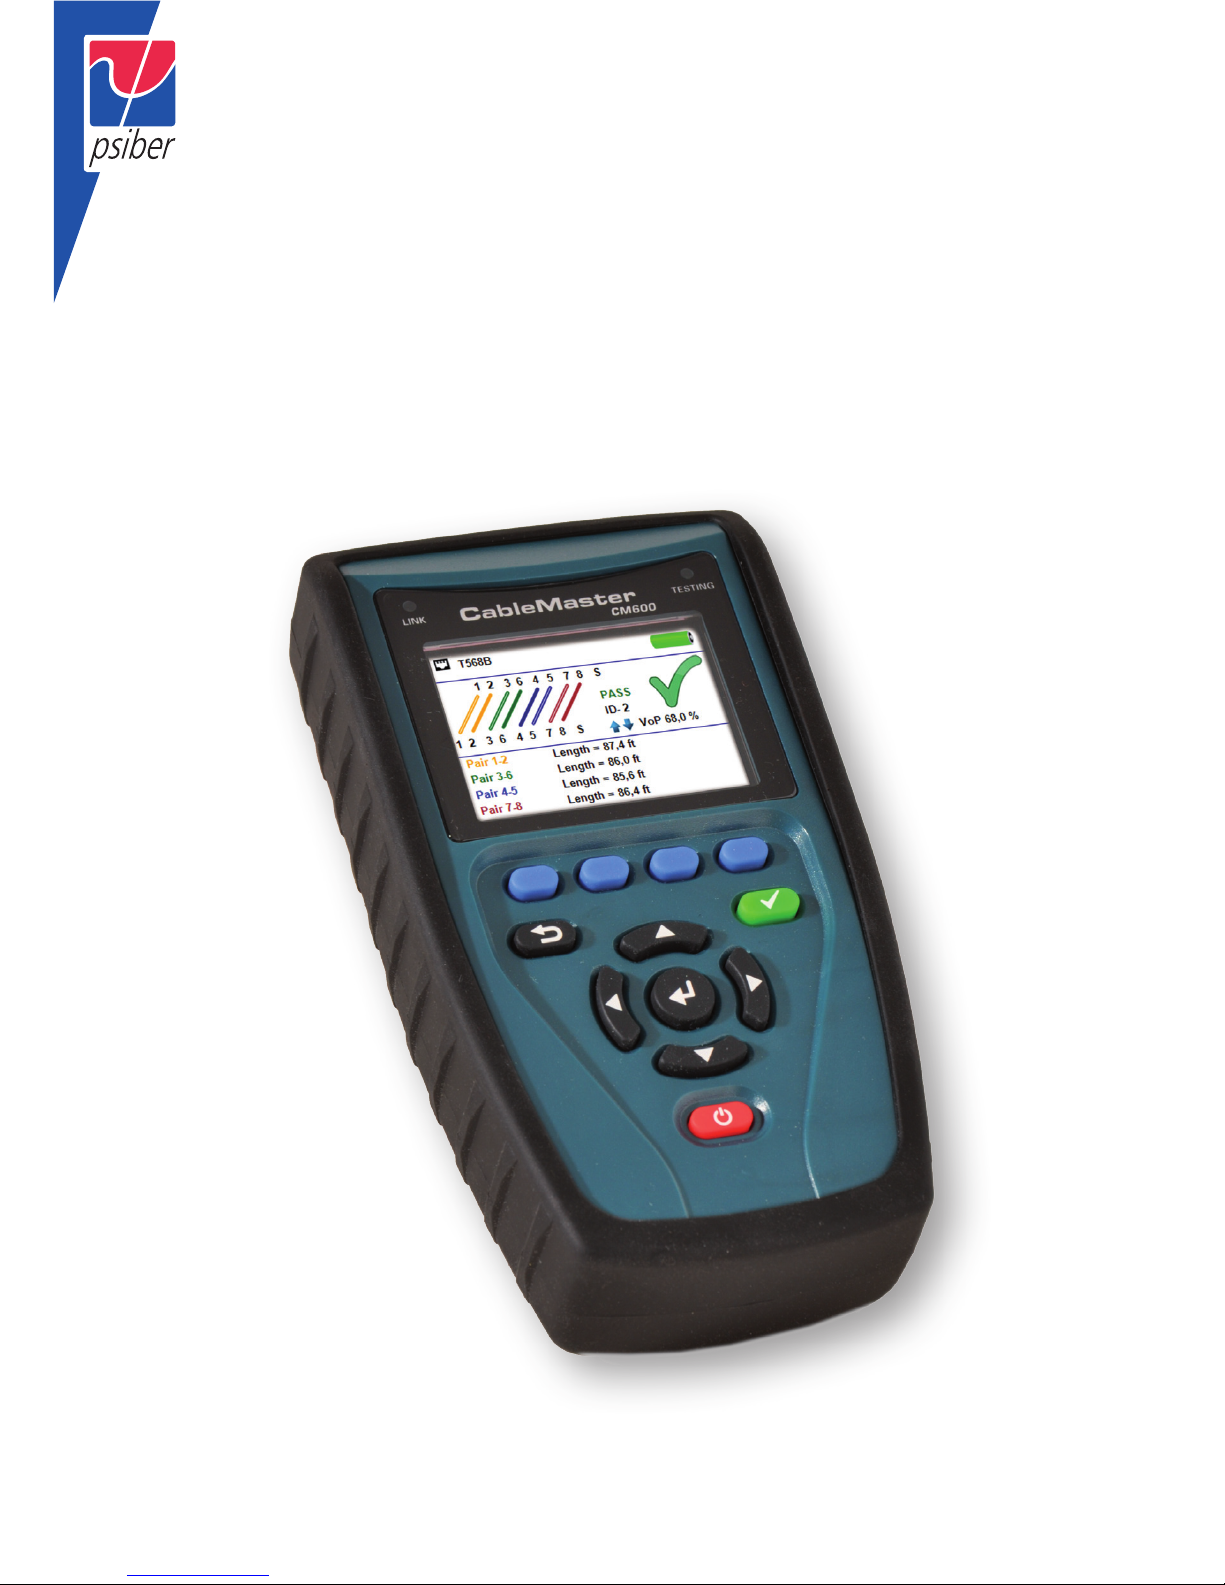
How to Perform a Cable Test
• Power on the CableMaster 600/650.
• Connect a network, coax, or telephone cable to the appropriate connector
on the top of the CableMaster 600/650.
(Warning! Do not plug an RJ11 cable directly into the CableMaster 600/650!
A standard RJ11 cable will damage the CableMaster 600/650’s RJ45 jack.
Use the included RJ adapter patch cable (CA012) that is included with the
CableMaster 600/650.)
• Press the enter button to display the cable test menu. The CableMaster
600/650 will automatically perform a test upon entering the cable test menu.
• To test coax or telephone cable, press the coax or telephone soft key.
• If a remote is NOT being used (one ended test), the CableMaster 600/650 will
test the length of each pair, opens, shorts, or split pairs. Performing a one
ended test will not verify connectivity on the opposite end of the cable.
• If a remote is being used, connect the remote to the opposite end of the
cable.
• To calibrate the NVP, connect a known length of cable to the CableMaster
600/650 and press the up/down/left/right buttons to increase or decrease
the NVP. Press the left and right buttons to select and change the NVP one
digit at a time.
• While adjusting the NVP, press the test button every so often until the length
of the cable is displayed.
• Press the green test button or the loop mode soft key to
perform additional tests.
• To save a cable test, press the save icon.
• Use the arrow buttons and the enter button to name the cable test file.
• Press the save icon to save the cable test file.
English
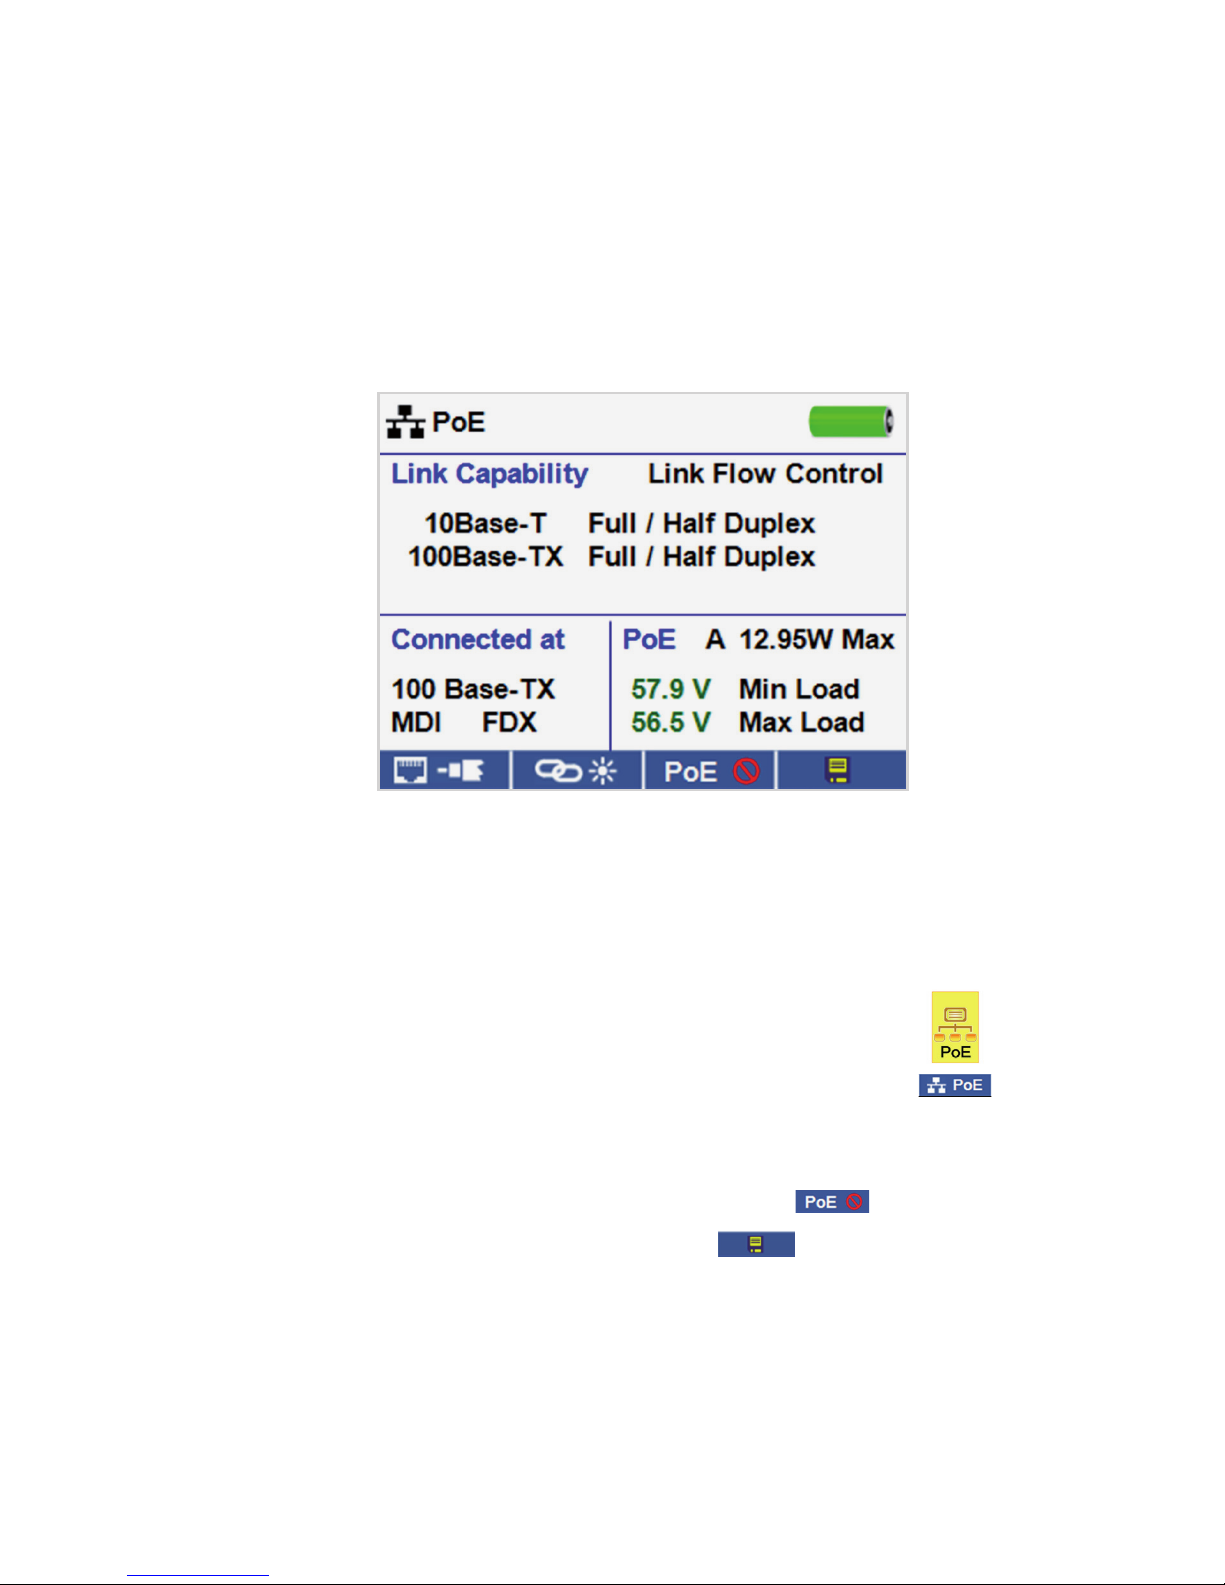
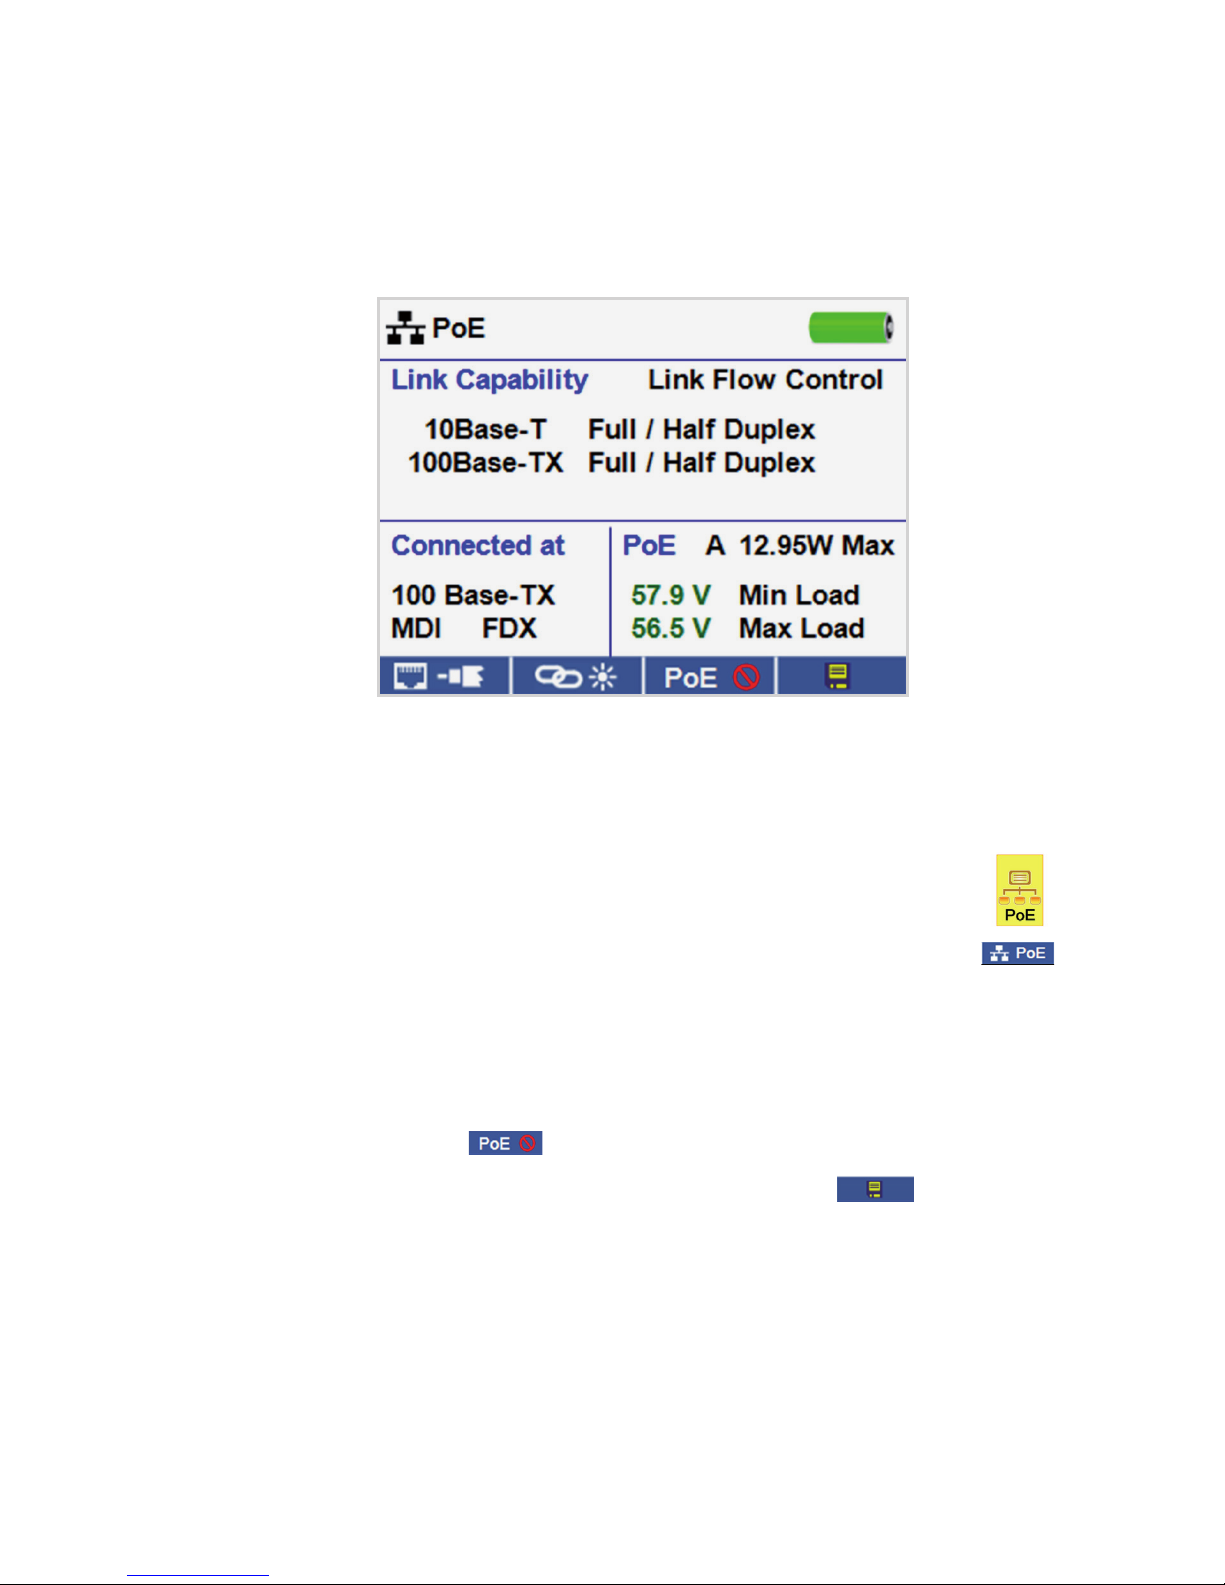
• Power on the CableMaster 600/650.
• Connect the CableMaster 600/650 to a switch
or active network jack.
• Use the left or right arrow buttons to select the Network/PoE icon
and press the enter button or press the Network/POE soft key.
• The CableMaster 600/650 will automatically detect and display link capability,
connection speed, PoE class, and PoE Min/Max voltages.
• To perform a Network Test only, press the PoE soft key.
• To save the PoE data, press the Save soft key.
»Use the arrow buttons and the enter button to name the PoE file.
»Press the Save soft key to save the PoE file.
Network / PoE Detection
English
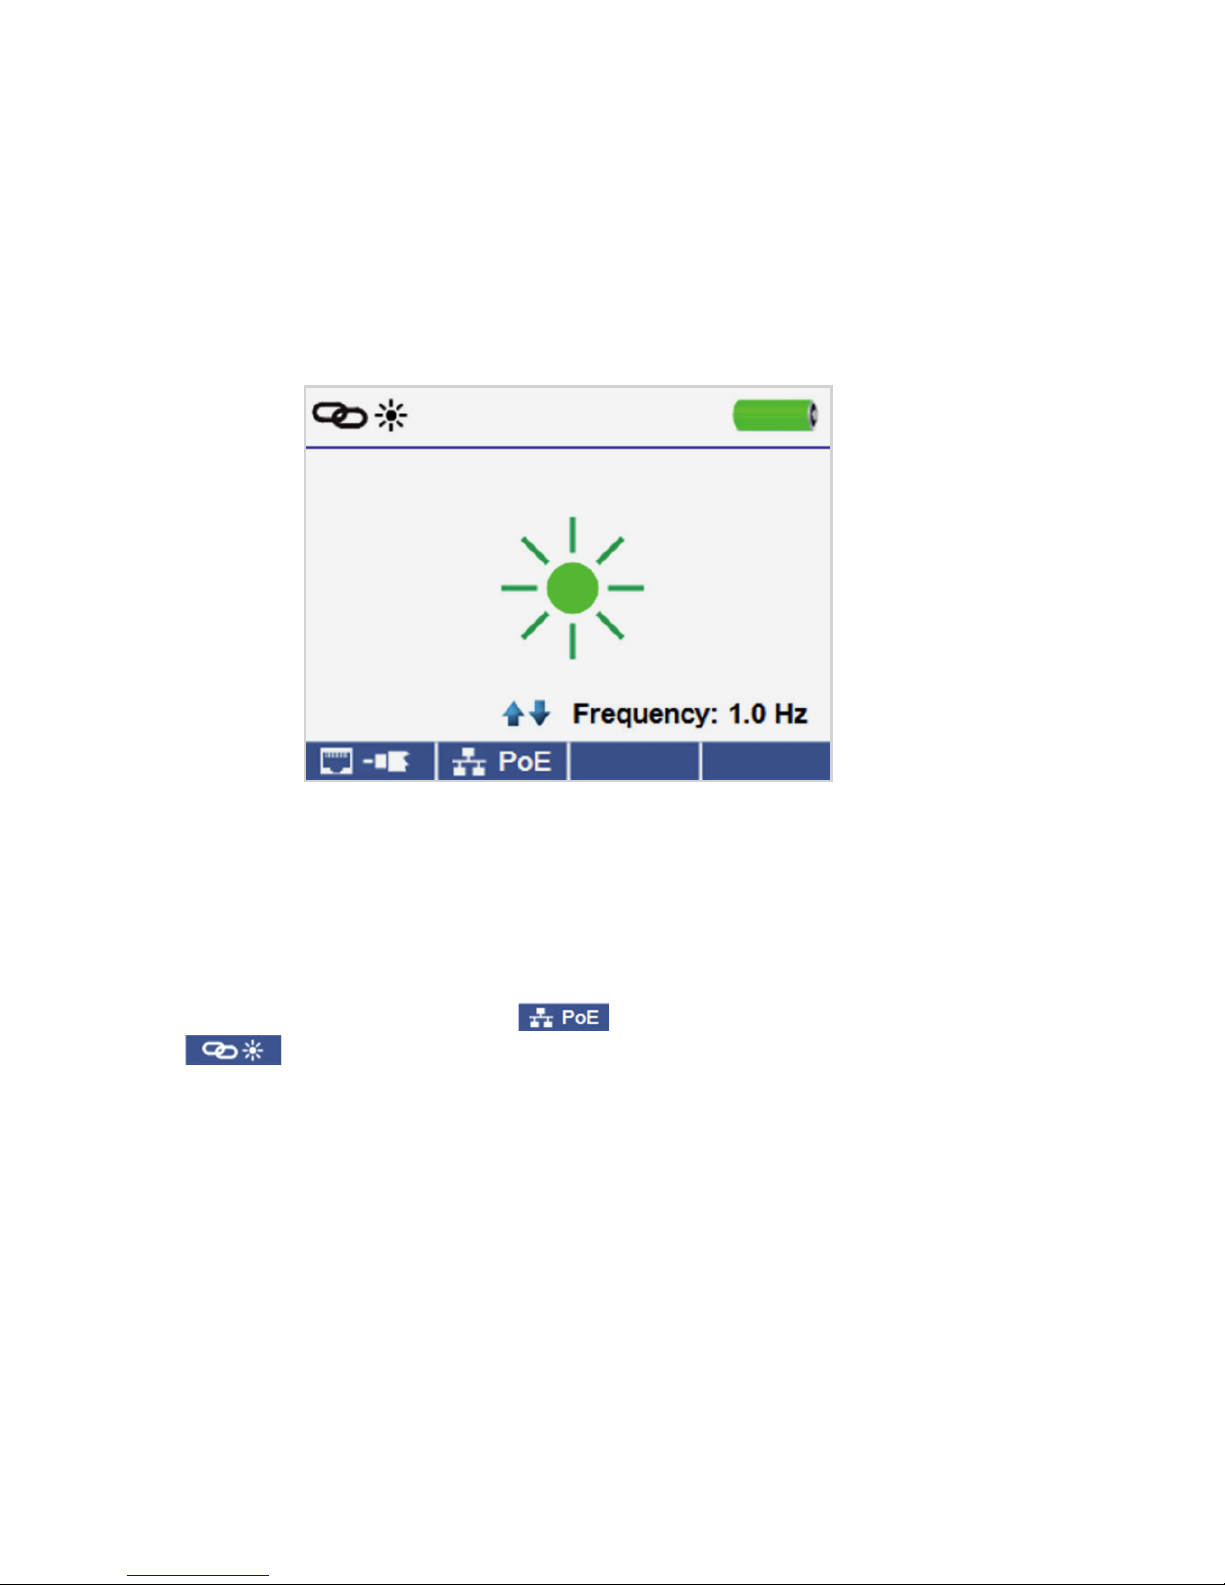
• Power on the CableMaster 600/650.
• Connect the CableMaster 600/650 to an active Network cable or port.
• Press the Network/Poe soft key then press the Link Light soft key.
• The Link Light will automatically begin upon entering the Link Blink menu.
• The Link LED above the LCD screen will flash at the same cadence as
the port light.
• Use the up and down arrows to adjust the transmit frequency to suit the switch
characteristics.
Link Light

English
• Power on the CableMaster 600/650.
• Use the left or right arrow buttons to select the tone generator icon and
press the enter button.
• The CableMaster 600/650 will automatically activate the tone generator upon
entering the tone generator menu.
• Connect your cable to either the RJ45 jack or coax connector located on the top
of the CableMaster 600/650.
• To switch between network and coax cables, press the coax cable/RJ45
soft key / .
• Press the up or down arrow buttons to select tone cadences 1 thru 4.
• Press the left or right arrow buttons to select which pin or pair to place the tone.
• Use a tone probe (P/N TP200 TrakAll) alongside the cable or at the end of the
cable to hear an audible tone.
Tone Generator
English
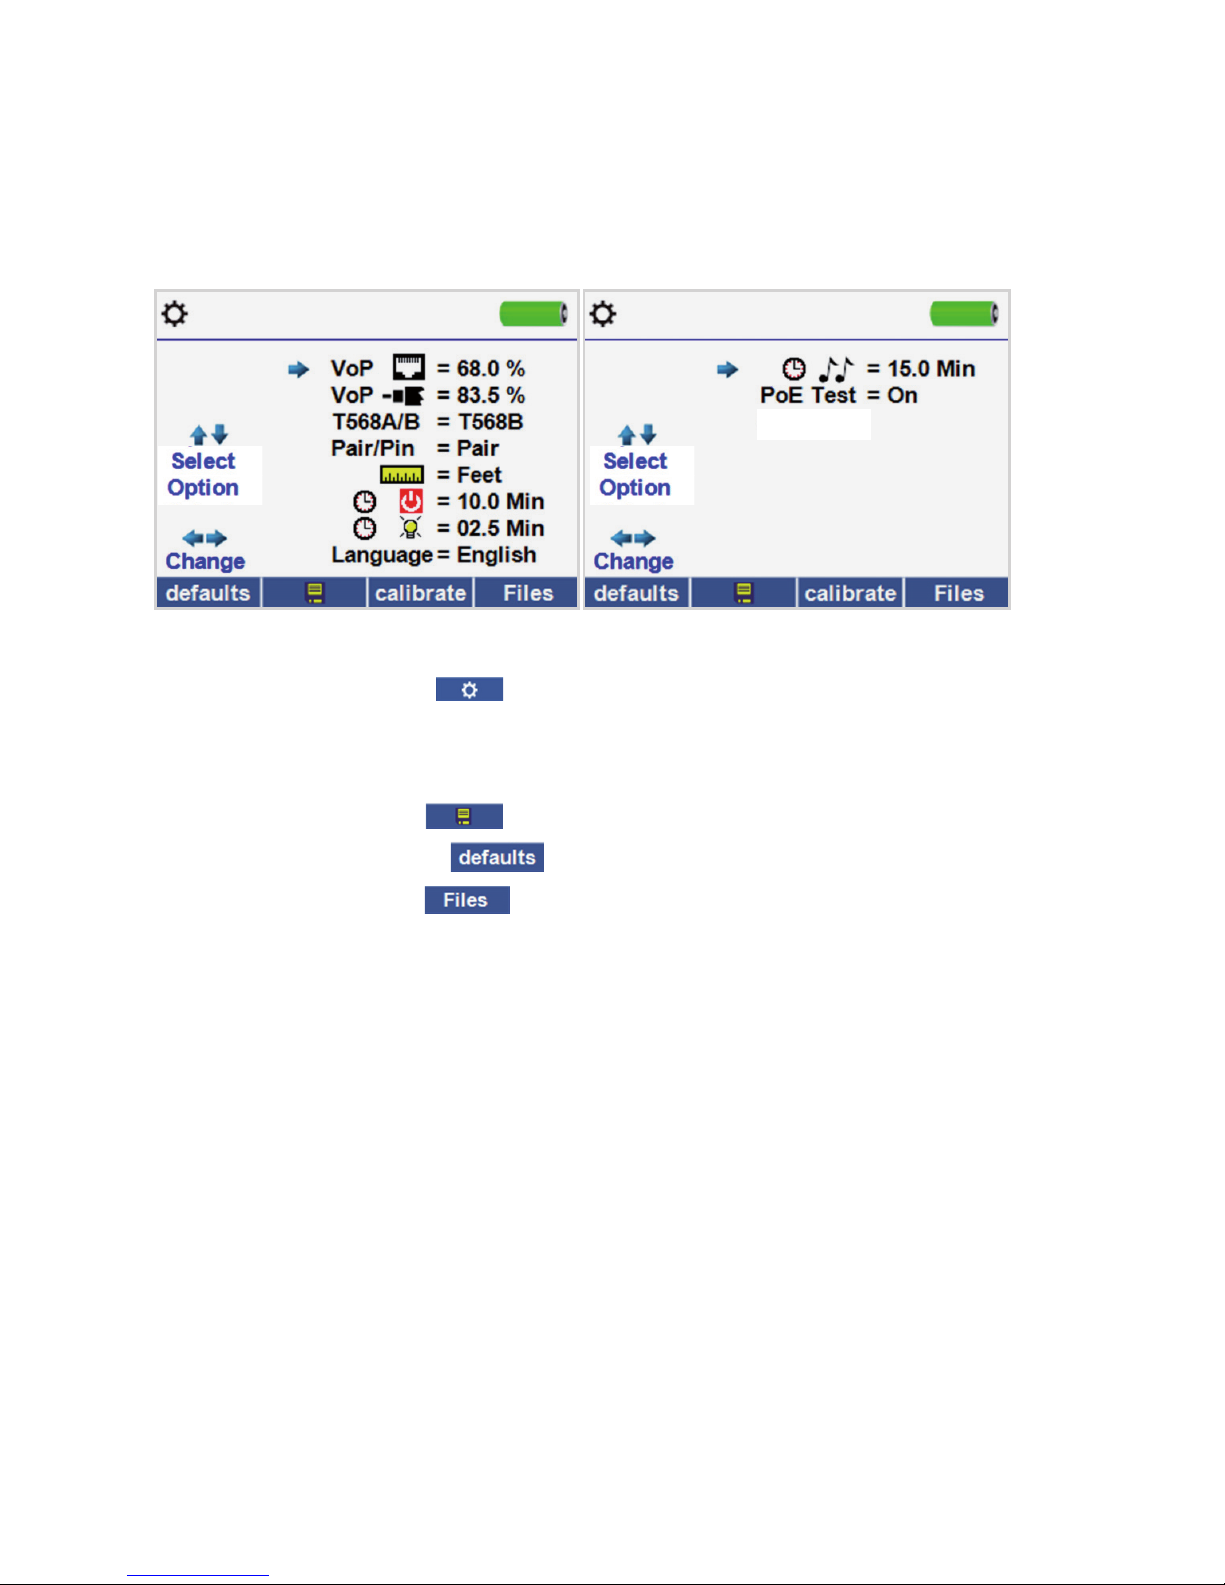
• Press the setup softkey to enter the setup menu.
• Use the up and down buttons to select a setting.
• Use the left and right arrow buttons to change the selected setting.
• Press the save soft key to save changes.
• Press the defaults soft key to reset the settings to factory settings.
• Press the Files soft key to view stored test results.
To install the CableMaster 600/650 software please download the newest software
version at http://emea.psiberdata.com/download
Setup
CableMaster 600/650 Software Application
Deutsch
Funktionstasten
aktivieren die über der
Taste angezeigte
Funktion
Test
zum Navigieren
auf dem Bildschirm
Ein/Aus
RJ45-Buchse
Micro USB Port
F-Stecker
Zurück
Eingabe/
Richtungstasten
Netzwerk-Kabeltest Koaxial-Kabeltest Telefon-Kabeltest

Deutsch
•SchaltenSiedenCableMaster600/650ein.
•SchließenSieeinNetzwerk-,Koaxial-oderTelefonkabelandenentsprechenden
Ausgang an der Oberseite des CableMaster 600/650 an.
Warnung! Stecken Sie niemals ein RJ11-Kabel direkt in den CableMaster 600/650.
Ein Standard RJ11-Kabel beschädigt die RJ45-Buchse des CableMaster 600/650.
Verwenden Sie in diesem Fall das im Lieferumfang des CableMaster 600/650
enthaltene RJ-Testkabel (CA012).
•DrückenSiedieEingabetaste,umindasMenüKabeltestzugelangen.
Der CableMaster 600/650 führt automatisch einen Test durch, sobald das Menü
Kabeltest aufgerufen wird
•ZumPrüfeneinesKoaxial-oderTelefonkabelsdrückenSiedieentsprechendeTaste
für Koax oder Telefon
•WennKEINERemoteeinheitverwendetwird(Testmitnureinemangeschlossenen
Kabelende), ermittelt der CableMaster 600/650 die Länge jedes Paares, prüft auf
Unterbrechung, Kurzschluss oder Split-Pair Fehler. Hierbei wird die Konnektivität
am anderen Kabelende nicht geprüft.
•BeiVerwendeneinerRemoteeinheitschließenSiedieseamanderenKabelendean.
•ZumEinstellenderNVPschließenSieeinKabelmitbekannterLängeanden
CableMaster 600/650 an und drücken die Auf/Ab/Links/Rechts-Pfeiltasten, um den
WertderNVPzuvergrößernoderzuverkleinern.MitdenLinks/Rechts-Pfeiltasten
wählen Sie NVP aus und verändern jeweils eine Stelle.
•BeimAnpassenderNVPdrückenSiedieTasteTestsooft,bisdieKabellänge
angezeigt wird.
•ZumDurchführenzusätzlicherTestsdrückenSiediegrüneTesttaste
oder die Taste für den Loop-Modus (Dauertest).
•ZumSpeicherneinesKabeltestsdrückenSiedieTastemitdemSpeichersymbol.
•VerwendenSiediePfeiltastenunddieEingabetaste,umdieKabeltest-Dateizu
benennen.
•ZumSpeichernderKabeltest-DateidrückenSiedieTasteSpeichern.
Einen Kabeltest durchführen
•SchaltenSiedenCableMaster600/650ein.
•VerbindenSiedenCableMaster600/650miteinemSwitchoder
einer aktiven Netzwerkbuchse.
•VerwendenSieLinks/Rechts-Pfeiltasten,umaufdasNetzwerk-/PoESymbol
zu gehen und drücken dann die Eingabetaste oder die Taste Netzwerk-/PoE .
•DerCableMaster600/650erkenntautomatischdiemaximaleunddieaktuelle
Verbindungsgeschwindigkeit, PoE-Klasse und min./max. PoE-Spannung und zeigt
diese auf dem Bildschirm an.
•WollenSielediglicheinenNetzwerk-Testdurchführen,
drücken Sie die Taste PoE.
•ZumSpeichernderPoE-DatendrückenSiedieSpeichertaste.
» Verwenden Sie die Pfeiltasten und die Eingabetaste zum Benennen
der PoE-Datei.
» Zum Speichern der PoE-Datei drücken Sie die Speichertaste.
Netzwerk-/PoE-Test
Deutsch
This manual suits for next models
1
Table of contents
Languages:
Other Psiber Test Equipment manuals


