Pulsar TELOS XP50 User manual

Magnification, x
2.5
Smooth Digital Zoom, x
2.5-10
Digital Zoom, x
x1 - x4
Lens Focus, mm
50
Relative Aperture, D/f'
1.0
Minimum Focus Distance, m/y
5 / 5.5
Exit Pupil Diameter, mm/inch
4 / 0.16
Angular Field of View (Horizontal x
Vertical), degree
12.4х9.3
Linear Field of View, m at 100 m
21.8
Eyepiece Focus Range, Dioptre
+4 / -5
Detection Distance for Deer-Sized
Objects, m/y
1800 / 1969
Display
Type
AMOLED
Resolution, Pixels
1024x768
Operational Characteristics
Power Supply, V
3 - 4.2
Battery Type/Capacity/Nominal
Output Voltage
LPS7i Li-ion Battery Pack / 6400
mAh / DC 3.7 V

External Power Supply
5 V, 9 V (USB Type-C)
Battery Run Time at t=22°C,
hours*
8.5
Degree of Protection, IP Code
(IEC60529)
IPX7
Operating Temperature Range, °C
/ °F
-25 … +40 / -13 – +104
Dimensions, mm/inch
238x72x62 / 9.37x2.83x2.44
Weight (with battery), kg/oz
0.67 / 23.6
Video Recorder
Photo/Video Resolution, Pixels
1024x768
Video/Photo Format
.mp4 / .jpg
Built-in Memory
64 GB
Wi-Fi Channel**
Frequency
2.4/5 GHz
Standard
IEEE 802.11 b/g/n/ac
* Actual battery life may vary depending on the use of Wi-Fi and the built-in
video recorder.
** Reception range may vary depending on various factors: obstacles, other
Wi-Fi networks.

About the device
Description
Telos thermal imaging monoculars are designed for use both at night-time
and during the day and provide exceptional image quality even in adverse
weather conditions (fog, smog, rain) and beyond obstacles like branches, tall
grass, dense foliage, etc. known to hinder target detection.
Unlike night-vision devices based on electron-optical converters, thermal
imaging devices do not need an external light source and are resistant to
bright light.
Telos thermal imagers are designed for various applications including
hunting, observation, security, terrain orientation, search and rescue
operations, etc.
To get started, see the sections:
Battery Charging
Battery Installation
Powering on and Image Settings
Stream Vision 2
Package Contents
• Telos thermal imager
• LPS7i battery pack with protective cover
• Spare battery compartment cover
• Power adapter
• USB Type-C cable with USB Type-A adapter
• Case
• Hand strap
• Quick start guide

• Lens cloth
• Warranty card
Components and Controls
1. Lens cover
2. Lens focus ring

3. Digital zoom adjustment ring
4. Tripod socket
5. Battery compartment
6. LPS7i battery
7. Battery compartment cover
8. Battery protective cover
9. ON/OFF/Calibration button
10. UP/REC button
11. MENU button
12. DOWN/MODE button
13. Eyepiece diopter adjustment ring
14. Operation status LED indication
15. Microphone
16. USB Type-C connector
17. LED indication of battery charge in the device
LED indicator (14) displays the current status of the device:
LED Indicator
Operating Mode
Device is turned on
The device is turned on/video recording
The device is turned on/battery charge < 10%
The device is turned on/video recording/battery
charge < 10%
Features
• Compact and lightweight
• Functional and ergonomic design

• 8-colour display palette
• 3 calibration modes: Manual, Semi-Automatic, Automatic
• Detection range up to 1800 m/1969 yds
• Smooth digital zoom 2.5-10x
• Three levels of sensitivity enhancement: Normal, High, Ultra
• Stadiametric Rangefinder
• Display-Off function
• Defective pixel repair
• Updatable firmware
• Wide operating temperature range (-25°С to +40°С / -13°F to +104°F)
• Fully waterproof (IPX7 rated)
• Tripod mount
Video/Audio Recording
• Built-in video and sound recorder
• Integration with iOS and Android devices
• Wi-Fi remote control and viewing using a smartphone
• Storing photos and videos in Cloud when using the Stream Vision 2 App
Battery Pack
• Quick Change Li-Ion Battery Pack LPS7i
• Charging from USB Power Bank
• Quick-Charge power delivery
Power supply
Precautions
• It is not recommended to charge the battery with the USB cable and wireless
charger at the same time. This will not increase the charge rate and may
damage the battery.
• Use the USB Type-C cable and power adapter supplied with the device (or
purchased separately) to charge the LPS 7i batteries.
• Follow the safety precautions described in its Manual when using the wireless
charger.
• Do not place any foreign objects between the battery and wireless charger
platform.

• Do not charge the battery immediately after brining it from cold to warm. Wait
at least 30 minutes for the battery to warm up.
• Do not leave the battery unattended while charging.
• Do not use the power adapter and wireless charger if they have been modified
or damaged.
• Do not leave the battery plugged in after charging is complete.
• Do not expose the battery to high temperatures and naked flame.
• Do not use the battery as a power source for devices that do not support LPS
7i batteries.
• Do not disassemble or deform the battery.
• Do not drop or strike the battery.
• Do not submerge the battery.
• Keep the battery out of the reach of children.
Recommendations for Battery Use
• The battery should be partially charged (50 to 80 %) for long-term storage.
• Charge at an ambient temperature of 0°C to +35°C (32°F to 95°F) or the
lifespan of the battery will decrease significantly.
• Using the battery at sub 0°C (<32°F) ambient temperature decreases battery
capacity. This is normal and not a defect.
• Using the battery at temperatures outside the range of -25°C to +50°C (-13°F
to 122°F) may reduce battery life.
• The battery is short-circuit protected. Any situation that may cause short-
circuiting should be avoided.
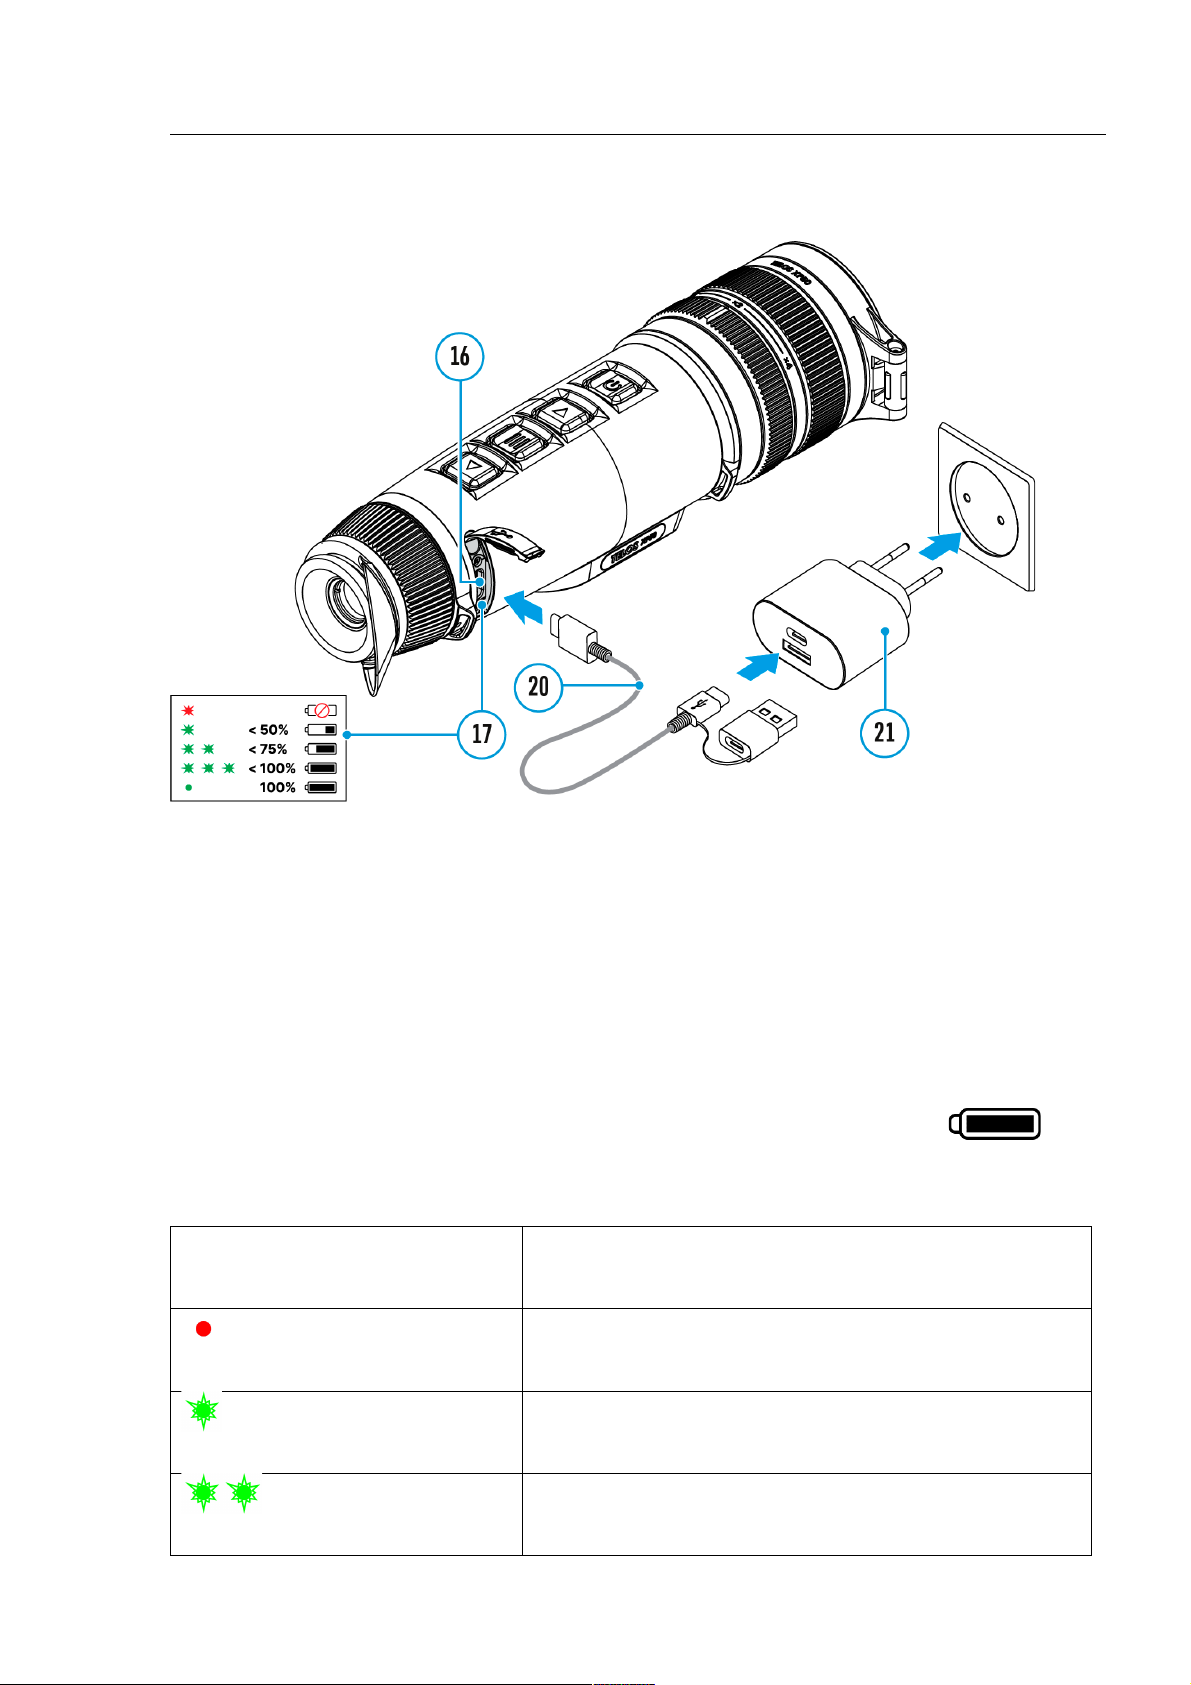
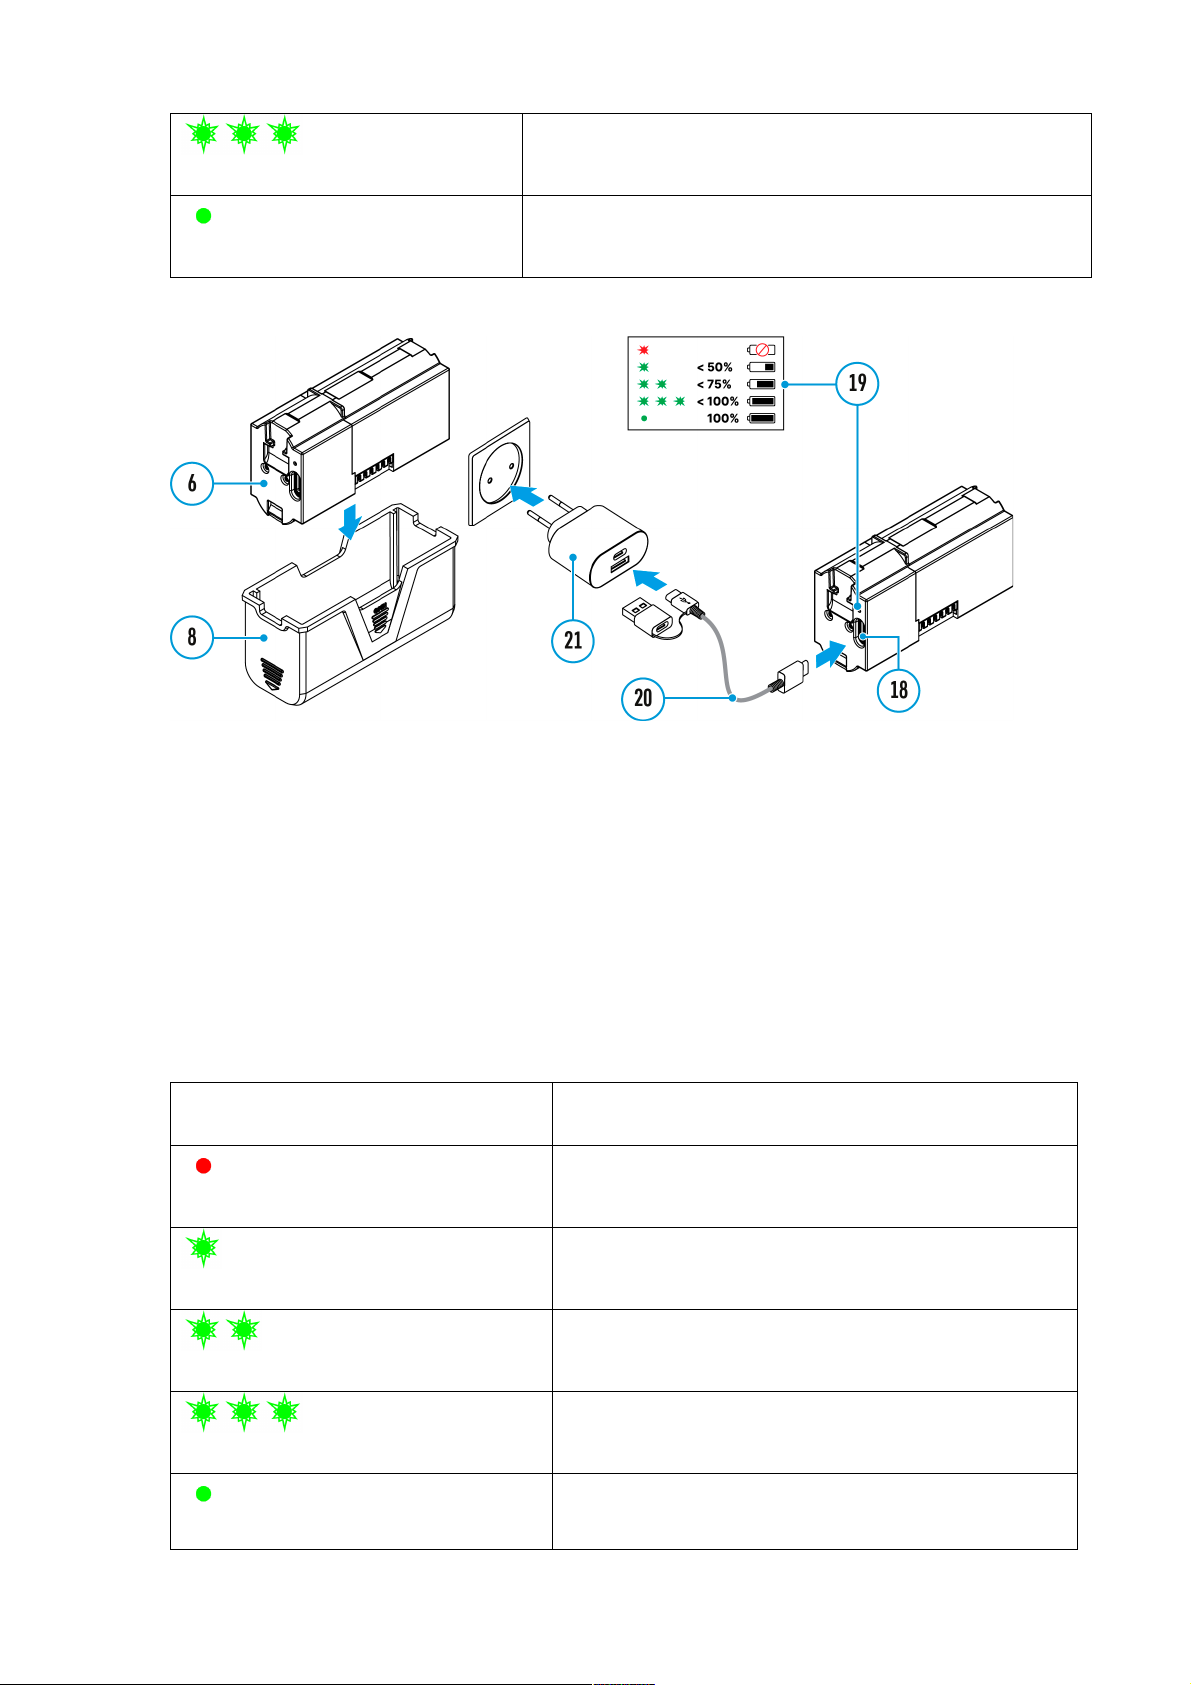
Battery Charging
The Telos thermal imager comes with an LPS7i rechargeable Lithium-ion
battery. LPS7i batteries support USB Power Delivery fast charging technology
when using a standard charging set (USB Type-C cable, power adapter).
Before first use, make sure the battery is fully charged. LPS 7i batteries also
support wireless charging.
The icon in the status bar will flash when the battery is low. The battery
needs to be charged.

Option 1. USB Charging
1. Install the LPS7i battery in the battery compartment of the device.
2. Connect the USB cable (20) to the USB Type-C connector (16) of the device.
3. Connect the other end of the USB cable (20) to the Power Adapter (21) by
removing the USB Type-A adapter.
4. Plug the Power Adapter (21) into a 100-240 V socket.
5. Wait until the battery is fully charged (indication in the status bar: ).
If the device is off, the LED indicator (17) will display the battery charge
status:
LED indication
Battery charge status
Battery defective. Do not use the battery!
Battery charge level is from 0% to 50%
Battery charge level is from 51% to 75%

Battery charge level is from 76% to 99%
Battery is full
Option 2. Charging the battery via USB
1. Remove the protective cover (8).
2. Connect the plug of the USB Type-C cable (20) to the USB Type-C
connector (18) of the battery.
3. For fast charging, connect the second end of the USB Type-C cable (20) to
the Type-C connector of the power adapter (21) by removing the Type-A
adapter from the plug. When connected to a computer or a Type-A power
adapter, the battery will charge at normal speed.
4. Plug the power adapter (21) into a 100-240 V socket.
5. LED (19) will display battery charge level (see Table).
LED indication
Battery charge status
Battery defective. Do not use the battery!
Battery charge level is from 0% to 50%
Battery charge level is from 51% to 75%
Battery charge level is from 76% to 99%
Battery is full
Other manuals for TELOS XP50
1
This manual suits for next models
1
Table of contents
Other Pulsar Thermal Camera manuals

Pulsar
Pulsar TRAIL LRF XQ38 User manual

Pulsar
Pulsar HELION XQ28F User manual

Pulsar
Pulsar KRYPTON FXG50 User manual

Pulsar
Pulsar Axion 2 LRF XQ35 User manual

Pulsar
Pulsar QUANTUM LSQ 19 User manual

Pulsar
Pulsar PROTON FXQ30 User manual

Pulsar
Pulsar Axion 2 XQ35 User manual

Pulsar
Pulsar AXION XQ38 User manual

Pulsar
Pulsar AXION XM30S User manual

Pulsar
Pulsar HELION 2 XP Series User manual


