Pulse fitness 870C-AAA User manual

Multi-Functional Trainer Rack

Important Safety Information
CAUTION
SUPPORTING DOCUMENTATION
Product Registration
SERIAL NUMBER
Questions

·Chapter 1: Safety Instruction
·Chapter 2: Exploded Drawing
·Chapter 3: Exploded Drawing Chart
·Chapter 4: Hardware Kit and ool Kit
·Chapter 5: Packing List
·Chapter 6: Installation instructions
·Chapter 7: Muscle argeted Illustration
·Chapter 8: General fitness tips
2
Contents

Safety tips: this safety manual contains important safety information. Please read it carefully before use. It is
recommended to keep this manual for future reference!
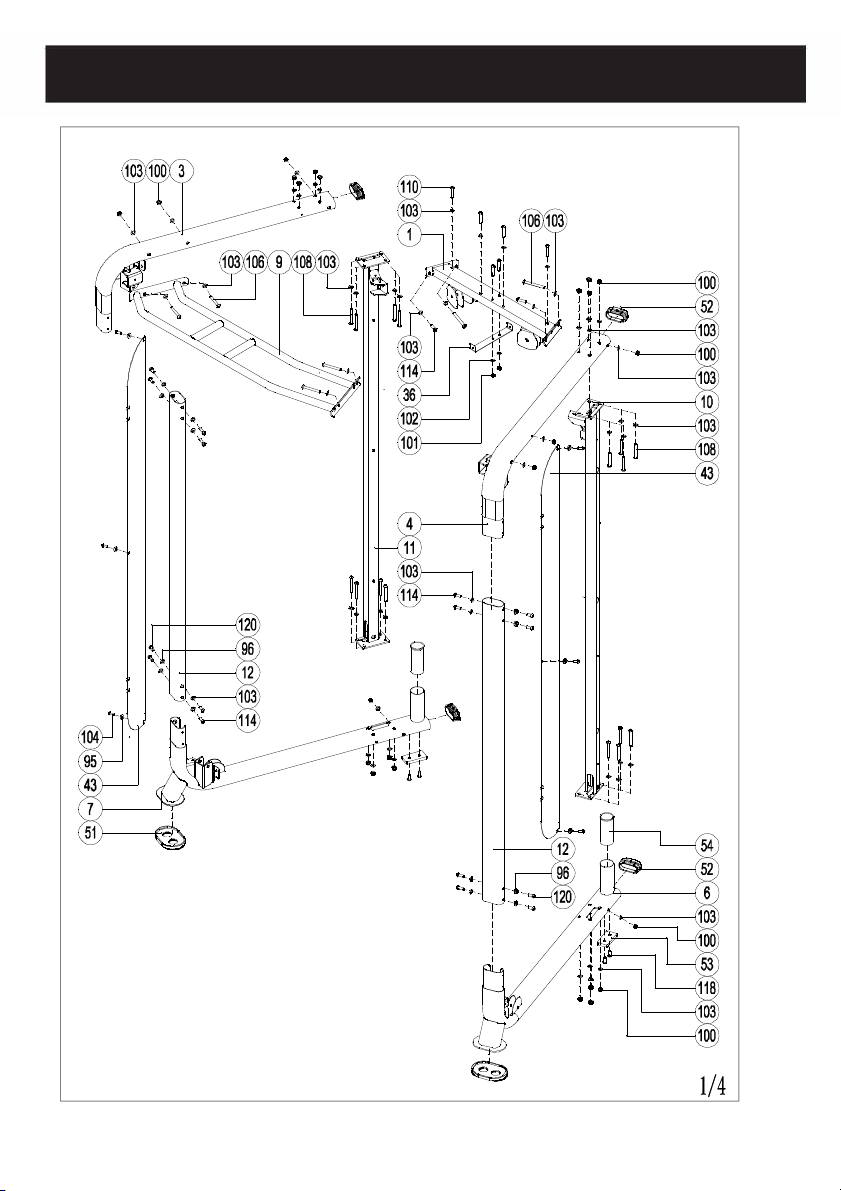
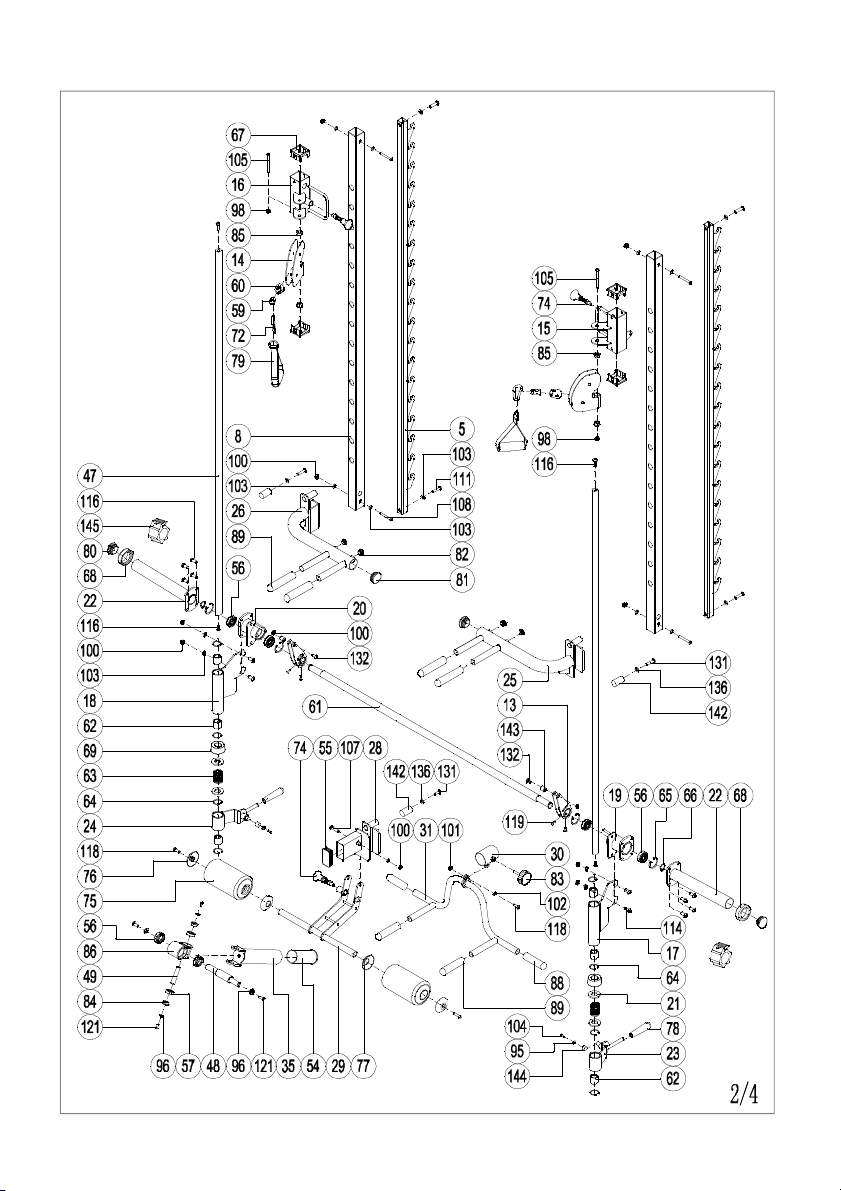
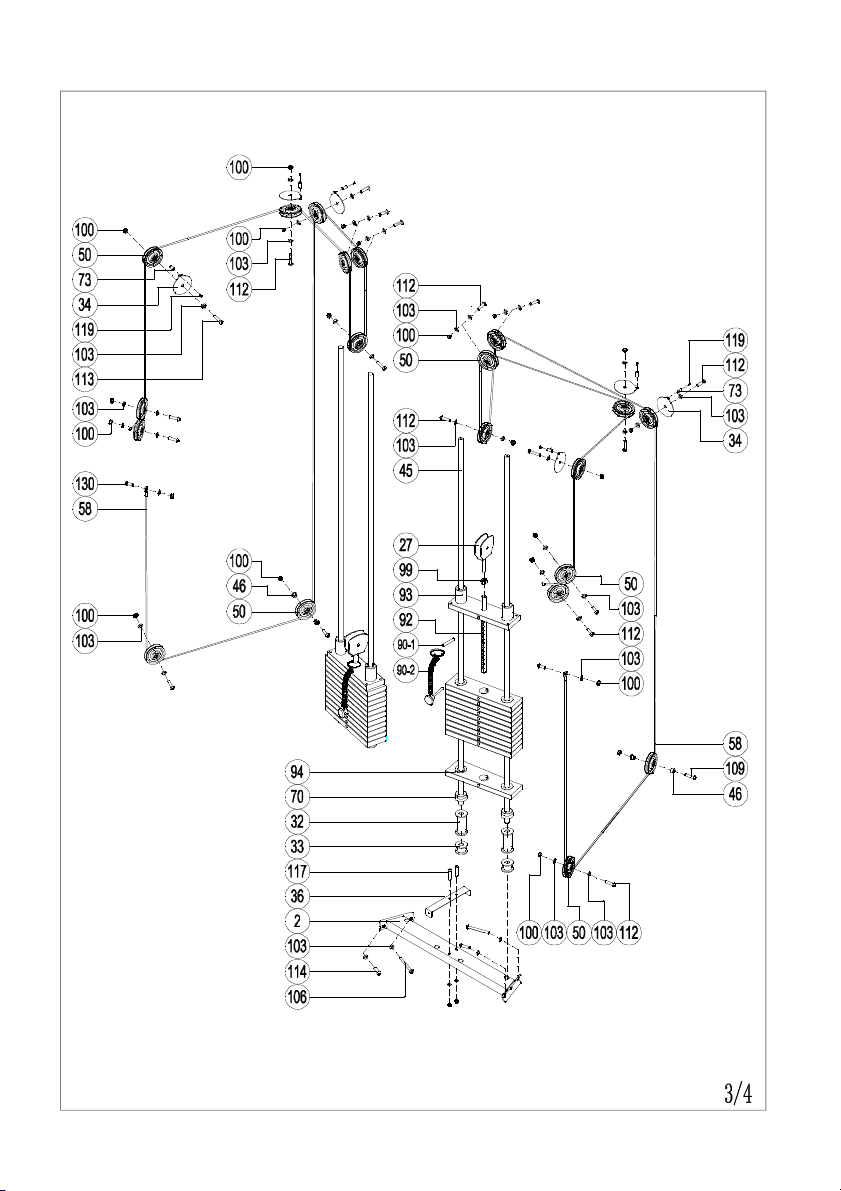
● Product: Assembly si e: 219*139*225cm; Workout area: 300*250cm, Net weight: 428KGS
● It is the responsibility of user to have full understanding of all warnings and precautions for this product, and
follow the instructions strictly.
● Keep children and pets away from the product, and avoid leaving children alone in the room where the product
is placed.
● Before use, please ensure the product has been properly assembled, and the screws of all parts have been
locked.
● This product should be placed on a level surface, and the four sides should be more than 1 meter away from
the wall. It is recommended to place this product on a dedicated floor mat to prevent damage to the floor or
carpet.
● This product shall be placed indoors to prevent moisture and dust. Keep smooth air in the place of use, and
don’t use it where the air is blocked.
● Do not place sharp objects around this product.
● When exercising with this product, please wear proper sports clothing, running shoes or sports shoes; don’t
wear robes or other clothing that may trip over this equipment.
● Do not exercise for too long, so to prevent muscle injury.
● If you feel uncomfortable or abnormal during use, please stop exercising and consult the doctor.
Following person under treatment shall consult professional doctor before use.
(1) Those who are suffering from back pain now or who have been injured in the legs, waist and neck in the past,
and those who have numbness in the legs, waist, neck and hands (with chronic diseases such as intervertebral
disc herniation, spondylolisthesis, cervical spine herniation, etc.).
(2) Those with deformed arthritis, rheumatism, and gout.
(3) Abnormalities such as osteoporosis.
(4) Those with circulatory system disorders (heart disease, vascular disorders, hypertension, etc.).
(5) Respiratory disorders.
(6) Those who are using artificial heart rhythm regulators who have implanted internal medical electronic
3
Safety Instructions

devices.
(7) Those with malignant tumors.
(8) People with thrombosis, severe dynamic lipoma, acute static lipoma and other blood circulation disorders or
various skin infections.
(9) Persons with perceptual impairment due to high peripheral circulatory disorders caused by diabetes, etc.
(10) Skin trauma.
(11) Those who have a high fever (38°C or more) due to illness, etc.
(12) Those with abnormal back bones or those with curved back bones.
(13) Those who are pregnant or may become pregnant or are menstruating.
(14) Those who feel abnormal in their body and need to rest.
(15) Those who are obviously in poor physical condition.
(16) Users for rehabilitation purposes.
(17) In addition to the above-mentioned cases, especially those who feel abnormal in their body.
Before exercising with this product, please consult your doctor, and it is recommended that you do a
physical examination first. If you are over 35 years old, have never exercised before, are pregnant or
have any medical conditions, you should pay more attention. Read carefully to follow this precaution,
failure to follow the above precautions and safety warnings may result in serious bodily in ury.
Warning! Following conditions may cause accidents or poor physical condition:
(1) Stop workout immediately and consult the doctor, if you feel back pain, numb leg, di iness, abnormal
heartbeat or other abnormalities or incoordination.
(2) Keep children away from the product, don’t let children play around; otherwise, risk of injury might occur.
(3) Children's guardians or caregivers shall prevent children from playing with this product; Otherwise, risk of
injury might occur.
(4) Make sure no other person or pets around the product (e.g., at the back, bottom and front of the product),
during use or product assembly or taking out the product from packing and moving it and etc.
(5) The user, who don’t make workout, shall not have intensive exercise suddenly.
4

(6) Don’t use the product, after meals, or you are tired, or you just finish workout and your physical strength is
not fully recovered yet. Otherwise, risk of health damage might occur.
(7) It’s suggested to use this product in gym rooms or other venues with surveillance cameras.
(8) Don’t use the product during meals or performing other activities.
(9) Don't use the product when feeling dull after drinking; Otherwise, risk of injury might occur.
(10) Don’t use the products when your pants pocket carrying hard objects; Otherwise, risk of injury might occur.
Forbidden!
(1) Don’t use the product if cracked shell, cracked or peeled-off status (the internal structure is exposed), or
peeled-off welding parts; Otherwise, risk of injury might occur.
(2) Don’t jump up or down during workout; You might fall down and cause injury.
(3) Don’t use the product or keep it in moisture area, e.g., outdoors, near the bathroom and other places with
moisture and water drops.
(4) Don’t use the product or keep it in high temperature places, e.g., in direct sunlight, around the stove, or on
heating appliances such as electric carpet.
Maintenance
(1) Make daily check if loose or damaged parts: including but not limited to chain, pull pin, spring lock, knob,
weight pin, the belt and its tension, cable, etc.
(2) Make weekly check on the attachments including but not limited to bars, handles, if all screws and bolts are
secured, if anti-slip surface is clean, if all stickers are complete.
(3) Make monthly check on the lubrications on the guide rod, seat slider, bushing, linear bearing and other
accessories.
(4) It’s suggested to make yearly disassembly, cleaning and maintenance on cables, belt and other connecting
parts.
5

Warning
(1) Stop using the machine immediately if damaged parts are found; It can be used only when replacement and
repair is completed.
(2) Mind the cable condition; The worn cables might cause injuries easily; Hence, they shall be taken regular
maintenance for good conditions.
(3) Insert the stack select pin into proper position before use, so to avoid danger.
(4) Max. load for smith weight bar on one side is 100KGS
(5) The person weight can be upto:100KGS, the max. weight stack on one side: 90kgs; Please select proper
weights for workout, so to avoid muscle injury and accidents.
6

7
Exploded Drawing

8

9

10

NO Description Specification QTY NO Description Specification QTY
1 Upper frame 1 34 Pulley plate 6
2 Base frame 1 35 Landmine 1
3 Left upper elbo frame 1 36 Fixed plate for cover 2
4 Right upper elbo frame 1 37 Rear cover 2
5 Smith adjustable rail 2 38 Front R-cover 1
6 Right base frame 1 39 Left front cover 1
7 Left base frame 1 40 Right front cover 1
8 Adjustable upright post 2 41 Left side cover 1
9 Pull-up bar 1 42 Right side cover 1
10 Right rear vertical frame 1 43 Front side cover 2
11 Left rear vertical frame 1 44 Hex rivet nut M5 16
12 Front vertical frame 2 45 Weight guide rod Φ20×2080 4
13 Smith hook 2 46 Plastic sleeve 20×10×12 4
14 Pulley bracket 2 47 Smith eight bar guide rod 1866×Φ25 2
15 Right cable slider 1 48 Long bar Φ30×Φ25×Φ20×186 1
16 Left cable slider 1 49 Short bar Φ17×76.5 1
17 Right Smith bar holder 1 50 Pulley Φ90×Φ10×25 20
18 Left Smith bar holder 1 51 Oval foot pad PT100*150*t5 2
19 Right Smith bar
connecting sleeve 1 52 Oval plug 50×100×t1.5 4
20 Left Smith bar
connecting sleeve 1 53 Square foot pad 50×100×15 2
21 Rubber bumper 4 54 Round hollo sleeve Φ60×Φ57×Φ51×136×
43
22 Weight plate post 2 55 Square plug 40×80×t1.5 1
23 Right safety stopper 1 56 Deep groove ball bearing 6005ZZ 6
24 Left safety stopper 1 57 Deep groove ball bearing 6003ZZ 2
25 Right dip bar 1 58 Cable Φ4.8×9140 2
26 Left dip bar 1 59 Bushing inner shaft Φ22×40 2
27 Pulley assembly 2 60 Bushing cover Φ37×44 2
28 Safety bar 1 61 Smith eight bar Φ30×Φ25×1466 1
29 Leg press 1 62 Linear bearing LM25UU/Φ40×Φ25×5
96
30 Bushing for T-bar 1 63 Smith spring Φ3.5×Φ37×50 2
31 T-bar 1 64 Bore retaining ring Φ40 8
32 Weight elevated bracket Φ49*150 4 65 Bore retaining ring Φ47 4
33 Weight elevated bracket Φ49*30 4 66 Axial retaining ring Φ25 2
11
Exploded Drawing Chart

*WE RESERVE THE RIGHT TO AMEND THE PRODUCT WITHOUT PRIOR NOTIC
NO Description Specification QTY NO Description Specification QTY
67 Square hollo sleeve 60×60×t1.5-50×50 4 101 Hex lock nut M8 5
68 Rubber bumper Φ48×Φ70×21 2 102 Flat asher Φ8 5
69 Rubber bumper Φ30×Φ50×20 2 103 Flat asher Φ10 123
70 Rubber bumper Φ20×Φ50×25 4 104 Cross recessed countersunk full
tooth bolt M5×15 20
71 Weight bar adaptor Φ48×Φ26.5×200 6 105 Hex large flat head half tooth
bolt M12×95×20 2
72 Snap hook Φ8×80 2 106 Hex large flat head half tooth
bolt M10×120×20 8
73 Scre sleeve Φ10*M6*22 6 107 Hex large flat head half tooth
bolt
M10×90×20 1
74 Pull pin Φ25×40+Φ12×15 3 108 Hex large flat head half tooth
bolt
M10×70×20 20
75 Leg press foam roll Φ110×170 2 109 Hex large flat head half tooth
bolt M10×65×20 2
76 Foam outer cover Φ97×Φ13 2 110 Hex large flat head half tooth
bolt M10×55×25 4
77 Foam inner cover Φ97×Φ27 2 111 Hex large flat head half tooth
bolt M10×50×20 4
78 Adjustable hand break 28.6×114.3 2 112 Hex large flat head half tooth
bolt M10×45×16 16
79 Handle 7014 2 113 Hex large flat head full tooth bolt M10×40 2
80 Round plug Φ48×t2.0 2 114 Hex large flat head full tooth bolt M10×25 16
81 Flat head round plug Φ50×t1.5 2 116 Hex large flat head full tooth bolt M10×15 18
82 Flat head round plug Φ25×t1.5 4 117 Hex large flat head half tooth
bolt M8×55×20 4
83 Handle knob Φ44×M10×54 1 118 Hex large flat head full tooth bolt M8×25 7
84 Small top sleeve Φ30×17.2×11 2 119 Hex large flat head full tooth bolt M6×8 10
85 Bushing Φ24×3+Φ20.2+Φ12.5×
13 4 120 Hex countersunk head full tooth
bolt M10×25 8
86 Universal bearing
assembly 103×59 1 121 Hex countersunk head full tooth
bolt M8×25 4
88 Foam Φ25×t3.5×130 2 122 Cross recessed countersunk
head full tooth bolt M5×20 28
89 Foam Φ25×t3.5×150 6 130 Hex large flat head full tooth bolt M10×20 2
90 Stack select pin 2 131 Hex countersunk full tooth bolt M8×15 3
91 Weight bar 6 132 Hex large flat head half tooth
bolt M10×40×20 2
92 Select rod 2 134 Cross recessed large flat head
full tooth bolt M5×15 2
93 Top eight plate 5KG+Φ20*230 2 135 Hex lock nut M5 2
94 Weight plate 5KG+Φ20*230 22 136 Fisheye asher M8×Φ25×5 3
95 Fisheye asher M5×Φ18×3.5 36 137 Accessory rack 433×43 1
96 Fisheye asher M10×Φ30×6 12 142 Sleeve Φ25×Φ21.2×55 3
97 Hex nut M5 12 143 Sleeve Φ18×Φ10.2×20 2
98 Hex lock nut M12 2 144 Sleeve Φ18×Φ14.2×25 2
99 Hex nut M12×P1.75 2 145 Collar Φ48 2
100 Hex lock nut M10 55
12

L101-BC01 L101-BC02
L101-BC03 L101-BC04
13
Hardware Kit and Tool Kit

L101-BC06
NO Description Specification QTY NO Description Specification QTY
95 Fisheye asher M5×Φ18×3.5 34 116 Hex large flat head full
tooth bolt M10×15 18
96 Fisheye asher M10×Φ30×6 9 117 Hex large flat head half
tooth bolt M8×55×20 4
97 Hex nut M5 12 118 Hex large flat head full
tooth bolt M8×25 3
100 Hex lock nut M10 53 119 Hex large flat head full
tooth bolt M6×8 6
101 Hex lock nut M8 5 120 Hex countersunk head full
tooth bolt M10×25 8
102 Flat asher Φ8 5 121 Hex countersunk head full
tooth bolt M8×25 1
103 Flat asher Φ10 123 122
Cross recessed
countersunk head full
tooth bolt
M5*20 28
104
Cross recessed
countersunk head full tooth
bolt
M5*15 18 123 T-shaped spanner 6×80 1
106 Hex large flat head half
tooth bolt M10×120×20 8 124 L-shaped spanner 3×28×100 1
107 Hex large flat head half
tooth bolt M10×90×20 1 125 17-19 spanner t5.0×32×150 1
108 Hex large flat head half
tooth bolt M10×70×20 20 126 Cross open spanner 14×17×75 1
109 Hex large flat head half
tooth bolt M10×65×20 2 127 L-shaped spanner 6×66×140 1
110 Hex large flat head half
tooth bolt M10×55×25 4 128 L-shaped spanner 5×35×85S 1
111 Hex large flat head half
tooth bolt M10×50×20 4 129 8-10 spanner t5.0×24×125 1
112 Hex large flat head half
tooth bolt M10×45×16 16 130 Hex large flat head full
tooth bolt M10×20 2
113 Hex large flat head full
tooth bolt M10×40 2 134 Cross recessed large flat
head full tooth bolt M5×15 2
114 Hex large flat head full
tooth bolt M10×25 16 135 Hex lock nut M5 2
14

1.Upper frame 2. Base frame 3. Left upper
elbo frame
4. Right upper
elbo frame
5. Smith
adjustable rail
6. Right
base
7.Left base
frame
8. Adjustable
upright post
9.Pull-up bar 10. Right rear
vertical frame
11.Left rear
vertical frame
12. Front
vertical frame
15. Right
cable slider
16. Left
cable
slider
17. Right Smith
bar holder
18. Left Smith
bar holder
22. Weight plate
post
23. Right
safety stopper
24.Left safety
stopper
25. Right dip
bar
26. Left dip
bar
27. Pulley
assembly
28. Safety bar 29.Leg press
31. T-bar 35. Landmine 36. Fixed
plate for cover
37.Rear cover 38. Front
R-cover
39. Left
front cover
40. Right front
cover
41. Left side
cover
42. Right side
cover
43.Front side
cover
45. Weight
guide rod
47. Smith
eight bar
guide
rod
50. Pulley 58. Cable 61. Smith
eight bar
71. Weight
bar adaptor
75. Leg press
foam roll
79. Handle 90. Stack
select pin
91. Weight
bar
92/93
Select rod;
Top eight
plate
94. Weight
plate
Accessory kit Hard are kit
& tool kit
137. Accessory
rack
145. Collar Manual
15
Packing List

Step 1
● Attach the base frame (2), the right base
frame (6) and the left base frame (7)
together, fix using hex large flat head full
tooth bolt (114), hex large flat head half
tooth bolt (106), flat washer (103) and hex
loc nut (100).
● Attach the fixed plate for cover (36) to the
base frame (2), fix using hex large flat head
half tooth bolt (117), flat washer (102) and
hex loc nut (101).
Step 2
● Attach one front vertical frame (12) to the left
base frame (7), fix using hex large flat head
full tooth bolt (114), flat washer (103), hex
countersun head full tooth bolt (120) and
fisheye washer (96) as picture shown.
● Attach the left rear vertical frame (11) to the
left base frame (7), fix using hex large flat
head half tooth bolt (108), flat washer (103)
and hex loc nut (100).
● Follow above steps to attach the other front
vertical frame (12) and the right rear vertical
frame (10) to the right base frame (6).
16
Installation Instructions

Step 3
● Attach one end of the left upper elbow frame
(3) to the front vertical frame (12), fix using
hex large flat head full tooth bolt (114), flat
washer (103), hex countersun head full
tooth bolt (120) and fisheye washer (96) as
picture shown.
● Attach the other end of the left upper elbow
frame (3) to the left rear vertical frame (11), fix
using hex large flat head half tooth bolt (108),
flat washer (103) and hex loc nut (100).
● Follow above steps to attach the right upper
elbow frame (4) onto the other front vertical
frame (12) and the right rear vertical frame
(10).
Step 4
● As picture shown, attach the upper frame (1)
to the left upper elbow frame (3) and the right
upper elbow frame (4), fix using hex large flat
head full tooth bolt (114), hex large flat head
half tooth bolt (106), flat washer (103), and
hex loc nut (100).
● As picture shown, attach the pull-up bar (9) to
the left upper elbow frame (3) and the right
upper elbow frame (4), fix using hex large flat
head half tooth bolt (106), flat washer (103),
and hex loc nut (100).
17

Step 5
● Attach the pulleys (50) into the left cable slider
(16), fix using hex large flat head half tooth
bolt (112), flat washer (103) and hex loc nut
(100).
● Pull the pull pin (74) from the left cable slider
(16) manually, then insert one adjustable
upright post (8), and release the pull pin (74).
● Follow above steps to attach the right cable
slider (15) to the other adjustable upright post
(8).
Step 6
● As picture shown, attach one adjustable
upright post (8) to the left base frame (7) by
aligning hole (a), fix using hex large flat head
half tooth bolt (108), flat washer (103) and
hex loc nut (100) on both ends of the
adjustable upright post.
● Attach the Smith adjustable rail (5) to the left
base frame (7) by aligning hole (b), fix using
hex large flat head half tooth bolt (111) and
flat washer (103) on both ends of the Smith
adjustable rail.
● Follow above steps to attach the other
adjustable upright post (8) and the other
Smith adjustable rail (5) to the right base
frame (6).
18

Step 7
● Following the preferred hole position,
insert the long bar (48) into the adjustable
upright post (8), fix using hex countersun
head full tooth bolt (121) and fisheye
washer (96). The long bar can be
arranged into both left and right
adjustable upright posts (8).
Step 8
● As picture shown, put the left Smith bar
holder (18), the rubber bumper (69), the
rubber bumper (21), the Smith spring (63)
and the left safety stopper (24) along the
Smith weight bar guide rod (47).
● Fix the Smith weight bar guide rod (47) to
position (C) by aligning the hole, attach
the lower end to the left base frame (7)
and the upper end to the left upper elbow
frame (3) by using hex large flat head full
tooth bolt (116).
● Follow above steps to attach the other
Smith weight bar guide rod (47) to the
other side.
19
Table of contents
Other Pulse fitness Fitness Equipment manuals

Pulse fitness
Pulse fitness EVOLVE Guide

Pulse fitness
Pulse fitness 224B-AAB User manual

Pulse fitness
Pulse fitness 3 6.0 CV Series User manual

Pulse fitness
Pulse fitness 240G Guide

Pulse fitness
Pulse fitness CLASSIC STRENGTH User manual

Pulse fitness
Pulse fitness Strength User manual

Pulse fitness
Pulse fitness 206D-AAA User manual
Popular Fitness Equipment manuals by other brands

Taurus
Taurus TF-RK1312 Assembly and operating instructions

Theragen
Theragen ActaStim-S quick start guide

Orbit
Orbit X303 Assembly instructions

Spirit Commercial
Spirit Commercial CVC800 owner's manual

Precor
Precor Experience Strength C-Line user guide

Stairmaster
Stairmaster FreeRunner 5400 ESS owner's manual