PulseTec Mega 65 User manual

MEGA 65
#PC-019-002
INSTRUCTION MANUAL

2
WARNING
This charger is not intended for use by persons (including children) with reduced phys-
ical, sensory or mental capabilities, or lack of experience and knowledge, unless they
have been given supervision or instruction concerning use of the appliance by a person
responsible for their safety.
Children should be supervised to ensure that they do not play with the charger.
Do not recharge non-rechargeable batteries!
During charging, the battery must be placed in a well-ventilated area!
Never leave the charger unattended when charging the battery.
Power Cord
MEGA 65
Download
English Manual
Download
French Manual
Téléchargez
le Manuel en
Français
Download
German Manual
Download
Deutsche
Anleitung
Set Content

3
Congratulations on your choice of PULSETEC MEGA 65 AC Balance Charger/Discharg-
er/Power Supply. This unit is simple to use, but the operation of a sophisticated automatic
charger such as PULSETEC MEGA 65 does require some knowledge from the user.
These operating instructions are designed to ensure that you quickly become familiar
with its functions. It is therefore important that you read right through the Operating In-
structions, Warning and Safety Notes before you attempt to use your new charger for the
rst time. We hope you have many years of pleasure and success with your new battery
charger.
The PULSETEC MEGA 65 s an AC input charger/discharger with compact size
(117x105x55mm). Like most SkyRC chargers, it supports TVC (Terminal Voltage Con-
trol), Battery Meter. And there are Automatic Charging Current Limit, Capacity Limit,
Temperature Threshold and Processing Time Limit for maximum safety.
The maximum charging power of MEGA 65 is 65W with maximum charging current 6A
and discharging current 2A. It is a high-performance micro processor control charge/
discharge station with battery management suitable for use with all current battery types,
LiPo, Lilon, LiFe, NiCd, NiHM, PB and also new generation LiHV with end voltage 4.35V.
For PB battery, MEGA 65 adds AGM and cold charge modes. It can charge AGM battery,
and Pb battery can be charged in cold charge mode in cold days.
It can be dangerous to mishandle batteries and battery chargers, as there is always a risk
of batteries catching re and exploding.
Please read this manual carefully before use. This manual contains important information
on the safe use of this charger. If you are a beginner in battery charging, please use this
charger with an experienced user.
Mishandling batteries and battery chargers is extremely dangerous, which may
cause re and explosion.
Introduction

4
LCD-Display
Temperature
Sensor Port
STOP Charge
Process
START / RESUME
Charge Process
Alter Values
See the Status of
Individual Cells in
Balance Charge
mode
AC Input : 100 - 240V
Output Charge Lead
XT60 Female
Output Charge Lead
XT60 Female
Cooling Fan
Balance Lead Socket
JST-XH Ports
Overview

5
Optimized Operating Software
PULSETEC MEGA 65 features the so-called AUTO function that sets the feeding current
during the process of charging or discharging. Especially for lithium batteries, it can pre-
vent the overcharging which may lead to an explosion due to the user’s fault. It can discon-
nect the circuit automatically and alarm once detecting any malfunction. All the programs
of this product were controlled through two way linkage and communication, to achieve the
maximum safety and minimize the trouble. All the settings can be congured by users!
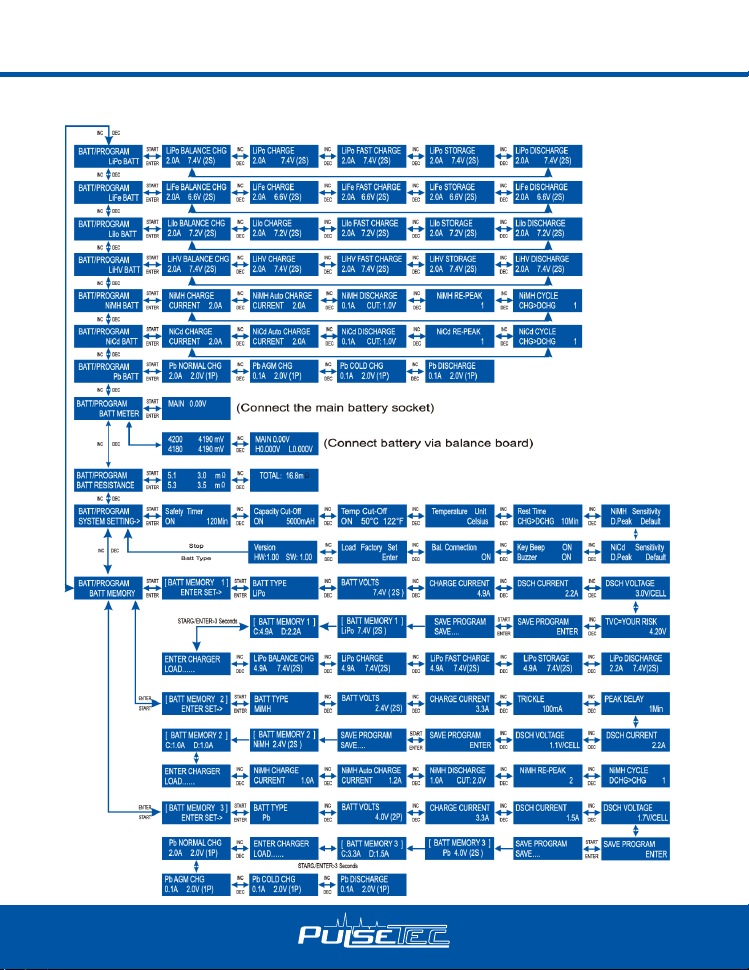
Battery Memory (Data Store/Load)
The charger can store up to 10 different charge/discharge proles for each channel. You
can keep the data pertaining to program setting of the battery of continuous charging or
discharging. Users can call out these data at any time without any special program setting.
PB AGM and Cold Charge
For PB battery, MEGA 65 adds AGM and cold charge modes. It can charge AGM battery,
and Pb battery can be charged in cold charge mode in cold days.
Terminal Voltage Control(TVC)
The charger allows user to change the end voltage. (for expert user only)
Internal Independent Lithium Battery Balancer
The MEGA 65 uses an individual-cell-voltage balancer. It isn’t necessary to connect an
external balancer for balance charging.
Balancing Individual Cells Battery During Discharging
During the process of discharging, the MEGA 65 can monitor and balance each cell of the
battery individually. Error message will be indicated and the process will be ended auto-
matically if the voltage of any single one cell is abnormal.
Adaptable to Various Type of Lithium Battery
The MEGA 65 is adaptable to various types of lithium batteries, such as LiPo, LiIon, LiFe
and the new LiHV batteries.
Fast Charge and Storage Mode of Lithium Battery
Function of the two modes differs from each other. “FAST CHG” minimizes battery charge
time, while “STORAGE” has the capacity to control the nal battery voltage, which is nec-
essary and helpful for a rarely used battery.
Re-Peak Mode of NiMH/NiCd Battery
In re-peak charge mode, the charger can peak charge the battery once, twice or three
times in a row automatically. This is good for making the battery fully charged.
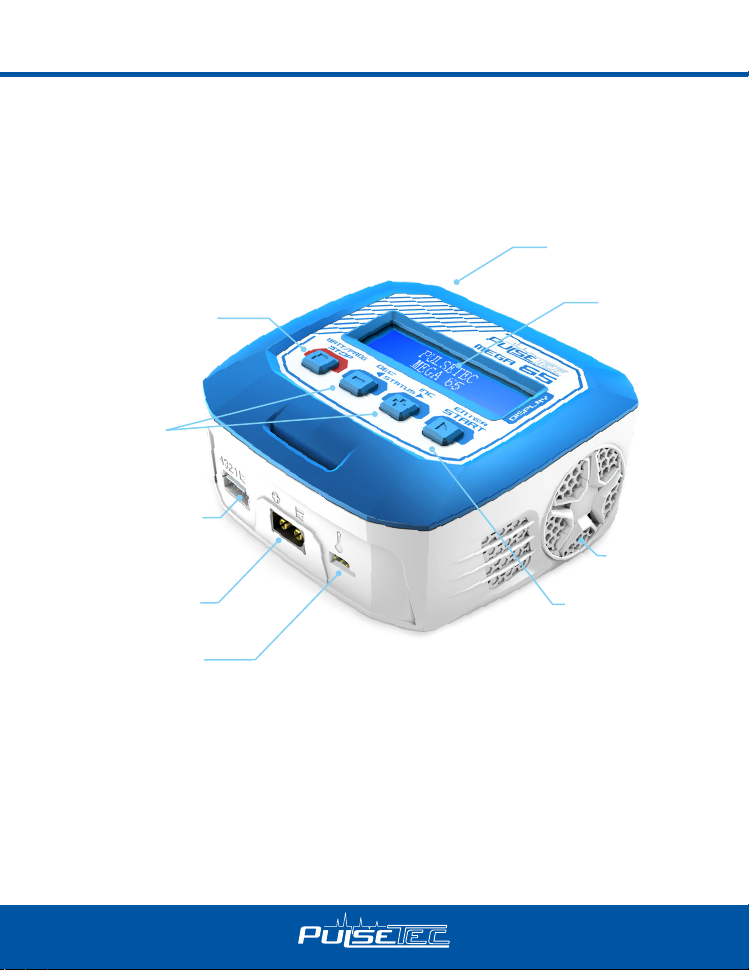
Special Features

6
Delta-peak Sensitivity for NiMH/NiCd
Delta-peak sensitivity for NiMH/NiCd battery: The automatic charge termination program
based on the principle of the Delta-peak voltage detection. When the battery’s voltage
exceeds the threshold, the process will be terminated automatically.
Cyclic Charging/Discharging
1 to 5 cyclic and continuous process of charge > discharge or discharge > charge is opera-
ble for battery refreshing and balancing to stimulate the battery’s activity.
Automatic Charging Current Limit
You can set up the upper limit of the charging current when charging your NiMH or NiCd
battery, it is useful for the NiMH battery of low impedance and capacity in the ‘AUTO’
charging mode.
Battery Meter
You can check battery voltage and battery internal resistance.
Capacity Limit
The charging capacity is always calculated as the charging current multiplied by time. If the
charging capacity exceeds the limit, the process will be terminated automatically when you
set the maximum value.
Temperature Threshold*
The battery’s internal chemical reaction will cause the temperature of the battery to rise. If
the temperature limit is reached, the process will be terminated.
* This function is only available by connecting optional temperature probe, which is not included in the package.
Processing Time Limit
You can also limit the maximum process time to avoid any possible defect.
Special Features

7
These warnings and safety notes are particularly important. Please follow the
instructions for maximum safety; otherwise the charger and the battery can be
damaged or at worst it can cause a re.
Never leave the charger unattended when it is connected to its power supply. If any
malfunction is found, TERMINATE THE PROCESS AT ONCE and refer to the opera-
tion manual.
Keep the charger well away from dust, damp, rain, heat, direct sunshine and vibra-
tion. Never drop it.
The allowable AC input voltage is 100~240V AC.
This charger and the battery should be put on a heat-resistant, non-inammable and
non-conductive surface. Never place them on a car seat, carpet or similar. Keep all
the inammable volatile materials away from operating area.
Make sure you know the specications of the battery to be charged or discharged to
ensure it meets the requirements of this charger. If the program is set up incorrect-
ly, the battery and charger may be damaged .It can cause re or explosion due to
overcharging.
LiPo LiIon LiFe LiHV NiCd NiMh Pb
Nominal
Voltage 3.7V/Cell 3.6V/Cell 3.3V/Cell 3.8V/Cell 1.2V/Cell 1.2V/Cell 2.0V/Cell
Max Charge
Voltage 4.2V/Cell 4.1V/Cell 3.6V/Cell 4.35V/Cell 1.5V/Cell 1.5V/Cell 2.46V/Cell
Storage
Voltage 3.8V/Cell 3.7V/Cell 3.3V/Cell 3.85V/Cell n/a n/a n/a
Fast Charge ≤ 1C ≤ 1C ≤ 4C ≤ 1C 1C-2C 1C-2C ≤0.4C
Min. Discharge
Voltage 3.0-3.3V/Cell 2.9-3.2V/Cell 2.6-2.9V/Cell 3.1-3.4V/Cell 0.1-1.1V/Cell 0.1-1.1V/Cell 1.8V/Cell
Standard Battery Parameters
Be very careful to choose the correct voltage for different types of battery other-
wise you may cause damage to the batteries. Incorrect settings could cause the
cells to re or explode.
Warning and Safety Notes

8
Never attempt to charge or discharge the following types of batteries.
A battery pack which consists of different types of cells (including different manufacturers).
A battery that is already fully charged or just slightly discharged.
Non-rechargeable batteries (Explosion hazard).
Batteries that require a different charge technique from NiCd, NiMh, LiPo or Gelcell (Pb,
Lead acid).
A faulty or damaged battery.
A battery tted with an integral charge circuit or a protection circuit.
Batteries installed in a device or which are electrically linked to other components.
Batteries that are not expressly stated by the manufacturer to be suitable for the currents
the charger delivers during the charge process.
Please bear in mind the following points before commencing charging:
Did you select the appropriate program suitable for the type of battery you are charging?
Did you set up adequate current for charging or discharging?
Have you checked the battery voltage? Lithium battery packs can be wired in parallel and
in series, i.e. a 2 cell pack can be 3.7V (in parallel) or 7.4V (in series).
Have you checked that all connections are rm and secure?
Make sure there are no intermittent contacts at any point in the circuit.
Charging
During charge process, a specic quantity of electrical energy is fed into the battery. The
charge quantity is calculated by multiplying charge current by charge time. The maximum
permissible charge current varies depending on the battery type or its performance,
and can be found in the information by the battery manufacturer. Only batteries that are
expressly stated to be capable of quickcharge are allowed to be charged at rates higher
than the standard charge current.
Connect the battery to the terminal of the charger: red is positive and black is negative.
Due to the difference between resistance of cable and connector, the charger can not
detect resistance of the battery pack, the essential requirement for the charger to work
properly is that the charge lead should be of adequate conductor cross-section, and high
quality connectors which are normally goldplated should be tted to both ends.
Always refer to the manual by battery manufacturer about charging methods, recom-
mended charging current and charging time. Especially, the lithium battery should be
charged according the charging instruction provided by the manufacturer strictly.
Warning and Safety Notes

9
Attention should be paid to the connection of lithium battery.
Do not attempt to disassemble the battery pack arbitrarily.
Please get highlighted that lithium battery packs can be wired in parallel and in series. In
the parallel connection, the battery s capacity is calculated by multiplying single battery
capacity by the number of cells with total voltage stay the same. The voltages imbalance
may cause re or explosion .Lithium battery is recommended to charge in series.
Discharging
The main purpose of discharging is to clean residual capacity of the battery, or to reduce
the battery voltage to a dened level. The same attention should be paid to the discharg-
ing process as charging. The nal discharge voltage should be set up correctly to avoid
deep-discharging. Lithium battery can not be discharged to lower than the minimum
voltage, or it will cause a rapid loss of capacity or a total failure. Generally, lithium battery
doesn‘t need to be discharged. Please pay attention to the minimum voltage of lithium
battery to protect the battery.
Some rechargeable batteries have a memory effect. If they are partly used and re-
charged before the whole charge is accomplished, they remember this and will only use
that part of their capacity next time. This is a memory effect. It is said that NiCd and
NiMH batteries are suffering from memory effect. NiCd has more memory effect than
NiMH.
Warning and Safety Notes

10
Program Flow Chart

11
BATT PROG / STOP
It is used to STOP the progress or GO Back to previous Step/Screen
DEC Button
It is used to go through the menus and DECREASE the parameter value
INC Button
It is used to go through the menus and INCREASE the parameter value
ENTER/START Button
It is used to ENTER parameter on screen and START the program
When you are willing to alter the parameter value in the program, press the START/ENTER
button to make it blink then change the value by pressing DEC and INC button. The value
will be stored by re-pressing the START/ENTER button. If there is another parameter can
be altered in the same screen, when you conrm the rst parameter value, the next param-
eter value will start to blink which means it is ready to alert.
When you are willing to start the process, Press and Hold the START/ENTER button for 3
seconds.
When you are willing to stop the progress or go back to previous step/screen, press the
BATT PROG/STOP button once.
When you power ON the charger, it will enter LiPo Battery balance program directly. You
could change the mode (balance mode, normal charge mode, fast charge mode, store
mode or discharge mode), enter the desired charging/discharging mode, set the referred
parameter and start the progress.
If you have no request for LiPo Battery program, please press the BATT PROG/STOP
button to enter BATT PROGRAM screen.
Buttons Explanation

12
Here is the detailed procedure to make the charger work. All the screens and operations
will take Li-Po BALANCE CHARGE program for example.
1. Connecting to AC Power Source
Please insert the AC power cord to the wall socket (100-240V) directly to power it on.
2. Connecting the Battery
Important!!! Before connecting a battery it is absolutely essential to check one last
time that you have set the parameters correctly. If the settings are incorrect, the battery
may be damaged, and could even burst into ames or explode. To avoid short circuits
between the banana plugs, always connect the charge leads to the charger rst, and
only then to the battery. Reverse the sequence when disconnecting the pack.
3. Balance Charge
In Balance Charge Mode, the balance wire attached to the battery must be connected
to the balance socket in front of the charger;the XT60 male connector is connected to
the XT60 female connector in the charger(See the wiring diagram below).
In the other modes, there is no request to connect the balance wire to the balance
socket in the charger.
But we suggest to charge your battery in balance mode for better performance.
Failure to connect as shown in this diagram will damage this charger.
To avoid short circuit between the charge lead always connect the charge cable to the
charger rst, then connect the battery. Reverse the sequence when disconnecting.
Operating Program

13
1. Getting started
Locate the owcharts show the entire programming menu. It is highly recommended to
have these owcharts handy while learning to operate this charger.
There are two main ways in which to set the charger.
(1) A memory prole is available for setting and storing pertinent information for up to
10 different batteries. Once a battery’s information is stored into a memory it will be
retained until changed again manually. Recalling a battery’s memory number makes
the charger instantly ready to go!
(2) If you do not wish to use the battery memories, this charger can be manually set
before each use.
The following owchart shows how the program is set manually :
2. BATT/PROGRAM Select
Press INC and DEC to go through all the programs and
press START/ENTER to enter LiPo BATT Program.
3. Mode Select
Press INC and DEC to go through all the modes and press
START/ENTER to enter LiPo Balance Charge Mode.
4. Battery Setting
Press START/ENTER, the present value will start to blink.
Press INC and DEC to change the value and press START/
ENTER to conrm your setting.
At the same time, the battery pack’s cell count will start to
blink, press INC and DEC to change the value and press
START/ ENTER to conrm your setting.
5. Program Start
Press and hold START/ENTER for 3 seconds to start the
program.
The charger is detecting the battery cell.
R shows the number of cells detected by the charger and S is the
number of cells set by you on the previous screen. If the two num-
bers are not identical, press STOP to go back to the previous screen
to recheck the number of cells of the battery pack that you set before
going ahead.
Lithium Battery Program (LiPo/LiFe/LiIon/LiHV)

14
VARIOUS INFORMATION DURING THE PROCESS
Press INC or DEC during the charging or discharging process to view further pertinent
information on the LCD screen.
Real-time status: battery type, battery cell count, charge current, battery
pack total voltage,working mode, elapsed time and charged capacity.
Voltage of each cell in the battery pack when the battery is connected with
balance lead.
Charged capacity percentage and average cell voltage of the battery
pack.
Resistance of each cell in the battery pack when the battery is connected
with balance lead.
R shows the number of cells detected by the charger and S is the number
of cells set by you at the previous screen. If both numbers are identical,
press START/ENTER to start charging process.
6. Charge Monitoring Screen
During charging process, you can read the values on the display.
Final voltage when the program ends.
Internal temperature.
Temperature probe needs to be connected to show external temperature.
Cut-off temperature.
Safety timer ON and duration of time in minutes.
Capacity cut-off ON and value of the set capacity limit.
Lithium Battery Program (LiPo/LiFe/LiIon/LiHV)

15
BATT
TYPE
OPERATION
PROGRAM DESCRIPTION
LiPo
Lilon
LiFe
LiHV
CHARGE
This charging mode is for charging LiPo/LiFe/LiIon/LiHV battery in normal
mode.
DISCHARGE
This mode is for discharging LiPo/LiFe/LiIon/LiHV battery.
STORAGE
This program is for charging or discharging lithium battery which will not be
used for long time.
FAST CHG
The charging capacity may be a bit smaller than normal charging but the
process time will be reduced.
BAL CHARGE
This mode is for balancing the voltage of lithium-polymer battery cells while
charging.
NiMH
NiCd
CHARGE
Press The charger will charge NiMH and NiCd batteries using the charge
current set by the user. to load factory default setting.
DISCHARGE
This mode is for discharging NiMH/NiCd battery.
AUTO
CHARGE
In this program the charger detects the condition of the battery which is con-
nected to the output and automatically charges the battery. Note: you should
set up the upper limit of the charge current to avoid damage by excessive
feeding current. Some batteries of low resistance and capacity can lead to
higher current.
RE-PEAK
In re-peak charge mode, the charger can peak charge the battery once,
twice or three times in a row automatically. This is good for conrming the
battery is fully charged, and for checking how well the battery receives fast
charges.
CYCLE
1 to 5 cyclic and continuous process of charge>discharge or dis-
charge>charge is operable for battery refreshing and balancing to stimulate
the battery’s activity.
Pb
NORMAL
CHARGE
This mode is for charging Pb battery.
AGM
CHARGE
This mode is for charging AGM battery.
COLD
CHARGE
This mode is for charging Pb battery in cold days when the temperature is
5°C to -20°C.
DISCHARGE
This mode is for discharging Pb battery.
7. Program Stop
During the charging process, press STOP to stop the charging process.
8. Program Complete
When the charging process nishes, an audible sound will be heard.
CHARGING PROGRAM
Depends on different battery type, the operation programs are different.
Lithium Battery Program (LiPo/LiFe/LiIon/LiHV)

16
The charger can store up to 10 different charge/discharge proles for your convenience,
and the stored proles can be recalled quickly without having to go through the setup
process.
When you are willing to alter the parameter value in the program, press START/ENTER to
make it blink then change the value with INC or DEC. The value will be stored by pressing
START/ENTER once.
Note: All following screen are taking 2S (7.4V) LiPo battery for example.
Enter the battery memory program.
(10 different charge/discharge proles can be stored in each channel).
Set the battery type(LiPo/LiFe/LiIon/LiHV/NiMH/NiCd/Pb).
Set the voltage and number of cells(2S-4S).
Set the charge current(0.1-6.0A).
Set the discharge current (0.1A-2.0A).
Set the discharge voltage(3.0-3.3V/Cell).
Set the terminal voltage(4.18-4.25V).
Press ENTER to save program.
1. Battery Memory Set
Battery Memory Set and Call Out

17
Indicate the battery type and battery cell of the saved prole.
Indicate the charge and discharge current of the saved prole. Press
the START/ENTER for 3 seconds to call out the memory.
Press START/ENTER for 3 seconds to start the process.
Load the memory set
2. Battery Memory Call Out
Battery Memory Set and Call Out

18
It will be operated with the default value of the essential user settings when it is powered
on for the rst time. The screen displays the following information in sequence and the user
can change the value of parameter on each screen.
When you are willing to alter the parameter value in the program, press START/ENTER to
make it blink then change the value with INC or DEC. The value will be stored by pressing
START/ENTER once.
ITEM SELECTION DESCRIPTION
Safety T ime r
ON 1 2 0Min
OFF/ON
(1-720MIN)
When you start a charge process, the inte-
gral safety timer automatically starts running
at the same time. This is programmed to
prevent overcharge the battery if it proves to
be faulty, or if the termination circuit cannot
detect the battery full. The value for the safe-
ty timer should be generous enough to allow
a full charge of the battery.
OFF/ON
(100-50000MAH)
This program sets the maximum charge
capacity that will be supplied to the battery
during charge. If the delta peak voltage is not
detected nor the safety timer expired by any
reason, this feature will automatically stop
the process at the selected capacity value.
Temp C ut-Off
ON 50 C 1 22 F
OFF/ON
(20°C/68°F -
80°C/176°F)
The battery’s internal chemical reaction
will cause the temperature of the battery to
rise. If the temperature limit is reached, the
process will be terminated.
Celsius
Fahrenheit
You can choose the temperature displayed
by Celsius or Fahrenheit as you like.
1-60Min A rest time allowing the battery to cool down
between charging/discharging cycle.
System Setting

19
ITEM SELECTION DESCRIPTION
Default: 4mV/Cell
3-15mV/Cell
This program is for NiMH/NiCd battery only.
When the charger detects the delta peak
value reaches the value you set, the charger
will say the battery is fully charged.
OFF/ON
The beep sounds at every time touching the
buttons to conrm your action. The beep
or melody sounded at various times during
operation to alert different mode changes.
Press ENTER to load factory default setting.
It indicates the hardware and rmware
version.
System Setting

20
The user can check battery’s total voltage, the highest voltage, the lowest voltage and each
cell’s voltage.
Connect the battery to the charger’s charging output and connect the balancing board to the
charger. See Below
This diagram shows the
correct way to connect your
battery to check the voltage.
Press the START/ENTER to enter the Lithium Battery Meter program.
The screen indicate each cell’s voltage.
The screen indicate the total voltage, the highest voltage and the
lowest voltage.
Battery Voltage Meter
Table of contents
Other PulseTec Batteries Charger manuals