Pur Line NTW-09 User manual

MANUAL DE INSTRUCCIONES
USERS MANUAL
MANUAL D’UTILISATION
MANUALE D’ISTRUZIONI
MANUAL DE UTILIZAÇÃO
ANLEITUNG
TOALLERO ELÉCTRICO
ELECTRIC TOWEL WARMER
RADIATEUR / SÈCHE-SERVIETTES
RADIATORE / SCALDASCIUGAMANI
AQUECEDOR DE TOALHAS
HANDTUCHHALTER
NTW-09


1
ES
Nos reservamos el derecho de modificar las características o funcionamiento de este aparato sin previo aviso, a fin de continuar con las
mejoras y el desarrollo del mismo.
Grado de protección contra polvo y agua: 24
2_–Protección contra cuerpos sólidos de diámetro mayor a 12,5mm
_4–Protección contra rociado de agua en todas direcciones (360º)
Modelo: NTW-09 Alimentación: 220~240V AC Frecuencia: 50Hz
Potencia max.: 80W IP: 24 Medidas: 57x39x27 Cm
ESPECIFICACIONES
Lea estas instrucciones detenidamente antes del uso,
y guárdelas para futuras consultas
ADVERTENCIAS DE SEGURIDAD
· Los niños menores de 3 años deben mantenerse fuera del alcance del aparato a menos que
sean continuamente supervisados
· Los niños desde 3 años y menores de 8 años deben sólo encender/apagar el aparato, siem-
pre que este haya sido colocado o instalado en su posición de funcionamiento normal pre-
vista y que sean supervisados o hayan recibido instrucciones relativas al uso del aparato
de una forma segura y entiendan los riesgos que el aparato tiene. Los niños desde 3 años y
menos de 8 años, no deben enchufar, regular y limpiar el aparato o realizar operaciones de
mantenimiento.
· Este aparato pueden usarlo niños con edad de 8 años y superior y personas con capacida-
des físicas, sensoriales o mentales reducidas o falta de experiencia y conocimiento, si se les
ha dado la supervisión o formación apropiadas respecto al uso del aparato de una manera
segura y comprenden los peligros que implica. Los niños no deben jugar con el aparato. La
limpieza y mantenimiento a realizar por el usuario no deben realizarlos los niños sin super-
visión.
· Para evitar el riesgo de descarga eléctrica, asegúrese de que el aparato esté desenchufado
de la toma de corriente antes de su traslado, mantenimiento o limpieza.
· Si el cable eléctrico está dañado, debe ser reemplazado por el fabricante, un agente del ser-
vicio técnico o personas cualificadas a fin de evitar cualquier peligro.
· El aparato no debe ser instalado justo debajo de una toma de corriente.
· ADVERTENCIA: A fin de evitar un peligro para los niños muy pequeños, este aparato debe ser
instalado de manera que la barra calefactora más baja se aparato debe ser instalado de manera
que la barra calefactora más baja se encuentre por lo menos a 600 mm por encima del suelo.
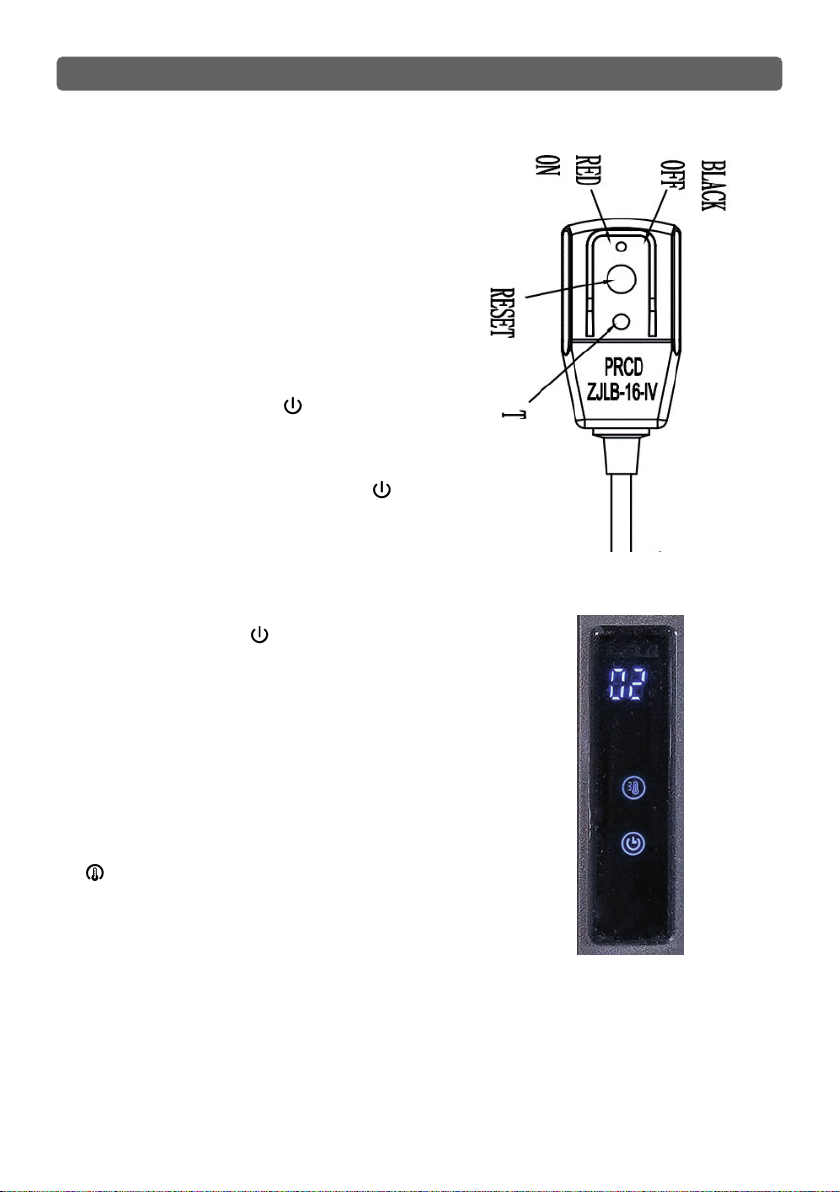
· El aparato debe suministrarse a través de un diferencial de corriente residual
(DCR) cuya corriente residual nominal de funcionamiento sea inferior a 30 mA.
ATENCIÓN: Algunas partes de este producto pueden calentarse y provo-
car quemaduras. Se debe prestar especial atención en presencia de niños y
de personas vulnerables.

2
PARTES
· Se deben incorporar los medios de desconexión con una separación de contac-
to en todos los polos en el cableado fijo de acuerdo con las normas de cableado.
· PRECAUCIÓN: Con el fin de evitar riesgos relacionados con la activación inopor-
tuna del interruptor térmico, este aparato no debe ser alimentado a través de un
dispositivo de conmutación externo, como un temporizador, ni estar conectado
a un circuito que encienda y apague regularmente el aparato.
ES
LISTA DE PIEZAS
FUNCIÓN
1. Estante plegable
1. Visualizador
1
1
2
2
3
4
2. Barra calefactora
2. Ajuste de la temperatura
4. Panel de control
3. Estante
3. Encendido/Apagado,
Temporizador
5. Gancho
5
3

3
ES
ACCESORIOS Y PIEZAS
1. Estante plegable x1pcs 8. Barra de conexión x2pcs
2. Pieza de calentamiento x1pcs 9. Pegamento x2pcs
4. Gancho x4pcs 11. Tapa del orificio
6. Enchufe de pared x4pcs 13. Destornillador ranurado
3. Estante x1pcs 10. Pegatinas secundarias x4pcs
5. Tornillo x4pcs 12. Destornillador hexagonal x1pcs
7. Pernos de fijación x2pcs 14. Manual del usuario
14

4
INSTALACIÓN
Antes de la instalación
Primer paso
Paso 2
- No conecte el aparato a la red eléctrica en este momento.
- Los tornillos y tacos suministrados con este paquete sólo son adecuados para la instalación
en paredes SÓLIDAS. Para paredes que no sean macizas, como las huecas, DEBEN utilizarse las
fijaciones adecuadas.
- Desembale el aparato, levante con cuidado el marco de la caja y colóquelo en posición vertical.
- Le sugerimos que abra el paquete de fijación y coloque todo el contenido en un recipiente,
reduciendo así el riesgo de perder piezas pequeñas.
- Decida la posición en la que se colgará el conjunto en la pared y determine la altura a la que
se fijará el secador. (Se recomienda una altura de 1500 mm desde el suelo hasta los tornillos
superiores).
1. Retire el estante plegable, las barras de
conexión y los pernos de fijación, como se
indica más arriba.
1. Despegue la cubierta de la cinta
adhesiva de los tacos y aplique pegamento
uniformemente en el lugar en blanco. Como
se muestra en la figura 2
Opción A: Fijar el toallero con pegamento
Atención: asegúrese de que la pared (se sugiere que sea de baldosas de cerámica) esté bien
limpia y seca.
2. Fije la barra de conexión con los soportes
de montaje mediante los pernos de fijación.
Ver figura 1
2. Fije firmemente el enchufe de pared (con
todo el estante plegable) en la pared.
Figura 1
Figura 2
ES

5
Opción B: Fijar el toallero con tornillos
Advertencia: Asegúrese siempre de que en la zona de la pared que se va a perforar no haya
cables eléctricos, tuberías de agua y/o gas ocultos.
3. Pegue las pegatinas secundarias en el
enchufe de pared para fijarlo. Mostrar como
Figura 3
1. Taladre los orificios (Ø6 mm) en la pared según las figuras 4 y 5.
2. Inserte los 4 tacos suministrados en los 4 orificios
3. Haga coincidir el orificio de la placa de fijación con los tacos y fije la placa con 4 tornillos.
4. una vez pegado, no lo utilice y espera unas
72 horas para usarlo hasta que el pegamento
se haya solidificado y, a continuación, vaya al
Paso 3.
Figura 3
Figura 4 Gráfico 5
ES

6
Paso 3
1. Afloje los tornillos de cabeza hueca en los
dos lados de la parte calefactora, como se
muestra en la figura 6.
2. Y, a continuación, conecte la parte
calefactora y la barra de conexión.
3. Apriete el tornillo de cabeza hueca con el
destornillador hexagonal
4. Afloje los tornillos de los dos lados de la
rejilla y fíjela a las dos columnas de la parte
calefactora. A continuación, apriete los
tornillos con el destornillador de ranura.
Como se muestra en la figura 7.
5. Tapar el agujero de los tapones. Mostrar
como fuego 8
Advertencia: El peso total colgado no debe superar los 15 kg.
Figura 6
Gráfico 7
Figura 8
ES

7
FUNCIONAMIENTO
A. Antes del uso
B. Encendido/Apagado
C. Temporizador
D. Ajuste de la temperatura
E. Autodetección
1. Conecte el transformador al enchufe de la
pared.
1. Mantenga pulsado el botón 1 segundo para
encender el calentador, y la temperatura inicial
se establece en 55ºC
1. Cuando se enciende el calefactor, el usuario
puede ajustar el tiempo de apagado de 1 a 24
horas pulsando el botón de 1 a 24 horas, y la
pantalla mostrará de 01 a 24.
1. Cuando se enciende el calefactor, el usuario
puede ajustar la temperatura pulsando el botón
de 45 a 70ºC y la pantalla mostrará los
números correspondientes.
Cuando hay alguna anormalidad en el circuito, el IC lo detectaría
automáticamenteymostraría E1,y entonces elcalentadorseapagaría
para protegerse.
2. El ajuste de la temperatura se confirmará
después de 5 segundos sin funcionar.
2. El ajuste de la hora se confirmará después de 5
segundos sin funcionar.
2. Pulse y mantenga pulsado el botón 1
segundo de nuevo, el calentador se apagará.
2. Presione el botón RESET para encender el
transformador.
3. Presione “T” para comprobar el correcto
funcionamiento del transformador.
4. Si el enchufe del disyuntor no presenta ningún
problema, pulse de nuevo el botón RESET para
iniciar el funcionamiento del cuadro de control.
ES

8
RETIRADA DE LOS APARATOS DOMÉSTICOS USADOS
La directiva Europea 2002/96/EC sobre los Residuos de Aparatos Eléctricos y Electrónicos (RAEE), exige
que los aparatos domésticos usados no se desechen en el flujo normal de los residuos municipales.
Los aparatos usados deben ser recogidos por separado, a fin de optimizar la tasa de recuperación y el
reciclaje de los materiales que entran en su composición y reducir el impacto sobre la salud humana
y el medio ambiente.
Las condiciones presentes en esta garantía se conceden en adición a todas las garantías implícitas, otros de-
rechos y recursos en relación con el producto que el consumidor tiene bajo la Ley de Prácticas de Comercio
y leyes similares estatales y territoriales. El comprador original de este producto dispone de la siguiente ga-
rantía, con sujeción a las siguientes condiciones. Proporcionamos una garantía para el producto acorde a la
legislación vigente a partir de la fecha de compra. El producto tendrá que ser devuelto a la tienda donde fue
comprado para sustituirse de forma gratuita o reembolso del importe. Con el fin de obtener un cambio o un
reembolso, es necesario presentar una prueba de compra al vendedor.
GARANTÍA
ES

9
ES
Identificador(es) del modelo: NTW-09
Partida
Símbolo
Valor
Unidad
Partida
Unidad
Potencia calorífica Tipo de aportación de calor, únicamente para
los aparatos de calefacción local eléctricos de
acumulación (seleccione uno)
Potencia calorífica
nominal
Pnom 0.07 kW control manual de la carga de calor, con
termostato integrado
[no]
Potencia
calorífica mínima
(indicativa)
Pmin 0.06 kW control manual de la carga de calor con
respuesta a la temperatura interior o exterior
[no]
Potencia
calorífica máxima
continuada
Pmax,c 0.08 kW control electrónico de la carga de calor con
respuesta a la temperatura interior o exterior
[no]
Consumo auxiliar de electricidad potencia calorífica asistida por ventiladores [no]
A potencia
calorífica nominal
elmax 0 kW Tipo de control de potencia calorífica/de temperatura
interior (seleccione uno)
A potencia
calorífica mínima
elmin 0 kW potencia calorífica de un solo nivel, sin control
de temperatura interior
[no]
En modo de
espera
elSB 0 kW Dos o más niveles manuales, sin control de
temperatura interior
[no]
con control de temperatura interior mediante
termostato mecánico
[no]
con control electrónico de temperatura interior [no]
control electrónico de temperatura interior y
temporizador diario
[no]
control electrónico de temperatura interior y
temporizador semanal
[no]
Otras opciones de control (pueden seleccionarse
varias)
control de temperatura interior con detección
de presencia
[no]
control de temperatura interior con detección
de ventanas abiertas
[no]
con opción de control a distancia [no]
con control de puesta en marcha adaptable [sí]
con limitación de tiempo de funcionamiento [sí]
con sensor de lámpara negra [sí]
Información de contacto CLIMACITY S.L.
C. Torrox, 2 - 5 · 28041 Madrid (ESPAÑA)
tel. +34 91 392 05 09
REQUISITOS DE INFORMACIÓN QUE DEBEN CUMPLIR LOS APARATOS DE CALEFACCIÓN LOCAL ELÉCTRICOS

10
EN
SAFETY PRECAUTIONS
· Children of less than 3 years should be kept away unless continuously supervised.
· Children aged from 3 years and less than 8 years shall only switch ON/Standby the
appliance provided that it has been placed or installed in its intended normal operating
position and they have been given supervision or instruction concerning use of the
appliance in a safe way and understand the hazards involved. Children aged from 3
years and less than 8 years shall not plug in, regulate and clean the appliance or per-
form user maintenance.
· This appliance can be used by children aged from 8 years and above and persons with
reduced physical, sensory or mental capabilities or lack of experience and knowledge
if they have been given supervision or instruction concerning use of the appliance in a
safe way and understand the hazards involved. Children shall not play with the applian-
ce. Cleaning and user maintenance shall not be made by children without supervision.
· To avoid the risk of electrical shock, make sure the appliance is unplugged from the
electrical outlet before relocating, servicing, or cleaning it.
· If the supply cord is damaged, it must be replaced by the manufacturer, its service
agent or a similarly qualified person in order to avoid a hazard.
· The appliance must not be positioned directly underneath socket-outlet.
· WARNING: In order to avoid a hazard for very young children, this appliance should be
installed so that the lowest heated rail is at least 600 mm above the floor.
· Appliance is to be supplied through a residual current device (RCD) having a rated
residual operating current not exceeding 30 mA.
· Means for disconnection having a contact separation in all poles must be incorporated
in the fixed wiring in accordance with the wiring rules.
Model: NTW-09 Power supply: 220~240V AC Frequency: 50Hz
Max. power: 80W IP: 24 Dimensions: 57x39x27 Cm
TECHNICAL DATA
CAUTION: some parts of this product can become very hot and cause
burns. Particular attention has to be given where children and vulnera-
ble people are present.
Please read this manual carefully before use,
and keep it for any future reference

11
PARTS
EN
· CAUTION: in order to avoid a hazard due to inadvertent resetting of the thermal cu-
tout, this appliance must not be supplied through an external switching device, such
as a timer, or connected to a circuit that is regularly switched on and off by the utility.
PARTS LIST
FUNCTION
1. Foldable Shelf
1. Displayer
1
1
2
3
2
3
4
2. Heating Bar
2. Temperature Setting
4. Control Panel
3. Rack
3. On/Off, Timer
5. Hook
5

12
EN
FITTINGS AND PARTS
1. Foldable Shelf x1pcs 8. Connecting Bar x2pcs
2. Heating Part x1pcs 9. Glue x2pcs
4. Hook x4pcs 11. Hole Cover
6. Wall Plug x4pcs 13. Slotted Screw Driver
3. Rack x1pcs 10. Secondary stickers x4pcs
5. Screw x4pcs 12. Hex screwdriver x1pcs
7. Fixing bolts x2pcs 14. User’s Manual
14

13
INSTALLATION
EN
Before Installation
Step 1
Step 2
- Do not connect the appliance to the electrical supply at this time.
- The screws and plugs supplied with this package are only suitable for SOLID wall installation. For
any walls other than solid, such as cavity, the appropriate fixings MUST be used.
- Unpack the appliance, carefully lift the surround from the carton and stand upright.
- We suggest that you open the fixing pack and place all the contents into a container, therefore
reducing the risk of losing any small pieces.
- Decide on the position where the suite will hang on the wall and determine a height for the
dryer to be fixed. (1500mm from the floor to the top screw fixings is a recommended height).
1. Take off the foldable shelf, connecting bars
and fixing bolts, as listed above
1. Peel off the cover of the adhesive tape on
the wall plugs, and apply glue evenly on the
blank place. As show in Figure 2
Option A: Fix the dryer by glue
Warning: make sure that the wall (suggested be of ceramic tile) shall be well cleaned and dry
2. Fix the connecting bar with mounting
brackets by the fixing bolts. See as figure 1
2. Affix the wall plug (with the whole foldable
shelf) on the wall tightly.
Figure 1
Figure 2

14
EN
Option B: Fix the dryer by screws
Warning: Always ensure intended wall area to be drilled is free from hidden electrical wires,
water and/or gas pipes.
3. Affix the secondary stickers on the wall
plug to fix it. Show as Figure 3
1. Drill the holes (Ø6mm) in the wall according to Figure 4 and Figure 5.
2. Strike 4 wall plugs provided into the 4 holes
3. Match the hole of the fixing board with the wall plugs, and fix the board with 4 screws.
4. Make it still and wait for 72hours when the
glue is solidified, and then start Step 3.
Figure 3
Figure 4 Figure 5

15
EN
Step 3
1. Loose the socket head screws in the two
sides of the heating part, as show in figure 6.
2. And then connect the heating part and the
connecting bar.
3. Tight the socket head screw by the hex
screwdriver
4. Loose the screws in the two sides of rack,
and buckle it on the two columns of the
heating part. And then tight the screws by
the slotted screw driver. As show in figure 7.
5. Cover the hole on the wall plugs. Show as
fire 8
Warning: The total hanging weight would not be over 15kg.
Figure 6
Figure 7
Figure 8

16
EN
A. Before use
B. On/Off
C. Timer
D. Temperature setting
E. Self-detect
1. Connect the leakage breaker plug at the wall
socket.
1. Press and hold the button 1second to turn
on the heater, and the initial temperature is set
at 55ºC
1. When the heater is turned on, user can set off
time from 1hour to 24hour by press the
button from 1hour to 24hour, and the displayer
would show 01 to 24.
1. When the heater is turned on, user can set
temperature by press the button from 45
to 70ºC and the displayer would show numbers
accordingly.
When there is any circuit abnormality, IC would automatically detect
it and show E1, and then the heater would be shut down to protect.
2. The temperature setting would be confirmed
after 5seconds without operating.
2. The time setting would be confirmed after
5seconds without operating.
2. Press and hold the button 1second again,
the heater would be turned off.
2. Press“RESET” button to power on the plug.
3. Press “T” to check the correct operation of the
transformer.
4. If the breaker plug is no problem, then press
“RESET” button again to start operating on
control board.
OPERATION

17
• Always switch off the device and disconnect the power cord before cleaning.
• Let the heater cool down completely.
• Never immerse it in water or other liquid. Do not allow water to run into the appliance.
• Clean your heater with a soft damp cloth.
• Do not use chemical materials for the cleaning of your heater.
• Clean the appliance regularly.
CLEANING & MAINTENANCE
The benefits conferred by this warranty are in addition to all implied warranties, other rights and
remedies in respect of the product which the consumer has under the Trade Practices Act and
similar State and Territory Laws. The original purchaser of this product is provided with the follow
warranty, subject to the following conditions. We provide a guarantee for the product in accordan-
ce with the legislation in force from the date of purchase. The product will need to be returned to
the retailer where it was purchased to be replaced free of charge or a refund issued. In order to
obtain an exchange or a refund, proof of purchase must be presented to the retailer.
WARRANTY
DISCARDING WORN HOUSEHOLD DEVICES
The European directive 2012/19/EC pertaining to electrical and electronic waste prohibits such household
goods from being discarded with local refuse services.Worn devices must be collected separately to optimize
the recovery and recycling rates of the components therein to reduce detrimental effects on the environment
and on human health.
EN

18
Model identifier(s): NTW-09
Item Symbol Value Unit Item Unit
Heat output Type of heat input, for electric storage local space
heaters only (select one)
Nominal heat
output
Pnom 0.07 kW manual heat charge control, with integrated
thermostat
[no]
Minimum heat
output (indicative)
Pmin 0.06 kW manual heat charge control with room and/or
outdoor temperature feedback
[no]
Maximum
continuous heat
output
Pmax,c 0.08 kW electronic heat charge control with room and/
or outdoor temperature feedback
[no]
Auxiliary electricity consumption fan assisted heat output [no]
At nominal heat
output
elmax 0 kW Type of heat output/room temperature control (select
one)
At minimum heat
output
elmin 0 kW single stage heat output and no room
temperature control
[no]
In standby mode elSB 0 kW Two or more manual stages, no room
temperature control
[no]
with mechanic thermostat room temperature
control
[no]
with electronic room temperature control [no]
electronic room temperature control plus day
timer
[no]
electronic room temperature control plus week
timer
[no]
Other control options (multiple selections
possible)
room temperature control, with presence
detection
[no]
room temperature control, with open window
detection
[no]
with distance control option [no]
with adaptive start control [yes]
with working time limitation [yes]
with black bulb sensor [yes]
Contact details CLIMACITY S.L.
C. Torrox, 2 - 5 · 28041 Madrid (ESPAÑA)
tel. +34 91 392 05 09
INFORMATION REQUIREMENTS FOR ELECTRIC LOCAL SPACE HEATERS
EN
Table of contents
Languages:
Other Pur Line Food Warmer manuals
Popular Food Warmer manuals by other brands

Frymaster
Frymaster Heated Landing Zone HLZ 18 Service manual

Henny Penny
Henny Penny HCS-2 Technical manual

Hatco
Hatco Glo-Ray GRSDH-24 Installation and operating manual

Wisco Industries
Wisco Industries 780 Replacement manual

Hatco
Hatco Glo-Ray Series Installation and operating manual

Continental Electric
Continental Electric CE23381 instruction manual