Pur Line ZAFIR V2000T LUX User manual

ZAFIR V2000T LUX
Este producto está indicado únicamente en lugares abrigados o para una utilización puntual.
This product is only suitable for well insulated spaces or occasional use.
Ce produit ne peut être utilisé que dans des locaux bien isolés ou de manière occasionnelle.
Este produto é adequado apenas para espaços bem isolados espaços ou utilização ocasional.
Il presente prodotto è adatto solo a ambienti correttamente isolati o ad un uso occasionale.
Dieses Produkt ist nur für gut isolierte Räume oder für den gelegentlichen Gebrauch geeignet.
MANUAL de USUARIO
USER MANUAL
MANUEL de L’UTILISATEUR
MANUAL DO USUÁRIO
MANUALE per L’UTENTE
BETRIEBSANLEITUNG
TOALLERO ELÉCTRICO CON WIFI
ELECTRIC TOWEL WARMER WITH WIFI
RADIATEUR SÈCHE-SERVIETTES AVEC WIFI
AQUECEDOR DE TOALHAS COM WIFI
PORTASCIUGAMANI ELETTRICO CON WIFI
HANDTUCHHALTER MIT WIFI
08/2022


1
Modelo: ZAFIR V2000T LUX Alimentación: 220 -240 V Frecuencia: 50Hz
Potencia max.: 2000W IP: X4 Medidas: 45x80x16,5 cm
ESPECIFICACIONES
ADVERTENCIAS DE SEGURIDAD
· Los niños menores de 3 años deben mantenerse fuera del alcance del aparato
a menos que sean continuamente supervisados
· Los niños desde 3 años y menores de 8 años deben sólo encender/
apagar el aparato, siempre que este haya sido colocado o instalado en
su posición de funcionamiento normal prevista y que sean supervisados
o hayan recibido instrucciones relativas al uso del aparato de una forma
segura y entiendan los riesgos que el aparato tiene. Los niños desde 3 años
y menos de 8 años, no deben enchufar, regular y limpiar el aparato o realizar
operaciones de mantenimiento.
· Este aparato pueden usarlo niños con edad de 8 años y superior y personas con
capacidades físicas, sensoriales o mentales reducidas o falta de experiencia
y conocimiento, si se les ha dado la supervisión o formación apropiadas
respecto al uso del aparato de una manera segura y comprenden los peligros
que implica. Los niños no deben jugar con el aparato. La limpieza y
mantenimiento a realizar por el usuario no deben realizarlos los niños sin
supervisión.
· Para evitar el riesgo de descarga eléctrica, asegúrese de que el aparato esté
desenchufado de la toma de corriente antes de su traslado, mantenimiento o
limpieza.
· Si el cable eléctrico está dañado, debe ser reemplazado por el fabricante, un
agente del servicio técnico o personas cualificadas a fin de evitar cualquier peligro.
· El aparato no debe ser instalado justo debajo de una toma de corriente.
· ADVERTENCIA: A fin de evitar un peligro para los niños muy pequeños, este
aparato debe ser instalado de manera que la barra calefactora más baja se
ATENCIÓN: Algunas partes de este producto pueden calentarse y
provocar quemaduras. Se debe prestar especial atención en presencia
de niños y de personas vulnerables.
ES
Lea estas instrucciones detenidamente antes del uso,
y guárdelas para futuras consultas

2
encuentre por lo menos a 600 mm por encima del suelo.
· El aparato debe suministrarse a través de un diferencial de corriente residual
(DCR) cuya corriente residual nominal de funcionamiento sea inferior a 30 mA.
·Se debenincorporarlosmediosdedesconexión conuna separación de contacto
en todos los polos en el cableado fijo de acuerdo con las normas de cableado.
· PRECAUCIÓN: Con el fin de evitar riesgos relacionados con la activación
inoportuna del interruptor térmico, este aparato no debe ser alimentado a
través de un dispositivo de conmutación externo, como un temporizador, ni
estar conectado a un circuito que encienda y apague regularmente el aparato.
· ADVERTENCIA: El aparato no debe ser usado si el panel de vidrio está dañado.
Volumen
exterior
Volumen
2
Volumen
1
2,25 m
0,60m
Volumen 0
Suelo
Volumen oculto
ADVERTENCIA: Este producto puede
ser instalado solo en el volumen 2 de
un cuarto de baño según la normativa
de instalación estándar (en Francia NF
C 15-100).
ADVERTENCIA: Los calefactores
aptos para ser utilizados en un cuarto
de baño, deben ser colocados de
manera que los interruptores y otros
controles no pueden ser tocados por
una persona desde la bañera o la
ducha.
Le sugerimos que consulte a un
electricista profesional para recibir
asistencia.
ADVERTENCIA: A fin de evitar un sobrecalentamiento, no cubrir el
aparato.
· Con respecto a la información de instalación, consulte el apartado“Instalación”
y“Montaje mural”.
Nota: El diagrama es sólo para referencia.
¡SUPERFICIE CALIENTE! ¡NO TOCAR durante su uso!
ES

3
INSTALACIÓN
MONTAJE MURAL
1. Elegir una pared en la que haya espacio suficiente.
2. Utilizar la plantilla para marcar los agujeros a perforar en la pared. Utilizar un taladro Φ6 para
taladrar 4 orificios.
3. Colocar los tacos de la bolsa de accesorios en los orificios.
4. Quitar el gancho de la parte posterior del aparato y colocarlo en la posición de las dos clavijas
en la parte superior. Fijar el gancho en la pared con los 2 tornillos ST4X35.
5. Insertar los 2 filtros en la ranuras laterales y fijarlos con los 2 tornillos ST3X10.
6. Colocar los 2 soportes murales Z en la parte posterior del aparato con los 2 tornillos M4X8, poner
la barra porta-toallas pequeña en la ranura fija y bloquear con los 4 tornillos M4X16 y luego poner
la barra porta-toallas grande en la ranura fija y bloquear con los 4 tornillos M4X16.
7. Montar el aparato en el gancho, apretar los 2 tornillos M4X10 en el lado derecho y los 2 tornillos
M4X10 en el lado izquierdo para fijar el aparato (2 personas para montar).
8. Fijar los soportes murales Z en la pared con los 2 tornillos ST4X35.
(Ver diagramas de instalación al final del manual)
ES

4
FUNCIONAMIENTO
ES
1. Botón de encendido/espera
5. Ajuste del programa
3. Calefacción de paneles/ Detección de
ventanas abiertas
7. Arriba
9. Pantalla LED
2. Ajuste de la potencia/ Conexión Wi-Fi
6. Ajuste del modo
PANTALLA Y BOTÓN
4. Temporizador
8. Abajo
10. Indicador WI-FI
1 5
9
10
2 6
3 7
4 8

5
• Enchufar el aparato a la fuente de alimentación y pulsar el interruptor de encendido/apagado (O/I), situado
en el lado izquierdo del aparato. El aparato emitirá una señal sonora y la pantalla se encenderá durante 10
segundos.
Para apagar el aparato, pulsar de nuevo el interruptor de encendido/apagado.
• Pulsar para iniciar la función de calefacción.
Nota: La iluminación de los botones se apagará en 10s si no se opera el aparato. Pulsar cualquier botón para
reactivar la iluminación de los botones.
• Pulsar de nuevo para apagar la función de calefacción y poner el aparato en modo de espera.
Nota: El motor seguirá funcionando durante 15 s. más para eliminar el calor residual del interior del aparato
antes de apagarse.
FECHA Y HORA:
• La primera vez que se utiliza el aparato, el icono parpadea como recordatorio de que hay que ajustar el
día y la hora locales.
• Mantener pulsado el botón temporizador durante 3 segundos, el icono 1 de los días “d1 ~ d7” parpadea
(d1=lunes a d7=domingo). Usar y para seleccionar el día. Pulsar el botón del temporizador para
confirmar.
• Después de confirmar el día de la semana, los dígitos de la hora parpadean, usar y para ajustar la
hora actual y confirmar la selección con el botón temporizador. Después de confirmar el día de la semana, los
dígitos de los minutos parpadean, seleccionar los minutos actuales y confirmar con el botón temporizador.
• La pantalla muestra el día de la semana actual y la hora.
POTENCIA DE CALEFACCIÓN:
Función Potencia Icono pantalla
Alta potencia de calefacción 1800W
Baja potencia de calefacción 1100W
Calentador de toallas 200W
Alta potencia de calefacción
+ Calentador de toallas
1800W + 200W = 2000W

6
ES
1- Calefacción PTC (1800W): Toque el botón para encender el aparato. El icono se ilumina, la
calefacción PTC está trabajando a alta potencia 1800W. Toque una vez para cambiar a baja potencia
1100W, el icono se ilumina.
2- Calefacción de paneles (200W): Toque una vez para iniciar el calentamiento del panel.
3- Calentamiento a plena potencia (2000W): Cuando la calefacción del panel funciona, toque para
cambiar la calefacción PTC a alta potencia 1800W. Entonces la potencia total es de 2000W.
Nota: en esta etapa, toque para cambiar la calefacción PTC de alta potencia - baja potencia - calefacción
PTC OFF (1800W- 1100W- 0W)
ADVERTENCIA: La superficie de cristal y la parte inferior de la salida de
aire se calentarán mucho. ¡NO TOCAR!
TEMPERATURA:
• Usar o para ajustar la temperatura (5-40ºC).
• La pantalla cambiará en consecuencia. Una vez ajustada la temperatura, el ajuste se confirmará
automáticamente en 5 segundos.
Nota: El aparato dejará de calentar cuando la temperatura ambiente alcance la temperatura establecida.
Cuando la temperatura ambiente sea 1ºC inferior a la temperatura establecida, el aparato reiniciará la función
de calefacción.
Nota: La temperatura ajustada debe ser superior a la temperatura ambiente. De lo contrario, el aparato no
comenzará a calentar.
PROGRAMA SEMANAL:
• Cuando el calefactor está encendido, pulsar el botón Modo para establecer uno de los modos automáticos
P1 - P2 - P3 - P4 - P5 - UP.
• Los modos P1 - P2 - P3 - P4 - P5 son el modo predeterminado para un ajuste rápido
- P1: modo de confort durante todo el día
- P2: modo para la familia en general
- P3: modo para oficina de trabajo
- P4: modo para plaza comercial
- P5: modo para la familia en viaje
• El modo UP: es un ajuste personalizado por el usuario final.
• Elija UP, pulse Prog para iniciar el ajuste. Una vez activado el ajuste del modo UP, la cifra d1 (lunes) y
comienza a parpadear.
Día
semana
Modo Modo funcionamiento
Anti-hielo Confort Anti-hielo Confort Anti-hielo Confort Anti-hielo
1-7 P1
00:00-24:00
1-5 P2
00:00-06:30 06:30-08:30 08:30-17:00 17:00-22:30 22:30-24:00
6-7
00:00-07:30 07:30-10:00 10:00-12:00 12:00-14:00 14:00-17:00 17:00-22:30 22:30-24:00
1-5 P3
00:00-06:00 06:00-17:00 17:00-24:00
6-7
00:00-24:00
1-7 P4
00:00-06:00 06:00-22:00 22:00-24:00
1-7 P5
00:00-24:00

7
• Ejemplo 1: ajuste uno o tres (como máximo) rangos de tiempo a un nivel confortable, luego siga los pasos
que se indican a continuación:
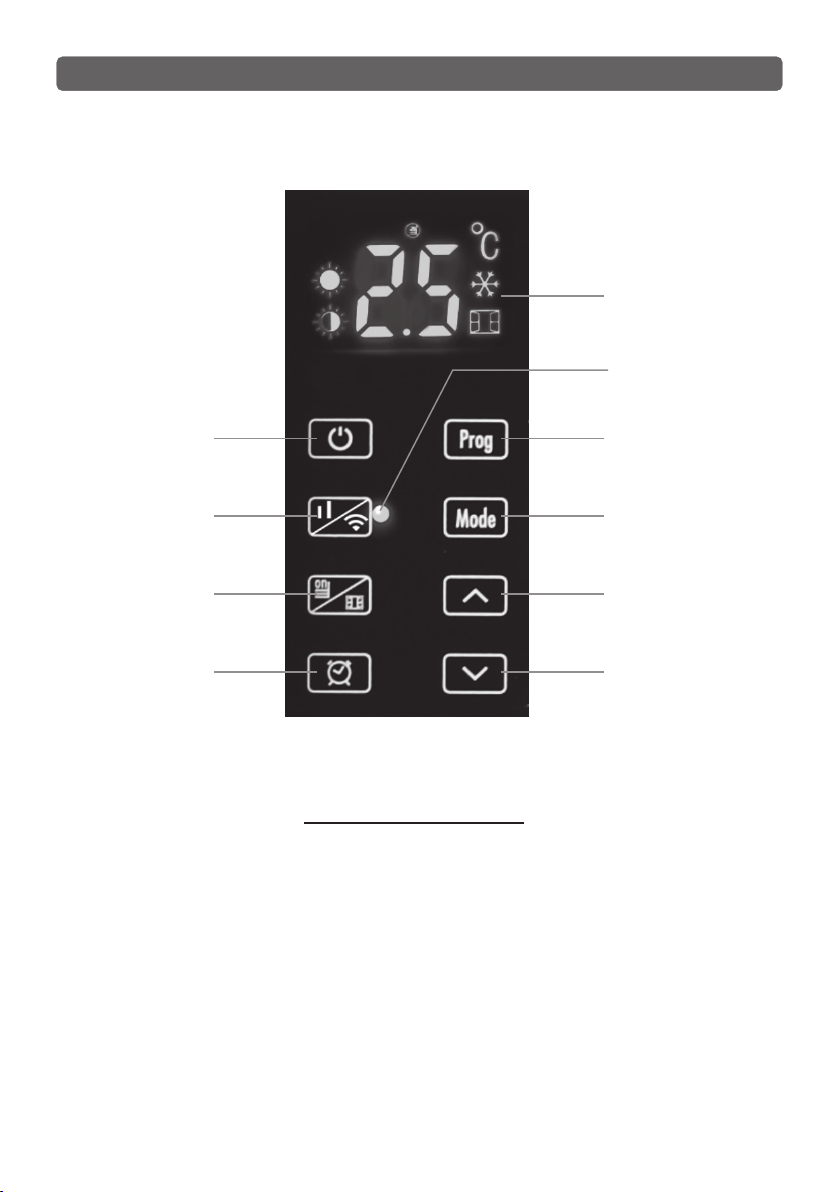
Pulsar el botón o En la pantalla aparecerá el número 1 (1ª hora de funcionamiento) y
parpadea. Usar los botones / para ajustar la hora de inicio entre las 0-23 horas. Confirmar con el botón
temporizador.
Pulsar el botón para ajustar la hora de finalización (al menos 1 hora más que la hora de inicio) y confirmar
con el botón temporizador.
En la pantalla aparecerá el número 2 (para la 2ª hora de funcionamiento). Ahora puede ajustar un intervalo
de tiempo más.
Una vez finalizados los ajustes del primer día, el icono “2” parpadeará. Ahora puede realizar los ajustes de
tiempo para los demás días de la semana como se ha descrito anteriormente.
• Ejemplo 2: Pulsar el botón temporizador (en lugar de los botones ( / ) para ajustar el modo anti-hielo
para el día seleccionado.
Nota: Cada paso debe realizarse en un plazo de dos minutos, de lo contrario se borrará el ajuste.
• Modo anti-hielo: la temperatura ambiente se mantiene a 5°C para evitar la formación de escarcha.
• Modo de confort: temperatura ambiente confortable, que se alcanza con los ajustes de temperatura y nivel
de calefacción según sea necesario.
TEMPORIZADOR 24 H:
• En el modo P1, pulsar dos veces seguidas el botón temporizador para activar el temporizador 24h. En la
pantalla parpadearán los iconos . Ajustar la hora de apagado entre las 0 y las 24horas con los botones
y . Pasados cinco segundos, los ajustes se guardarán (los iconos dejarán de parpadear). En la pantalla
se mostrarán la temperatura ambiente y la cuenta atrás del temporizador.
• Pulsar de nuevo dos veces rápidamente el botón temporizador para cancelar el ajuste. vuelve a mostrar
la temperatura ambiente.
BLOQUE DE SEGURIDAD PARA NIÑOS:
• En el modo de espera, mantener pulsados y al mismo tiempo durante 3 segundos para activar
la función de bloqueo de niños, la pantalla mostrará [ ] después del ajuste y volverá a la pantalla inicial en
5 segundos. Las demás funciones no son seleccionables una vez que la función de bloqueo infantil se ha
activado. Una vez que se toca un botón, la pantalla parpadeará [ ] para recordarle que la función de bloqueo
infantil está funcionando y se recuperará a la visualización inicial en 5 segundos.
• Mantener pulsados y al mismo tiempo durante 3 segundos de nuevo cancela la función de bloqueo
de niños.
DETECCIÓN INTELIGENTE DE VENTANA ABIERTA:
• Pulsar durante 3 segundos para activar el modo de detección de ventana abierta. El símbolo
parpadea en la pantalla. Para cancelar el modo de ventana abierta, pulsar el botón de nuevo.
• Cuando la temperatura ambiente desciende 5°C en un intervalo de 10 minutos, mientras la función
decalefacción está activada, el aparato lo considerará como un efecto de ventana abierta. Después de 30
minutos, se vuelve a medir la temperatura ambiente. Si la temperatura ambiente es igual o inferior a la anterior,
la función de calefacción se desactiva. El símbolo se muestra de forma permanente en la pantalla.
• Una vez que haya cerrado la ventana, pulsar de nuevo para volver a activar la función. El símbolo
parpadeará de nuevo en la pantalla.
ES

8
RESTABLECER LOS AJUSTES DE FÁBRICA:
- En el modo de trabajo, pulsando rápidamente el botón de Modo dos veces al mismo tiempo se puede
recuperar la unidad a la configuración de fábrica.
AJUSTE WIFI:
• Mantener pulsado el botón WI-FI durante 3 segundos para activar la conexión WI-FI, el indicador
correspondiente empezará a parpadear. Cuando el indicador deja de parpadear y permanece iluminado, la
conexión WI-FI se ha realizado con éxito.
• Iniciar sesión en la aplicación Tuya para encontrar el calefactor toallero eléctrico y controlarlo.
• Pulsar de nuevo el botón WI-FI durante 3 segundos para desconectar el WI-FI.
Nota: consulte el manual de Tuya App para el funcionamiento del aparato a través de WiFi.
• Apagar y desenchufar antes de limpiar el aparato.
• Dejar enfriar el aparato antes de limpiar.
• No sumergir en agua o en otro líquido. No permitir la entrada de agua en el
aparato.
• Utilice un aspirador para eliminar el polvo de las áreas de entrada y salida.
• Limpie el exterior del aparato con un paño húmedo y luego séquelo con un
paño seco.
• No utilice materiales químicos para la limpieza.
• Limpiar el aparato con regularidad.
ALMACENAMIENTO
• Desconecte siempre el aparato, déjelo enfriar completamente y límpielo antes
de guardarlo.
• Si no utiliza el aparato durante un largo periodo, vuelva a meter el aparato y el manual de
instrucciones en la caja original y guárdelo en un lugar seco y ventilado.
• No coloque ningún objeto pesado encima de la caja durante el almacenamiento, ya que podría
dañar el aparato.
LIMPIEZA Y MANTENIMIENTO
ES

9
El filtro se irá ensunciando con el uso
diario. Por favor, limpie el filtro después
de aprox. 150 horas de uso.
Apagar el aparato y retirar el filtro de la
parte trasera del aparato. Limpiar el filtro
directamente bajo el agua. No utilizar
material agresivo o corrosivo durante
la limpieza, ya que puede dañar el filtro.
Luego, dejar secar el filtro al aire.
Nota: En primer lugar, desatornillar dos
tornillos ST3X10 del filtro, quitar los filtros
izquierdo y derecho.
Una vez seco, montar el filtro según la
línea de referencia.
Empujar el filtro hasta el final hasta que
no pueda moverse más.
Las condiciones presentes en esta garantía se conceden en adición a todas las garantías implícitas, otros
derechos y recursos en relación con el producto que el consumidor tiene bajo la Ley de Prácticas de Comercio y
leyes similares estatales y territoriales. El comprador original de este producto dispone de la siguiente garantía,
con sujeción a las siguientes condiciones. Proporcionamos una garantía para el producto acorde a la legislación
vigente a partir de la fecha de compra en caso de“error de fabricación”, el producto tendrá que ser devuelto a la
tienda donde fue comprado para sustituirse de forma gratuita o reembolso del importe. Con el fin de obtener
un cambio o un reembolso, es necesario presentar una prueba de compra al vendedor.
GARANTÍA
ES
LIMPIEZA FILTRO:
RETIRADA DE LOS APARATOS DOMÉSTICOS USADOS
La directiva Europea 2012/19/EC sobre los Residuos de Aparatos Eléctricos y Electrónicos (RAEE), exige que
los aparatos domésticos usados no se desechen en el flujo normal de los residuos municipales. Los aparatos
usados deben ser recogidos por separado, a fin de optimizar la tasa de recuperación y el reciclaje de los
materiales que entran en su composición y reducir el impacto sobre la salud humana y el medio ambiente.

10
Identicador(es) del modelo: Zar V2000T
Partida
Símbolo
Valor
Unidad
Partida
Unidad
Potencia caloríca Tipo de aportación de calor, únicamente para
los aparatos de calefacción local eléctricos de
acumulación (seleccione uno)
N/A
Potencia caloríca
nominal
Pnom 2.0 kW control manual de la carga de calor, con
termostato integrado
N/A
Potencia
caloríca mínima
(indicativa)
Pmin 1.1 kW control manual de la carga de calor con
respuesta a la temperatura interior o exterior
N/A
Potencia
caloríca máxima
continuada
Pmax,c 2.0 kW control electrónico de la carga de calor con
respuesta a la temperatura interior o exterior
N/A
Consumo auxiliar de electricidad potencia caloríca asistida por ventiladores N/A
A potencia
caloríca nominal
elmax 0 kW Tipo de control de potencia caloríca/de temperatura
interior (seleccione uno)
A potencia
caloríca mínima
elmin 0 kW potencia caloríca de un solo nivel, sin control
de temperatura interior
[no]
En modo de
espera
elSB 0 kW Dos o más niveles manuales, sin control de
temperatura interior
[no]
con control de temperatura interior mediante
termostato mecánico
[no]
con control electrónico de temperatura interior [no]
control electrónico de temperatura interior y
temporizador diario
[no]
control electrónico de temperatura interior y
temporizador semanal
[sí]
Otras opciones de control (pueden seleccionarse
varias)
control de temperatura interior con detección
de presencia
[no]
control de temperatura interior con detección
de ventanas abiertas
[sí]
con opción de control a distancia [sí]
con control de puesta en marcha adaptable [no]
con limitación de tiempo de funcionamiento [sí]
con sensor de lámpara negra [no]
Información de contacto CLIMACITY S.L.
C. Torrox, 2 - 5 · 28041 Madrid (ESPAÑA)
tel. +34 91 392 05 09
REQUISITOS DE INFORMACIÓN QUE DEBEN CUMPLIR LOS APARATOS DE CALEFACCIÓN LOCAL ELÉCTRICOS
ES

11
SAFETY PRECAUTIONS
· Children of less than 3 years should be kept away unless continuously
supervised.
· Children aged from 3 years and less than 8 years shall only switch ON/Standby
the appliance provided that it has been placed or installed in its intended
normal operating position and they have been given supervision or instruction
concerning use of the appliance in a safe way and understand the hazards
involved. Children aged from 3 years and less than 8 years shall not plug in,
regulate and clean the appliance or perform user maintenance.
·This appliance can be used by children aged from 8 years and above and persons
with reduced physical, sensory or mental capabilities or lack of experience and
knowledge if they have been given supervision or instruction concerning use of
the appliance in a safe way and understand the hazards involved. Children shall
not play with the appliance. Cleaning and user maintenance shall not be made
by children without supervision.
· To avoid the risk of electrical shock, make sure the appliance is unplugged from
the electrical outlet before relocating, servicing, or cleaning it.
· If the supply cord is damaged, it must be replaced by the manufacturer, its
service agent or a similarly qualified person in order to avoid a hazard.
· The appliance must not be positioned directly underneath socket-outlet.
· WARNING: In order to avoid a hazard for very young children, this appliance
should be installed so that the lowest heated rail is at least 600 mm above the floor.
· Appliance is to be supplied through a residual current device (RCD) having a
rated residual operating current not exceeding 30 mA.
Model: ZAFIR V2000T LUX Power supply: 220 -240 V Frequency: 50Hz
Max. power: 2000W IP: X4 Dimensions: 45x80x16,5 cm
TECHNICAL DATA
CAUTION: some parts of this product can become very hot and
cause burns. Particular attention has to be given where children and
vulnerable people are present.
EN
Please read this manual carefully before use,
and keep it for any future reference

12
· Means for disconnection having a contact separation in all poles must be
incorporated in the fixed wiring in accordance with the wiring rules.
· CAUTION: in order to avoid a hazard due to inadvertent resetting of the thermal
cutout, this appliance must not be supplied through an external switching
device, such as a timer, or connected to a circuit that is regularly switched on
and off by the utility.
· WARNING
: The heater must not be used if the glass panel is damaged.
Excl. Volume
Volume
2
Volume
1
2,25 m
0,60m
Volume 0
Floor
Hidden volume
· WARNING: this product shall be
used in the volume 2 only according
to the national wiring rules (For
France NF C 15-100).
We suggest that you to contact
a professional electrician for
assistance.
· WARNING: The installation of this
appliance on the wall of a bathroom
always must be done at a distance
where no person in the shower or
in the bath may touch it or switch
it on.
Note:The drawing is for reference only.
WARNING: In order to avoid overheating, do not cover the heater.
· Concerning installation information, please refer to the chapter “Fixing to the
wall”.
Don’t touch the hot surfaces.
EN

13
INSTALLATION
FIXING TO THE WALL
1. Choose a wall on which there is enough space.
2. Use the enclosed template to mark the holes to be drilled on the wall. Use a Φ6 drill to drill 4
holes.
3. Fit the plugs from the accessory bag in the holes.
4. Detach the up-hook from the back of the appliance and put it in the position of the two pegs at
the top. Fix the up-hook on wall with two ST4X35 screws.
5. Insert the two filters in the left and right card slot, tighten them with two ST3X10 screws.
6. Put the two Z wall hanging brackets on the back of the appliance with two M4X8 screws, put the
small towel rack into the fixed slot and lock with four M4X16 screws, and then put the big towel
rack into the fixed slot and lock with four M4X16 screws.
7. Assemble the appliance on the up-hook, tighten two M4X10 screws on the right side and two
M4X10 screw on the left side to fix the appliance (two people to assemble).
8. Fix the Z wall hanging brackets on the wall with two ST4X35 screws.
(Check installation diagrams at the end of the manual)
EN

14
OPERATION
EN
1. On/ standby button
5. Program setting
3. Panel heating/
Window open detection
7. Up
9. LED display
2. Power setting/ Wi-Fi
connection
6. Mode setting
DISPLAY AND BUTTON
4. Timer
8. Down
10. WI-FI indicator
1 5
9
10
2 6
3 7
4 8

15
• Connect to power supply, push the ON/OFF (O/I) button to switch on the left side of the appliance. Buzzer will
have a short “D”sound and full screen display will light up for 10 seconds.
Push ON/OFF button again to switch off.
• Press to turn on the heating function.
Note: Button light will go out in 10s if the appliance is not operated. Touch any button to reactivate the button
light.
• Press again to turn off the heating function and put the appliance in standby mode.
Note: The motor will continue to run for a further 15 seconds to remove residual heat from inside the appliance
before switching off.
SET DATE AND TIME:
• The first time the device is used, the icon on the display flashes to remind to set the local day and time.
• Press and hold the timer button for 3 seconds, the 1 day icon “d1~ d7” flashes (d1=Monday to d7=Sunday).
Use and to select the day. Press Timer button to confirm.
• After confirming the day of the week, the hour digits flash, use and to set the current hour and
confirm selection with Timer button. Then the minut digits flash, select the current minutes and confirm with
Timer button.
• The display shows he current day of the week and time.
POWER SETTING:
Function Power Display symbol
High heating level 1800W
Low heating level 1100W
Towel heating function 200W
High heating level + Towel
heating function
1800W + 200W = 2000W

16
EN
1- PTC heating (1800W): Touch button to turn on the appliance. Icon light up, PTC heating is working
at high power 1800W. Touch once to switch it low power 1100W, icon lights up.
2-Panel Heating (200W): Touch once to start panel heating.
3-Full power heating (2000W): When panel heating works, touch to switch PTC heating at high power
1800W. Then total power is 2000W.
Note: at this stage, touch will switch PTC heating from high power – low power- PTC heating OFF
(1800W- 1100W- 0W)
WARNING: The glass surface and air outlet bottom will become very hot.
Be careful and avoid touching it.
TEMPERATURE SETTING:
• Use or to set temperature (5-40ºC).
• The display will change accordingly. Once the temperature has been set, the setting will be confirmed
automatically in 5 seconds.
Note: Heater will stop heating when ambient temperature reaches the set temperature. When ambient
temperature is 1ºC lower than the set temperature, heater will restart heating.
Note: The set temperature must be higher than the room temperature. Otherwise, the appliance will not start
heating.
WEEKLY PROGRAM:
• When the heater is ON, please press the Mode button to set one of the automatic modes P1 - P2 - P3 - P4 -
P5 - UP.
• P1 - P2 - P3 - P4 - P5 modes are default mode for quick setting
- P1: all day comfort mode
- P2: mode for general family
- P3: mode for working office
- P4: mode for commercial plaza
- P5: mode for family on travel or trip
• UP mode is week timer setting of comfort / anti-frost set by end-user.
Choose UP, press Prog to start setting. Once UP mode setting is activated, figure d1 (Monday) and begin
flashing.
Week
day Mode Working mode
Anti-frost Comfort Anti-frost Comfort Anti-frost Comfort Anti-frost
1-7 P1
00:00-24:00
1-5 P2
00:00-06:30 06:30-08:30 08:30-17:00 17:00-22:30 22:30-24:00
6-7
00:00-07:30 07:30-10:00 10:00-12:00 12:00-14:00 14:00-17:00 17:00-22:30 22:30-24:00
1-5 P3
00:00-06:00 06:00-17:00 17:00-24:00
6-7
00:00-24:00
1-7 P4
00:00-06:00 06:00-22:00 22:00-24:00
1-7 P5
00:00-24:00

17
EN
• Example 1 - set one or three (at most) time-range at comfortable level, then follow steps as below:
Touch or . The display shows number 1 (1st working-hour) and flashes. Now you can
use the / buttons to set the start time between 0-23 o’clock. Confirm your selection with the Timer
button. Press the button to set the end time (at least 1 hour higher than the start time) and confirm your
selection with the Timer button.
The Display will show the number 2 (for the second hour of operation). Now you can set one more time
range as described above.
Once the settings for the first day have been completed, the icon 2 will flash on the display. Now you can make
the time settings for the other days of the week as described above.
• Example 2: Please press the Timer button (instead of / buttons) to set the comfort mode for the
selected day.
Note: Each step must be taken within two minutes, otherwise the setting will be cleared.
• Anti-frost mode: the room temperature is maintained at 5°C to prevent frost formation.
• Comfort mode: comfortable room temperature, which is achieved with temperature and heating level
settings as required.
24 H TIMER:
• In P1 mode, touchtimer button twice quickly to activate 24 hour timer setting.The icons will flash on the
display. Please set the desired off time between 0 and 24 hours with the / buttons. After five seconds
the settings will be saved (symbols will stop flashing) and the display will show the ambient temperature and
the timer countdown.
• Touch timer twice quickly again to cancel the setting. Screen will turn to show room temperature.
CHILD LOCK FUNCTION:
• In working mode, touch and at the same time for 3 seconds to activate child lock function, the
display will show [ ] after setting and will recover to initial display in 5 seconds. Other function is invalid once
child lock function works. Once a button is touched, screen will flash [ ] to remind you child lock function is
working and recover to initial display in 5 seconds.
• Touch and at the same time for 3 seconds again cancels child lock function.
INTELLIGENT OPEN WINDOW DETECTION:
Long press for 3 seconds to switch on open window detection mode. The symbol flashes on the
display. To cancel open window mode, press button again.
• When room temperature drops 5°C within 10 minutes, while the heating function is activated, the unit will
consider this as an effect of an open window. After 30 minutes, the room temperature is measured again. If the
room temperature is the same or lower than before, the heating function is deactivated. The symbol is
shown permanently on the display.
• Once you have closed the window, please press the button again to reactivate the function. The symbol
will flash again on the display.

18
RESTORING THE FACTORY SETTINGS:
• In working mode, quickly press and Mode button twice at the same time can recover the unit to factory
default setting.
WIFI SETTING:
• Long press WI-FI button for 3s to activate the WI-FI connection, the corresponding indicator will start
flashing . Once the indicator stop flashing and stay long light, it means the WI-FI connection success.
• Login in Tuya App to find the glass panel heater and control it.
• Long press WI-FI button for 3s again to disconnect the WI-FI
Note: Please refer to the Tuya App manual for operation of the appliance via WiFi.
• Always switch off the device and disconnect the power cord before cleaning.
• Let the heater cool down completely.
• Never immerse it in water or other liquid. Do not allow water to run into the
appliance.
• Use a vacuum cleaner to remove dust on inlet and outlet surfaces.
• Clean the outside of the unit with a damp cloth and then dry it with a dry cloth.
• Do not use chemical materials for the cleaning of your heater.
• Clean the appliance regularly.
STORAGE
• Always disconnect the appliance, let it completely cool and clean it before
storing.
• If you do not use the device for a long period, put back the unit and the instruction manual back
into the original carton and store in a dry and ventilated place.
• Do not place any heavy items on top of carton during storage as this may damage the appliance.
CLEANING & MAINTENANCE
EN
Table of contents
Languages:
Other Pur Line Food Warmer manuals
Popular Food Warmer manuals by other brands

APW Wyott
APW Wyott CFHS-16 Installation and operating instructions

Wagen Tech
Wagen Tech 2260 user manual

Henny Penny
Henny Penny MP-941 Operator's manual

IRIS
IRIS BLW-C2 user manual

Star Manufacturing
Star Manufacturing HFD2A Installation and operation instructions

Myson
Myson GEM Series Installation and operating instructions