Quaildigital Q-HCBS User manual

User guide
HEALTHCARE HEADSET SYSTEM

These instructions are aimed at a person with a reasonable level of
technical competence and familiar with the safety precautions relevant
to the use of electrical and electronic equipment.You should not attempt
to install this system without the relevant level of expertise.
System components
HEALTHCARE HEADSET SYSTEM
Healthcare Base Station
(Q-HCBS)
Healthcare Headset
(Q-P7HS)
Healthcare Charger
6-Port (Q-RCH)

3
Installing the system 4
Positioning the charger 6
Registering and using headsets 7
Product specification 10
Frequently asked questions 12
Troubleshooter 14
Contents

Installing the system
HEALTHCARE HEADSET SYSTEM
✓Good location
✗Bad location
Monitoring room
Operating room
Important note: Your headsets should be fully charged before
commissioning the system. Begin the installation process by connecting
the charger and placing all headsets on it. The blue LED on the
headsets will flash during the charge process. Batteries will arrive
partially charged. It takes 2.5 hours to charge fully a drained battery.
Positioning the Base Station
The diagram below illustrates possible locations to mount your Base. Your
Base must be wall mounted at a height of around 2m from floor level. As
a tip, always locate a Base where it has maximum direct sight of the area
you want to cover. Avoid placing it behind or immediately beside other
fixtures or equipment which may reduce its effective range. Before fixing
your installation permanently, place the Base in temporary locations
around the premises to test the range and optimize coverage.
If you don’t mount the Base on a wall, and in clear space, headset range
may be severely restricted and the system may not perform to
specification.

5
Healthcare Base Station
The Base Station has two LEDs on the front facia.
Power illuminated when power is on
Status flashes when a headset is in talk mode
Base Station features
There are 4 connectors on the top of the
Base. When you connect to POWER 48v DC,
the power LED will illuminate orange, then turn red after 30 seconds.
The INPUT MUTE connector, when shorted, switches off the input. It
removes excess noise from the headset system and from the external
audio source if there is background noise on external equipment.
The LINE OUTPUT and LINE INPUT connectors link the mixed audio output
from all the headsets to external source and link the external audio into
all the headsets. The Base comes with 1.2m jack-to-jack 3.2mm cables
for connection to external equipment.
There are 5 buttons or connectors on the
bottom of the Base.
The MICRO SD card slots are for uploading firmware updates (left side
DECT radio, right side audio).
The OUTPUT VOLUME controls the mixed outbound audio from the
headset system into the external source, using a flat head screw driver.
Note that each headset also has its own audio level adjustment.
The INPUT VOLUME controls the level from the external source to the
headsets, adjust using a flat-head screwdriver.
The REGISTRATION/RESET updates the system: hold in for 5 seconds to
enter registration mode; hold for 15 seconds to enter reset mode.

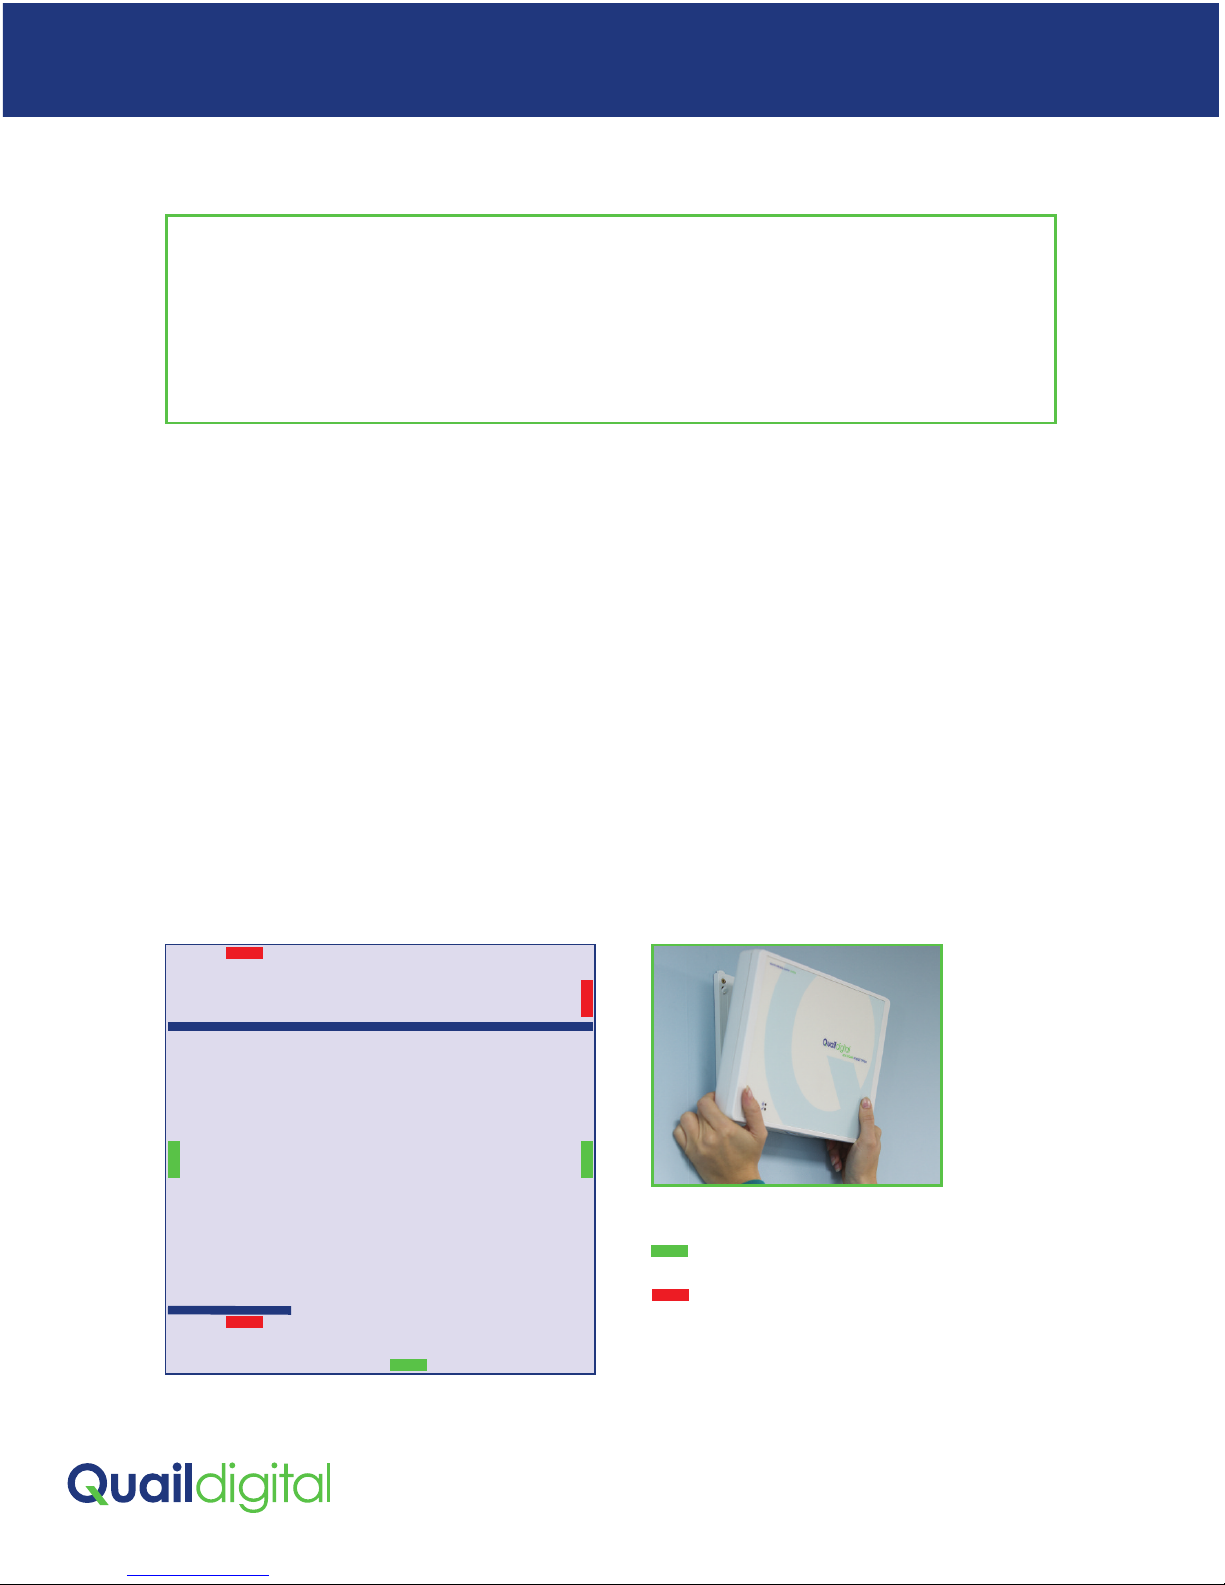
The Healthcare Headset System comes with one or more charger.
Chargers should be located within transmit range (same or annexed
room) of the Base so that headsets activate automatically when they’re
taken out of the charger.
Make sure the charger remains plugged in at all times, day and night -
shown by the illuminated red LED. If the charger is not plugged in, or the
power goes off over night, headsets will not charge, and will discharge.
Whenever a headset is not being used it should be placed back in the
charger. The charging process starts as soon as the headset is placed in
the charger. Headsets will last for up to 9 hours between charges in
standby/PTT mode and up to 6.5 hours
on TalkLock. When the user hears 3
beeps in close succession every 60
seconds in the earpiece, it means the
battery is low. Replace in the charger
and take another headset.
Full charge takes up to 2.5 hours. When headsets are charging, the
headset blue LED will flash every 5 seconds and when fully charged the
blue LED will be constant.
When headsets are removed from the charger, you will hear a double
bleep in the ear. That signifies they’re ready to
use.
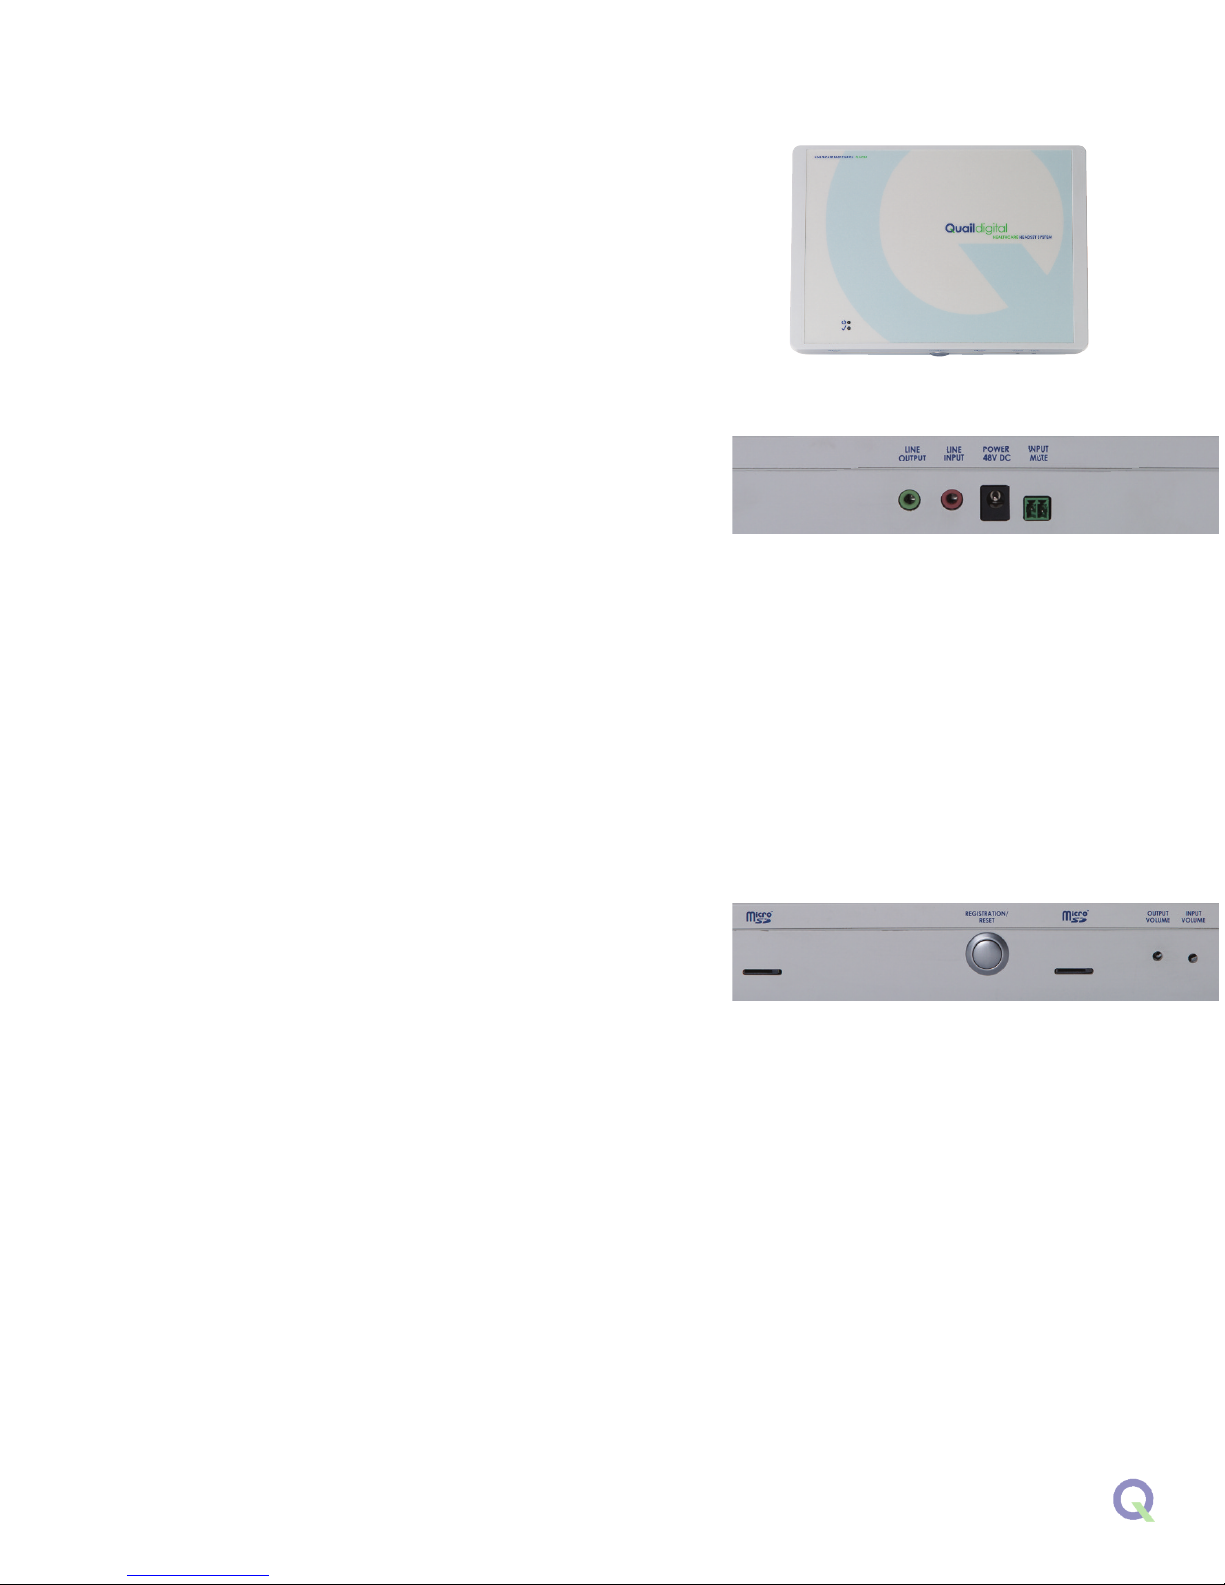
The Headset Charger Shelf (Q-P7SHELF) in
lightweight aluminium is available for wall
mounting. The hanger bar below is for
headband and neckband storage.
Positioning the charger
HEALTHCARE HEADSET SYSTEM

7
Registering and using headsets
Each headset needs to be registered to the system for the first time before
use. The system has the capacity for 30 headsets at any one time. New
or additional headsets can be added at any time by following the
registration process. To register one or more
headsets, follow this procedure:
1Make sure the new headset has a charged
battery (blue LED flashes every 5 seconds).
2Make sure all the headsets in use with the system are in range of the
Base. If a headset isn’t in range of the Base during the registration
process it will be deleted from the system.
3Put the Base in ‘registration mode’ by pressing the Registration Button
on the Base for 5 seconds. On the Base both LEDs will flash green.
4Place the new headset to your right ear, press the large silver button
and volume toggle down for 3 seconds. Wait for the bleeps to
change their frequency and tone to 1 bleep every second.
5A 3 second long bleep signifies successful registration. You may also
hear a double bleep tone that will indicate it is ready to use.
6Once headsets have successfully registered to the Base, place them
back in the charger. The system as a whole goes through an internal
process of alignment with all the headsets and Base(s). This process can
take up to 10 minutes. After 10 minutes the headsets will be fully
operational with the Base(s).
7The registration process will time-out after 10 minutes, no further action
required.
8The system is now ready to use.

HEALTHCARE HEADSET SYSTEM
Multiple systems in the same premises
It’s quite normal to use multiple systems in the same premises - and
systems won’t interfere with one another. But if you swap headsets
between systems, thus taking a headset from system A and registering it
to system B, you should clear its registration from system A; otherwise the
headset may pick up audio from both, because it could remain
registered to both.
If you move a headset from system A to system B follow
this procedure:
1Go to system A, make sure all the headsets used
on the system are gathered, including the one(s)
you want to move to system B. Remove the battery
from each headset.
2Put the Base into registration mode.
Leave it for 2-3 minutes. This process will
delete all the headsets from the Base. Press
registration button again.
3Put the battery back into each of the headsets you want to keep on
system A, then go through the normal registration process again, as
if for the first time to register the remaining headsets back onto system A.
4When the system A registration is completed, then go to system B and
add the headset(s) to that system following the normal registration
procedure.
Never have more than one system in registration mode at the same time.

9
Volume There are 5 volume settings. Use the toggle at the rear of the
headset to adjust volume by pressing upwards for each step.
Speech The headset can be used in 2 speech modes:
- TalkLock: this mode is hands-free. To activate, press the silver button
for less than 1 second - the headset is then hands-free. To de-activate it,
press the silver button again. This will shut off the microphone.
- PTT: press the silver button whilst talking, then release when finished.
Up to 6 users can speak at any one time. All headsets hear all the time.
Best practice: only use TalkLock if you need to be hands-free. Use PTT for
routine communication.
Audible tones for different headset status and functions:
STATUS TONE
Registration mode 1 beep every second
Out of range 2 beeps every 10 seconds
Battery low 3 beeps every 60 seconds
Registration complete 1 long beep (3 seconds)
Busy tone 3 long beeps
Headset not registered 1 beep every 3 seconds
Base capacity full As per busy tone
Call drop Bloop-bleep tone

HEALTHCARE HEADSET SYSTEM
Product specifications
HEALTHCARE BASE STATION Q-HCBS
Operating frequency 1.88-1.90 GHz EMEA, Asia,
1.910-1.930 GHz North
America
Headset capacity 30 headsets (6 in talk mode
at one time
Power requirements 100-240v AC voltage sensing
Dimensions HxWxD 168 x 128 x 36 mm
Weight 400g
HEALTHCARE HEADSET Q-P7HS
Operating frequency 1.88-1.90 GHz EMEA, Asia,
1.910-1.930 GHz North America
Operating modes TalkLock and PTT as standard
Microphone Noise cancelling, electrec mic
Battery capacity 9 hours PTT, 6.5 hours TalkLock
Charge time 2.5 hours to full re-charge
Volume control 5-stage, slide button up/down
Battery (part number) Lithium Ion 3.7v (Q-RH7BAT)
Weight 23g

11
HEALTHCARE CHARGER Q-RCH
Capacity for headsets 6 port
Power indicator Red LED
Mounting Shelf / desktop
Power requirements 100-240v AC voltage sensing
Dimensions HxWxD 110 x 330 x 96 mm
Weight 680g
HEALTHCARE ACCESSORIES
NECKBAND Q-RH7NB HEADBAND Q-RH7HB BATTERY Q-RH7BAT
POWER ADAPTER Q-48V HEADSET CHARGER SHELF Q-P7SHELF
HYGIENE COVERS
Q-RH7HC
Box of 100

Up to 6 people can use
TalkLock at one time. If 6
people are using
TalkLock, can anyone
else speak on the
system?
No. Anyone else pressing their talk-button will
hear an engaged tone and cannot enter the
call.
How are the 6 speech
channels freed up?
As soon as the 6th user engages TalkLock they
effectively block anyone else entering the call.
At this point the system hunts randomly for any
of the other 5 users that aren’t speaking at that
moment and cancels TalkLock on one of them.
This frees a channel. The system only attempts
to free one channel.
Will the system throw off
more than just the 6th
user?
No. Up to 5 users can remain in TalkLock mode
continuously without concern that their TalkLock
will be cancelled by the system.
What happens if TalkLock
is left on when the
headset has finished
being used? Is the
TalkLock cancelled?
No, TalkLock isn’t cancelled just because the
headset isn’t on someone’s head. TalkLock will
be cancelled if: a) the battery goes flat; b)
headset taken out of range; c) placed in
charger; d) becomes one of the randomly
selected 5 headsets to have the channel
cancelled because a 6th hands-free user has
joined.
If the registration button is
pressed, do the headsets
currently registered to the
system need re-
registering.
No, they don’t. Provided headsets are in range
of the base station, whether in or out of the
battery charger, they remain registered and do
not need re-registration.
Frequently asked questions
HEALTHCARE HEADSET SYSTEM

What maximum distance
would you recommend
between base station
and control equipment,
speakers or voice
recorders?
The base station has an unbalanced input and
output and comes with 2 x 4ft 3.5mm cables to
link with external equipment. Cables can be run
for up to 30 ft before balancing transformers
need to be inserted to remove external noise.
Speak to your AV specialist for connection of
external devices.
How do you add external
speakers onto the
system?
Two methods are recommended: 1) connect
from Q-HCBS output socket into PC speakers;
2) connect from Q-HCBS output socket to PA
amplifier of your choice and then into ceiling
and wall mounted speakers. Seek advice from
your AV specialist.
What is the input mute? This feature is used to reduce background
noise or hum picked up on long cable runs
when customers use external microphones to
speak into the headset system. The mute
feature will activate when the external device
is engaged (pushed to talk). Your AV specialist
will wire to include the mute feature onto your
devices.
There are 2 SD card slots.
When are these used?
If the system firmware requires upgrading, these
slots accept the SD cards containing the
firmware revision. There is no permanent SD
card in either slot.
What does the reset
feature do?
Pressing the reset button for 15 seconds will re-
boot the firmware and clear spurious
interference which may have induced a
robotic or watery sound into the headsets.
13

HEALTHCARE HEADSET SYSTEM
FAULT ACTION
None of the headsets
are working
Always check the headsets are registered.
Check the Base power LED is illuminated. If not,
check the mains power is on. If yes, power
supply or Base may be faulty. Contact your
service company.
The system is working
but the range is short
Is your Base positioned on a wall as per
specification on page 3? If in doubt, move it to
another location, and see if range improves. If
it doesn’t, contact your service provider.
One or more headsets
isn’t working
Is the battery charger LED light illuminated RED?
If not, check the power to that socket is on. If it
is, check the power supply is connected. If it is
connected and the power light doesn’t
illuminate , contact your service provider.
Headset(s) LED is flashing,
but not working
Put the headset to your ear, stand near to the
Base: are you hearing 1 beep every 3 seconds?
If so, headset isn’t registered. Follow registration
procedure. Are you hearing 2 beeps every 10
seconds? If so, you’re out of range of Base. Move
closer. Once in range you’ll hear 1 long beep.
Headset has been in
charger but LED light
isn’t flashing
Swap the battery with another headset which
you know is working. If the headset works with
the alternative battery, discard the failed
battery and contact your service provider for a
replacement battery.
Headset LED is on but the
headset has ‘locked up’
Remove battery for 5 seconds then replace back
onto the headset. This should clear the lock-up.
Headsets are picking up
audio from more than
one system.
Your headset is registered to more than one
Base, and needs removing from the one you
don’t want it used with. See page 7 for
procedure.
How do I order
accessories?
Contact your service provider or email
Troubleshooter

15

www.quaildigital.com
26.01.16
Quail Digital North America
200 East Randolph Street,
Suite 5100, Chicago, IL 60601
Toll Free 1-888-575-1010
Service 1-888 575 1016
Quail Digital Europe
92 Lots Road, London SW10 0QD
Tel: +44 (0)20 7349 2000
Service +44 (0)8706 087 087
This manual suits for next models
2
Table of contents
Other Quaildigital Headset manuals

Quaildigital
Quaildigital Pro10 User manual

Quaildigital
Quaildigital Pro11 User manual

Quaildigital
Quaildigital Q-P7BS User manual

Quaildigital
Quaildigital QP10HS User manual

Quaildigital
Quaildigital Q-P7BS User manual

Quaildigital
Quaildigital PRO7 User manual

Quaildigital
Quaildigital Pro9 User manual

Quaildigital
Quaildigital QP10HS User manual

Quaildigital
Quaildigital Pro9 User manual

Quaildigital
Quaildigital Pro9 User manual