QUIK CORP greenPRO GP1200 User manual

A DIVISION OF
GP1200
ATV 6-in-1 SEEDER
INSTRUCTION
MANUAL
PROUDLY AUSTRALIAN
OWNED & OPERATED

ADDRESS
GREENPRO HQ
37 Production Avenue,
Warana 4575 QLD
Australia
PHONE & FAX
Free Toll: 1800 768 748
Phone: 07 5493 8944
ONLINE
Email: info@greenpro.com.au
Website: www.greenpro.com.au
READ THIS INSTRUCTION MANUAL CAREFULLY
BEFORE ATTEMPTING TO OPERATE THE UNIT
No part of this manual may be reproduced without
written permission.
All information in this manual is based on the latest
product information available at the time of printing.
Greenpro Australia Pty Ltd
GP-1200 6-IN-1 Seeder
Instructions and Guidelines
Updated: January 2017
Original Instruction
All information, illustrations and specifications in this manual are based on the latest information at the time of publication.
The right is reserved to make changes at any time without notice.
COPYRIGHT© 2015
greenPRO
Quik Corp Pty Ltd
Client Implement Division
All rights reserved
Previous Editions
COPYRIGHT© 2015
WARNING

On behalf of the greenPRO team, we would like to thank
you for investing in the GP1200 6-IN-1 Seeder. All greenPRO
implements are manufactured to the highest standard of
quality to give our owners the best product and service
possible. As an Australian owned business your investment
has enabled our every success.
greenPRO, as a division of Quik Corp, have provided over two
decades of manufacturing premium agricultural implements
into the Australian market. Since we started in 1988, our
product range has continually expanded and our innovation
sparks from the passion and commitment we have for small
farms and lifestyle properties.
Our 28 years of active involvement in this community has
allowed us to provide solutions to combat challenges that
Australian farmers face in agriculture today.
We appreciate your patronage and wish you many years of
safe and satisfied use of your implement.
This manual should be considered a permanent part of your
greenPRO GP 1200 6-IN-1 Seeder and should be kept in a safe
place for future reference.
Welcome to where the grass is greener.
CONGRATULATIONS,
YOU’RE A PRO.

SECTION 1
Setup and Unpack
SECTION 2
System Overview
SECTION 3
Basic Operational Information
SECTION 4
Seed Flow Control Handle
SECTION 5
Available Attachments
SECTION 6
Dimensions and Specifications
SECTION 7
Maintenance
SECTION 8
Trouble Shooting Guide
SECTION 9
Helpful Planting Hints
SECTION 10
Warranty Policy
SECTION 11
Warranty Registration Form
5
8
9
11
15
16
17
18
20
23
29
TABLE OF
CONTENTS
GP1200 ATV 6-IN-1 SEEDER
INSTRUCTION MANUAL

5
GP-1200 6-IN-1 SEEDER INSTRUCTION MANUAL
1SETUP and UNPACK
Gold levelling bar and rotation pin.
Turn pin to raise, lower or level the
tow bar for attaching the tow bar to
the ATV tow ball.
Your seeder will arrive with the tow
hitch in the folded up position. Pull
the hitch down towards your ATV
50mm tow ball.
1
After folding down the tow hitch
insert the levelling bar pivot pin and
circlip into the tow bar position hole.
2
Manoeuvre your tow hitch over the
tow ball on your ATV with the hitch
lever in the up position.
3

6
GP-1200 6-IN-1 SEEDER INSTRUCTION MANUAL
Lower the tow hitch onto the tow ball
turning the gold leveling bar and push
down onto the tow hitch until the
release lever clicks and moves down
into the lock position.
4
15 Amp blade fuse holder.
Plug your Anderson plug into the
Anderson plug attached to the control
box wiring harness.
Hook up your ATV wiring harness to
your 12 volt battery supply. Red wire
is + and black wire is -.
5
Switch for lowering or raising the
height of the disc plough assembly.
Seeder control box.
On off switch for optional middle seed
box.
On/off switch for rear seed box.
6
SECTION 1 SETUP & UNPACK

7
GP-1200 6-IN-1 SEEDER INSTRUCTION MANUAL
Plug in the two male deutsch wiring
connectors from the control box to
the two female deutch connectors on
the seeder near the tow hitch.
7
Plug in Anderson plug from ATV
wiring harness provided to the seeder
control box wiring harness to provide
power to the control box and seeder
motor.
8
Remove the auger shield by unscrewing
the 4 wing nuts and bolts to inspect the
brush rotation. Turn the on/off switch
on at the control box to make sure the
seed brush rotation is rotating towards
the rear of the seeder. If it is rotating the
wrong direction seeds will not disperse
correctly and you have hooked up your
wiring harness to the 12 volt battery
reverse polarity.
9
Seed Brush with Auger Shield removed
showing rotation towards the rear of
the seeders drag bar metal grating
The seed Brush is designed to move,
mix and dispense seed and granular
fertiliser to the tear drop holes in the
bottom of the Seed Box. This ensures
an even distribution of seed/fertiliser as
well as blending mixed sized seeds.
10
1SETUP & UNPACK

8
GP-1200 6-IN-1 SEEDER INSTRUCTION MANUAL
2SYSTEM OVERVIEW
Electric seeder
brush motor
Electric lift
motor
Optional middle
seed hopper
Rear seed
hopper
Seed ow
control handles
Disc plough
assembly
Wheels for
moving
the seeder in
transport
mode
Soil
compaction
roller
Top link
levelling we
distribution arm
and adjustment
handle
Drag bar and
harrow mesh

9
GP-1200 6-IN-1 SEEDER INSTRUCTION MANUAL
3
PLEASE READ OPERATING INSTRUCTION CAREFULLY BEFORE USE.
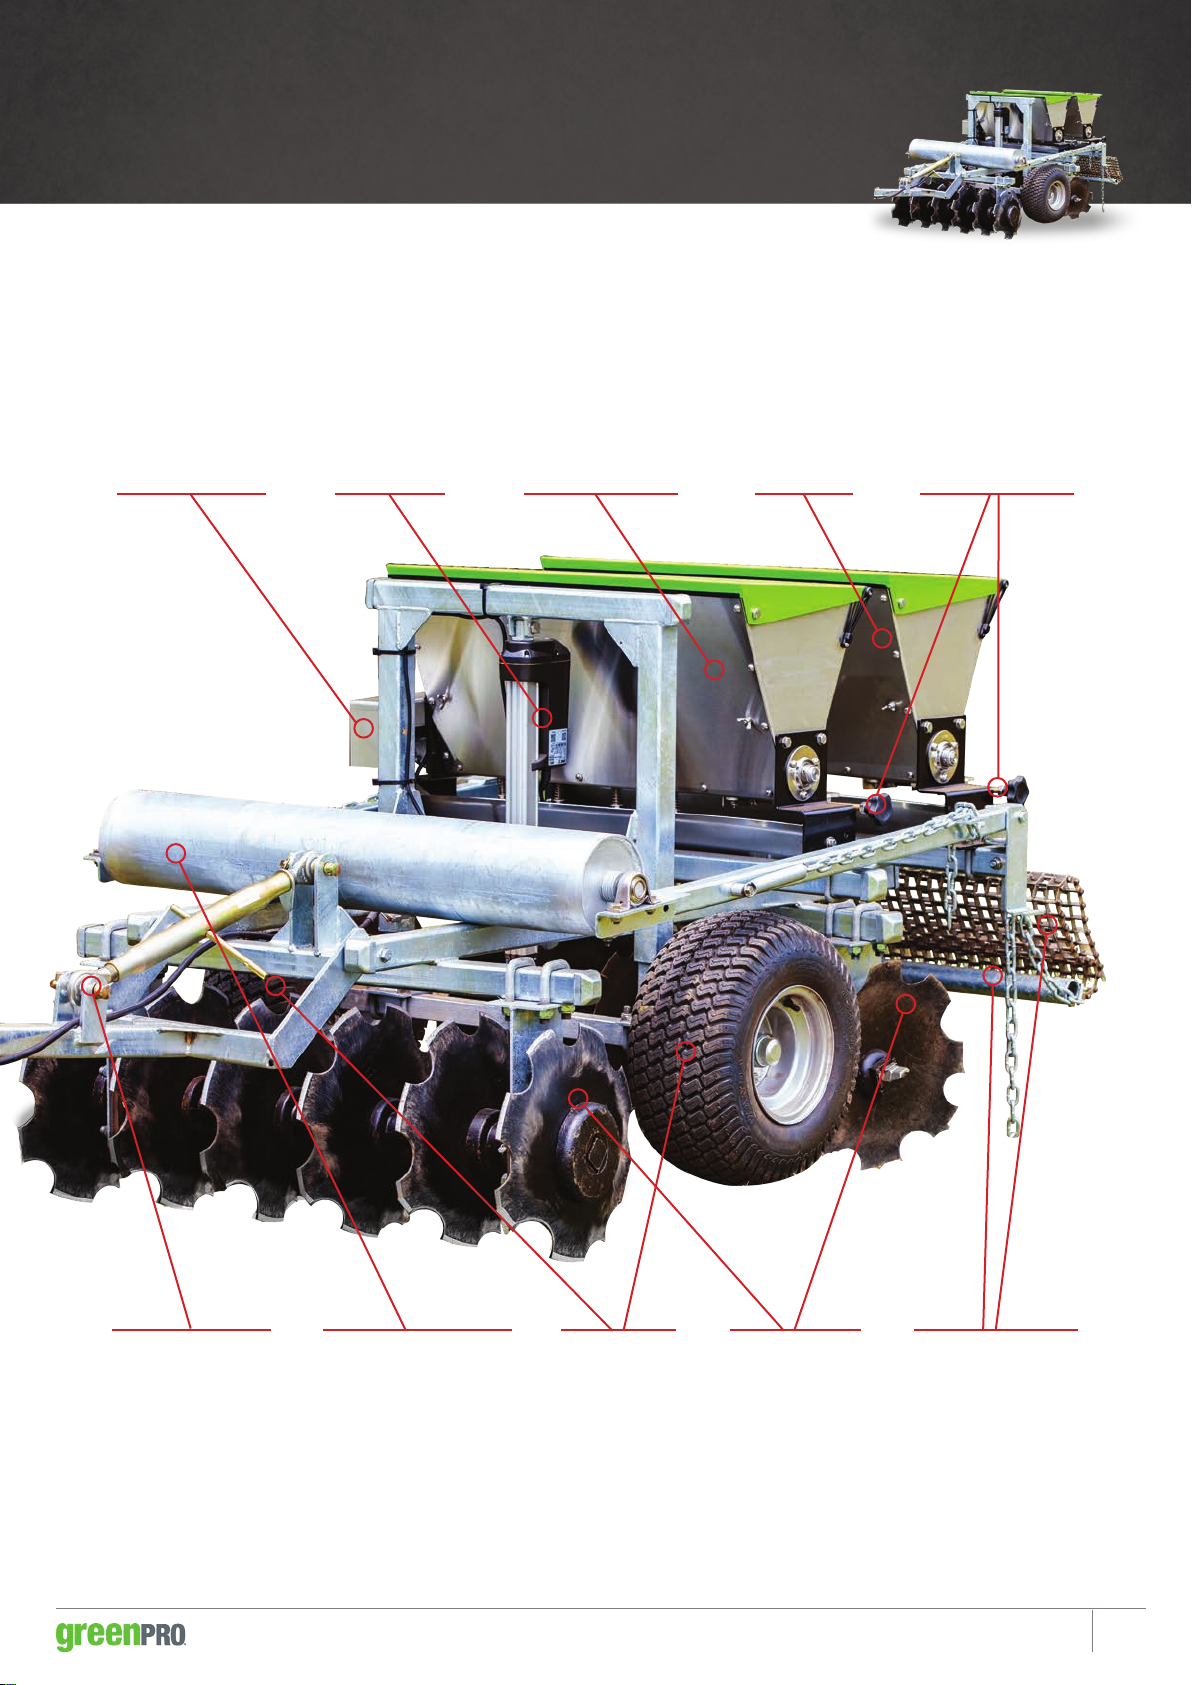
› Do not turn right when the plow discs are in the ground or damage to the disks
will occur. Left turns ONLY when discs are engaged.
› Do not sit, stand or ride on the seeder while in use.
› Maximum capacity of the seeder box seeder 1200 is 25kg per box
› Do not put hands in seed box while seeder motor is in the on position.
› Do not put lime in seeder.
› Only use granulated fertiliser.
› Keep hands and feet clear when raising and lowering unit.
› Keep hands and ngers clear when raising or lowering the drag and/or press roll
to avoid pinching.
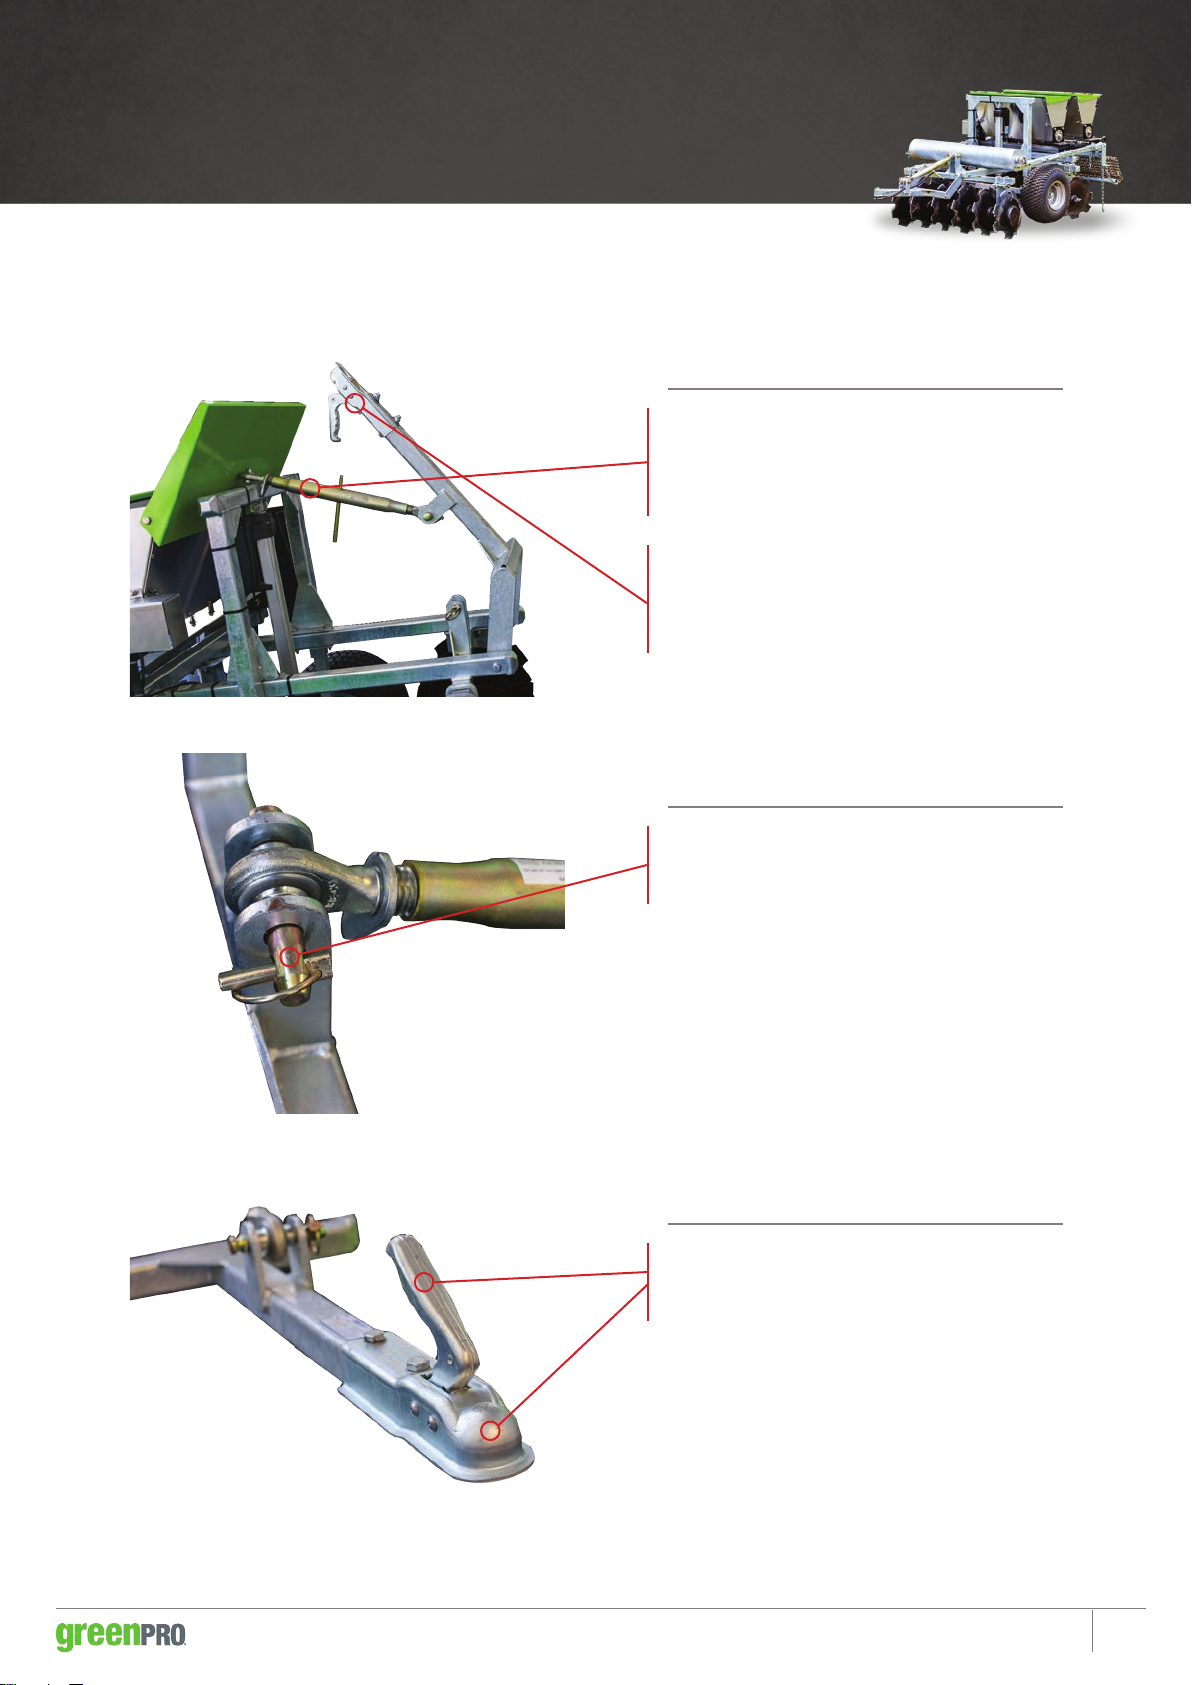
› The seeder 1 point hitch units, can be used with ATVs/UTVs & with tractor’s
that have draw bar/single point connections.
› Seeder is designed for off road use. DO NOT tow on public roadways.
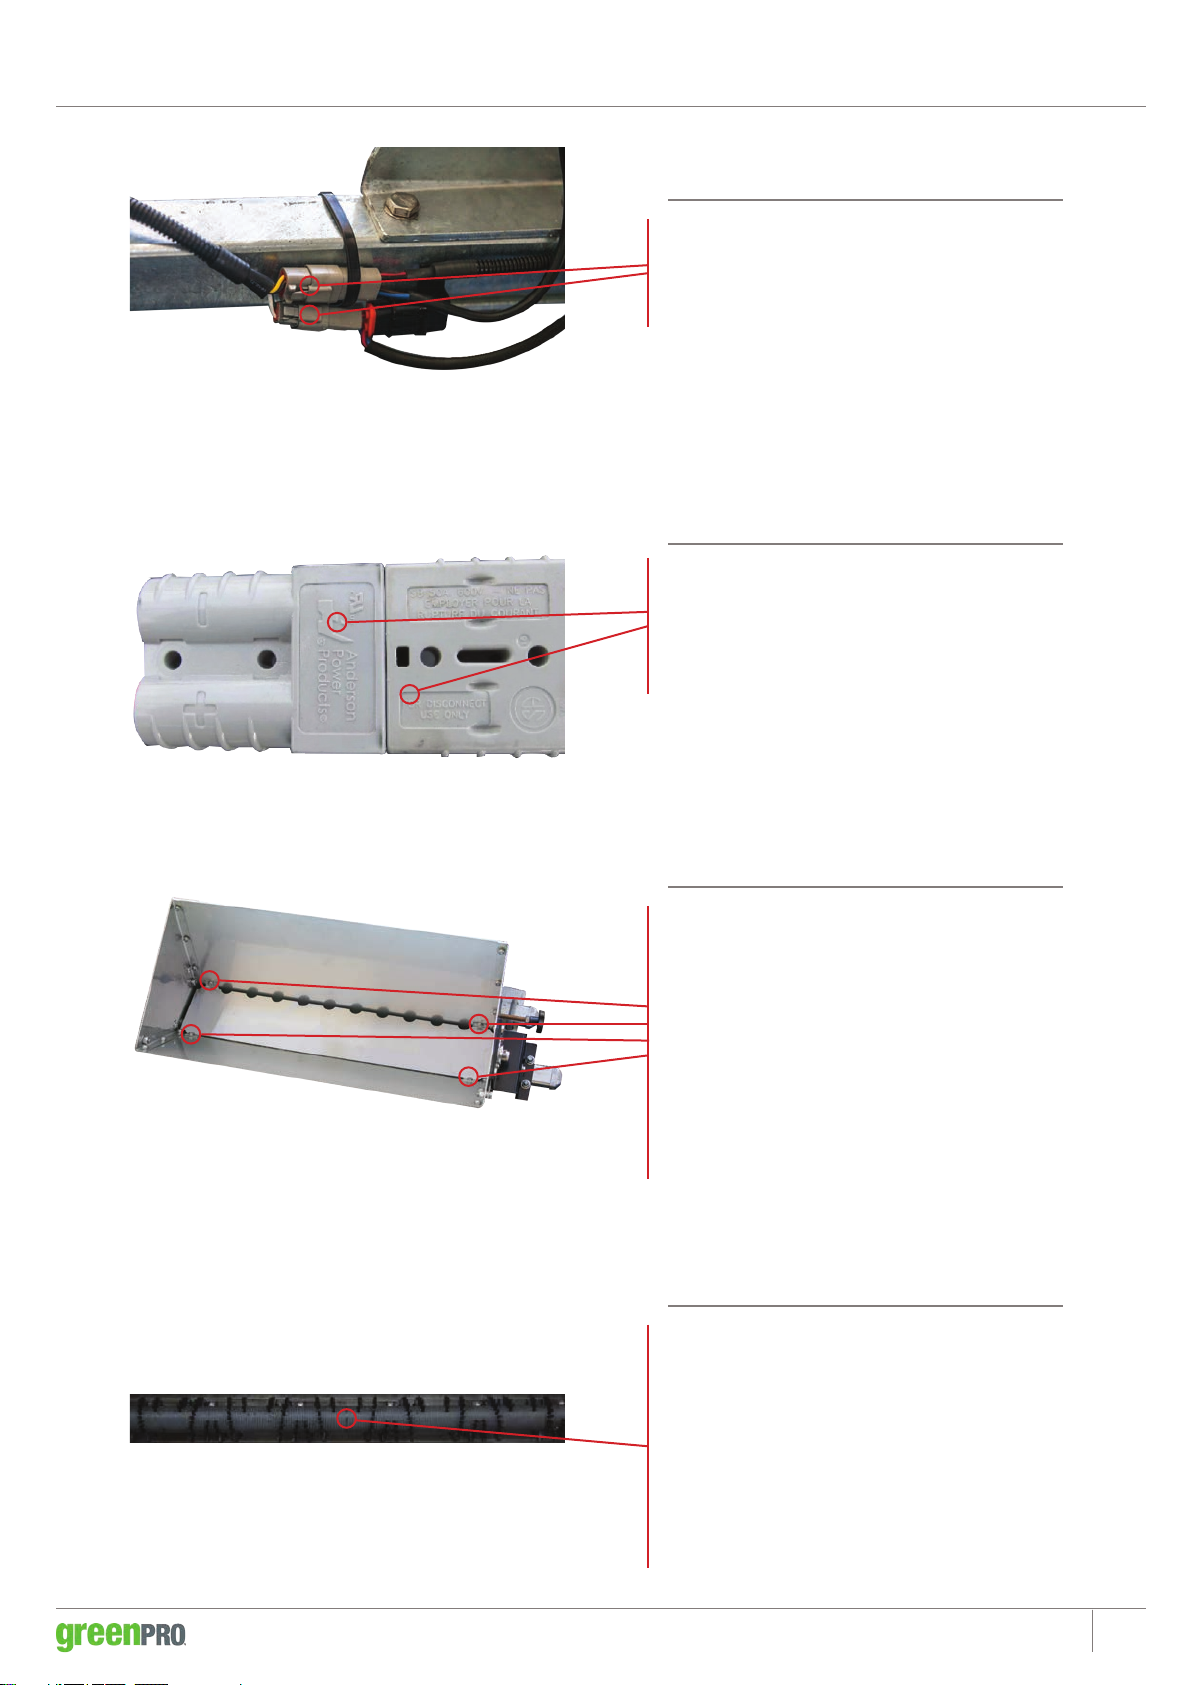
› Make sure that the battery clips are connected to the proper terminals to avoid
damage to your electrical system and/or your ATV/UTV/tractor.
(Red = positive terminal. Black = negative terminal)
› Avoid coming in contact with any other metal parts on the ATV when
connecting the battery clips to your battery.
› Adding lime or non-granular fertiliser to your seeder will void the warranty of
“all” parts associated with the seeding system.
› In addition the density of Lime is much greater than seed and can bind your
brush shaft causing the motor to “burn out”.
› Seed is far lighter and will not compact around your Seeder Brush and cause
damage to your seed motor like lime/non-granular fertiliser can.
DO NOT OPERATE YOUR SEEDER ON INCLINES
GREATER THAN 10°.
WARNING
BASIC OPERATIONAL
INFORMATION

10
GP-1200 6-IN-1 SEEDER INSTRUCTION MANUAL
1PT. HITCH RECEIVER
Each Seeder comes with a 1-point hitch hook-up that connects directly to your
ATV or UTV. This hitch is designed to t a 50mm trailer ball. (Adjustment can be
made by loosening or tightening the nut on the under-side of the coupler hitch).
TOP LINK HOOK-UP
The Down Pressure System is designed so the user can apply disc pressure to
either the front or the rear of the unit. (Unit is recommended to be set level to
plant to get correct coverage with the chain drag and/or press roller).
PRESS ROLLER
The roller is designed for compaction of the soil over the seed thus increasing
seed to soil contact for optimal germination of what has been planted. The roller
can also be used for added weight during tillage. This is achieved by leaving the
roller in the folded position and resting it over the front disc.
ELECTRIC LIFT
The Electric Lift serves many purposes; one is the ability to rise & lower your unit
for transport, the other is to gauge the depth of discing and or planting. This is
activated by the UP/DOWN switch that is located on the control box.
WHEEL ASSEMBLY
The Wheel Assembly is how the unit travels when in transport mode, and is
connected to the Electric Lift to raise and lower the unit.
BE SURE TO PACK WHEELS WITH GREASE EVERY 10 HOURS OF USE TO
EXTEND THE LIFE OF THE WHEEL HUB, BEARING/BUSHING WHICHEVER
MAY APPLY TO YOUR MODEL.
IMPORTANT
3BASIC OPERATIONAL INFORMATION
DISC PLOUGH ASSEMBLY
The Disc Plough is set in a manner that soil disturbance is substantial and mimics
a “cross cut” affect for greater mixing of all types of the soil.

11
GP-1200 6-IN-1 SEEDER INSTRUCTION MANUAL
4SEED FLOW CONTROL HANDLE
The Seed Control Handle allows you
to adjust the rate of seed dispensed
depending upon the size seed you are
planting.
The 0-5 Scale helps in determining
the width of the opening. Smaller seed
will be the low end, 0-2, and larger
seed will be the high end, 3-5.
Actual seed hole gauge size opening
in seed box and scale arrow pointer.
ELECTRIC SEEDER BOXES
IT IS RECOMMENDED TO USE A LEAF BLOWER TO BLOW OUT
THE SEED BOXES AFTER EACH BOX OF SEED IS DISPENSED,
AND AFTER FERTILISER DISPENSE.
CAUTION

12
GP-1200 6-IN-1 SEEDER INSTRUCTION MANUAL
The electric seeder motor is activated
by the control boxes ON/OFF switch.
This motor drives the spiral brush that
dispenses the seed. (guard removed)
SEEDER MOTOR
This receiver is located on the rear of
the unit and is secured by a 1/2” x 3
hitch pin with clip. You can adjust the
height of the drag bar to allow more
or less metal grating to be in contact
with the ground.
Drag Bar Receiver
The drag bar and/or harrow mesh is
used for either leveling uneven areas
or for covering smaller seed that only
require a minimal amount of coverage
to germinate. You can adjust the
amount of harrow mesh swing allowed
by putting more or less tension on the
side chains.
Drag Bar with
Harrow Mesh
4SEED FLOW CONTROL HANDLE

13
GP-1200 6-IN-1 SEEDER INSTRUCTION MANUAL
The control box is used to raise
and lower the unit and to switch
the seeder/s motor on and off.
Replacement Fuse—15 AMP BLADE
FUSE.
CONTROL BOX
Adjustment bolts for changing the
angle of the disbursement plate.
The plates can be adjusted vertical/
horizontal or anywhere in between for
desired disbursement of seeds being
planted. The more vertical the angle
the seeds will drop directly behind
the Seeder. The more horizontal the
angle and the seeds will scatter wider
behind the Seeder.
Plates for Seed
Disbursing
4SEED FLOW CONTROL HANDLE

14
GP-1200 6-IN-1 SEEDER INSTRUCTION MANUAL
The roller is designed to pack the soil
for greater seed to soil contact. The
Spring/Chain is designed to add even
more compaction, if desired.
Compaction Roller
CAUTION
Make sure to grab the chain only
when adjusting the roller tension. If
you grab the spring you can pinch
your fingers.
4SEED FLOW CONTROL HANDLE

15
GP-1200 6-IN-1 SEEDER INSTRUCTION MANUAL
5AVAILABLE ATTACHMENTS
Reversible Tooth Spikes/Chisel Plough Attachment/Direct Seed Drill Attachment
› This attachment comes with 6 heavy-duty S-Tines and 6 reversible tooth
spikes.
› This attachment is also used for increased tillage and for added down pressure.
› It works great to break up hard, compacted soil as well as virgin soil prior to
preparing your plots for planting.
› The extra sharp spikes/chisel points penetrate the soil with ease and increase the
down pressure forcing the discs deeper into your soil for increased tillage.
› The attachment ts into the rear 50mm receiver of all the Seeder units.
› The addition of the direct seed drill attachment allows for sowing of seed such
as corn, where greater seed sowing depth is required.
Reversible Tooth Point

16
GP-1200 6-IN-1 SEEDER INSTRUCTION MANUAL
6DIMENSIONS & SPECIFICATIONS
Dry Weight Single Seed Box 332 KG
Dry Weight Dual Seed Box 365 KG
Width 1200 mm
Height 1090 mm
Length completely folded 1800 mm
Length with tow bar folded down 2500 mm
Length with roller bar extended 3350 mm
System voltage 12 Volts
System wiring harness fuse 15 Amp Blade
System wiring harness length 3500 mm
Tyre Pressure – 16 PSI Max Pressure – 22 PSI
Maximum cutting width 1220 mm
Maximum cutting depth 135 mm
Heavy Duty Notched Discs with Sealed Bearings 12 x 406 mm
Maximum seed capacity per Seed Box 25 KG
Recommended ATV 500 cc or larger 4WD

17
GP-1200 6-IN-1 SEEDER INSTRUCTION MANUAL
7MAINTENANCE
› Pack wheels with grease every 10 hours of use to extend the life of the wheel
hub and bearing bushings.
› Check tyre pressure every 10 hours of use. 16 PSI is the recommended pressure.
› Clean Seeder Boxes and Seed Brush often. If using granular fertiliser the Seeder
Boxes must be hosed out after each use to prevent the brush from jamming.
› Inspect seeder brushes for wear when cleaning and replace as necessary.

18
GP-1200 6-IN-1 SEEDER INSTRUCTION MANUAL
8TROUBLE SHOOTING GUIDE
PROBLEM POSSIBLE CAUSE & SOLUTION
Electric lift motor and Seeder Box
Motors are not working.
Check the wiring loom to make sure it is
plugged in to the 12 volt power source.
Check the wiring loom for damage.
Repair or replace as necessary.
Check the 12 volt power source to make
sure it is charged. Charge or replace as
necessary.
Check the 15 blade fuse in the wiring
harness. Replace if blown.
Electric lift motor is working but
Seeder Box motor is not working.
Check wiring harness Deutsch plug to
seeder box motors. Plug in or replace if
necessary.
Possible failure of seeder box motor.
Replace if necessary.
Electric lift motor is not working but
Seeder Box motors are working.
Check wiring harness Deutsch plug to
lift motor. Plug in or replace if necessary.
Possible failure of lift motor. Replace if
necessary.
Seeder box stops dispensing seeds.
Seeder box it empty. Rell with seed as
necessary.
Seeder box brush is jammed with seed.
Empty seeder box and free up seeds
around the brush.

19
GP-1200 6-IN-1 SEEDER INSTRUCTION MANUAL
PROBLEM POSSIBLE CAUSE & SOLUTION
Seeder box stops dispensing
granular fertiliser.
Seeder box is empty. Rell with granular
fertiliser.
Seeder box brush is jammed with
fertiliser. Only use granular fertiliser or
the brush will jam every time. Empty
Seeder box and free up fertiliser around
the brush.
Cutting discs have been damaged.
Cutting discs have not been raised when
driving over concrete or pavement.
Only allow the rubber tyres to be in
contact when moving over concrete or
pavement.
Electric lift motor travelling guide
posts have become jammed not
allowing the motor to move the
Seeder up or down.
The seeder has been driven over uneven
terrain with the cutting blades too far
off the ground causing the travelling
posts to have moved in a way that they
have jammed inside the guide post. Call
greenPRO for assistance.
Always try to travel with the cutting
discs just above the ground or about
100mm clearance when moving the
Seeder from one location to another.
Travelling with them too high can cause
the travelling guide posts to bind and
jam in undulating terrain.
Seeder is not level or weight is too
far forward or backward on the unit.
The gold top link is out of adjustment.
Rotate the top link adjustment handle
to level the unit or disperse the weight
in the desired direction.
8TROUBLE SHOOTING GUIDE

20
GP-1200 6-IN-1 SEEDER INSTRUCTION MANUAL
9HELPFUL PLANTING HINTS
1 Do not ll Seeder Assembly with Seed prior to reaching the area you will be
planting. Also, do not over-ll seeder beyond the recommendation. If you do the
seed will become compacted around the brush and will stall your electric motor.
(In case of compaction, open seed gate fully and then turn seeder motor on to
relieve binding.
2 If you will be planting small, similar or same size single species seeds it is
recommended that you use some type of additive to avoid compaction around the
Brush. This gives the air pockets needed to stop compaction. (The most commonly
used additive is oil absorb. You can also mix additional seed.)
3The Augur Shield inside of the seeder is there to help relieve the weight of heavier
seed onto the brush itself. This shield can be removed when dispensing loftier seed.
Loftier seed can bridge between the shield and the brush and may cause binding
of the brush and or motor. (Rye, Wheat, Oats, Grasses etc.)
4It is recommended to use “de-bearded” Grasses. The beards on these seeds can
collect in the Brush and inhibit correct dispensing of your seeds. (Blue Stem, Switch
Grass, Indian Grass etc.)
Table of contents
Other QUIK CORP Farm Equipment manuals
Popular Farm Equipment manuals by other brands

Blue Diamond
Blue Diamond 103015 Operation and maintenance manual

Honeybee
Honeybee AirFlex 200 Series Calibration guide

H&S
H&S M6 PARTS LIST AND OPERATOR'S INSTRUCTIONS

horsch
horsch SW 750 owner's manual

Norwood
Norwood The Grain Handler 8 Operator's manual

breviglieri
breviglieri b83 Operating and maintenance manual