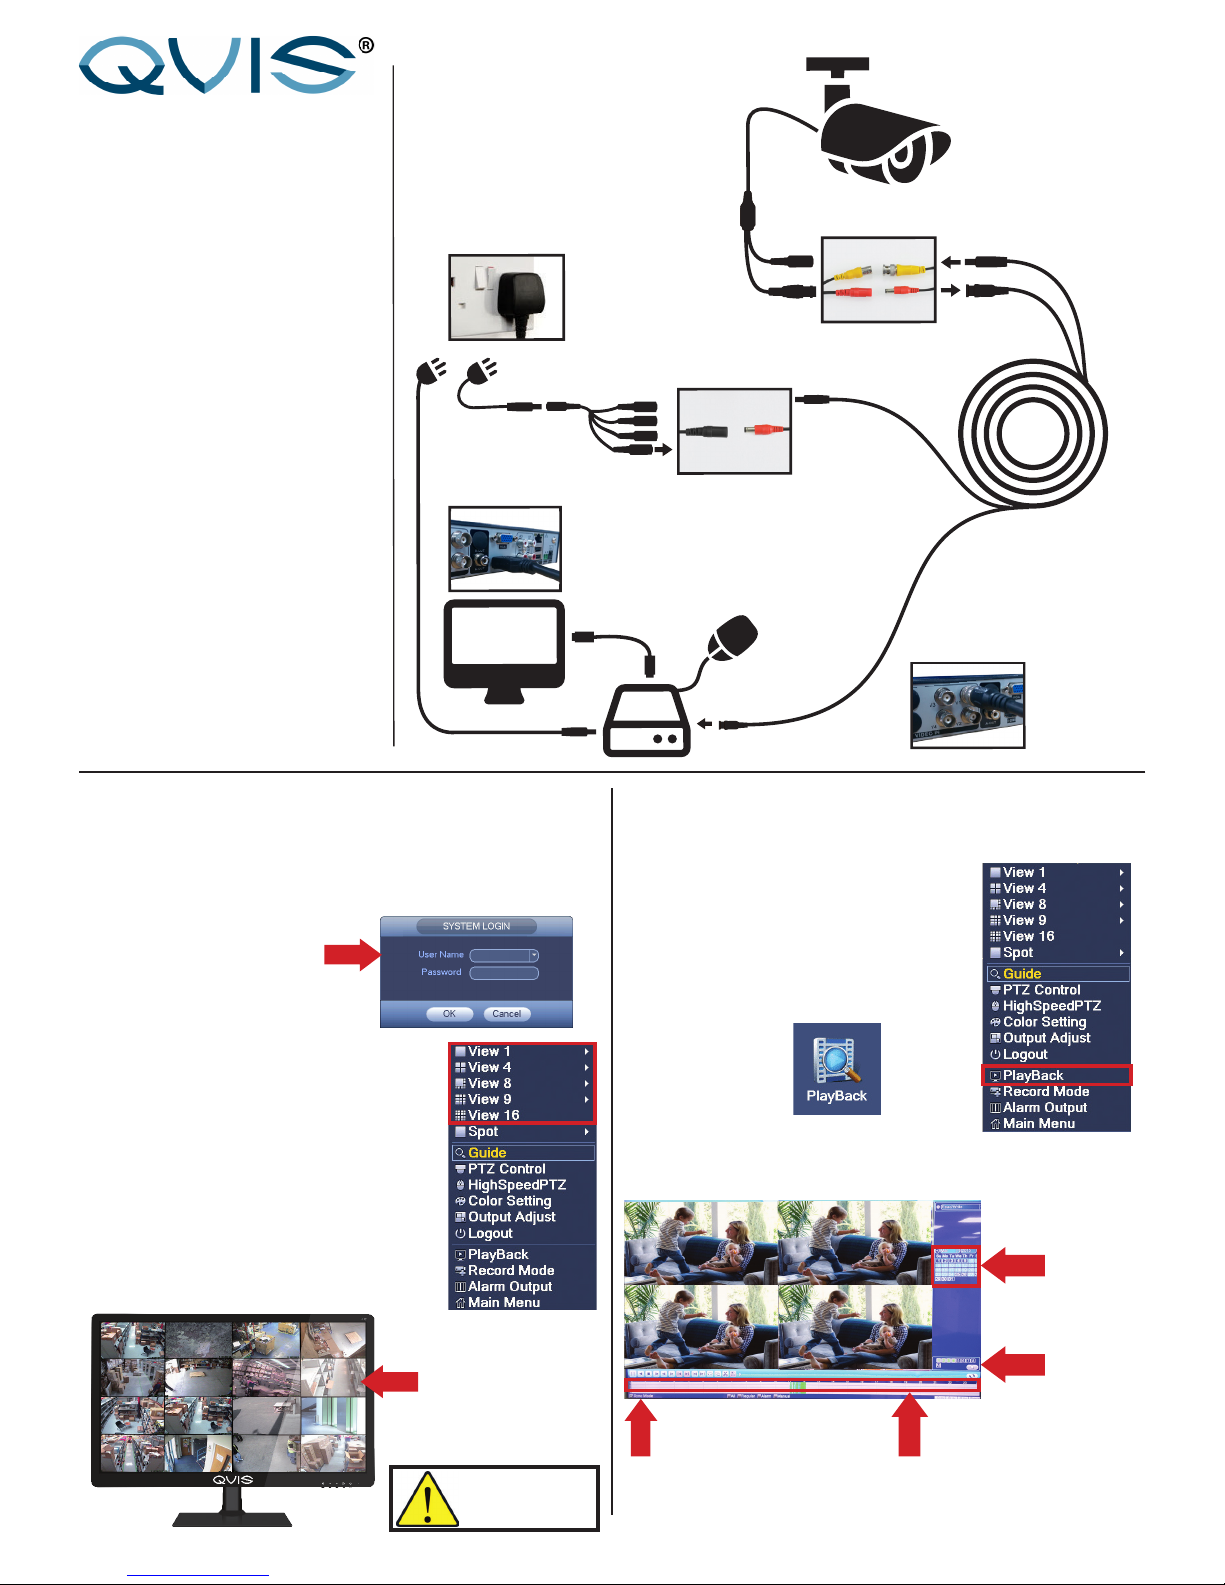
manuals.online logo
Brands
  1. Home
  2. •
  3. Brands
  4. •
  5. Qvis
  6. •
  7. Security Camera
  8. •
  9. Qvis Quattro User manual

Qvis Quattro User manual

BNC Connector
Power Connector
Camera
Output to TV
or Monitor
BNC Connector
to DVR
Power Adaptor
4-Way Split Cable
Power
Connecto r
BEFORE INSTALLING ANYTHING WE
STRONGLY RECOMMEND THAT YOU
CONNECT YOUR CAMERAS TO YOUR DVR
AND TEST YOUR SYSTEM FIRST.
WE CHECK EVERYTHING TO MAKE SURE IT
IS WORKING WHEN IT LEAVES US BUT
OCCASIONALLY THINGS FAIL AND IT IS
BETTER TO KNOW NOW THAN AFTER YOU
HAVE FITTED EVERYTHING!
QUICK SET UP
GUIDE
This connects
your camera to
the DVR
This connects
your camera to
the power supply
Connect the
mouse to the
USB socket
(We recommend you
keep your cables
coiled whilst you test
your system)
1.
2.
3.
Connecting your cameras.
Your Cameras have 2 plugs
attached, one is a BNC connector
(for the video) the other is for
power. Connect these plugs into
the sockets on on the end of one
of the cables inlcuded in the kit.
1.
Switching on
Once you have connected all the
cables successfully. Then connect
the DVR & Camera power leads to
a power outlet. Switch on your TV
and select the HDMI socket you
have connected to.
3.
Connecting your DVR.
At the other end of the cable are
two plugs, these connect your
camera to the DVR and also the
power supply.
2.
DVR Power
You can connect your system to
a HD TV using a HDMI cable, you
can also connect them together
using an RCA lead, or to a
monitor using a VGA lead.
You will also need to connect your
DVR to a TV or monitor. You can
connect your system to a HD TV
using a HDMI cable, you can also use
the RCA (Video Out) socket or the
VGA socket on the back of the DVR.
Further, more detailed instructions on
how to operate your DVR are included
in the main manual which is on the set
up disc included.
We refrain from printing these large
manuals in an effort to limit our impact
on the environment.
VIEWING LIVE FOOTAGE PLAYING BACK RECORDED FOOTAGE
3.
1.
2.
To play back the footage from your cameras that has been recorded
to the NVR’s HDD, please follow these steps below:
When on the multi-tiled live view screen,
right click mouse button, the option list
appears (as shown to the right). Select
the option ‘Playback’ (highlighted by the
red box).
You can also access Playback interface
via the ‘Main Menu’ option and clicking
on the item:
The Playback interface will appear. To view footage from
a specic date and time please follow the numbered steps
below:
1. Choose
the date
here.
2. Choose
channels
here
3. Select on timeline
what time you which
to view footage from
that date.
4. To synchronise
channels selected to
play simultaneously
click button here
You will now be
able to play and
view footage.
Video playback
controls also
provided above
timeline.
1.
To view the live footage from the cameras connected to the NVR
and customise the multi-tiled live view interface please follow the
steps below:
To customise the live view interface
right click mouse button anywhere on
the interface, the option list appears (as
shown to the right). Select any of the
preferred views (highlighted by the red
box). Choose which camera channel you
want to view in the view tiles.
When the NVR has fully booted/powered up (complete startup
wizard if using the NVR for the rst time), login with these
details:
User Name: admin
No password is required at this
point. To create one go to ‘Main
Menu’ -> ‘System’ -> ‘Accounts’
2.
When the live view interface is
customised, you will see the selected
live camera feeds. Double click on one of
the panels to view it in full screen mode.
Double click again to return to multi-tile
mode.
Double click left mouse
button on one of the
tiles to go full screen.
Setup is now complete.
It is very important you
change the password
on your device to
ensure optimum
security.
Analogue Camera Connection
(See ‘Main User’s Guide’ for instructions
on how to setup IP cameras with the NVR)
NVR
NVR
NVR
NVR
NVR
NVR
NVR
REMOTE CONNECTION SETUP: CONTROL YOUR NVR OVER A NETWORK
Success! You should now be fully setup.
3.
1.
PLEASE MAKE SURE THAT YOUR NVR DEVICE IS SETUP AS SHOWN ON THE REVERSE SIDE OF THIS PAGE BEFORE CONTINUING.
IMPORTANT: Please connect NVR to router/
modem to access the Internet.
Ethernet connector
to NVR ‘NET’ port
Ethernet
connector
to spare router
port
Ethernet
cable
Modem - Router
2.
4.
ANDROID APP iOS (APPLE) APP
BASIC SETUP ADVANCED SETUP
Connect the Ethernet cable into
the ‘Net’ port on the rear of the
device, then connect the other end
into one of the spare ports on your
modem-router, as shown here:
Remote connection to view your NVR via a mobile smart device. Remote connection to view & control your NVR
via PSS on a PC workstation
Download ‘Explorer’ app
to your smartphone
Scan QR codes here to
download the app from
either iTunes or Google
Play stores depending on
your phone’s operating
system.
Launch app
Select ‘Local Login’ to add device. To
add device select the ‘+’ symbol.
Select ‘SerialNum’ tab to view P2P
setup. See image to the right.
Give you device a identifying name.
Open ‘Guide’ setup on NVR
Right click mouse button on live view
screen. Select ‘Guide’ option from the
list (highlighted by the red box in the
image to the right)
Follow guide until it displays the unique
SN (serial number) for the NVR.
Use smart device to scan SN QR code
Select this to bring up
QR scanner
After successful scan the
details of the device will
be lled in, select ‘OK’.
A device list will appear
and show the added
device. Select device and
wait for login to nish.
Select Camera you wish
to view. Setup is now
complete.
1.
Port forward Modem-Router
Access your network router via its IP
address using a PC or Laptop.
Select ‘Port Forwarding’
Open/Forward ports: 34667 and 80 for
the Local IP address of your NVR. Please
refer to your router’s manual for details
on how to ‘Port Forward’.
2.install PSS software for Windows
Download PSS Software For Windows v4.06 from:
www.adata.co.uk/support/info/software.
Install PSS Software For Windows v4.06 on your PC or Laptop,
and launch.
3.
Add device to PSS software
To add device select ‘Setting Manage’ and ‘Device manage’
(shown below). Fill in details in the ‘Update device’ setup.
Title = Identifying name of device.
Type = NVR
IP = External IP of your network or DDNS (You can
nd this by searching whats my IP on the Internet)
Port = 34667
User = Admin
Password = password of Device
Click save to complete setup.
4.Open device and view device’s cameras
Open device list in top right corner of the
client software.
Right click on the device’s name
(highlighted by the red box to the right)
and login.
Once device is logged in drag and drop
each camera into the empty GUI.

Other manuals for Quattro

1

Other Qvis Security Camera manuals

Qvis AMB-VANIR User manual

Qvis

Qvis AMB-VANIR User manual

Qvis IPTZ-P400-10X User manual

Qvis

Qvis IPTZ-P400-10X User manual

Qvis APOIP-BL User manual

Qvis

Qvis APOIP-BL User manual

Qvis APOIP-EYE1.3 User manual

Qvis

Qvis APOIP-EYE1.3 User manual

Qvis AHD-P400-4X User manual

Qvis

Qvis AHD-P400-4X User manual

Qvis APOIR-PTZ23 User manual

Qvis

Qvis APOIR-PTZ23 User manual

Qvis MINI-PTZ-23X-H User manual

Qvis

Qvis MINI-PTZ-23X-H User manual

Qvis KIT005-SFX User manual

Qvis

Qvis KIT005-SFX User manual

Qvis EYE-4MP-FG/W Instruction manual

Qvis

Qvis EYE-4MP-FG/W Instruction manual

Qvis APOIP-MB User manual

Qvis

Qvis APOIP-MB User manual

Qvis APOPTZ-18IR User manual

Qvis

Qvis APOPTZ-18IR User manual

Qvis IPTZ-IR20A User manual

Qvis

Qvis IPTZ-IR20A User manual

Qvis KIT005-SFX User manual

Qvis

Qvis KIT005-SFX User manual

Qvis APOHD-PTZ20 User manual

Qvis

Qvis APOHD-PTZ20 User manual

Qvis HDCVI-MB1 User manual

Qvis

Qvis HDCVI-MB1 User manual

Popular Security Camera manuals by other brands

Zavio CB3211 user manual

Zavio

Zavio CB3211 user manual

Axis P3265-LVE-3 user manual

Axis

Axis P3265-LVE-3 user manual

C&H Technologies LICE24NSHB user guide

C&H Technologies

C&H Technologies LICE24NSHB user guide

LECTURER LTC-S2007 user manual

LECTURER

LECTURER LTC-S2007 user manual

GeoVision GV Series quick start guide

GeoVision

GeoVision GV Series quick start guide

Panasonic AW-HE145KP operating instructions

Panasonic

Panasonic AW-HE145KP operating instructions

Cisco CIVS-IPC-5010 user guide

Cisco

Cisco CIVS-IPC-5010 user guide

IOT RF HC8301 user manual

IOT

IOT RF HC8301 user manual

Hitachi KP-FM500WCL Operation manual

Hitachi

Hitachi KP-FM500WCL Operation manual

Axis Q3505-V installation guide

Axis

Axis Q3505-V installation guide

FLIR Navigator II installation guide

FLIR

FLIR Navigator II installation guide

Wirepath WPS-300-CUB-IP-WH quick start guide

Wirepath

Wirepath WPS-300-CUB-IP-WH quick start guide

SECUBEST NVD7-E1-R user manual

SECUBEST

SECUBEST NVD7-E1-R user manual

Luma Surveillance 310 Series quick start guide

Luma Surveillance

Luma Surveillance 310 Series quick start guide

LevelOne FCS-5051 Specifications

LevelOne

LevelOne FCS-5051 Specifications

LTS CMIP9743W-SZ user manual

LTS

LTS CMIP9743W-SZ user manual

OPTICOM NVD-120-S - DATASHEET 2 datasheet

OPTICOM

OPTICOM NVD-120-S - DATASHEET 2 datasheet

Sony SNC-CH115 user guide

Sony

Sony SNC-CH115 user guide

manuals.online logo
manuals.online logoBrands
  • About & Mission
  • Contact us
  • Privacy Policy
  • Terms and Conditions

Copyright 2025 Manuals.Online. All Rights Reserved.