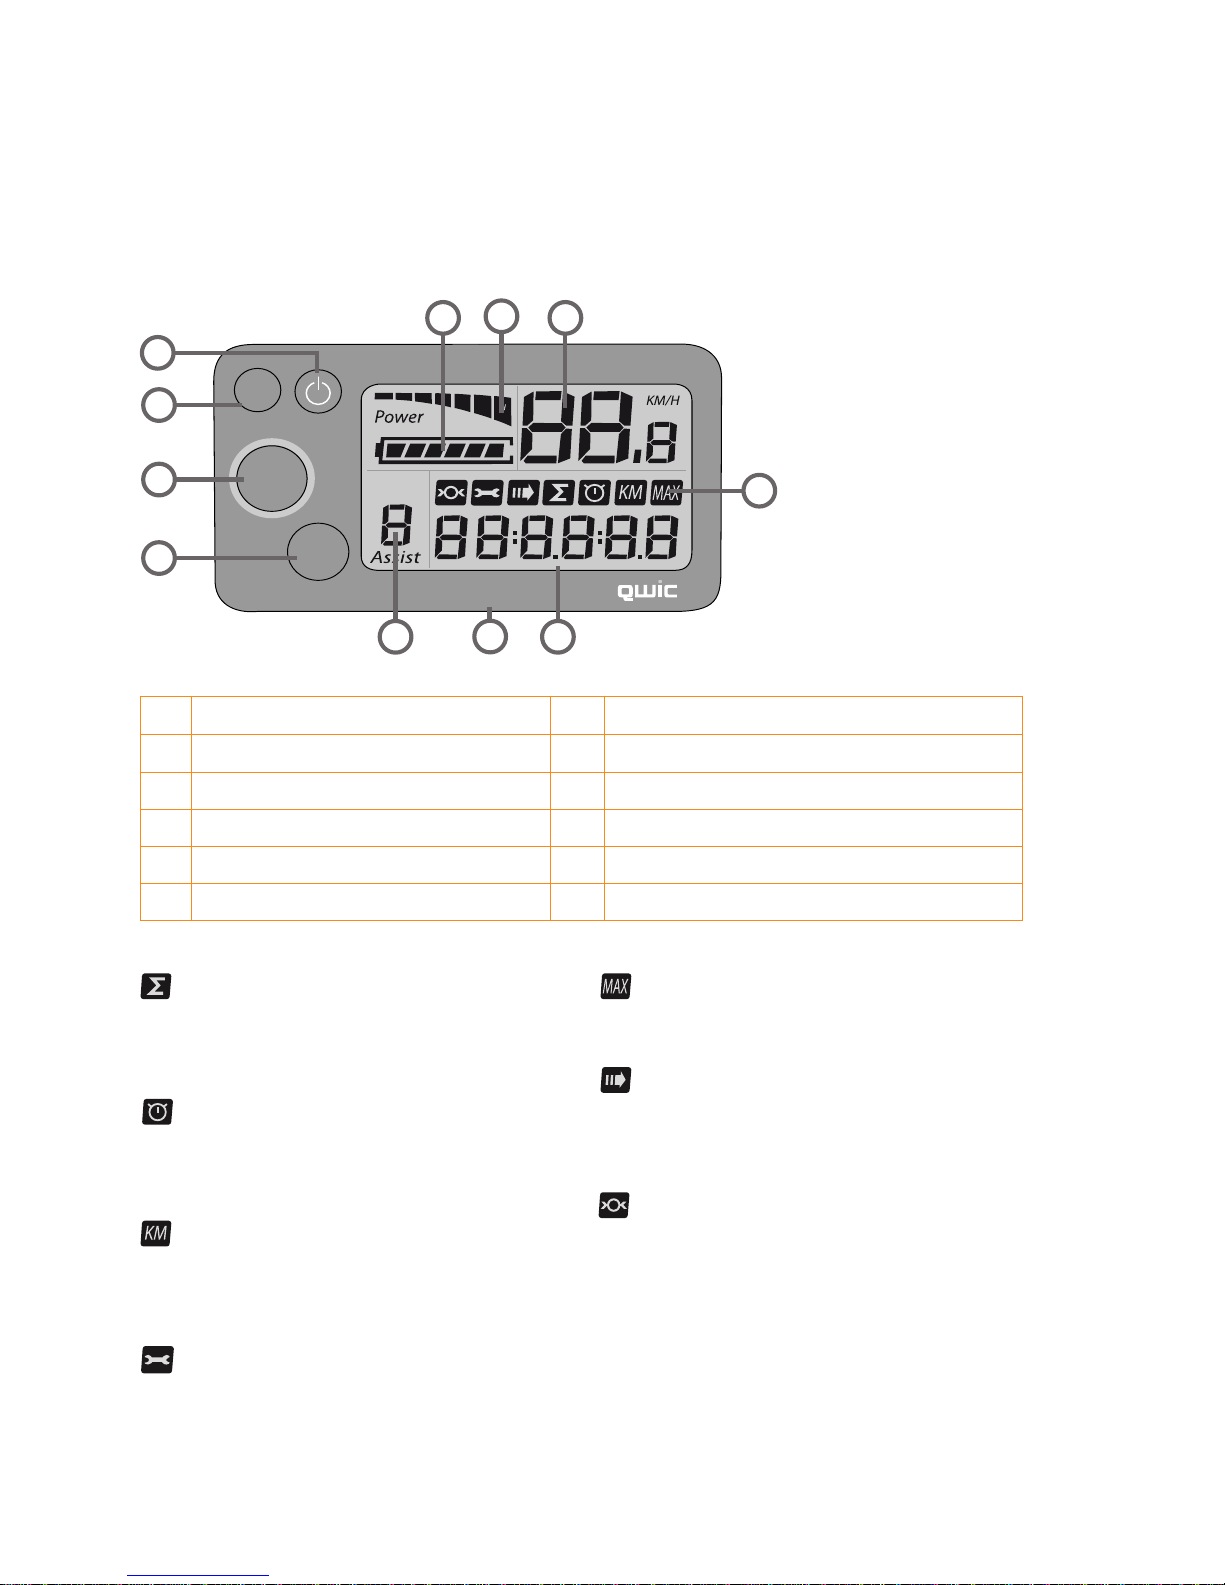
Qwic D9.1 User manual

USER MANUAL
ELECTRIC BICYCLES

FRAME NUMMERS (VIN) (BARCODE)
The Framenumber (VIN) is located on the le side of the frame, down at the
boom bracket, below the barcode.
Colophon
Manual electric bicycles
QWIC reserves the right to make changes in specicaons and / or prices
without noce. This manual has been compiled with great care. QWIC can
not be held responsible for any inaccuracies whatsoever.
Publishers & copyright ©: QWIC, Amsterdam
Your bike may dier from the illustraons in this manual.
Mijn framenummer: E F Y _ _ _ _ _ _ _

1
QWIC Electric Bicycle Manual
Congratulaons!
You have just become the proud owner of a QWIC electric bike. You probably only
want one thing right now: Get out and ride! Before you jump in your seat, we
encourage you to take a moment to read through this manual. Then you know
everything that is needed for many carefree cycling tours.
Want to know more?
For more informaon and the latest news, please visit our website or follow us on
facebook.
www.qwic.nl / www.qwic.eu

2
QWIC Electric Bicycle Manual
Table of contents
1. Display 4
1.1 Information on the screen
1.2 Menu
1.3 (Display-)lightning
1.4 Seng pedal assistance on and o
1.5 ‘Walk assist’ function
1.6 Timer / Tripdistance reset
1.7 Failure codes
1.8 Switching off
1.9 Wheel sizes (mm)
2. Battery 7
2.1 Range
2.2 Baery disconnecng and removal
2.3 Battery charging
2.4 Further informaon on your baery
3 Cycling with power assistance 11
3.1 Wat is Trapbekrachtiging?
3.2 Seng pedal assistance on and o
3.3 Further informaon on pedal assistance
4 Folding Smart-e413
5 Seatpost & Saddle 14
5.1 Saddle height
5.2 Adjusting saddle height
6 Steering wheel 15
6.1 Steering wheel height
6.2 Adjusting steering wheel height
7 Lightning 16
7.1 Setting lighning on and off

3
QWIC Electric Bicycle Manual
8 Brakes 17
8.1 Adjusting brakes
8.2 Additional information rollerbrakes
8.3 Additional information V-brakes
9 Tires 17
9.1 Tire pression
10 Gears 18
10.1 Shifting gears
11 Lock 18
11.1 Additional information lock
12 Maintenance 19
12.1 General maintenance
12.2 Cleaning
12.3 Treatment
12.4 general inspection
12.5 Roadworthy inspection
12.6 Service check-up
12.7 Big maintenance check-up
12.8 Service chart
13 Warnings 24
14 Warranty 25

4
QWIC Electric Bicycle Manual
1.1 Screen information
The display will only work if the battery is in the bike. Switch the display on with the
‘ON / OFF’ Button
1. On / Off & (Screen) Lighting 7. Assistance level
2. Selection options & Menu 8. Energy consumption indicator
3. Power level up & Walk assist 9. Menu
4. Power level down 10. Menu icons
5. Accu indicator 11. USB (not working)
6. Speed
SET
+
-
g. 1.1
2
3
4
5 6
7
8
9
10
11
Totaal afstand
Total distance traveled by bicycle
Resetting is not possible
Timer
Effective driven time since last reset
Reset: ‘MINUS’ 3 sec. pressed
Trip afstand
Driven distance since last reset
Reset: ‘MINUS’ 3 sec. pressed
Maximum speed
Maximum driven speed
Shuffle mode
Shuffle through the four options above
Tiresize
Keep ‘SET’ 10 sec. pressed and then set
with ‘PLUS’ and ‘MINUS’ the desired
tiresize. (see table 1.9)
1
Failure
See 1.3 for failure codes overview
1 Display

5
QWIC Electric Bicycle Manual
1.2 Menu
Selecting Menus
Press and release ‘SET’ and then use the ‘PLUS’ and ‘MINUS’ buons to switch
between the menus. Press ‘SET’ to hold this funcon.
1.3 Screen lightning
Press the ‘ON/OFF’ buon to turn on the (screen) lighng. Press ‘ON/OFF’ again to
turn it o again. When you turn on the screen light, the front and rear light will turn
automacally on as well. They work as well on the baery, so no extra baeries are
required.
1.4 Adjusting the pedal assistance
Use the ‘PLUS’ and ‘MINUS’ buons to select the assistance programs (0 - 8). Power
level 8 gives the strongest assistance. In power level 0 the motor gives no assistance
but you can use the display of the bike. Please note that the baery runs out of
power faster when using a high power level than with a low power level.
1.5 Controlling the Walk-Assist
Use the Walk Assist feature to easily take the bicycle by the hand, by for example
taking it out of a bicycle cellar.
Stand rmly next to the bike and hold your hands on the wheel. If the is a brake
lever present, keep at least one hand on the brake where the brake-circuitbreaker
(interrupon of the motor assistance) is present.
In general, this is the le brake lever. Keep the ‘PLUS’ buon pressed while rmly
holding the steering wheel. Aer a few seconds the engine starts. Once you release
the ‘PLUS’ buon the Walk Assist funcon switches itself o. The Walk Assist had a
speed of 3 Km/h.
1.6 Error codes
Code 01: Problem with 3-phase control from the controller of motor
Code 02: Problem with throle connecon (not in use)
Code 03: Motorcable 3-phase wiring loose or defecve
Code 04: Motorcable Hall Sensor signal Malfuncon(Malfuncon in motor or
motorcable)
Code 05: Malfuncon in brake sensor(signal)
Code 06: Baery voltage too low
Code 07: Motorcable is connected incorrectly
Code 08: Malfuncon in display cable
Code 09: Malfuncon in pedalsensor(signal)
Code 10: Malfuncon in display cable

6
QWIC Electric Bicycle Manual
1.7 Switching on/o
Press the ‘ON/OFF’ buon for 2 seconds to turn o the system. The control panel
can be used only when the baery is connected to the bike. When the display is
turned o while riding the bike, or when riding without baery, it is possible that
random values are displayed as the motor generates light powerstreams. Everything
that appears on the display whan the system is not acvated, can be ignored.
1.8 Tire size / Wheel size (mm)
Seng the correct resize (mm) can be done by pressing the ‘SET’ buon for 10
seconds. *The pre-set sizes can have a small deviaon. This means that the amount
of driven kilometers deviates maximum 5%.
E-bike ETRTO setting
Smart-e foldable bike 53-406 20x1.95 1590*
Trend 3+ / Trend 3 Lite 40-622 28x1.5 2224*
Urban 3 50-622 28x2.00 2268*

7
QWIC Electric Bicycle Manual
2 Battery
2.1 Range
How great is the range of my electric bike?
The total distance that you can travel per trip with you QWIC e-bike without
recharging in between is the range. To assess this properly, you should leave the bike
/ baery a whole night on the charger. The range should be measured during one
trip and not spread over several days.
* Baeries run slowly empty even if the bicycle is not used. If the baery is
connected to the bike it will run out of power faster than if it is taken out and stored
inside.
Capacity baery
The amount of enery in a baery is expressed in Wa-hours (Wh). The number of
Wa-hours is calculated by mulplying the number of Ampere-hours (Ah) mes the
nominal Voltage (36V). The higher the amount of Wa-hours, the higher the range!
Calculaon example: Suppose your baery has a capacity of 10 Ah and a voltage 36
Volts. This baery delivers: 10 Ah x 36V = 360 Wh.
QWIC provides bikes with 216 Wh, 360 Wh and 432 Wh baeries. Which baery you
have, you can read at the boom of the baery. The following chart is an indicaon
of the expected range per baery type.
Wh Expected range**
216 30 - 60 km
288* 40 - 70 km
360 50 - 100 km
432 70 - 130 km
* Only available on certain foldable bicycles
** Measured on a at roadsurface under average condions and with an outside
temperature of about 20 degrees, with an average speed of about 20 km/h and a
total of approximately 75kg load. No rights can be derived from these values.
There is a number of inuencing factors which can signicantly shorten the range.
Many of these factors can be overcome, so that the range is posively aected. Ask
your dealer for personal advice.

8
QWIC Electric Bicycle Manual
Range of QWIC electric bicycles
Factors inuencing range:
* The total weight (weight of bike + rider + cargo)
* The resistance (wind, re pressure, speed, road condions and altude
dierences)
* Your driving behavior (mely shiing up and down and driven speed)
* The outside temperature
* Baery age (baery capacity decreases as the baery ages)
* The use of the power assistance programs (see gure below)
WARNING! Each year the capacity will decrease with a maximum of
15%. This depends on the amount of charging
g. 2.1 g. 2.2
2.2 Detaching the battery
On the le rear of your bike is the baery lock. This lets you lock the baery to the
bike or lets you take it out. You can use the same key as the ring lock. To unlock:
insert the key in the lock and turn it counterclockwise. Use the handle on the
boom of the baery in order to take it out.
Remove the key when you slide the baery back in. By sliding the baery fully back
you will hear a click and the baery is locked. Locking can also be done with the key
in it, by turning the key clockwise aer placing the baery. (g. 2.1 and g. 2.2)
With the Smart-e foldable bicycle the battery lock is at left side on top of the
battery. By flipping the saddle with the handle bar, the battery is easy to remove.

9
QWIC Electric Bicycle Manual
2.3 Charging the battery
With the supplied charger you can charge the baery. (g 2.5) You can charge
the bike both on the bike as o the bike. The loading connecon of the baery is
covered by a turnable plasc cap.(g 2.4) During charging a red light will be visible
on the charger. When this indicator is green, the baery is fully charged. (g 2.6)
g. 2.4 g. 2.5 g. 2.6
* Aenon! For your safety, you can charge and / or store the baery the
best in a (re) safe place.
* Aenon! If the baery is not used for a long me is can sustain
permanent damage. Make sure you fully charge the baery every 3 months
(24 hours on the charger)
* Aenon! When the baery is completely empty, you need to charge it
immediatly. When cells are empty for a long me, they may be irreparably
damaged.
* Aenon! If the bike is not used for a long me, we recommend you to
remove the baery from the bike.
* Aenon! Use only the supplied charger.
* Aenon! Use your charger only in dry, well-venlated places.
* Aenon! The baery charger is not resistant against moisture and / or
drop down shocks.

10
QWIC Electric Bicycle Manual
2.4 Further information about the battery
* The environmental burden is not heavy, electricity is part of clean forms energy.
Your baery should be (just like normal baeries) submied in order to be recycled
at the end of the life cycle (look for a drop-o point in your area).
* The baery pack can, under ideal condions, be fully charged and discharged
around 1000 - 1500 mes. The performance will slowly decline by lots of use, and
eventually the baery pack should be replaced.
* The performance of the baery will decrease at low temperatures. The referred
range is opmal at a measured temperature of approximately +/-25 °C. The guideline
is that the capacity decreases by 1 % at a 1 °C temperature drop.
* Do not connect the posive contact point of the baery to the negave contact
point.
* Do not expose the baery to high temperatures
(> 50 °C), such as heat and re.
* Do not take the baery apart. Consult your dealer by any problems. With long-
term storage, place the baery in a shady, cool and dry place.
* The baery is sealed and therefore resistant to rain. So you can use you bike well in
bad weather. Try not to expose the baery to large amounts of water.
* Aenon! The capacity will increase the rst 4 - 10 charging cycles (e.g. up
to appoximately 1000 km with the 560 Wh baery) and only then reach its fully
specied capacity range.
* Aenon! Capacity may be reduced up to 15 % per year. The decrease depends on
usage and charging cycles.
* Aenon! It may happen that same bicycles purchased at the same me give a
dierent range. New baeries provide minimal their specied values. There can be a
slight variaon, so it is possible that one of the bikes performs above specicaons.
* Aenon! The baery without luggage is only suitable for small loads such as
bages, up to max 10 kg.
* Aenon! Child seats or heavy load (up to max 20 kg) can only be connected to
the carrier, which can be ordered oponally.

11
QWIC Electric Bicycle Manual
3 Pedal assistance
3.1 What is pedal assistance?
The bike is equipped with electric pedal assistance. The motor enhances your
eorts, thus increasing your performance while you deliver less power. The
funconing of the pedal assistance depends on whether the pedals are rotated and
the cycling speed. When accelerang from stand, the acceleraon is great so have
an easy start on the way.
3.2 Setting pedal assistance on/o
Once the display is turned on the power level is set in level 0. The ‘PLUS’ and
‘MINUS’ buons can be used to enlarge or lessen the assistance level. The motor
gives assistance in the power levels 1-8, where 8 gives the highest power assistance.
You can turn o the pedal assistance by pressing the ‘MINUS’ buon on to power
level 0. Please note that the baery runs out of power faster when using a high
power level than with a low power level. (g 3.1)
* Also the re pressure, the mass of the user, the surroundings, the temperature and
the cycling behavior can have a major impact on the range.
8
7
6
5
4
3
2
1

12
QWIC Electric Bicycle Manual
3.3 Further information on pedal assistance
* Due to the powerful support you will easier achieve high speeds than usual. Do not
let yourself be suprised, use the bike for the rst me in a low trac environment,
to get used to the bike.
* Stepping up the bike, if the pedal assistance is turned on, is unlike a normal bike.
You will drive o easier. It is advisable to use powerlevel 1-3, for driving away from
stand.
* When the pedal assistance is turned o, the bicycle will have very minimal
resistance. In this way, the bicycle can also be used a normal bike. Be careful
however that if you ride without a baery, the lighng also can not work.
* The funconing of the pedal assistance is dependent on the cycling speed, the set
power level program and how full the baery is.
* The pedal assistance is legally limited to a speed of 25 km/h. This means that if
you are going towards a speed of 25 km/h the pedal power will decrease to zero
gradually.
* The range of the bicycle depends on the circumstances. The given values are
measured under average condions. The most important factors are:
weight of rider, speed, slopes in the trail, re pressure, wind, lots of accelerang and
braking (e.g. in the city) and the temperature. At very low temperatures, the range
will be inuenced greatly. Take this into account.
* Aenon! Turn the assistance o when you step o the bicycle. Never walk with
enabled assistance.
* Aenon! Keep the le brake lever (if present and possibly also supplied with
brake circuit-breaker) pressed in when you are staonary with enabled power
assistance.

13
QWIC Electric Bicycle Manual
4 Folding the Smart-e4
1. Flip the side stand completely
2. Flip the pedal to the upwards position
3. Unlock the frame clamp (fig. 5.1, fig 5.2). and
fold the frame
4. Unlock the steer clamp (fig. 5.3 - fig. 5.4) and
fold the steering wheel against the right side of the
bicycle. Be aware of any cables getting stuck behind
the saddle
5. Lower the saddle to its lowest position
6. Lower the steering wheel to its lowest position
g. 5.1
g. 5.2
g. 5.3 g. 5.4 g. 5.5
g. 5.6

14
QWIC Electric Bicycle Manual
5 Saddle
5.1 Desired seat height
With the seat height the distance between the saddle and pedal in the lower
posion is meant. The seat height is properly adjusted when the knee is bent just a
lile while you stand with your foot on the pedal (in the lower posion). Please do
not hesitate to ask your dealer for advice!
* Aenon! If you can put your feet at on the ground, your saddle is too low.
5.2 Seat adjustment
The height of the seat can be adjusted by turning the Allen bolt in the seat clamp
loose with an Allen key. g 5.2
* Aenon! The safety marks should never be visible when the seat is adjusted in
height.
By the saddle connecon you can lt the seat and adjust it to front as well as to the
back. To adjust the saddle use an Allen key to loosen the Allen bolt on the underside
of the saddle connecon. g 5.4
g.5.1 g. 5.2
g. 5.3 g. 5.4

15
QWIC Electric Bicycle Manual
6 Handle bars
6.1 Desired handlebar setting
As a rule of thumb for determing the distance between the handlebar and the
saddle is that you should be able to touch the handlebars with your st while you
hold your elbow at the point of the saddle. Note that this rule of thumb should be
seen as a guideline, because this seng is very personal. Note also that a too big
distance between the saddle and the handlebars, oen can be the cause of neck,
back, and shoulder complaints. We recommend that you adjust the saddle and
handlebars to your wishes together with your dealer.
6.2 Adjusting the handle bars
You can adjust the height of the handlebars by, with the big lever up, lt the
handlebars all the way down. Aer this, the Allen bolt is visible and accessible, aer
loosening this bolt, you can adjust the height.
By the foldable bicycles (Smart-e) you can lt the handlebars by loosen the Allen bolt
on the front. The height of the handlebars can be adjusted by turning the Allen Bolt
on the top. These bolts can be potenally covered by protecve caps.
*Aenon! Do not forget to ghten the bolts aer adjustments and make sure that
your handlebars are aached rmly again.
g. 6.1
A
B
C

16
QWIC Electric Bicycle Manual
8 Brakes
Rollerbrakes will provide a luxurious braking experience, are durable and require
just lile maintenance as well. V-brakes are lightweight and provide a good sense
of control. With too much wear and tear (if the notches are no longer visible), the
brake pads must be replaced.
8.1 Adjusting the brake sensitivity
With the cable adjuster at the brake lever, you can ne tune the brake sensivity.
By turning the adjuster closer you increase the slack of the cable and by rotang it
open, you chuck the cable right on.
7 Lightning
7.1 Switching lightning on/o
The Smart-e foldable bicycles have battery front- and rearlightning. You can switch
these on or off with the buttons on top of these lightning elements.
g. 8.5

17
QWIC Electric Bicycle Manual
8.3 Additional information V-brakes
The brake pads must be mounted so that the blocks hit the side completely. The
cable can be adjusted with the set screw. There must be the same amount of space
between tboth the brake pads and the rims. If this is not the case, you can center
the brake by adjusng the screws on the side of the brake lever.
(See the image below)
g. 8.2
9 Tires
9.1 Desired tire tension
The re pressure has a strong inuence on the range and comfort of your bicycle.
QWIC advises you to always keep your res at the right pressure. On the side of all
res the maximum re pressure can be found.
LET OP! Te zachte banden zullen de actieradius ernstig verkleinen!

18
QWIC Electric Bicycle Manual
10 Gears
10.1 Shifting gears
The bicycles have hub or derailleur gears, depending of the bicycle model. The gears
can be shied by handling the gripshier which is integrated in the right gripshier
(g 10.1) The display of the shier provides you the informaon about which gear
you’re in. Please shi one gear at the me.
How to shift gears
Hub gear: With the hub gears you can easily shi gears, even in a
standsl.
Derailleur gear: Dont shift gear in a standstil and never cycle backwards.
11 Lock
11.1 Lock information
Your e-bike is equipped with an ART approved AXA ring lock. The ring lock can be
closed by turning the key clockwise while turning the bracket down. Now take the
key from the lock when you have reached the lowest posion with the bracket.
To purchase ensurance for the electric bicycle the following specicaons are
requested:
- Brand and type name: QWIC, electric bicycle, type of model (D9.1 / N7.1 / A2.1)
- Frame number: your unique framenumber
(page 2), Starng with E F Y
- Brand and type ART cered lock: AXA defender
- Key number: Your unique key number
- Date of purchase: Your date of purchase
* Be aware! There is one key for the ART cered lock and the baery as well.
g. 10.1
This manual suits for next models
2
Table of contents
Other Qwic Bicycle manuals