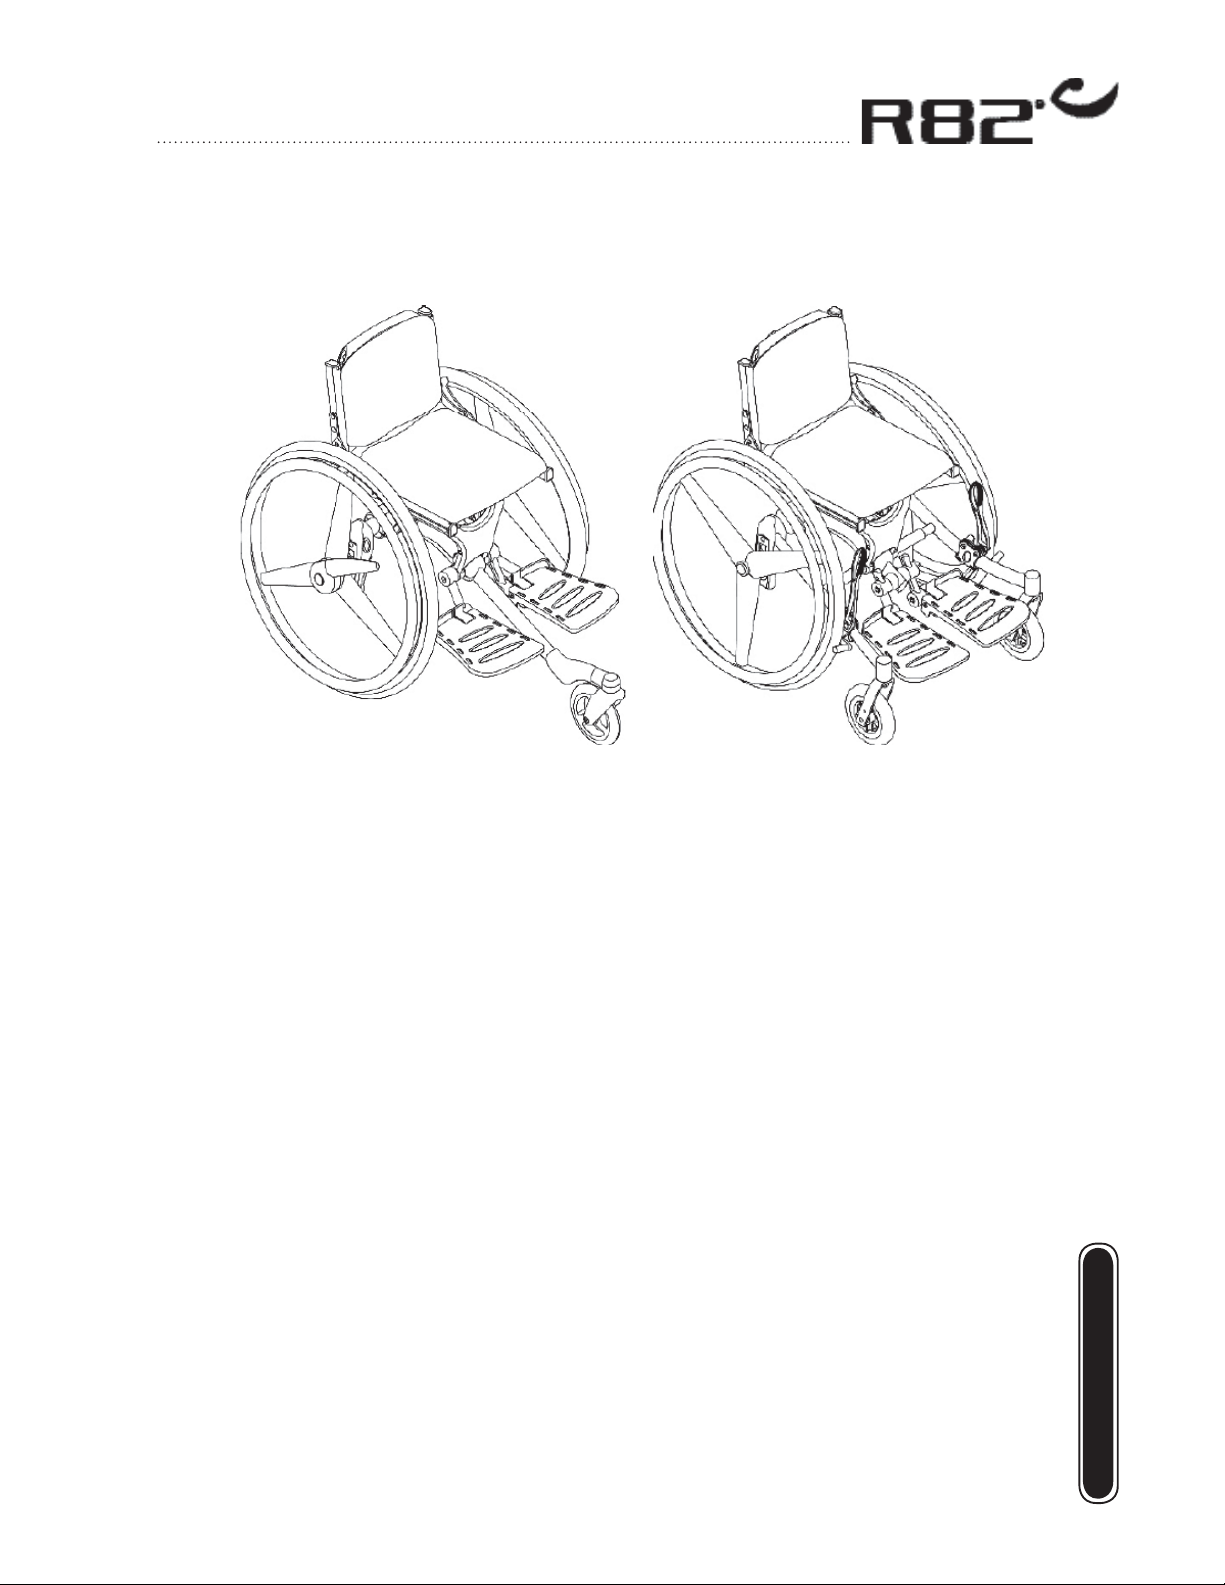
R82 cheetah User manual

cheetah
04.2005
TM
© 2004 R82 A/S. All rights reserved.
The R82 logo and the Cheetah chairs are registered trademarks of R82 A/S.
United States user manual

2
E
N
G
L
I
S
H
CONTENTS
Safety ................................................................................4
Warranty............................................................................4
Tools..................................................................................4
Washing.............................................................................5
Maintenance......................................................................5
Warnings .....................................................................6-10
Mounting and dismounting from the chair ....................... 11
Quick release...................................................................12
Foot support ....................................................................13
Drum brake......................................................................14
Hand brake......................................................................15
Seat and back angling.....................................................16
Back and seat width ........................................................17
Seat depth and back height.............................................18
Back extension................................................................19
Seat extension and webbing ...........................................20
Anti-tip device..................................................................21
Head support and helper's handle...................................22
Swing away side supports...............................................23
Transfer armrests and side plates...................................24
Pommel ...........................................................................25
Side plates.......................................................................26
Arm rests.........................................................................27
Tray .................................................................................28
Conversion kit..................................................................29
Wheel combinations Cheetah 3-wheeler.........................30
Wheel combinations Cheetah 4-wheeler.........................31
Seat belt attachment........................................................32
Fix locks...........................................................................32
Transportation .................................................................33
Transportation in motor vehicles .....................................34
Transportation in motor vehicles 1/2 ...............................35
Transportation in motor vehicles 2/2 ...............................36
Product identification.......................................................37
Measurements.................................................................38
Accessories.....................................................................39
Technical data..................................................................40
Producer..........................................................................40
Distributor........................................................................40
Care and maintenance....................................................41
Stain removal guide.........................................................42
Troubleshooting...............................................................43

3
Pat. pend. Pat. pend.
CHEETAH
The Cheetah is an active wheelchair, developed for the active child who both
wants to and can move around on their own. With this wheelchair, the child has
every opportunity of moving around and being together with other children, still
withexeptionalseatingcomfortas the mainfocus.The Cheetah is delivered either
as a 3-wheel or 4-wheel model.
This user manual is meant as a guide to assist the user in gaining the full benefit
of the many options offered by the Cheetah. Therefore we recommend that you
go through this manual before the Cheetah is put into use.
E
N
G
L
I
S
H

4
E
N
G
L
I
S
H
SAFETY
The Cheetah has earned the CE-mark. This certifies that it meets all relevant European
safety requirements. The Cheetah has also been registered with the US FDA (Food and
Drug Administration).
FurthertheCheetahisapprovedaccordingtoEN12182andEN12183.Thismanualisapproved
according to ISO 7176-15 and EN 1041.
Remove the CE-mark, when rebuilding the product or when using other than original
R82 spare parts.
Never leave your child unattended in this product. Ensure permanent supervision
by an adult. Incorrect use of the Cheetah may cause serious injury to the user. Take
care that all the fixations and adjustments are placed and fitted correctly and check
WARRANTY
R82/Snug Seat warrants the Cheetah wheelchair, including the frame and stainless steel
quick release rear axles, against defects in materials and workmanship for five years.
All R82/Snug Seat manufactured and distributed parts and frame attachment components,
including,butnotlimitedto,rigidside guards, antitips, pushhandles,wheellocks,drumbrakes
caster forks, hubs, armrests, caster and bearings for front wheel assembly and axles are
warrantedagainstdefects in materials and workmanshipforone year from date ofpurchase.
Items not warranted include all tires and tubes, upholstery, and foam or padded parts.
R82/Snug Seat will repair or replace, at R82/Snug Seat’s sole discretion, the wheelchair, its
parts or components provided an authorization for return has been approved by R82/Snug
Seat, and the part in question is returned to Snug Seat, 12801 E. Independence Blvd., Stal-
lings, NC, 28105 within the prescribed period of warranty.
Cheetah’s returned to Snug Seat on which the serial number has been removed or altered
will not be repaired or replaced, and the warranty will be voided.
R82/Snug Seat will not warranty and parts damaged by improper installation and/or repair,
neglect, accident or misuse on the part of the owner, nor those parts altered or serviced by
an agency not authorized by Snug Seat. R82/Snug Seat will not warranty the frame or any
parts damaged when the maximum weight limit of 155 pounds is exceeded. Damage to
the frame or components resulting from use of tire downs and/or seat restraints will not be
covered by the R82/Snug Seat warranty.
R82/Snug Seat’s sole liability extends to repair or replacement of the wheelchair, its parts or
components, as specified herein. The foregoing is in lieu of all other warranties, expressed,
implied, or statutory, whether written or oral.
TOOLS
There is a tool bag at the back of the chair with 3, 4, 5 and 6 mmAllen keys. Use these tools
for the adjustments described in the manual. You will also find a set of reflector stickers
which may be adhered to the chair. We recommend that you place the reflector stickers on
the front by the front wheels, on the back under the seat and on the sides of the chair.

5
MAINTENANCE
- Check the tires regualary for air.
Air presure: 110 PSI/7,5 bar/750 kPa - 36 PSI/3,5 bar/350 kPa.
- Check the function of the hand brake regularly. Safety distance between the wheel and
the brake block is: 8-10 mm
- Clean the frame on a regular basis, especially when it has been in contact with rainwater
/ saline water.
Adjustmentswhichare not described in this manual,mustonlybe made by authorized
R82 personnel.
Oil the swing away parts, the turn handle and the spring boxes occasionally. We
recommend use of a synthetic teflon oil.
Do not use any cleaning materials containing chlorine or methylated spirit. Please
find the stain removal guide in the back of the manual.
WASHING
The cover on the Cheetah is removable and washable at 104°. Further, regular vacuum
cleaning and brushing will help to preserve the fabric's colour and appearance year after
year. It is important to keep the frame clean to maintain the warranty of the chair.
E
N
G
L
I
S
H

6
WARNINGS
Do not operate this wheelchair without first reading and understanding this manual. If you are unable to
understand the warning and instructions contact your dealer or Snug Seat, Inc. at (800) 336-7684 before
attempting to use the wheelchair. If you fail to pay attention to these warnings damage to your chair, a fall,
tip-over, or loss of control may occur resulting in severe injury to the rider or others.
Save These Instructions
Notice
The information contained in this document is subject to change without notice.
Operating Information
Never exceed the weight limit of 155 pounds (71 kg), for the combined weight of the rider and items carried.
If you do exceed the weight limit, damage to your chair, a fall, tip-over or loss of control may occur and cause
severe injury to the rider or others.
Before each use of your wheelchair:
1. Make sure the chair rolls easily and that all parts work smoothly. Check for noise, vibration, or a change
in ease of use. (They may indicate low tire pressure, loose fasteners, or damage to the chair).
2. Repair any problem. Your authorized supplier can help you find and correct the problem.
3. The rear wheel axles must be full engaged before using the wheelchair. The locking pins must be protru-
ding past the inside of the rear wheel axle bushing for a positive lock. If not locked, a wheel may come off
and cause the user to fall.
4. Lock the antitips in place.
5. Ifthe wheelchair isequipped with theoptional reclining back,make sure theback is lockedsecurely before
using the wheelchair. Failure to do so may result in injury.
To determine and establish your particular safety limits, practice bending, reaching and transferring activities
in several combinations in the presence of a qualified health care professional before attempting active use
of the wheelchair.
Do not attempt to reach objects if you have to move forward in the seat.
Do not attempt to reach objects if you have to pick them up from the floor by reaching down between your
knees.
Do not lean over the top of the backrest to reach objects from behind as this may cause the chair to tip
over.
Do not shift your weight or sitting position toward the direction you are reaching as the wheelchair may tip
over.
Do not tilt the wheelchair without assistance.
Do not use an escalator to move a wheelchair between floors. Serious bodily injury may occur.
E
N
G
L
I
S
H

7
WARNINGS CONTINUED
Before attempting to transfer in or out of the wheelchair, every precaution should be taken to reduce the
transfer distance. Turn both casters toward the object you are transferring to. R82 suggests engaging the
wheel locks, or drum brakes, to prevent the wheels from moving when transferring.
Do not operate on roads, street or highways.
Do not operate the chair in sand, loose soil or over rough terrain. This may damage wheels or axles, or
loosen fasteners of your chair.
Exercise caution when going up or down steep slopes or ramps.
Do not attempt to move up or down an incline with a water, ice or oily film.
Contact with water or excess moisture may cause your chair to rust or corrode. This could cause your chair
to fail. Dry your chair as soon as possible if it gets wet, or if you use water to clean it.
Do not attempt to ride over curbs or obstacles. Doing so may cause your chair to turn over and cause bodily
harm or damage to the chair.
Do not use parts, accessories, or adapters other than those authorized by R82 or Snug Seat.
Do not attempt to lift the wheelchair by any removable (detachable) parts.
Do not use the footplate as a platform when getting in or out of the wheelchair.
Do not stand on the wheelchair frame or seat.
The wheelchair user should always wear a seat restraint if one is recommended.
Snug Seat recommends the use of wheel locks at all times.
Do not use the chair unless it has the proper tire pressure (psi). Do not over-inflate the tires. Failure to follow
these suggestions may cause the tire to explode and cause bodily harm.
Note: Recommended tire pressure is indicated on the sidewall of the tire.
Replacement of a pneumatic tire or tube must be performed by a qualified R82/Snug Seat dealer or qualified
technician.
Antitips must be attached at all times. Since the antitips are an option on this wheelchair, R82 strongly re-
commends ordering antitips as an additional safeguard for the wheelchair user.
The user should always use a seat-positioning strap. Since the seat-positioning strap is an option on this
wheelchair, R82 strongly recommends ordering the seat-positioning strap as an additional safeguard for the
wheelchair user.
E
N
G
L
I
S
H

8
WARNINGS CONTINUED
Alwaysusethehandrimsforself-propulsion. Since the handrims are an option on this wheelchair, R82strongly
recommends ordering the handrims as an additional safeguard for the wheelchair user.
Never use this wheelchair for weight training or other sports activities such as tennis, basketball, rugby, etc.
The Cheetah has not been designed or tested for any kind of weight training or sports. If occupant uses this
wheelchair for any of these activities, R82/Snug Seat shall not be liable for bodily injury and the warranty will
be voided immediately.
Safety/Handling Of Wheelchairs
Safety and handling of the wheelchair requires the close attention of the user as well as the assistant. This
manual points out the most common procedures and techniques involved in the wheelchair’s safe operation
and maintenance. It is important to practice and master these safe techniques until you are comfortable
maneuvering around frequently encountered architectural barriers.
Use this information only as a basic guide. Many people have used the techniques that are discussed on
the following pages successfully.
Individual wheelchair users often develop skills to deal with daily living activities that may differ from those
described in this manual. R82/Snug Seat recognizes and encourages each individual to try what works best
forhim/herin overcoming architectural obstacles they mayencounter. Techniques in this manual areastarting
point for the new wheelchair user and assistant with safety as the most important consideration for all.
Stability and Balance
To assure stability and proper operation of your wheelchair, you must, at all times, maintain proper balance.
Your wheelchair has been designed to remain upright and stable during normal daily activities as long as you
do not move beyond the center of gravity.
Virtually all activities that involve movement in the chair have an effect on the center of gravity.
Do not lean forward out of the chair any further than stability allows. Make sure the castes are trailing forward
whenever you lean forward. This can be achieved by advancing the chair and then reversing it in a straight
line.
Coping With Everyday Obstacles
Coping with the irritation of everyday obstacles can be alleviated somewhat by learning how to manage your
wheelchair. Keep in mind your center of gravity to maintain stability and balance.
A Note To Wheelchair Assistants
When assistance to the wheelchair user is required, remember to use good body mechanics. Keep you back
straight and bend your knees whenever tilting the chair or traversing curbs, or other impediments. Also, be
aware of any removable (detachable) parts. These must never be used for handhold or lifting supports, as
they may inadvertently release, resulting in possible injury to the user and/or assistant(s). When learning a
new technique, have an experienced assistant help you before attempting it alone.
E
N
G
L
I
S
H

9
WARNINGS CONTINUED
Tilting
Caution – Do not tilt the chair without assistance. When tilting the wheelchair, an assistant should grasp the
back of the chair on a non-removable (non-detachable) part. Do not use the attendant handle to tilt the chair.
Inform the chair occupant before tilting the chair and remind him/her to lean back. Be sure the occupant’s
feet and hands are clear of all wheels. Apply a continuous motion until the balance point is achieved. At this
point, the assistant will feel a difference in the weight distribution. Turn the chair in the desired direction if
necessary. Slowly lower the chair in one continuous movement. Do not let the chair drop the last few inches
to the ground. This could result in injury to the occupant.
Tilting: Curbs Or Steps
Warning – R82/Snug Seat does not recommend that these wheelchairs be used where curbs present an
obstacle.
After mastering the techniques of tilting the chair, use this procedure to tackle curbs, short stairs, etc.
Method 1 – The attendant should tilt the chair until the front casters clear the curb. Roll the chair forward
and lower the front casters to the sidewalk. Push the chair forward until the rear wheels roll up and over the
curb.
Method 2 – Unless the first assistant has exceptional upper body strength, it is recommended that Method 2
utilize two assistants. The second assistant should be positioned at the front of the wheelchair lifting upward
on a non-removable (non-detachable) part of the wheelchair frame when lifting the wheelchair and stabilizing
the wheelchair when the wheelchair is being lowered to the ground.
The first attendant should stand on the sidewalk and turn the wheelchair so the rear wheels are against the
curb or step. The wheelchair should be tilted back to the balance point and, in one continuous movement,
the rear wheels should be pulled up and over the curb or step. Do not return the front casters to the ground
until the wheelchair has been pulled backwards far enough for the front casters to clear the edge of the curb
or step.
Tilting: Stairways
Warning– Concerning stairway access: R82/Snug Seat doesnotrecommendthatthe Cheetah be transported
up or down stairways with an occupant n the wheelchair.
Donot attempt to liftwheelchair by lifting onany removable (detachable) parts. Liftingby means of removable
(detachable) parts of a wheelchair may result in injury to the user or attendant, and damage to the wheelchair.
Extreme caution is advised when it is necessary to move an occupied wheelchair up or down a stairway.
R82/Snug Seat recommends using two (2) assistants and making thorough preparations. Make sure to use
only secure, non-detachable parts for handhold supports.
Follow this procedure for moving the chair between floors when an elevator is not available:
1. Afterthechairhasbeentilted back to the balance point, one assistant (in the rear) backs the chair up against
the first step, while securely grasping a non-removable (non-detachable) part of the chair for leverage.
2. Thesecondassistant, with a firmholdon a non-detachable part oftheframework, lifts the chairupand over
the stair and steadies it as the first assistant places one foot on the next stair and repeats the procedure.
3. The front of the chair should not be lowered until the last stair has been negotiated and it has been rolled
away from the stairway. E
N
G
L
I
S
H

10
WARNINGS CONTINUED
Transferring To And From Other Seats
Warning – Before attempting to transfer in or out of the wheelchair, every precaution should be taken to re-
duce the transfer the distance. Turn both casters toward the object you are transferring onto. Also be certain
both wheel locks or drum brakes are engaged to help prevent the wheels from moving. Caution – When
transferring, position yourself to a safe position on the seat. This will prevent damage to upholstery and the
possibility of the wheelchair tipping forward.
Note: This activity may be performed independently provided you have adequate mobility and upper body
strength.
During independent transfer, little or no seat surface will be beneath you. Use a transfer board if at all pos-
sible.
R82/Snug Seat recommends you place your feet on the floor when transferring from your chair.
E
N
G
L
I
S
H

11
E
N
G
L
I
S
H
MOUNTINGAND DISMOUNTING
FROM THE CHAIR
Before placing the user into the Cheetah the
brakes have to be locked in place.
Place the user into the Cheetah and adjust the
accessories to achieve the optimal seating for
the child.
Further, go to the pages concerning trans-
fer armrest and side plate.

12
B
A
E
N
G
L
I
S
H
QUICK RELEASE
Cheetahis,as standard,supplied with removab-
le Quick Release driving wheels, which means
fastandeasydimounting ofthewheels,when for
example the wheelchair has to be transported.
Quick Release driving wheels:
Push and hold the release button (A) and pull
out the wheel. Make sure that the wheel "clicks"
into place when remounting.
Quick Release front wheel (Optional):
Push the release button (B) and pull down the
front fork and wheel. Make sure that the wheel
"clicks" into place when remounting.

13
A
B
E
N
G
L
I
S
H
FOOT SUPPORT
Loosen the screws (A) with the enclosed 6 mm
Allen key to angle the foot plate. Angle the foot
plates individually.
Thisalso allows theindividual footrestextension
tubes to be adjusted to the desired length.
The foot plates can be equipped with straps
when needed (B).
Watch out not to get the feet caught in the
gap between the footplates.

14
D
AB
C
E
E
N
G
L
I
S
H
DRUM BRAKE
The Cheetah, 3-wheel version is delivered with
drum brakes as standard (A). The brake does
not require any maintenance.
Pull back the brake (B) to activate, and push
forward (C) to deactivate.
Follow the instructions below to mount wheels
with drum brakes on the Cheetah.
* Loosenthe nut (D)to removethe pushwheel.
Mount the new wheel with drum brake and
fasten the nut.
Tighten the screw (E) at the brake shoe, if
the drumbrake does not brake enough.
The Rear Wheel height must be changed
by an authorized R82/Snug Seat Repre-
sentative ONLY.
Whenmounting the wheel,make sure that
it "clicks into place" and that the brakes
function correctly.

15
A
B
C
D
E
N
G
L
I
S
H
HAND BRAKE
TheCheetah,4-wheelerversionis delivered with
parking brakes as standard. Drum Brakes can
be ordered as an option
The brake is simple to use. Push the handle
forwards(A) toactivate andpull thehandle back
(B) to deactivate the brake.
The hand brake is mounted in a fitting on the
frame.Move the fittingforward or backward, ac-
cording to how tight the brake should be. When
the fitting is moved backward, the brake will be
tighter. Move the fitting forward and the brake
will be looser.
Loosen the 4 screws (C) with the enclosed 4
mm Allen key to adjust the hand brake. Fasten
the screws in the position required.
Keep the recommended air pressure, 110
PSI/7,5 bar in the driving wheels, to make
the brakes work properly.
Keep the recommended safety distance,
3/8", between the wheel and the brake
block.
Watch out not to get your fingers caught at
position (D), when activating the brake.

16
A
C
B
E
N
G
L
I
S
H
SEATAND BACK
ADJUSTMENTS
Seat ramp:
Turn the handle (A) under the seat to adjust the
seat and back angle position of the chair.
Oil the turn handle (A) occasionally.
Reclining the back*
To adjust the back angle, pull out the strap (B).
The back angles all the way down to the seat,
which makes the chair take up minimum space,
for transportation or storage.
Hold on to the back to prevent it from sud-
denly moving when the strap is pulled.
Remove the transfer armrests and side
plates, if any, to fold the back all the way
down to the seat.
Oil the spring boxes (C) occasionally.
* May not be available with OEM Seating**
**OEM Seating
The Cheetah wheelchair accommodates seating sys-
tems from other equipment manufacturers. This can
be accomplished by two methods; attaching the OEM
seating system directly to the Cheetah's standard seat
platform, or utilizing the Cheetah's seat and back rail
system that attaches to the Cheetah seat platform.
Please contact our Technical Service Department (800-
336-7684) to determine the best method for attaching
OEM seating systems

17
D
B
28 cm
36 cm
40 cm
32 cm
A
28 cm
36 cm
40 cm
32 cm
D
C
1 2 3 4
max
E
E
N
G
L
I
S
H
PLANAR BACKAND SEAT
WIDTHADJUSTMENTS
TheCheetahhas ungraduatedwidthadjustment
from11" to16".The marks 28, 32, 36 and 40 cm
indicate the width of the cushions.
* Loosen the 4 screws (A) with the enclosed 5
mm Allen key to adjust the back width.
* Loosen the 8 screws (B) with the enclosed 3
mm Allen key to adjust the seat width.
* Loosen the 13 screws (C) with the enclosed
4 and 5 mm Allen keys to adjust the frame
width.
Back and seat width:
Adjust the back and seat width according to the
marks (D).
Frame width:
Adjust the frame width according to the mark
(E). If seat and back width are adjusted to 36
cm, the frame width must be adjusted to 2 (36
cm). With this adjustment, there will be room for
sideplates ect. When no sideplates are needed
and the wheels are required to be closer to the
body, the frame width can be adjusted where
desired.
The four marks in respect of the seat and
back must be the exactly the same.
The marks in frame width must be exactly
the same in both sides of the chair.
Donotgobeyond themax.indicationwhen
adjusting the width of the seat and back.
Make sure that all screws (A+B+C) have
been fastened safely after adjustment.
New cushions can be ordered as an ac-
cessory.

18
A
C
B
E
N
G
L
I
S
H
PLANAR SEAT DEPTHAND
BACK HEIGHTADJUSTMENT
If you need to adjust the width of the back or
seat, please do this before you adjust the depth
of the seat and height of the back (see the pre-
vious page).
Seat depth:
* Loosen the 8 screws (A) with the enclosed 3
mmAllen key with ball end to adjust the seat
depth.
* When the seat depth is adjusted the back
needs to be adjusted also. Use the enclosed
4 mmAllen key to loosen the 2 screws (B) on
both sides of the chair and adjust the back
into the required position.
Back height:
*
Loosen the 8 screws (C) with the enclosed 4
mmAllen key
with ball end
to adjust the back
up or down.
Theback-andseat platesaremountedinto rails,
which have the same length as the cushions in
the chair. Move the cushions into place, when
the depth and height adjustments have been
made.
To maintain the optimal seating comfort,
withthe seatplate movedall theway back,
a seat extension or a web extension can
be added.
Do not position the seat and back behind
the center of gravity.
Make sure that all screws have been fa-
stenedsafely afteradjustments havebeen
made.

19
A
C
BD
E
N
G
L
I
S
H
BACK EXTENSION & PUSH
BRACE
The Planar Back is designed ready to receive a
back extension.
* The back extension is mounted in the fitting
(A) on the back of the chair. Fasten when
mounted.
Use the special fitting (B) when both the back
extension and the helpers handle have to be
mounted.
* Use the enclosed 3 mm Allen key to fasten
the fitting on the back extension bar (C).
* The back extension is mounted on the back
of the chair.
* Use the enclosed 3 mm Allen key to fasten
the push brace in the fitting (D).
Be carefull not to get your fingers caught
whenadjusting the height and depthof the
head support.
Do not ever use the helpers handle to lift/
pull the wheelchair up or down from stairs,
landings, curbs ect. The wheelchair can
onlybe liftedby twopersons grabbinghold
ofthe frame.Never usethe helpershandle
to lift the wheelchair.

20
B
C
D
A
E
E
N
G
L
I
S
H
SEAT EXTENSIONAND
WEBBING
The Planar seat depth is adjustable to fit almost
anyneeds. Further,it ispossible tomount aseat
or a web extension.
* Remove the end piece (A) from the rails.
* Mount the seat extension in the bottom inside
groove of the rails (B). Fasten the seat exten-
sion, using the enclosed 3 mm Allen key (C).
* Mount the webbing in the top groove of the
rails (D) and secure as shown (E).
* Remount the end pieces (A).
The seat and web extensions have to be
adjusted when the seat depth is chan-
ged.
To avoid a potentially dangerous seating
position, we recommend the use of the
seat extension and/or the webbing on the
Cheetah 32, 36, and 40 cm
Other manuals for cheetah
6
Table of contents
Other R82 Wheelchair manuals
Popular Wheelchair manuals by other brands

Stand Aid
Stand Aid 1600 instructions

Invacare
Invacare Aquatec Dot user manual

Mobilex
Mobilex 278372 user manual

Drive DeVilbiss Healthcare
Drive DeVilbiss Healthcare DSF 130 Instructions for use

HD Rehab
HD Rehab Motion 15680 Assembly instructions

Platinum Health
Platinum Health PHB3300 Assembly and instruction manual