RCA Scenium DRS700N User manual

DRS700N DVD Player
User’s Guide
DRS700N_cover 8/1/02, 11:15 AM1

Product Registration
Please fill out the product registration card and return it
immediately, or register on-line at rca.com. Returning this
card allows us to contact you if needed.
Keep your sales receipt to obtain warranty parts and service
and for proof of purchase. Attach it here and record the
serial and model numbers in case you need them. The
numbers are located on the back of the player.
This symbol indicates “dangerous
voltage” inside the product that
presents a risk of electric shock or
personal injury.
This symbol indicates
important instructions
accompanying the product.
CAUTION
THIS PRODUCT UTILIZES A LASER. USE OF CONTROLS OR
ADJUSTMENTS OR PERFORMANCE OF PROCEDURES
OTHER THAN THOSE SPECIFIED HEREIN MAY RESULT IN
HAZARDOUS RADIATION EXPOSURE. DO NOT OPEN
COVERS AND DO NOT REPAIR YOURSELF. REFER
SERVICING TO QUALIFIED PERSONNEL.
CLASS 1
LASER
PRODUCT
Note:
This DVD player is designed and manufactured to
respond to the Region Management Information. If the
Region number of a DVD disc does not correspond to
the Region number of this DVD player, this DVD player
cannot play the disc. The Region number for this DVD
player is Region No 1.
Note:
This device is protected by U.S. patent numbers
4,631,603 and 4,577,216 and 4,819,098 and other
intellectual property rights. The use of Macrovision’s
copy protection technology in the device must be
authorized by Macrovision and is intended for home and
other limited pay-per-view uses only, unless otherwise
authorized in writing by Macrovision. Reverse
engineering or disassembly is prohibited.
CAUTION
FCC Regulations state that unauthorized changes or
modifications to this equipment may void the user’s
authority to operate it.
FCC INFORMATION
This equipment has been tested and found to comply with
the limits for a Class B digital device, pursuant to Part 15 of
the FCC rules. These limits are designed to provide reasonable
protection against harmful interference in a residential
installation. This equipment generates, uses and can radiate
radio frequency energy and, if not installed and used in
accordance with the instructions, may cause harmful
interference to radio communications. However, there is no
guarantee that interference will not occur in a particular
installation. If this equipment does cause harmful
interference to radio or television reception, which can be
determined by turning the equipment off and on, the user is
encouraged to try to correct the interference by one or more
of the following measures.
• Reorient or relocate the receiving antenna.
• Increase the separation between the equipment and
receiver.
• Connect this equipment into an outlet on a circuit
different from that to which the receiver is connected.
• Consult the dealer or an experienced radio/TV technician
for help.
This class B digital apparatus meets all requirements of the
Canadian Interference--Causing Equipment Regulations.
Refer to the identification/rating label located on the back
panel of your product for its proper operating voltage.
Important Information
CAUTION
RISK OF ELECTRIC SHOCK
DO NOT OPEN
WARNING
To reduce the risk of fire or shock hazard, do not expose
this DVD player to rain or moisture.
This symbol indicates that this product incorporates
double insulation between hazardous mains voltage
and user accessible parts.
WARNING
No objects filled with liquids, such as vases, shall be
placed on the apparatus.
DRS700N_cover 8/1/02, 6:06 PM2

Table of Contents
Chapter 1: Setup and Connections
Things to consider before you connect ........................2
Types of Discs your DVD Player will play ..........2
Install batteries in the remote control..........................2
Connect the DVD + TV + VCR ......................................3
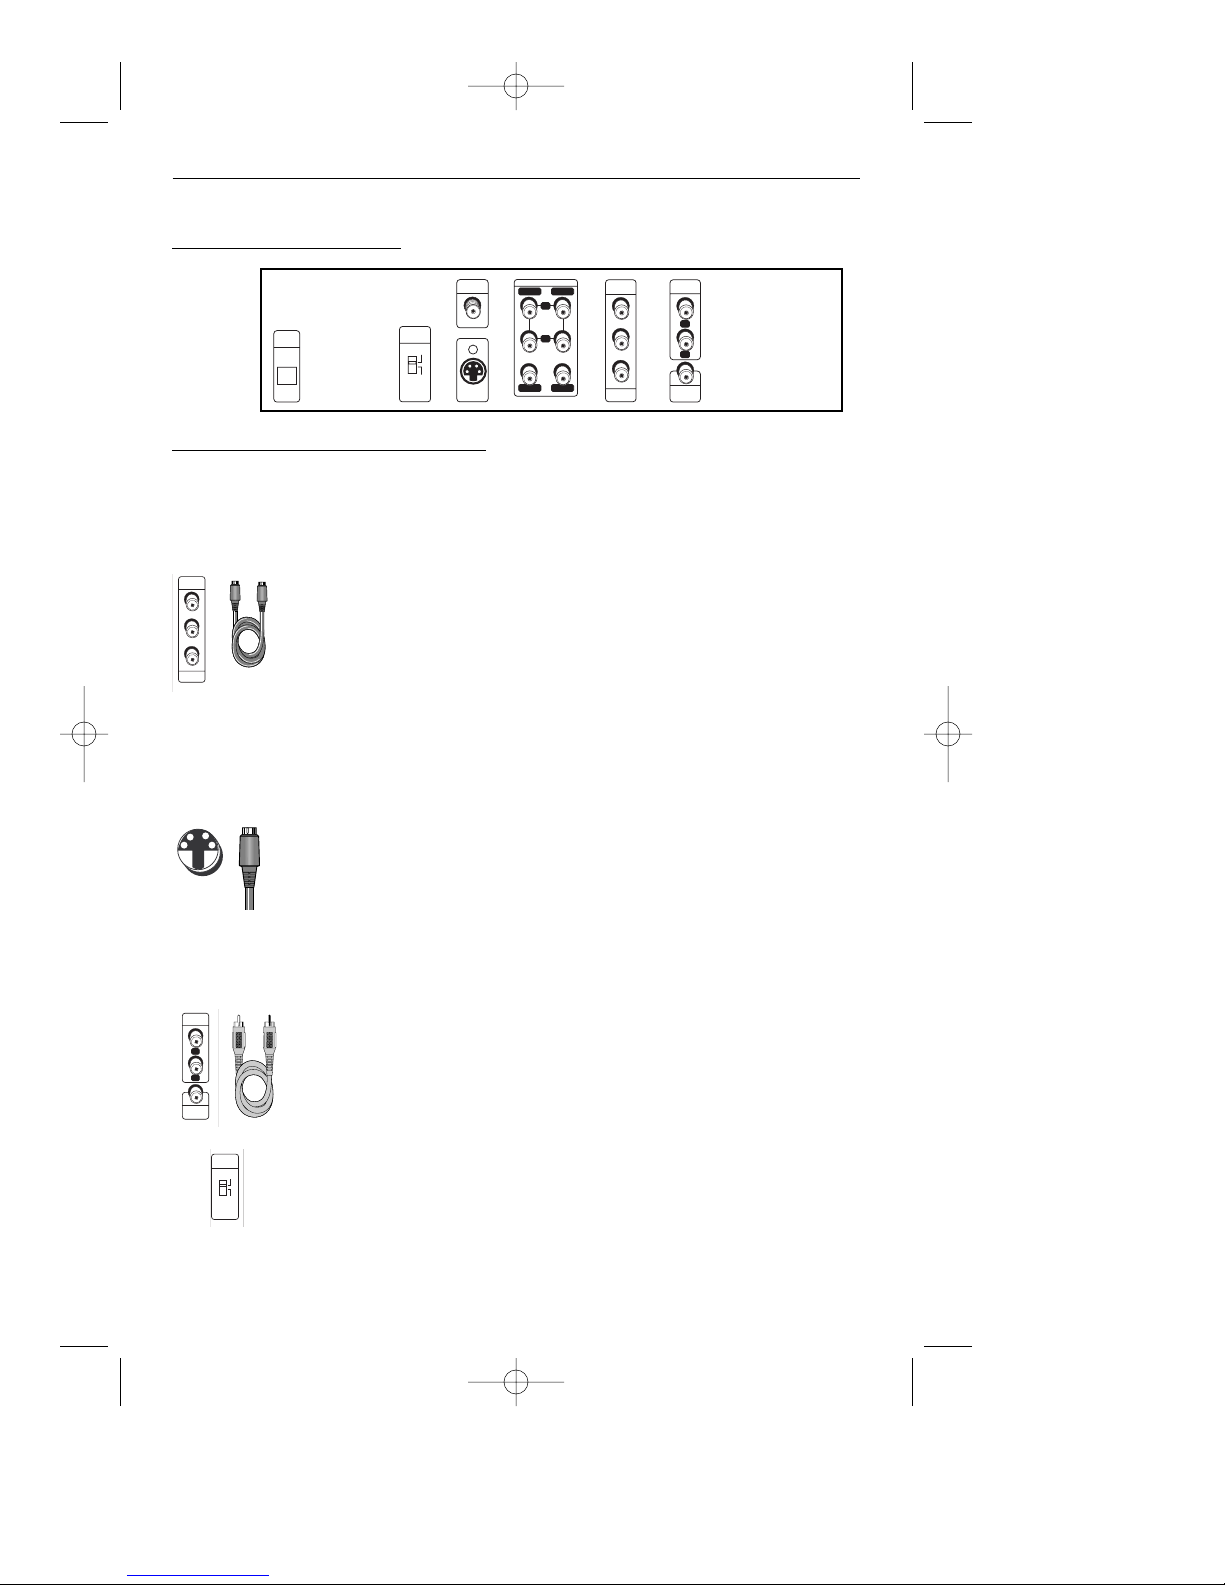
Back of the DVD Player ..................................................4
Explanation of jacks and cables ....................................4
Front of the DVD Player ................................................6
Point the remote in the right direction........................6
Turn on the TV and the DVD player..............................6
Chapter 2: The Remote Control
Navigating through On-Screen Menus ........................7
Explanation of buttons ..................................................7
Find out if the remote can operate your TV ................8
Programming the remote to operate your TV ..............8
Programming the remote to operate
other components ......................................8
Television Codes (programming remote) ......................9
VCR Codes (programming remote)..............................10
Cable Box Codes (programming remote)....................12
Satellite Codes (programming remote) ......................12
Audio Receiver Codes (programming remote)............12
Chapter 3: Playing Discs
Compatible discs ..........................................................13
Regional Coding............................................................13
Using Different Menus ................................................13
How to Load and Play a Disc ......................................13
Search Options..............................................................14
Playback Options ..........................................................14
Chapter Advance ................................................14
Zoom ..................................................................14
Scene Again........................................................14
Using the On-Screen Info Display ..............................15
Time Display........................................................16
Selecting Titles (DVD/VCDs) or Tracks (CDs) ..16
Selecting a Chapter............................................16
Screen Fit............................................................17
Selecting Subtitles ............................................17
Changing the Audio Language..........................17
Using the Repeat Feature..................................18
Using the Bookmark Feature ............................19
Changing the Camera Angle ............................20
Using the Play Mode feature ............................20
Introscan ............................................................21
PBC (Playback Control)......................................21
Playing DVD Audio Discs..............................................21
Playing MP3 Discs ........................................................23
Viewing JPEG Files........................................................24
Chapter 4: DVD Menu System
The DVD Player Menu System ....................................25
Play/Resume menu........................................................26
Play Mode menu ..........................................................26
Standard Play......................................................26
Random Play ......................................................26
Program Play ......................................................26
Edit Program ......................................................26
AutoPlay..............................................................27
Lock menu ....................................................................27
Locking Player ....................................................27
Unlocking Player ................................................28
Changing Your Password ..................................28
Explanation of Ratings Limits ....................................28
Rated Titles ........................................................29
Unrated Titles ....................................................29
Country................................................................30
Display menu ................................................................30
TV Image ............................................................30
Front Display ......................................................31
Black Level ..........................................................31
Progressive Scan ................................................32
Sound menu ..................................................................32
Sound Logic ........................................................32
Digital Output ....................................................33
Virtual Surround ................................................33
Speakers ..............................................................33
Distance ..............................................................34
Languages menu ..........................................................35
Player Menus ......................................................35
Disc Menus..........................................................35
Audio ..................................................................35
Subtitles ..............................................................35
Chapter 5: Additional Information
Troubleshooting ............................................................36
Maintenance of Cabinet ..............................................40
Handling Cautions ........................................................40
How to find your TV’s Video Input Channel ..............41
Accessories ....................................................................42
Limited Warranty..........................................................43
This product incorporates copyright protection technology that is protected by method claims of certain U.S. patents and
other intellectual property rights owned by Macrovision Corporation and other rights owners. Use of this copyright
protection technology must be authorized by Macrovision Corporation, and is intended for home use only unless
otherwise authorized by Macrovision Corporation. Reverse engineering or disassembly is prohibited.
Graphics are for representation only. Your unit might differ from pictures in this book.
DRC700N.part1.7.26.02 8/1/02 11:05 AM Page 1

Chapter 1 Connections and Setup
Things to consider before you connect
Protect components from overheating
• Don’t block ventilation holes on any of the components. Arrange the components so
that air can circulate freely.
• Don’t stack components.
• When you place components in a stand, make sure you allow adequate ventilation.
• If you connect an audio receiver or amplifier, place it on the top shelf.
Position cables properly to avoid audio interference
• Insert each cable firmly into the designated jack.
• If you place components above the TV, route all cables down the side of the back of the
TV instead of straight down the middle of the back of the TV.
• If your antenna uses 300-ohm twin lead cables, do not coil the cables. Also, keep the
twin lead cables away from audio/video cables.
Types of discs your DVD player can play
• DVD discs – contain high quality picture and
sound content.
• DVD Audio discs – contain high quality sound
content.
• Audio CDs – contain musical or sound content
only.
• Video CDs – Like DVD video discs, Video CDs
contain picture and sound content. The difference
is the amount of information that can be stored
on the disc.
• CDs with JPEG files and/or MP3 files on them.
Some discs may not be
compatible due to laser pickup
and disc design.
VIDEO CD
Install Batteries in the Remote
1. Remove the battery compartment cover on the back of the remote.
2. Insert new batteries. Match the polarities (+ and –) on the batteries with the diagram on
the remote.
3. Put the battery compartment cover back on the remote.
Important Battery Information
• If you’re not going to use the remote for a month or more, be sure to remove the batteries because they can
leak and cause damage.
• Dispose of batteries in the proper manner, according to federal, state, and local regulations.
• Any battery may leak electrolyte if mixed with a different battery type, if inserted incorrectly, if all batteries
are not replaced at the same time, if disposed of in fire, or if an attempt is made to charge a battery not
intended to be recharged.
• Discard leaky batteries immediately. Leaking batteries can cause skin burns or other personal injury.
2chapter 1
Graphics are for representation only. Your unit might differ from pictures in this book.
DRC700N.part1.7.26.02 8/1/02 11:05 AM Page 2

Connections and Setup
TV
AUDIO
OUT
COMPONENT
VIDEO OUT
Pr
Pb
Y
PROGRESSIVE
SCAN
VIDEO
OUT
5.1 CH AUDIO OUT
DIGITAL
OUT
COAXIAL
VIDEO
OUTPUT
S-VIDEO
S-VIDEO
OUT
COMPONENT/
PROGRESSIVE
SCAN
DIGITAL
OUT
OPTICAL
L
R
WOOFERCENTER
L
R
REARFRONT
VIDEO L
R
INPUT1
INPUT2
YPBPR
COMPONENT VIDEO INPUT
CABLE/ANTENNA
S-VIDEO
VCR
OUT TO TV
IN FROM
ANTENNA
From Cable Line
Notes:
The back of your TV and VCR might
look different than the ones pictured
here. Details about the different kinds
of cables used to connect your DVD
player are on page 4.
Don’t connect the DVD player to the
VCR, or through the VCR. Doing so
could negatively affect the picture
quality and/or disable the DVD player.
Connection: DVD + TV + VCR
1. Connect the audio cables to the AUDIO OUT L (left – white) and R (right – red) jacks on
the back of your DVD Player, and to the corresponding Audio Input jacks on your TV
(sometimes labeled AUDIO IN L and R).
2. Connect the video cable.
2a. Basic video connection – Connect the video cable (yellow) to the
TV VIDEO OUT jack on the back of your DVD Player, and to the Video Input jack on your TV
(sometimes labeled VIDEO IN).
– OR –
2b. S-Video (optional) – If your TV has an S-Video jack, connect the S-Video cable (not
provided) to an S-VIDEO OUT jack on the back of your DVD Player and to the S-VIDEO jack
on your TV. – OR –
2c. If your TV has component/progressive scan video (Y, Pb, Pr) jacks, use video-grade
cables (not provided) to connect the TV to the DVD player (Y to Y, Pb to Pb, etc.). It is
essential to match the color coded connectors with a compatible TV.
Note: If your TV or monitor has progressive scanning capability, you need to set the Progressive Scan
menu (p. 32)
3. Connect the antenna or cable to the Antenna Input jack on the VCR (sometimes labeled IN
FROM ANTENNA).
4. Connect a coaxial cable to the Antenna Output jack on the VCR (OUT TO TV) and to the
Antenna Input jack (CABLE/ANTENNA) on the TV.
5. Insert the AC power cord into an AC outlet.
6. Set the VIDEO OUT SELECT switch to S-VIDEO or COMPONENT/PROGRESSIVE SCAN,
depending upon the type of connection you used. Either setting works for the Basic video
connection (2A). Go to page 6
chapter 1 3
Graphics are for representation only. Your unit might differ from pictures in this book.
1
1
2c
2c
2a
2a
2c
2c
3
3
4
4
6
6
DRC700N.part1.7.26.02 8/1/02 11:05 AM Page 3

Connections and Setup
Video Jacks and Cables
COMPONENT VIDEO OUT (Y, Pb, Pr) Jacks and Cables
The Y, Pb, Pr jacks provide optimum picture quality because the video
signal is separated into three parts.
To ensure maximum picture quality, use three video-grade cables for the
connection. There are bundled component video cables sold that are color-
coded to match the Y, Pb, Pr jacks (red, green, and blue).
Note: Remember to connect the audio cables because the component cable carries
only the picture signal, not the sound.
S-VIDEO OUT Jacks and Cables
The S-Video (separate video) jack provides better picture quality than
composite video because the color is kept separate from the black and
white part of the video signal. If your TV has an S-VIDEO jack, connect the
DVD Player to the TV with an S-Video cable.
Note: Remember to connect the audio cables because the S-Video cable carries
only the picture signal, not the sound.
VIDEO OUT
The basic Video jack (usually color-coded yellow) is also referred to as
composite video. Composite video is better than the video quality you get
from an RF coaxial cable (the type used to plug the cable feed into a TV).
VIDEO OUTPUT switch
If you connect the DVD Player to a TV that is capable of progressive
scanning the signal, you need to use the Y, Pb, Pr jacks and video cables. It
is essential you turn the VIDEO OUTPUT switch to the COMPONENT/
PROGRESSIVE scan position. If you use S-VIDEO our VIDEO OUT jacks for
your connection, leave the switch in the S-VIDEO position.
Explanation of Jacks and Cables
There are several ways to connect your DVD Player to your TV depending upon the cables you
have and the jacks that are on the back of your TV. Different jacks and cables provide a
different level of performance. The jacks on the back of your DVD Player and the cables used
to connect them are explained below.
Back of the DVD Player
VIDEO
OUTPUT
S-VIDEO
COMPONENT/
PROGRESSIVE
SCAN
AUDIO
OUT
COMPONENT
VIDEO OUT
Pr
Pb
Y
PROGRESSIVE
SCAN
VIDEO
OUT
5.1 CH AUDIO OUT
DIGITAL
OUT
COAXIAL
VIDEO
OUTPUT
S-VIDEO
S-VIDEO
OUT
COMPONENT/
PROGRESSIVE
SCAN
DIGITAL
OUT
OPTICAL
L
R
WOOFERCENTER
L
R
REARFRONT
AUDIO
OUT
VIDEO
OUT
L
R
COMPONENT
VIDEO OUT
Pr
Pb
Y
PROGRESSIVE
SCAN
4chapter 1
Graphics are for representation only. Your unit might differ from pictures in this book.
DRC700N.part1.7.26.02 8/1/02 11:05 AM Page 4

Connections and Setup
chapter 1 5
Graphics are for representation only. Your unit might differ from pictures in this book.
Audio Jacks and Cables
AUDIO L (left) and R (right)
These jacks send the audio from the disc you’re playing to the TV. The
audio jacks and cables are often color-coded (red for right audio, and
white for left audio). You must connect audio cables to the AUDIO L and R
jacks on the DVD Player and the corresponding Audio Input Jacks on the
TV no matter which Video jack you connect (VIDEO; S-VIDEO; Y, Pb, Pr).
Notes:
If your component has only one input for audio (mono), connect it to the left
(white L/Mono) audio jack on the TV and don’t connect the right audio part of the
cable.
You must use the 5.1CH AUDIO OUT jacks to experience true DVD audio sound
quality when playing DVD audio discs.
DIGITAL OUT/OPTICAL and DIGITAL OUT/COAXIAL
Use one of these jacks to connect your DVD Player to a Dolby Digital or
DTS receiver or decoder. Some receivers have either the COAXIAL or
OPTICAL type of Digital Audio Input jack, and some have both. Under most
conditions, optical and coaxial connections work equally well — the only
difference is the type of cable you connect to the jack.
If you want to use a less expensive cable, connect a coaxial cable to the
COAXIAL jack if your receiver has a Coaxial input jack. Rarely, but
sometimes, coaxial digital cables — especially long ones, pick up radio
frequency (RF) interference from household appliances, nearby power
lines, and/or broadcast towers. If that is the case, connect an optical cable
(sometimes called SPDIF) to the DIGITAL OUT/OPTICAL jack on the DVD
Player and a compatible Digital Input Optical jack on the receiver.
Note: DVD Audio discs sometimes vary in the way they are created — the sampling
can be different from one disc to the next. To enjoy maximum sound quality and
surround effect of DVD Audio, you must use 5.1 channel analog audio output
(5.1CH AUDIO OUT jacks on the back of the DVD Player). If you use the DIGITAL OUT
(OPTICAL or COAXIAL) for your audio connection, the sound will only be similar to
CD-quality sound even though you’re playing a DVD Audio disc.
5.1CH AUDIO OUT
Use these audio jacks to connect your DVD Player to a home theatre
system if you have one. Each one of the 5.1 Channel Audio Out jacks
maintains the audio on the same track as produced when using this audio
technology (FRONT L and R; SURROUND L and R; SUB (subwoofer); and/or
CENTER).
Digital Out
Optical cable
Digital Out
Coaxial cable
AUDIO
OUT
VIDEO
OUT
L
R
5.1 CH AUDIO OUT
WOOFERCENTER
L
R
REARFRONT
DIGITAL
OUT
OPTICAL
Note: DVD Audio discs sometimes vary in the way they are created — the sampling can be different
from one disc to the next. To enjoy maximum sound quality and surround effect of DVD Audio, you
must use 5.1 channel analog audio output (5.1CH AUDIO OUT jacks on the back of the DVD Player).
If you use the DIGITAL OUT (OPTICAL or COAXIAL) for your audio connection, the sound will only be
similar to CD-quality sound even though you’re playing a DVD Audio disc.
DRC700N.part1.7.26.02 8/1/02 11:05 AM Page 5

Connections and Setup
6chapter 1
Graphics are for representation only. Your unit might differ from pictures in this book.
STANDBY/ON + VOLUME - AUDIO ONLY
PHONES
OPEN/CLOSE PLAY/PAUSE STOP SCAN SKIP
STANDBY/ON – Turns the player on and off.
The indicator lights when the player is
powered on, and turns off when the player is
in standby mode (off).
PHONES – Connect headphones with a
standard stereo type plug.
VOLUME (+/ –) Controls PHONES volume
level.
AUDIO ONLY - When you’re playing a disc,
turns the video on and off so the screen is
blank — you still hear the audio on the disc.
OPEN/CLOSE – Opens and closes disc tray.
PLAY/PAUSE – Begins disc play (and closes
disc tray if open), or pauses disc play.
STOP – Stops disc play.
SCAN << – scans backward (reverse)
through DVD or CD; each time you press and
hold the button the speed increases.
SCAN >> – scans forward (fast forward)
through DVD or CD; each time you press and
hold the button the speed increases.
SKIP l<< – Skips to the beginning of the
previous chapter or track.
SKIP >>l– Skips to next chapter or track.
Front of the DVD Player
3. The first time you turn on your DVD player, the
Language menu appears.
If you want the DVD player’s menus to appear in
English, press the OK button on the remote control.
If you prefer another language, press the arrow
down button until that language is highlighted.
Press OK to select the language.
Point the Remote in the Right Direction and Put it in DVD Mode
When you want the remote to operate the DVD Player, point the remote at the DVD Player,
not the TV. Make sure there is a clear path between the remote control and the component
you want to operate, so the signal isn’t blocked. Make sure the remote is in DVD mode — press
the DVD button.
Turn on the TV and DVD Player
1. Turn on your TV and tune it to the correct Video Input Channel (if you don’t know which
channel is the Video Input channel, go to page 41 for help).
2. Make sure the remote is in DVD mode (press the DVD button). Press the ON•OFF button to
turn on the DVD Player.
Next Steps
Before you start playing discs, you might want to get familiar with the remote control —
Chapter 2 has details. Playing Discs is found in Chapter 3; the menu system is outlined in
Chapter 4; and Chapter 5 contains troubleshooting, Limited Warranty, and accessory
information.
DRC700N.part1.7.26.02 8/1/02 11:05 AM Page 6

chapter 2 7
Graphics are for representation only. Your unit might differ from pictures in this book.
Chapter 2 The Remote Control
SUBTITLE AUDIO ZOOM
ANGLE
DVD ON • OFF TV
VCR AUDIO AUX SAT •CABLE
CH +
SEARCHMUTE
CH -
SPEED GO BACK
OK
INFOGUIDE
CLEARMENU
123
456
789
0
AGAIN ANTENNA
REVERSE FORWARDPLAY
RECORD PAUSESTOP
VOL
VOL
OK
GO BACK Returns to the previous
menu.
GUIDE Accesses the DVD disc guide
(if available). INFO Displays the on-screen Info
Display when playing discs.
MENU To see the disc’s menu
during playback, press this button.
MUTE Lowers the volume to
minimum level. Press again to restore
volume.
ON•OFF Turns the DVD Player on
and off.
PAUSE Pauses disc play. When
using DVD discs, press again to
search forward a frame at a time.
PLAY Begins disc play.
RECORD In VCR mode, used to record
a program from TV.
REVERSE Searches backward through
the disc.
STOP Stops playback. Press and hold
to open and close the disc tray. In
order to see the DVD Player menu,
press the STOP button.
0-9 (Number buttons) Use to input
information such as chapter numbers,
track numbers, or to make selections
on some menu screens.
ANTENNA Fuctions as a TV/VCR
button in VCR mode, and a
TV/receiver button in SAT•CABLE
mode
ANGLE Accesses various camera
angles that might have been added
to the disc when it was created.
CH +/- In DVD mode, advances to
the next/preceding chapter or track.
In TV mode, changes channels.
CLEAR Removes on-screen menus
and displays.
DVD Puts the remote in DVD mode
so it operates the DVD Player.
FORWARD Searches forward
through the disc.
TV Puts the remote in TV mode so
it operates the TV.
SUBTITLE Accesses the the on-screen
Info Display that enables you to play
a disc with subtitles. Turns subtitles
on and off.
In VCR mode, adjusts tracking.
AGAIN Replays the last several
seconds of the title you’re playing.
VOL </> Decreases and increases
volume level.
Navigating through On-Screen Menus
Use the the arrow buttons on the remote to move through on-screen menus.
Press the OK button to select a menu item that is highlighted.
VCR Puts the remote in VCR mode so
it operates the VCR.
SAT•CABLE Puts the remote in
satellite or cable mode so it can
operate a satellite receiver or cable
box.
SEARCH In VCR mode, accesses
Index search feature.
SPEED In VCR mode, selects tape
speed.
ZOOM Enlarges the picture.
AUDIO Accesses the Audio icon in
the on-screen Info Display that
enables you to play a disc in a
different language.
In VCR mode, adjusts tracking.
AUX Used to program a second
VCR, TV, or satellite receiver.
INPUT In TV mode, accesses Video
Input Channel(s).
DRC700N.part1.7.26.02 8/1/02 11:05 AM Page 7

The Remote Control
Find out if the remote can operate your TV
This remote control is designed to operate most RCA, GE, and Proscan TVs.
1. Press the TV button.
2. Press the ON•OFF button (if the TV turns on or off, this remote will operate the TV.
3. If that doesn’t work, you can try programming the remote by following the instructions
below.
Programming the Remote to Operate your TV
The remote can be programmed to control many brands and models of remote
controllable TVs.
1. Turn on the TV.
2. Look up the brand and code number(s) from the list on page 9.
3. Press and hold the TV button on the remote while pointing the remote at the TV.
4. Keep holding down the TV button, and enter the first code from the code list for your
brand.
5. Release the TV button.
6. Press ON•OFF to see if the TV turns off. If it doesn’t, press the TV button and then press
ON•OFF. If you get no response, follow steps 1-4 again, but enter the next code from the
code list for your brand of television.
Note: This remote may not be compatible with all brands and models of televisions.
Programming the remote to operate other components (VCR, satellite
receiver, etc.)
This remote is already programmed to operate most RCA, GE, and Proscan VCRs and satellite
receivers — just press the corresponding button (i.e., VCR button for VCR, SAT•CABLE button
for a satellite receiver). If you have other brands, follow the instructions for Programming the
Remote to Operate Your TV, but press the component button that applies to the component
8chapter 2
Graphics are for representation only. Your unit might differ from pictures in this book.
DRC700N.part1.7.26.02 8/1/02 11:05 AM Page 8

The Remote Control
chapter 2 9
Graphics are for representation only. Your unit might differ from pictures in this book.
Television Codes
Abex . . . . . . . . . . . . . . . . . . .1172
Admiral . . . . . . . . . . . . . . . . .1001, 1173, 1211
Adventura . . . . . . . . . . . . . . .1174
Aiko . . . . . . . . . . . . . . . . . . .1016
Akai . . . . . . . . . . . . . . . . . . .1002
Alleron . . . . . . . . . . . . . . . . .1046
Amtron . . . . . . . . . . . . . . . . .1038
Anam National . . . . . . . . . . .1003, 1038, 1192, 1193, 1194
AOC . . . . . . . . . . . . . . . . . . .1004, 1005, 1006, 1007, 1175, 1176, 1195
Audiovox . . . . . . . . . . . . . . .1038
Belcor . . . . . . . . . . . . . . . . . .1004
Bell & Howell . . . . . . . . . . . .1001, 1083, 1162
Bradford . . . . . . . . . . . . . . . .1038
Brokwood . . . . . . . . . . . . . . .1004
Candle . . . . . . . . . . . . . . . . .1004, 1006, 1008, 1174
Celebrity . . . . . . . . . . . . . . . .1002
Centurion . . . . . . . . . . . . . . .1009
Citizen . . . . . . . . . . . . . . . . .1004, 1006, 1008, 1016, 1038, 1105, 1171,
1174, 1177
Colortyme . . . . . . . . . . . . . . .1004, 1006, 1010
Concerto . . . . . . . . . . . . . . . .1004, 1006
Contec/Cony . . . . . . . . . . . . .1012, 1013, 1014, 1038
Craig . . . . . . . . . . . . . . . . . . .1038
Crown . . . . . . . . . . . . . . . . . .1038, 1171
Curtis Mathes . . . . . . . . . . . .1000, 1004, 1006, 1015, 1105, 1162, 1171,
1212
CXC . . . . . . . . . . . . . . . . . . .1038
Daewoo . . . . . . . . . . . . . . . . .1004, 1005, 1006, 1016, 1017, 1018,
1127, 1171, 1196
Daytron . . . . . . . . . . . . . . . .1004, 1006, 1171
Dimensia . . . . . . . . . . . . . . . .1000
Dumont . . . . . . . . . . . . . . . . .1004, 1151
Electroband . . . . . . . . . . . . . .1002
Electrohome . . . . . . . . . . . . .1003, 1004, 1006, 1019, 1020, 1022
Emerson . . . . . . . . . . . . . . . .1004, 1006, 1012, 1023, 1024, 1025,
1026, 1027, 1028, 1029, 1030, 1031, 1032, 1033, 1034, 1035, 1036,
1037, 1038,1039, 1041, 1042, 1043, 1044, 1046, 1047, 1123, 1124, 1162,
1171, 1177, 1179, 1191, 1208
Envision . . . . . . . . . . . . . . . .1004, 1006
Fisher . . . . . . . . . . . . . . . . . .1048, 1049, 1051, 1162, 1180
Fujitso . . . . . . . . . . . . . . . . .1046
Funai . . . . . . . . . . . . . . . . . .1038, 1046
Futuretec . . . . . . . . . . . . . . . .1038
GE . . . . . . . . . . . . . . . . . . . .1000, 1003, 1004, 1006, 1022, 1052,
1054, 1055, 1087, 1164, 1165, 1166, 1167, 1168, 1181, 1213
Gibralter . . . . . . . . . . . . . . . .1004, 1151
Goldstar . . . . . . . . . . . . . . . .1004, 1005, 1006, 1012, 1019, 1056,
1057,1058, 1155, 1156, 1171, 1172
Grundy . . . . . . . . . . . . . . . . .1038, 1046, 1171
Hallmark . . . . . . . . . . . . . . . .1004, 1006
Harvard . . . . . . . . . . . . . . . . .1038
Hitachi . . . . . . . . . . . . . . . . .1004, 1006, 1012, 1013, 1014, 1059,
1060, 1061, 1135, 1136, 1137, 1138, 1139, 1140, 1141, 1142, 1143, 1144,
1145,1146, 1148, 1150, 1179, 1198, 1199
IMA . . . . . . . . . . . . . . . . . . .1038
Infinity . . . . . . . . . . . . . . . . .1062
JCPenney . . . . . . . . . . . . . . .1000, 1004, 1005, 1006, 1008, 1022,
1052, 1054, 1058, 1063, 1064, 1072, 1087, 1105, 1128, 1171, 1172,
1181, 1201
Janeil . . . . . . . . . . . . . . . . . .1174
JBL . . . . . . . . . . . . . . . . . . . .1062
JCB . . . . . . . . . . . . . . . . . . . .1002
Jensen . . . . . . . . . . . . . . . . . .1004, 1006
JVC . . . . . . . . . . . . . . . . . . . .1012, 1013, 1014, 1054, 1060, 1065,
1066, 1067, 1157,1158, 1159, 1182
Kawasho . . . . . . . . . . . . . . . .1002, 1004, 1006
Kenwood . . . . . . . . . . . . . . . .1004, 1006, 1019
Kloss Novabeam . . . . . . . . . .1068, 1069, 1174, 1183
KTV . . . . . . . . . . . . . . . . . . .1038, 1070, 1171, 1177
Loewe . . . . . . . . . . . . . . . . . .1062
Logik . . . . . . . . . . . . . . . . . .1083
Luxman . . . . . . . . . . . . . . . .1004, 1006
LXI . . . . . . . . . . . . . . . . . . . .1000, 1006, 1049, 1062, 1071, 1072,
1073, 1162, 1181, 1207, 1088, 1130, 1131, 1132, 1133, 1134, 1183,
1219, 1235
Magnavox . . . . . . . . . . . . . . .1004, 1006, 1008, 1019, 1062, 1068,
1069, 1075, 1076, 1077, . . . . . 1088, 1130, 1131, 1132,
1133, 1134, 1183, 1219, 1235
Majestic . . . . . . . . . . . . . . . .1083
Marants . . . . . . . . . . . . . . . .1062
Marantz . . . . . . . . . . . . . . . .1004, 1006, 1062, 1078
Megatron . . . . . . . . . . . . . . .1006, 1059
Memorex . . . . . . . . . . . . . . . .1001, 1006, 1082, 1083, 1162
MGA . . . . . . . . . . . . . . . . . . .1004, 1005, 1006, 1019, 1022, 1051,
1079, 1080, 1082
Midland . . . . . . . . . . . . . . . .1054, 1151, 1171, 1172, 1181
Mitisubishi . . . . . . . . . . . . . .1004, 1005, 1006, 1019, 1022, 1051,
1079, 1080, 1081, 1082, . . . . 1125
Minutz . . . . . . . . . . . . . . . . .1052
Montgomery Ward . . . . . . . . .1083
Motorola . . . . . . . . . . . . . . . .1003, 1173
MTC . . . . . . . . . . . . . . . . . . .1004, 1005, 1006, 1105
Multitech . . . . . . . . . . . . . . .1038
Multivision . . . . . . . . . . . . . .1084
Minutz . . . . . . . . . . . . . . . . .1052
Montgomery Ward . . . . . . . . .1083
Motorola . . . . . . . . . . . . . . . .1003, 1173
MTC . . . . . . . . . . . . . . . . . . .1004, 1005, 1006, 1105
Multitech . . . . . . . . . . . . . . .1038
Multivision . . . . . . . . . . . . . .1084
NAD . . . . . . . . . . . . . . . . . . .1006, 1071, 1072, 1185
NEC . . . . . . . . . . . . . . . . . . .1003, 1004, 1005, 1006, 1200
Nikko . . . . . . . . . . . . . . . . . .1006, 1016
NTC . . . . . . . . . . . . . . . . . . .1016
Onwa . . . . . . . . . . . . . . . . . .1038
Optimus . . . . . . . . . . . . . . . .1185
Optonica . . . . . . . . . . . . . . . .1095, 1173
Orion . . . . . . . . . . . . . . . . . .1035, 1191
Panasonic . . . . . . . . . . . . . . .1003, 1054, 1062, 1170, 1214
Philco . . . . . . . . . . . . . . . . . .1003, 1004, 1005, 1006, 1008, 1012,
1019, 1062, 1068, 1069, 1075, 1077, 1183
Philips . . . . . . . . . . . . . . . . .1003, 1004, 1008, 1012, 1019, 1062,
1068, 1069, 1075, 1076, 1086, 1087, 1088, 1089
Pilot . . . . . . . . . . . . . . . . . . .1004, 1171
Pioneer . . . . . . . . . . . . . . . . .1004, 1006, 1090, 1091, 1092, 1179,
. . . . . . . . . . . . . . . . . . . . . .1185
DRC700N.part1.7.26.02 8/1/02 11:05 AM Page 9

The Remote Control
10 chapter 2
Television Codes (continued)
RCA . . . . . . . . . . . . . . . . . . .1000, 1003, 1004, 1005, 1006, 1007, 1019,
1096, 1098, 1099, 1100, 1101, 1102, 1103, 1129, 1179, 1181, 1187, 1188,
1190, 1202, 1203, 1215, 1233
Runco . . . . . . . . . . . . . . . . . .1151
Sampo . . . . . . . . . . . . . . . . .1004, 1006, 1171, 1172
Samsung . . . . . . . . . . . . . . . .1004, 1005, 1006, 1012, 1015, 1019, 1104,
1105, 1106, 1171, 1172, 1204
Samsux . . . . . . . . . . . . . . . . .1171
Sansui . . . . . . . . . . . . . . . . . .1191
Sanyo . . . . . . . . . . . . . . . . . .1004, 1048, 1049, 1080, 1107, 1108, 1162,
. . . . . . . . . . . . . . . . . . . . . .1169, 1180
Scotch . . . . . . . . . . . . . . . . . .1006
Scott . . . . . . . . . . . . . . . . . . .1004, 1006, 1012, 1024, 1035, 1038, 1046
Sears . . . . . . . . . . . . . . . . . . .1000, 1004, 1006, 1013, 1014, 1019, 1046,
1048, 1049, 1051, 1066, 1071, 1072, 1109, 1110, 1162, 1180, 1181, 1189
Sharp . . . . . . . . . . . . . . . . . .1004, 1006, 1012, 1029, 1095, 1111, 1112,
. . . . . . . . . . . . . . . . . . . . . .1113, 1122, 1171, 1173
Shogun . . . . . . . . . . . . . . . . .1004
Signature . . . . . . . . . . . . . . .1001, 1083, 1115
Simpson . . . . . . . . . . . . . . . .1008
Sony . . . . . . . . . . . . . . . . . . .1002, 1205, 1216, 1218
Soundesign . . . . . . . . . . . . . .1004, 1006, 1008, 1038, 1046
Squareview . . . . . . . . . . . . . .1189
SSS . . . . . . . . . . . . . . . . . . . .1004, 1038
Starlite . . . . . . . . . . . . . . . . .1038
Supre-Macy . . . . . . . . . . . . . .1174
Supreme . . . . . . . . . . . . . . . .1002
Sylvania . . . . . . . . . . . . . . . .1004, 1006, 1008, 1019, 1062, 1068, 1069,
. . . . . . . . . . . . . . . . . . . . . .1075, 1076, 1077, 1088, 1116, 1161, 1183
Symphonic . . . . . . . . . . . . . .1033, 1038, 1189
Tandy . . . . . . . . . . . . . . . . . .1173
Tatung . . . . . . . . . . . . . . . . .1003
Technics . . . . . . . . . . . . . . . .1054
Techwood . . . . . . . . . . . . . . .1004, 1006, 1054
Teknika . . . . . . . . . . . . . . . . .1004, 1005, 1006, 1008, 1012, 1013, 1014,
1016, 1038, 1046, 1076, 1082, 1083, 1105, 1170, 1171
Telecaption . . . . . . . . . . . . . .1117
TMK . . . . . . . . . . . . . . . . . . .1004, 1006
Toshiba . . . . . . . . . . . . . . . . .1049, 1071, 1072, 1105, 1109, 1117, 1118,
1160, 1162
Totevision . . . . . . . . . . . . . . .1171
Universal . . . . . . . . . . . . . . . .1052, 1087
Victor . . . . . . . . . . . . . . . . . .1066, 1182
Vidtech . . . . . . . . . . . . . . . . .1004, 1005, 1006
Viking . . . . . . . . . . . . . . . . . .1174
Wards . . . . . . . . . . . . . . . . . .1000, 1001, 1004, 1005, 1006, 1019, 1024,
1033, 1046, 1052, 1062, 1068, 1069, 1075, 1076, 1083, 1087, 1088, 1095,
. . . . . . . . . . . . . . . . . . . . . .1119, 1120
Yamaha . . . . . . . . . . . . . . . . .1004, 1005, 1006, 1019
Zenith . . . . . . . . . . . . . . . . . .1004, 1083, 1151, 1152, 1153, 1154, 1210,
. . . . . . . . . . . . . . . . . . . . . .1217
VCR Codes
Admiral . . . . . . . . . . . . . . . . .2132
Adventura . . . . . . . . . . . . . . .2026
Aiko . . . . . . . . . . . . . . . . . . .2027
Aiwa . . . . . . . . . . . . . . . . . . .2026
Akai . . . . . . . . . . . . . . . . . . .2003, 2004, 2005, 2007, 2008, 2111,
2112, 2113
American High . . . . . . . . . . .2021
Asha . . . . . . . . . . . . . . . . . . .2013
Audio Dynamics . . . . . . . . . .2009, 2010
Audiovox . . . . . . . . . . . . . . .2014
Beaumark . . . . . . . . . . . . . . .2013
Bell & Howell . . . . . . . . . . . .2011
Broksonic . . . . . . . . . . . . . . .2012, 2025
Calix . . . . . . . . . . . . . . . . . . .2014
Candle . . . . . . . . . . . . . . . . .2013, 2014, 2015, 2016, 2017, 2018,
2019
Canon . . . . . . . . . . . . . . . . . .2021, 2022, 2114
Capehart . . . . . . . . . . . . . . . .2020, 2110
Carver . . . . . . . . . . . . . . . . . .2062
CCE . . . . . . . . . . . . . . . . . . .2027, 2061
Citizen . . . . . . . . . . . . . . . . .2013, 2014, 2015, 2016, 2017, 2018,
2019, 2027
Colortyme . . . . . . . . . . . . . . .2009
Colt . . . . . . . . . . . . . . . . . . .2061
Craig . . . . . . . . . . . . . . . . . . .2013, 2014, 2023, 2061
Curtis Mathes . . . . . . . . . . . .2000, 2009, 2013, 2016, 2018, 2021,
2022, 2024, 2115, 2131
Cybernex . . . . . . . . . . . . . . .2013
Daewoo . . . . . . . . . . . . . . . . .2015, 2017, 2019, 2025, 2026, 2027,
2028, 2110
Daytron . . . . . . . . . . . . . . . .2110
DBX . . . . . . . . . . . . . . . . . . .2009, 2010
Dimensia . . . . . . . . . . . . . . . .2000, 2131
Dynatech . . . . . . . . . . . . . . . .2026
Electrohome . . . . . . . . . . . . .2014, 2029
Electrophonic . . . . . . . . . . . .2014
Emerson . . . . . . . . . . . . . . . .2012, 2014, 2015, 2021, 2024, 2025,
2026, 2029, 2030, 2031, 2032, 2033, 2034, 2035, 2036, 2037, 2038,
2039, 2040, 2041, 2042, 2044, 2045, 2046, 2047, 2065, 2113, 2116,
2117, 2130
Fisher . . . . . . . . . . . . . . . . . .2011, 2023, 2048, 2049, 2050, 2051,
2052, 2118
Fuji . . . . . . . . . . . . . . . . . . . .2021, 2119
Funai . . . . . . . . . . . . . . . . . .2026
Garrard . . . . . . . . . . . . . . . . .2026
GE . . . . . . . . . . . . . . . . . . . .2000 (VCR1), 2001 (VCR2), 2013,
2021, 2022, 2053, 2115, 2120, 2131
Goldstar . . . . . . . . . . . . . . . .2009, 2014, 2018, 2054
Gradiente . . . . . . . . . . . . . . .2026
Harley Davidson . . . . . . . . . .2026
Harman Kardon . . . . . . . . . . .2009
Harwood . . . . . . . . . . . . . . . .2061
Headquarter . . . . . . . . . . . . .2011
Hi-Q . . . . . . . . . . . . . . . . . . .2023
Hitachi . . . . . . . . . . . . . . . . .2055, 2056, 2057, 2107, 2111, 2120,
. . . . . . . . . . . . . . . . . . . . . .2122
Instant Replay . . . . . . . . . . . .2021
JCPenney . . . . . . . . . . . . . . .2009, 2010, 2011, 2013, 2014, 2021,
2022, 2055, 2056, 2058, 2059, 2060, 2107, 2118
JCL . . . . . . . . . . . . . . . . . . . .2021
DRC700N.part1.7.26.02 8/1/02 11:05 AM Page 10

The Remote Control
VCR Codes (continued)
Jensen . . . . . . . . . . . . . . . . . .2055, 2056, 2111
JVC . . . . . . . . . . . . . . . . . . . .2009, 2010, 2011, 2018, 2111, 2123
Kenwood . . . . . . . . . . . . . . . .2009, 2010, 2011, 2016, 2018, 2111,
. . . . . . . . . . . . . . . . . . . . . .2123
KLH . . . . . . . . . . . . . . . . . . .2061
Kodak . . . . . . . . . . . . . . . . . .2014, 2021
Lloyd . . . . . . . . . . . . . . . . . .2026
Logik . . . . . . . . . . . . . . . . . .2061
LXI . . . . . . . . . . . . . . . . . . . .2014
Magnavox . . . . . . . . . . . . . . .2021, 2022, 2062, 2063, 2104, 2105,
2108, 2124
Magnin . . . . . . . . . . . . . . . . .2013
Marantz . . . . . . . . . . . . . . . .2009, 2010, 2011, 2016, 2018, 2021,
2062, 2064
Marta . . . . . . . . . . . . . . . . . .2014
Masushita . . . . . . . . . . . . . . .2021
MEI . . . . . . . . . . . . . . . . . . . .2021
Memorex . . . . . . . . . . . . . . . .2011, 2013, 2014, 2021, 2023, 2026,
2104, 2132
MGA . . . . . . . . . . . . . . . . . . .2029, 2065, 2113
MGN Technology . . . . . . . . . .2013
Midland . . . . . . . . . . . . . . . .2053
Minolta . . . . . . . . . . . . . . . . .2055, 2056, 2107
Mitsubishi . . . . . . . . . . . . . . .2029, 2055, 2056, 2065, 2066, 2067,
2068, 2069, 2070, 2071, 2072, 2073, 2074, 2106, 2113, 2123
Montgomery Ward . . . . . . . . .2075, 2132
Motorola . . . . . . . . . . . . . . . .2021, 2132
MTC . . . . . . . . . . . . . . . . . . .2013, 2126
Multitech . . . . . . . . . . . . . . .2013, 2016, 2026, 2053, 2061
NEC . . . . . . . . . . . . . . . . . . .2009, 2010, 2011, 2016, 2018, 2064,
2076, 2078, 2079, 2111, 2123
Nikko . . . . . . . . . . . . . . . . . .2014
Noblex . . . . . . . . . . . . . . . . .2013
Olympus . . . . . . . . . . . . . . . .2021
Optimus . . . . . . . . . . . . . . . .2014, 2132
Optonica . . . . . . . . . . . . . . . .2096
Panasonic . . . . . . . . . . . . . . .2021, 2022, 2109, 2125, 2126, 2127
Pentax . . . . . . . . . . . . . . . . .2016, 2055, 2056, 2107, 2120
Pentex Research . . . . . . . . . .2018
Philco . . . . . . . . . . . . . . . . . .2021, 2022, 2062, 2063
Philips . . . . . . . . . . . . . . . . .2021, 2062, 2096, 2124
Pilot . . . . . . . . . . . . . . . . . . .2014
Pioneer . . . . . . . . . . . . . . . . .2010, 2055, 2080, 2081, 2123
Portland . . . . . . . . . . . . . . . .2016, 2017, 2019, 2110
Proscan . . . . . . . . . . . . . . . . .2000 (VCR1), 2001 (VCR2), 2131
Protec . . . . . . . . . . . . . . . . . .2061
Pulsar . . . . . . . . . . . . . . . . . .2104
Quarter . . . . . . . . . . . . . . . . .2011
Quartz . . . . . . . . . . . . . . . . . .2011
Quasar . . . . . . . . . . . . . . . . .2021, 2022, 2125
Radio Shack/Realistic . . . . . .2011, 2013, 2014, 2021, 2022, 2023,
2026, 2029, 2049, 2050, 2096, 2132
Radix . . . . . . . . . . . . . . . . . .2014
Randex . . . . . . . . . . . . . . . . .2014
RCA . . . . . . . . . . . . . . . . . . .2000 (VCR1), 2001 (VCR2), 2003,
2013, 2021, 2055, 2056, 2082, 2083, 2084, 2085, 2086, 2087, 2088,
2089, 2090, 2091, 2107, 2115, 2120, 2125, 2131, 2133
Ricoh . . . . . . . . . . . . . . . . . .2128
Runco . . . . . . . . . . . . . . . . . .2104
Samsung . . . . . . . . . . . . . . . .2005, 2013, 2015, 2033, 2053, 2112
Sanky . . . . . . . . . . . . . . . . . .2104, 2132
Sansui . . . . . . . . . . . . . . . . . .2010, 2092, 2111, 2123
Sanyo . . . . . . . . . . . . . . . . . .2011, 2013, 2023
Scott . . . . . . . . . . . . . . . . . . .2012, 2015, 2025, 2032, 2038, 2065,
. . . . . . . . . . . . . . . . . . . . . .2093, 2116
Sears . . . . . . . . . . . . . . . . . . .2011, 2014, 2021, 2023, 2048, 2049,
2050, 2051, 2055, 2056, 2107, 2118
Sharp . . . . . . . . . . . . . . . . . .2017, 2029, 2094, 2095, 2096, 2097,
. . . . . . . . . . . . . . . . . . . . . .2132
Shintom . . . . . . . . . . . . . . . .2004, 2056, 2061, 2098
Shogun . . . . . . . . . . . . . . . . .2013
Signature . . . . . . . . . . . . . . .2132
Singer . . . . . . . . . . . . . . . . . .2021, 2061, 2128
Sony . . . . . . . . . . . . . . . . . . .2004, 2098, 2099, 2119
STS . . . . . . . . . . . . . . . . . . . .2021, 2107
Sylvania . . . . . . . . . . . . . . . .2021, 2022, 2026, 2062, 2063, 2065,
. . . . . . . . . . . . . . . . . . . . . .2124
Symphonic . . . . . . . . . . . . . .2026
Tandy . . . . . . . . . . . . . . . . . .2011
Tashiko . . . . . . . . . . . . . . . . .2014
Tatung . . . . . . . . . . . . . . . . .2111
Teac . . . . . . . . . . . . . . . . . . .2026, 2085, 2111
Technics . . . . . . . . . . . . . . . .2021, 2109
Teknika . . . . . . . . . . . . . . . . .2014, 2021, 2026, 2100, 2129
TMK . . . . . . . . . . . . . . . . . . .2013, 2024, 2047
Toshiba . . . . . . . . . . . . . . . . .2015, 2049, 2051, 2055, 2065, 2093,
. . . . . . . . . . . . . . . . . . . . . .2116
Totevision . . . . . . . . . . . . . . .2013, 2014
Unitech . . . . . . . . . . . . . . . . .2013
Vector Research . . . . . . . . . . .2009, 2010, 2015, 2016
Victor . . . . . . . . . . . . . . . . . .2010
Video Concepts . . . . . . . . . . .2009, 2010, 2015, 2016, 2113
Videosonic . . . . . . . . . . . . . .2013
Wards . . . . . . . . . . . . . . . . . .2013, 2014, 2015, 2021, 2023, 2026,
2029, 2055, 2056, 2061, 2096, 2101, 2102, 2103, 2107, 2116, 2132
XR-1000 . . . . . . . . . . . . . . . .2021, 2026, 2061
Yamaha . . . . . . . . . . . . . . . . .2009, 2010, 2011, 2018, 2111
Zenith . . . . . . . . . . . . . . . . . .2004, 2098, 2104, 2119, 2128
chapter 2 11
DRC700N.part1.7.26.02 8/1/02 11:05 AM Page 11

The Remote Control
12 chapter 2
Cable Box
ABC . . . . . . . . . . . . . . . . . . .5002, 5003, 5004, 5006,
5053
Antronix . . . . . . . . . . . . . . . .5008, 5009
Archer . . . . . . . . . . . . . . . . . .5008, 5009, 5010
Cabletenna . . . . . . . . . . . . . .5008
Cableview . . . . . . . . . . . . . . .5008
Colour Voice . . . . . . . . . . . . .5012, 5013
Comtronic . . . . . . . . . . . . . . .5014
Contec . . . . . . . . . . . . . . . . .5016
Eastern . . . . . . . . . . . . . . . . .5017
GC Electronics . . . . . . . . . . . .5009
GE . . . . . . . . . . . . . . . . . . . .5000, 5001
Gemini . . . . . . . . . . . . . . . . .5018, 5019
General Instrument . . . . . . . .5003
Hamlin . . . . . . . . . . . . . . . . .5020, 5021, 5022, 5028,
5035, 5045
Hitachi . . . . . . . . . . . . . . . . .5003
Jerrold . . . . . . . . . . . . . . . . .5003, 5018. 5023, 5024,
5046, 5053
Magnavox . . . . . . . . . . . . . . .5025
Memorex . . . . . . . . . . . . . . . .5026
Movie Time . . . . . . . . . . . . . .5027
NEC . . . . . . . . . . . . . . . . . . .5005
NSC . . . . . . . . . . . . . . . . . . .5027
Oak . . . . . . . . . . . . . . . . . . . .5016, 5029
Panasonic . . . . . . . . . . . . . . .5048, 5052
Philips . . . . . . . . . . . . . . . . .5011, 5012, 5013, 5015,
5019, 5025, 5030, 5031, 5032
Pioneer . . . . . . . . . . . . . . . . .5033, 5034
Proscan . . . . . . . . . . . . . . . . .5000, 5001
RCA . . . . . . . . . . . . . . . . . . .5007, 5047, 5049, 5052
Realistic . . . . . . . . . . . . . . . .5009
Regal . . . . . . . . . . . . . . . . . .5022, 5035
Regency . . . . . . . . . . . . . . . .5017
Rembrandt . . . . . . . . . . . . . .5003
Samsung . . . . . . . . . . . . . . . .5034
Scientific Atlanta . . . . . . . . . .5006, 5036, 5037, 5038
Signal . . . . . . . . . . . . . . . . . .5018
Signature . . . . . . . . . . . . . . .5003
Sprucer . . . . . . . . . . . . . . . . .5052
Standard Components . . . . . .5039, 5044
Starcom . . . . . . . . . . . . . . . .5018, 5053
Stargate . . . . . . . . . . . . . . . .5018
Starquest . . . . . . . . . . . . . . . .5018
Tocom . . . . . . . . . . . . . . . . . .5004, 5023
Tusa . . . . . . . . . . . . . . . . . . .5018
TV86 . . . . . . . . . . . . . . . . . . .5027
Unika . . . . . . . . . . . . . . . . . .5008, 5009
United Cable . . . . . . . . . . . . .5053
Universal . . . . . . . . . . . . . . . .5008, 5009, 5010
Viewstar . . . . . . . . . . . . . . . .5025, 5027
Zenith . . . . . . . . . . . . . . . . . .5050, 5051
Satellite
Alphastar . . . . . . . . . . . . . . .5079
Chapparal . . . . . . . . . . . . . . .5056, 5057
Dishnet . . . . . . . . . . . . . . . . .5078
Drake . . . . . . . . . . . . . . . . . .5058, 5059
Echostar . . . . . . . . . . . . . . . .5089
GE . . . . . . . . . . . . . . . . . . . .5000 (SAT1), 5001
(SAT2)
General Instruments . . . . . . .5060, 5061, 5062
Hitachi . . . . . . . . . . . . . . . . .5083, 5084
Hughes Network . . . . . . . . . .5077, 5090
JVC . . . . . . . . . . . . . . . . . . . .5082
Panasonic . . . . . . . . . . . . . . .5075
Philips . . . . . . . . . . . . . . . . .5085
Primestar . . . . . . . . . . . . . . .5076
Proscan . . . . . . . . . . . . . . . . .5000 (SAT1), 5001
(SAT2)
RCA . . . . . . . . . . . . . . . . . . .5000 (SAT1), 5001
(SAT2), 5071, 5080, 5081
Realistic . . . . . . . . . . . . . . . .5063
Sony . . . . . . . . . . . . . . . . . . .5072
STS1 . . . . . . . . . . . . . . . . . . .5064
STS2 . . . . . . . . . . . . . . . . . . .5065
STS3 . . . . . . . . . . . . . . . . . . .5066
STS4 . . . . . . . . . . . . . . . . . . .5067
Toshiba . . . . . . . . . . . . . . . . .5068, 5073
Uniden . . . . . . . . . . . . . . . . .5069, 5086
Audio Receivers
(RCA and Dimensia) AM/FM 4003, 4270
(RCA and Dimensia) Aux . . . .4004
(RCA and Dimensia) CD . . . . .4007, 4190, 4211
(RCA and Dimensia) Phono . .4005
(RCA and Dimensia) Tape . . . .4006
Aiwa . . . . . . . . . . . . . . . . . . .4261, 4262, 4263,
4264, 4265, 4266, 4267, 4277
Denon . . . . . . . . . . . . . . . . . .4283
Harmon Kardon . . . . . . . . . . .4276
JVC . . . . . . . . . . . . . . . . . . . .4268
JVL . . . . . . . . . . . . . . . . . . . .4276
Kenwood . . . . . . . . . . . . . . . .4269
Onkyo . . . . . . . . . . . . . . . . . .4278
Optimus . . . . . . . . . . . . . . . .4284
Panasonic . . . . . . . . . . . . . . .4279, 4280
Pioneer . . . . . . . . . . . . . . . . .4275
RCA . . . . . . . . . . . . . . . . . . .4270
Sherwood . . . . . . . . . . . . . . .4282
Sony . . . . . . . . . . . . . . . . . . .4271, 4272, 4281
Technics . . . . . . . . . . . . . . . .4279, 4280
Wards . . . . . . . . . . . . . . . . . .4275
Yamaha . . . . . . . . . . . . . . . . .4274, 4275
DRC700N.part1.7.26.02 8/1/02 11:05 AM Page 12

Chapter 3 Playing Discs
Regional Coding
Both the DVD Player and the discs are coded by region. These regional codes must match in
order for the disc to play. This player’s code is region 1.
Using Different Menus
Each disc is programmed with different features. There are three separate types of menus
that you can use to access features:
• The Disc menu – The Disc menu is part of each disc and is separate from the DVD player’s
menu. The contents of each Disc menu varies according to how the disc was authored
and what features are included. The Disc menu is turned on and off (while the disc is
playing) with the MENU button on the remote.
• The DVD player’s Info Display – The Info Display appears as icons across the top of the
screen. It can only be accessed while you are playing a disc. It’s turned on and off with
the INFO button on the remote.
• The DVD player menu – The DVD player’s menu system is accessed only when a disc isn’t
playing. It appears automatically when you press the STOP button on the remote.
Remember: A feature will only work if the disc was programmed with that feature. For example, if you
choose subtitles on the Info Display, the subtitles will only appear if the disc was created with subtitles.
If a menu or icon is “grayed out” it means that item (or feature) isn’t available.
Compatible discs
This DVD Player is capable of playing the following
types of discs: DVDs, audio CDs, Video CDs, and MP3
CDs. Before you put a disc in the player, make sure it is
compatible.
You can’t play the following types of discs:, Laserdiscs,
CD-I, CD-ROM (computer-only discs), DVD-ROM, or
discs recorded using other broadcast standards (i.e. PAL
or SECAM); CD-G discs.
VIDEO CD
chapter 3 13
How to load and play a disc
Turn on the TV and your DVD Player.
1. If necessary, tune the TV to its Video Input channel (for help, go to page 41).
2. Press the OPEN/CLOSE button (the disc tray opens). Place a disc gently into the tray with
the disc’s label facing up (double-sided discs have content on both sides, so you can place
either side up).
3. Press the OPEN/CLOSE or PLAY button. The disc tray closes. The DVD Player reads the disc’s
table of contents, and then one of three things happens depending on how the disc was
programmed:
• The disc starts playing
• The disc menu appears. One of the options will start playing the disc. Highlight that option
and press OK.
• The DVD Player’s main menu appears (highlight play and press OK).
DRC700N.part1.7.26.02 8/1/02 11:05 AM Page 13

14 chapter 3
Graphics are for representation only. Your unit might differ from pictures in this book.
Playing Discs
Search Options
To search a disc, you can use the FORWARD button or the REVERSE button. You can also
utilize the following search features:
Picture Scan — When you’re playing a disc, each time you press FORWARD or REVERSE, your
DVD Player scans the disc faster until you reach the fastest scan speed. To resume normal
playback, press PLAY.
Freeze Frame and Frame Advance – While a disc is playing, press PAUSE to freeze the picture.
To advance one frame at a time, press PAUSE again (the on-screen icon changes from PAUSE
to FRAME). Each time you press the FORWARD or REVERSE button, the picture goes to the
next (or previous) frame. To resume normal playback, press PLAY.
Note: If you pause a DVD disc or VCD disc for a long period of time, the video will disappear from the
screen. Press any button on the remote to revert to the place on the disc where you paused playback.
Slow Motion (in Freeze Frame Mode) – While a disc is playing, press PAUSE. Press REVERSE or
FORWARD (each time you press REVERSE or FORWARD the slow motion will get even slower
until you reach slowest speed). To resume normal playback, press PLAY.
Playback options
Many of your DVD Player’s playback features are accessed through the Info Display.
Additionally, with some discs you can access playback features directly from the remote
control.
Chapter Advance
While a disc is playing, you can skip forward or backward a chapter or track at a time by
pressing the CH+ and/or CH- buttons.
Zoom
1. While you’re playing a disc, press ZOOM (the player zooms in on the image). Each time
you press ZOOM, the picture is magnified even more (until you get to the maximum zoom
level).
2. To see other parts of the picture when you’ve zoomed in on the image, try pressing the
up, down, left, and/or right arrow buttons to go in corresponding directions. If that
doesn’t work, try pressing the PAUSE button first.
Scene Again™
While you’re playing a DVD disc, press the AGAIN button on the remote (the disc
automatically repeats the last 10 seconds of the movie).
DRC700N.part1.7.26.02 8/1/02 11:05 AM Page 14

chapter 3 15
Graphics are for representation only. Your unit might differ from pictures in this book.
Playing Discs
Using the On-Screen Info Display
The on-screen Info Display contains many playback features. To see the Info Display, press the
INFO button on the remote while a disc is playing (the Info Display appears across the top of
the screen). Each feature is illustrated with an icon. Use the left and right arrow buttons to
move through the different icons in the Info Display. When an icon is highlighted, use the up
and down arrow buttons on the remote to scroll through the choices displayed in the text box
under the icons. You can only access the Info Display when you’re playing a disc. Also, the
Info Display features are only available if the disc was created with that particular feature. If
one of the icons is “grayed out,” the Info Display feature isn’t available for the disc you’re
playing.
The invalid symbol appears on the screen when you press a button that doesn’t have
any function. To make the Info Display disappear from the screen, press INFO on the
remote.
Time display Chapter Subtitles Repeat Angle
Title Screen Fit Audio Bookmarks
Time display Track PlayBack Audio Repeat
Control
Video CD (VCD) Info Display
Audio CD Info Display
DVD Disc Info Display
Time display Track Play Mode Repeat Bookmark IntroScan
Time display Group Track Screen fit Subtitles Audio Repeat Browse
DVD Audio Disc Info Display
DRC700N.part1.7.26.02 8/1/02 11:05 AM Page 15

16 chapter 3
Graphics are for representation only. Your unit might differ from pictures in this book.
Playing Discs
Time Display
This feature displays the time that has elapsed during playback. For DVD
discs, the time displayed refers to the current title and acts as a Time
Search feature. You can skip right to any scene.
1. Press INFO on the remote (the Info Display appears).
2. If the time box isn’t already highlighted, use the left/right arrow buttons on the remote
control to highlight it.
3. Use the number buttons on the remote to enter the elapsed time you want to go to in
that title. You must use two digits for each field. For example, if you enter 01:35:12,
playback will start one hour, 35 minutes, and 12 seconds into the title.
Note: For Audio CDs, the time displayed refers to the track that’s playing.
Selecting Titles (DVDs and VCDs) and Tracks (Audio CDs)
Some discs contain more than one title. Each title is divided into chapters. To
select a title:
1. While the disc is playing, press INFO on the remote (the Info Display
appears).
2. If the Title (Track) icon on the Info Display isn’t highlighted, press the right/left arrow
buttons to highlight it.
3. Use the number button(s) on the remote to enter the title number (track number) and
press OK, or press the up/down arrow buttons to scroll through the titles/tracks.
Note: Many discs only have one title.
Selecting a Chapter
A title can be divided into individual chapters (similar to tracks on a CD). To
skip to a specific chapter:
1. While a disc is playing, press INFO on the remote (the Info Display
appears).
2. Press the right arrow button until the chapter icon is highlighted.
3. Use the up and down arrow buttons to scroll through different chapters. Use the number
buttons to enter a specific chapter number.
Note: The Chapter feature won’t work if the disc isn’t formatted with separate chapters.
DRC700N.part1.7.26.02 8/1/02 11:05 AM Page 16

chapter 3 17
Playing Discs
Selecting Subtitles (DVD only)
By default, subtitles are off. To turn subtitles on:
1. While a disc is playing, press INFO (the Info Display appears).
2. Press the right arrow button until the Subtitle icon is highlighted.
3. Press the SUBTITLE button to turn on subtitles.
4. To change the subtitle language, press the up or down arrow button repeatedly to see
what subtitle languages are available (the subtitle language options appear in the box at
the bottom of the Info Display).
5. To turn subtitles off, press SUBTITLE again when the Subtitle icon is highlighted.
Notes:
Changing the subtitle language with the Info Display will only affect the disc you are currently playing.
When the disc is removed or the player is turned off, the subtitle language will revert to the language
setting specified through the DVD player’s main menu.
If the disc doesn’t contain the language you select, the disc’s default language is automatically selected.
Some discs are programmed to only allow access to the subtitle feature through the disc’s menu.
Changing the Audio Language (DVD only)
If the disc was created with different language tracks (recorded in different
languages), you can change the language while you’re playing the disc.
1. While a disc is playing, press INFO (the info display appears).
2. Press the right arrow button until the Audio icon is highlighted.
3. Press the down arrow button on the remote to scroll through the available audio
languages.
4. When the language you want to use is highlighted, press the OK button (the dialog plays
in the language you selected).
Notes:
The language feature only works if the disc was created with multiple language tracks. If the disc doesn’t
contain the language you selected, the disc will play in the default language.
When you choose an audio language during disc playback, you only override the audio language setting
in the DVD Player’s main menu temporarily.
The audio language can also be changed through the DVD player menu.
Screen Fit (DVD only)
You can change the way the image appears on the screen when you’re playing
a DVD movie, by using the screen fit icon.
1. While a disc is playing, press INFO (the Info Display appears).
2. Highlight the Screen Fit icon. Press the up/down arrow buttons to choose
between Normal, Enhanced, and Maximum.
DRC700N.part1.7.26.02 8/1/02 11:05 AM Page 17

18 chapter 3
Graphics are for representation only. Your unit might differ from pictures in this book.
Playing Discs
Using the Repeat Feature
By default the Repeat feature is Off. There are three Repeat modes for DVD
discs (Title Repeat, Chapter Repeat, A-B Repeat), and three options for Audio
CDs (Repeat Disc, Repeat Track, or A-B Repeat).
Repeating Titles, Chapters, or Tracks
1. While a disc is playing, press INFO (the Info Display appears).
2. Press the right arrow button until the Repeat icon is highlighted.
3. Press the up or down arrow button to scroll through the different Repeat options (the
modes appear at the bottom of the Info Display).
4. To turn off the Repeat feature, press the up or down arrow button repeatedly until Repeat
Mode: Off appears.
AB Repeat
AB Repeat lets you define a specific segment on the disc that you want to repeat. To watch a
scene over and over:
1. Follow steps 1 and 2 above.
2. Press the up/down arrow buttons until Repeat Mode: AB. Press OK to set A point appears
at the bottom of the Info Display. Press OK when the disc gets to the beginning point of
the segment (the A point) that you want to repeat.
3. Allow the disc to play to the end of the segment you want to repeat. Don’t fast forward —
the disc has to play in standard playback mode to set the B point (the end point of the
segment). Press OK to set the B point (the segment will play repeatedly until you turn off
the Repeat feature).
4. To turn off the Repeat feature, press the up arrow button on the remote until Repeat
Mode: Off appears at the bottom of the Info Display. Repeat is also cancelled when you
eject the disc.
Using the Bookmark Feature
The Bookmark feature lets you mark a point on the disc so that when you
turn the player off and back on (without having ejected the disc), you can
quickly start playing the disc from a bookmarked point. There are 6
bookmarks available.
DRC700N.part1.7.26.02 8/1/02 11:05 AM Page 18
Table of contents
Other RCA DVD Player manuals

RCA
RCA DRC500L User manual

RCA
RCA DRC300i User manual

RCA
RCA DRC300iH Instruction Manual

RCA
RCA DRC105N User manual

RCA
RCA MRP1150 User manual

RCA
RCA RTD315W User manual

RCA
RCA RC5231Z User manual

RCA
RCA DRC69702 - Dual 7" Mobile DVD System User manual

RCA
RCA HDV5000 User manual

RCA
RCA DRC233N - Progressive-Scan DVD Player User manual