Kado Aspect Swivel Heated Towel Rail Wall Mount
635mm x 400mm Chrome
Installation Instructions
Plumbers, please ensure a copy of the Installation
Instructions are left with the end user for future reference
Kado Aspect Swivel Heated Towel Rail Wall Mount
635mm x 400mm Chrome
Installation instructions
WARNING:
This appliance is not intended for use by young children or infirm persons without supervision.
CAUTION:
The cord extension set must be positioned so that it is not subject to splashing or ingress of moisture.
The supply shall have means for disconnection with an air gap in all active conductors
incorporated in the fixed wiring according to the Wiring Rules in AS/NZS 3000:2000.
CAUTION
WARNING
This product must be installed by a qualified electrician in accordance with AS/NZS 3000 wiring rules. Switch off the electrical
supply at the mains before installation and maintenance. A means of disconnection must be incorporated in the fixed wiring
in accordance with the wiring rules. Suitable for bathroom and non-bathroom/dry areas. Not suitable for above baths, nor
for installation in saunas, steam rooms or shower cubicles. Please consult with a qualified electrician to confirm appropriate
compliant installation location.
Do not connect to a plug and socket outlet. Rated IPX5 and suitable for indoor use only. Do not fix to damp or conductive
surfaces. Site well away from curtains and fabrics. Switch off after use. Do not leave on for prolonged periods. This appliance is
not to be used by persons (including children) with reduced physical, sensory or mental capabilities.
Please consult with a qualified electrician to confirm appropriate compliant installation location.
HYDROTHERM
MILAN HEATED WALL MOUNT TOWEL RAILS
INSTALLATION
•Slide the WALL BRACKET1into the BRACKETARM2
and hold up tothe wall in position.
• With a pencil, outline the WALL BRACKET1in the desired
position and remove from the wall.
• Using apencil and the WALL BRACKET1, mark the centre
screw hole and cross it for accuracy.
• Drill ahole for the SCREW 4and insert nylon plug into tiled
wall (if applicable). Installer may choose to use alternative
screws tosuit the application.
• Position WALL BRACKET1sothat the GRUB SCREW hole
faces directly down towards the floor and place SCREW 4
into the wall.
DO NOT OVERTIGHTEN SCREW - LEAVE SLIGHT
ADJUSTMENT OF THE FLANGE (SLACK) TO ENABLE
MOVEMENT WHEN THE TOWEL RAIL IS POSITIONED.
•When all of the WALL BRACKETS 1are in place, slide
the TOWELRAIL 5into position towards the wall, until
BRACKETARM2reaches the WALL BRACKET1.
•Insert GRUB SCREW 3through BRACKETARM2and into
WALL BRACKET1.
• With the ALLEN KEY 6provided, tighten the GRUB SCREW
until tight toensure that towel rail stays in position.
Please ensure that the measurements are taken accurately and
that the screw is in astud or noggin toprovide support. Do not
overtighten screws.
WARNING
All rails are individually hand made.
Due to this fact some measurments may not be exact.
PLEASE READINSTRUCTIONS CAREFULLY and do
not force towel rail into bracket if position of wall flange is not
accurate.
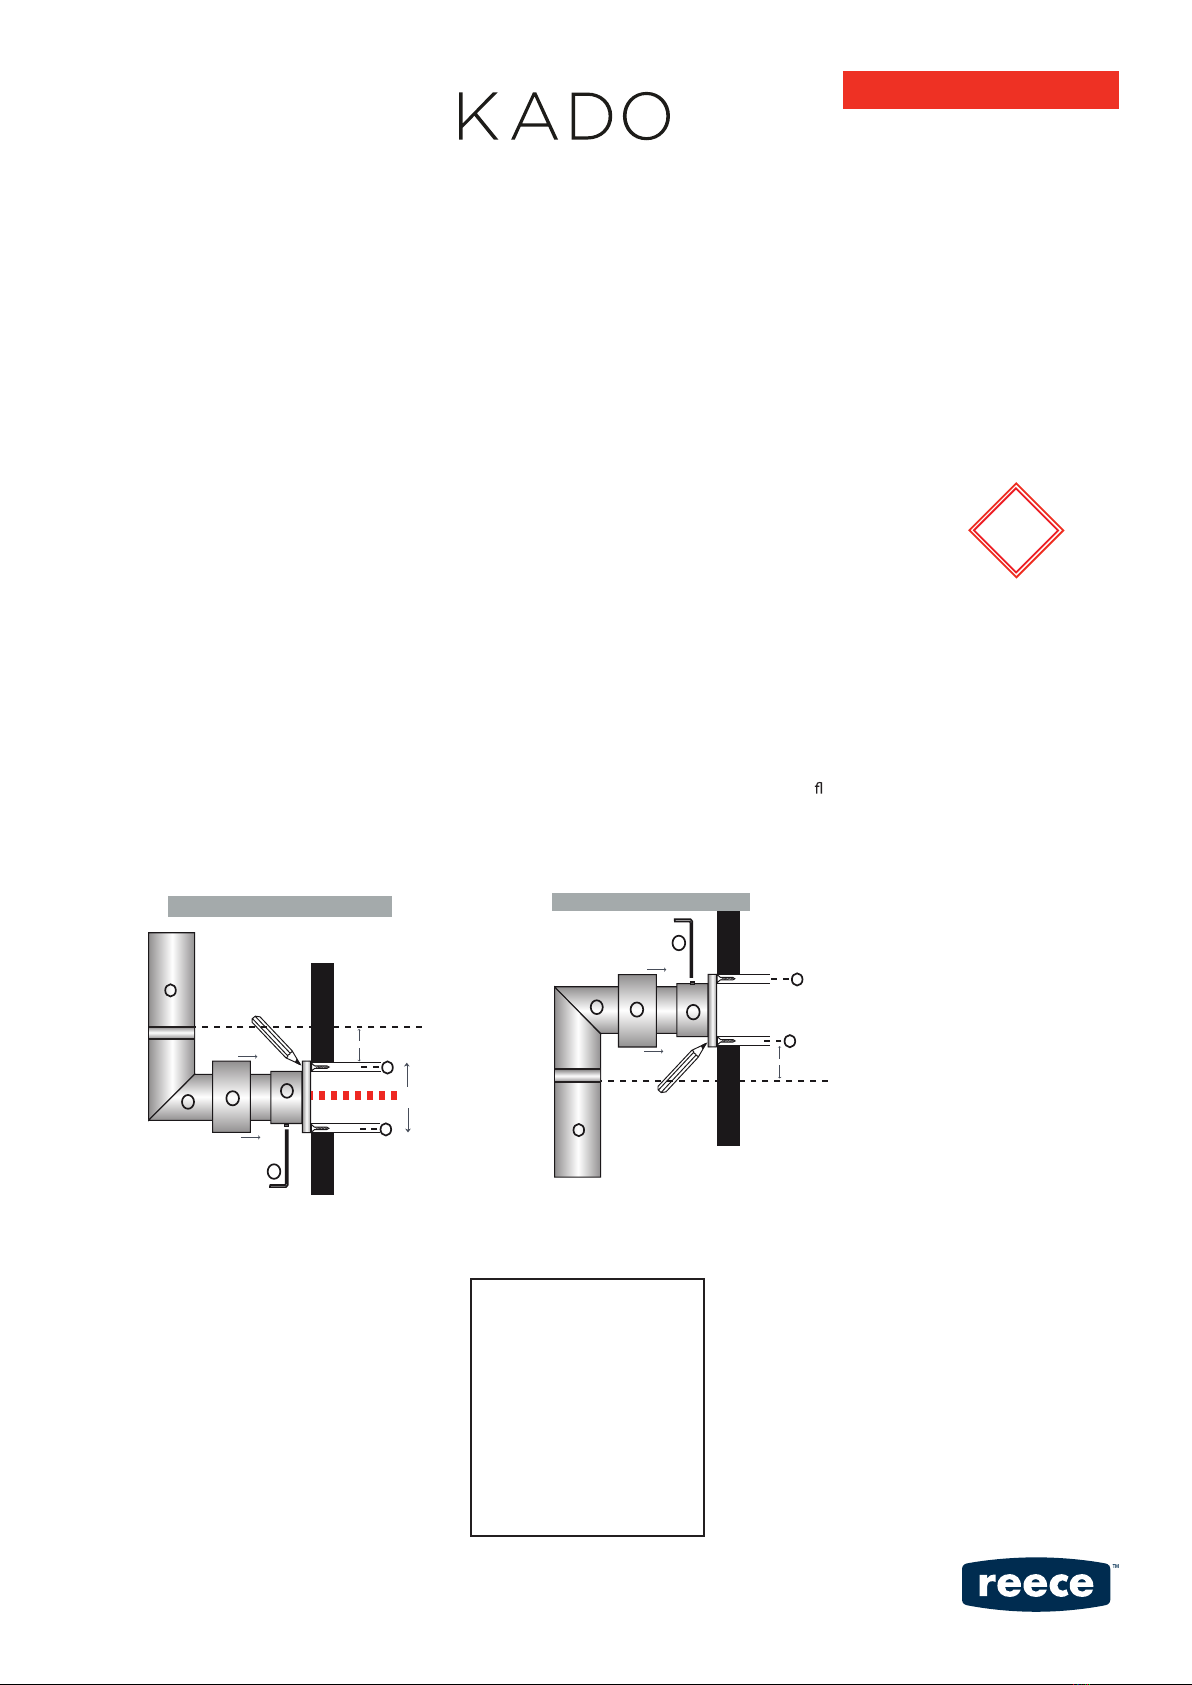
I N STA LLINGBRACKETS
WARNING
Hydrotherm take pride in the fact that all rails are individually hand made. Due to this fact
some measurements may not be exact. PLEASE READ INSTRUCTIONS CAREFULLY and do not
force towel rail into bracket if position of wall flange is not accurate.
TOWEL RAILS MUSTALWAYS BE INSTALLEDWITHTHE ELEMENT
PLACEDATTHE BOTTOM FOR CORRECT HEATTRANSFER
•
Slide the WALL BRACKET
1
into the BRACKET ARM
2
and hold up to the wall in position.
•
With a pencil, outline the WALL BRACKET
1
in the
desired position and remove from the wall.
•
Using a pencil and the WALL BRACKET
1
, mark the
centre screw hole and cross it for accuracy.
•
Drill a hole for the SCREW
4
and insert nylon plug into
tiled wall (if applicable). Installer may choose to use
alternative screws to suit the application.
•
Position WALL BRACKET
1
so that the GRUB SCREW
hole faces directly down towards the floor and place
SCREW
4
into the wall.
DO NOT OVERTIGHTEN SCREW - LEAVE SLIGHT
ADJUSTMENT OF THE FLANGE (SLACK) TO ENABLE
MOVEMENT WHEN THE TOWEL RAIL IS POSITIONED.
•
When all of the WALL BRACKETS
1
are in place, slide
the TOWEL RAIL
5
into position towards the wall, until
BRACKET ARM
2
reaches the WALL BRACKET
1
.
•
Insert GRUB SCREW
3
through BRACKET ARM
2
and
into WALL BRACKET
1
.
•
With the ALLEN KEY
6
provided, tighten the GRUB
SCREW until tight to ensure that towel rail stays in position.
5
**INSTALLER MAY CHOOSE NOT TO USE SCREW IF NOT SUITABLE FOR APPLICATION
Wall Bracket Wall Screw**
Hydrotherm Towel Rail
Alen Key & Grub Screw
Bracket Arm
Grub Screw
Hydrotherm will not accept
responsibility for incorrectly
installed brackets.
Please read instructions carefully.
Please ensure that the measurements are taken accurately
and that the screw is in a stud or noggin to provide support.
Do not overtighten screws.
STUD OR
NOGGIN
WALL
I N STA LLINGBRACKETS
TOWEL RAILS
LY and do not
force towel rail into bracket if position of wall flange is not accurate.
TOWEL RAILS MUSTALWAYS BE INSTALLEDWITHTHE ELEMENT
PLACEDATTHE BOTTOM FOR CORRECT HEATTRANSFER
•
Slide the WALL BRACKET
1
into the BRACKET ARM
2
and hold up to the wall in position.
•
With a pencil, outline the WALL BRACKET
1
in the
desired position and remove from the wall.
•
Using a pencil and the WALL BRACKET
1
, mark the
centre screw hole and cross it for accuracy.
•
Drill a hole for the SCREW
4
and insert nylon plug into
tiled wall (if applicable). Installer may choose to use
alternative screws to suit the application.
•
Position WALL BRACKET
1
so that the GRUB SCREW
hole faces directly down towards the floor and place
SCREW
4
into the wall.
DO NOT OVERTIGHTEN SCREW - LEAVE SLIGHT
ADJUSTMENT OF THE FLANGE (SLACK) TO ENABLE
MOVEMENT WHEN THE TOWEL RAIL IS POSITIONED.
•
When all of the WALL BRACKETS
1
are in place, slide
the TOWEL RAIL
5
into position towards the wall, until
BRACKET ARM
2
reaches the WALL BRACKET
1
.
•
Insert GRUB SCREW
3
through BRACKET ARM
2
and
into WALL BRACKET
1
.
•
With the ALLEN KEY
6
provided, tighten the GRUB
SCREW until tight to ensure that towel rail stays in position.
2
3
2
1
1
3
6
6
4
4
5
5
**INSTALLER MAY CHOOSE NOT TO USE SCREW IF NOT SUITABLE FOR APPLICATION
Wall Bracket Wall Screw**
Hydrotherm Towel Rail
Alen Key & Grub Screw
Bracket Arm
Grub Screw
Hydrotherm will not accept
responsibility for incorrectly
installed brackets.
Please read instructions carefully.
Please ensure that the measurements are taken accurately
and that the screw is in a stud or noggin to provide support.
Do not overtighten screws.
1Twin Hole Wall Bracket (BOTTOM) 4Wall Screw *
2Single Hole Wall Bracket (TOP)5HydrothermTowel Rail
3Grub Screw 6Alen Key & Grub Screw
page 2 of 5
Plumbers, please ensure a copy of the installation
instructions is left with the end user for future reference
* Installer may choose not to use screw if not suitable for application.
TOWEL RAILS MUST ALWAYS BE INSTALLED WITH THE ELEMENT
PLACED AT THE BOTTOM FOR CORRECT HEAT TRANSFER
CLEANING RECOMMENDATIONS
We recommend the use of soapy water or approved cleaners.
This product should not be cleaned with abrasive cleaners.
Damage caused by imporper treatment is not covered by the product warranty. Refer to Warranty Conditions.
KADO LUSSI WALL MOUNT HTR