Reed Instruments R9030 User manual

Hardness Tester
Instruction
Manual
R9030
REED Instruments

2
Table of Contents
Introduction ................................................................................................ 3
Product Quality........................................................................................... 4
Safety ......................................................................................................... 4
Features...................................................................................................... 4
Included...................................................................................................... 4
Specications............................................................................................. 5
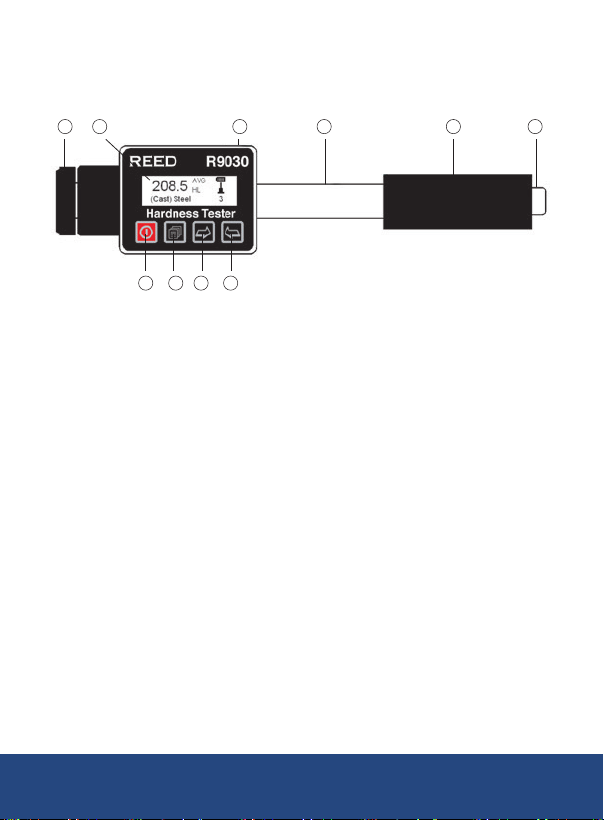
Instrument Description............................................................................... 6
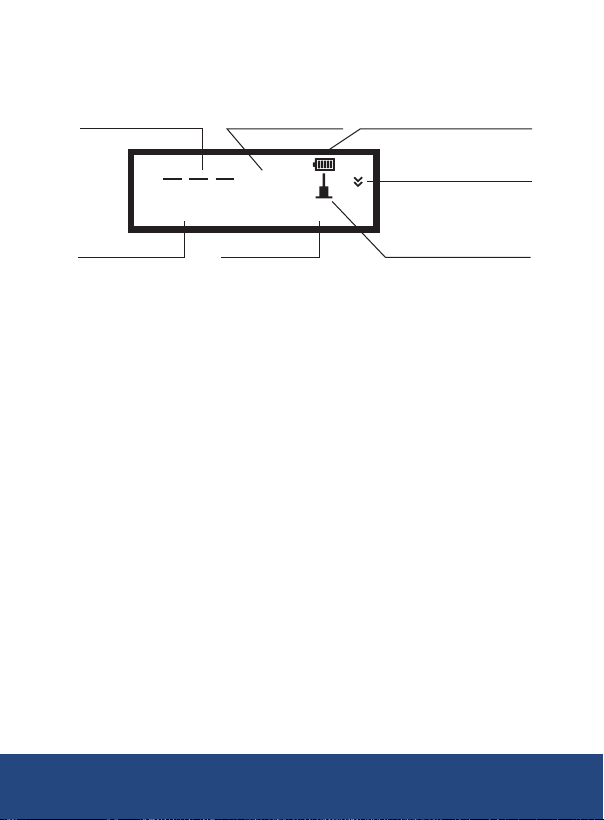
Display Description .................................................................................7-8
Hardness Testing Principle..................................................................... 8
Operating Instructions...........................................................................8-18
Power On/Off......................................................................................... 8
Preparation of Test Piece....................................................................... 8
Prior to First Measurement .................................................................... 9
Loading Impact Device .......................................................................... 9
Taking Measurements ............................................................................ 9
Viewing Measurement Values .............................................................. 10
Storing Average Value.......................................................................... 10
Auto Power OFF .................................................................................. 10
Menu Navigation/Setup Mode ........................................................10-16
Test Set........................................................................................11-13
Impact Direction .......................................................................... 11
Average........................................................................................ 11
Material ........................................................................................ 12
Hardness Scale............................................................................ 12
Tolerance Limit............................................................................. 12
Hard/ b (Hardness/Strength Testing) .......................................... 13
Probe Type................................................................................... 13
Standard ...................................................................................... 13
Memory Manager ........................................................................13-15
continued...
REED Instruments

3
View from No.1/View from End .................................................... 14
View from No................................................................................ 14
Transfer ........................................................................................ 14
Delete by No. ..........................................................................14-15
Delete All...................................................................................... 15
System Set ..................................................................................15-16
Enabling/Disabling Auto Save...................................................... 15
Enabling/Disabling Auto Delete.................................................... 15
Enabling/Disabling Auto Transfer ................................................. 15
Enabling/Disabling Auto Shutoff .................................................. 16
Setting the Time and Date ........................................................... 16
Quick Setup Mode ..........................................................................16-17
Calibration Procedure .......................................................................... 17
Connecting to a Computer .................................................................. 17
Launching the R9030 Software............................................................ 18
Battery Charging and Replacement......................................................... 18
Applications.............................................................................................. 19
Appendix A: Hardness Scale Tables ...................................................19-22
Accessories and Replacement Parts ....................................................... 22
Product Care .......................................................................................22-23
Product Warranty ..................................................................................... 23
Product Disposal and Recycling .............................................................. 23
Product Support....................................................................................... 23
Introduction
Thank you for purchasing your REED R9030 Hardness Tester. Please
read the following instructions carefully before using your instrument. By
following the steps outlined in this manual your meter will provide years of
reliable service.
REED Instruments

4
Product Quality
This product has been manufactured in an ISO9001 facility and has been
calibrated during the manufacturing process to meet stated product
specications. If a certicate of calibration is required please contact the
nearest authorized REED distributor or authorized Service Center. Please
note an additional fee for this service will apply.
Safety
Never attempt to repair or modify your instrument. Dismantling your
product, other than for the purpose of replacing batteries, may cause
damage that will not be covered under the manufacturer's warranty.
Servicing should only be provided by an authorized service center.
Features
• Measures a wide range of materials including; cast steel, alloy steel,
stainless steel, aluminum, bronze, copper and cast irons
• Measures 7 types of hardness scales; Rockwell (HRC, HRB, HRA),
Brinell (HB), Leeb (HL), Vickers (HV) and Shore (HS)
• Compact pen style design
• Bright OLED display
• Real-time clock and internal memory stores up to 350 measurements
• USB connectivity and software allows for further measurement analysis
• Rechargeable lithium battery
• Low battery indicator
Included
• D Impact Device
• Leeb Test Block
• Small Supporting Ring
• Nylon Brush
• AC Adapter
• USB Cable
• Software
• Hard Carrying Case
REED Instruments

5
Specifications
Hardness Scales: Rockwell (HRA, HRB, HRC)
Brinell (HB)
Leeb (HLD)
Vickers (HV)
Shore (HS)
Measuring Ranges: HRA: 59 to 85
HRB: 13 to 100
HRC: 20 to 68
HB: 19 to 651
HLD: 170 to 960
HV: 80 to 967
HS: 30 to 100
Measuring Direction: 360°
Sampling Time: Less than 1 second (when triggered)
Display: Dot Matrix OLED
Battery Life: Approx. 40 hours
Low Battery Indicator: Yes
Power Supply: Rechargeable Lithium Ion Battery
Charge Time: Approx. 2 hours
Internal Memory: Yes (up to 350 readings)
Product Certications: CE
Operating Temperature: 32 to 104°F (0 to 40°C)
Storage Temperature: -4 to 140°F (-20 to 60°C)
Operating Humidity Range: 0 to 90%
Dimensions: 5.7 x 1.3 x 1" (146 x 32 x 26mm)
Weight: 5.6oz (160g)
REED Instruments

6
Instrument Description
1 2
345 6
78 9
10
1. Support Ring
2. LCD Display
3. POWER/Exit Button
4. Menu/Enter Button
5. Measurement set up shortcut/Right/Down/Increase Button
6. Scan/Delete/Left/Up/Decrease Button
7. Micro USB Port
8. Impact Device
9. Coding Sheath
10. Release Button
REED Instruments

7
Display Description
Measured Value Hardness Scale Battery Indicator
Connection Flag
Impact DirectionImpact TimesMaterial
(Cast) Steel
HL
03
Battery Indicator: Displays battery capacity and charge status when
plugged in.
Impact Direction: Set impact direction.
Hardness Scale: Set hardness scale.
Measured Value: Current measured value (without average value
indicator), or current average value (with average value indicator).
Material: Set material.
Impact Times: The total number of impact times will be displayed. Impact
times set through the menu will also be displayed here.
Connection Flag: The connection ag will blink when the instrument is
trying to connect to the PC. A solid ag means successful connection.
continued...
REED Instruments

8
Hardness Testing Principle
The hardness value comes from the rate of rebound velocity and impact
velocity at 1mm distance from the testing surface. Using the Leeb
hardness scale as an example, the following calculation is used to
calculate the hardness value:
HL=1000×VB / VA
Impact Phase Rebound Phase
Time
Operating Instructions
Power On/Off
Turn the meter on by pressing the POWER button. To turn the meter off,
press and hold the POWER button for 2 seconds.
Preparation of Test Piece
Please note that measurement values may be affected if the material
under test is exposed to extreme temperatures.
If the tested material is too rough, a measuring error will appear. The
surface of the sample must have metallic luster and the surface must be
at and smooth. No oil or dirt should be present.
Curved surface: It is better that the testing surface of the test piece is
at. When the curvature radius (R) of the curved surface to be tested is
less than 30mm (for D and DL type impact device), a small support ring
(included with the R9030) should be used.
Self-magnetism of the test piece should be less than 30 Gauss.
continued...
REED Instruments

9
Prior to First Measurement
Before rst use or if unused for an extended period of time,
5 measurements should be performed using the included test block.
If the average values from the charts at the end of this manual are
exceeded, the internal calibration is required (see Calibration Procedure
section for details).
Loading Impact Device
Push down the loading sheath to load and lock the impact body in place.
Taking Measurements
1. Press down on the release button located at the top of the impact
device to take a measurement.
The reading will appear on the display matching the selected material,
hardness or strength testing and impact direction (see Menu Navigation/
Setup Mode section for details).
Note: While taking a measurement, the test piece, impact device and
operator are all required to be stable.
2. Five measurements should be performed of the test piece. The
divergence of data should be not exceed ±15HL of the
required value.
3. The distance between any two impact points, or from the center of
any impact point to the edge of the test piece should be in
accordance with the following specications:
Type of
impact device
The distance of two
indentations center
The distance between
indentation center and
edge of test piece
D, DC, DL, D+15 No less than: 3mm No less than: 5mm
C No less than: 2mm No less than: 4mm
continued...
REED Instruments

10
Viewing Measurement Values
1. When testing is complete, press the button to enter the recorded
data mode.
2. Press the button to scroll through the recorded data taking during
the measurement process.
3. To delete the displayed data, press the button.
4. Press the or buttons to select between Yes or No.
5. Press the button to conrm selection, or press the button to
exit and resume normal operation.
Storing Average Value
1. When testing is complete, the meter displays the average value
taken during the measurement process.
2. Press the button to enter storing average value mode.
3. Press the or buttons to select between Save & Exit or Quit.
4. Press the button to conrm selection, or press the button to
exit and resume normal operation.
Auto Power OFF
To preserve battery life, the meter is programmed to turn itself off after
5 minutes of inactivity. Prior to shutting off, the display will begin a 10
second countdown that can be cancelled by pressing the button. To
disable this feature, see Enabling/Disabling Auto Shutoff in Menu
Navigation/Setup Mode section for details.
Menu Navigation/Setup Mode
1. Press the button to enter the menu screen.
2. Press the and buttons to scroll through the
following parameters.
Parameter Description
Test Set Setting up your meter
Memory Manager View/Delete/Transfer Data
continued...
REED Instruments

11
Parameter Description
System Set Setting automatic preferences
About View Firmware Version/Serial Number
3. Press the button to enter the appropriate parameter and follow
the setup instructions below.
Note: At any time, you can press the button to exit the Menu Screen/
Setup mode and resume normal operation.
Test Set
While in the Test Set function, press the and buttons to scroll
through the following list of sub parameters:
a) Impact Direction
b) Average
c) Material
d) Hardness Scale
e) Tolerance Limit
f) Hard/b
g) Probe Type
h) Standard
Follow the instructions below to adjust each setting.
a) Impact Direction
1. Press the button when "Impact Direction" is highlighted.
2. Press the and buttons to scroll through the 360° measuring
direction list.
3. Press the button to conrm selection.
b) Average
1. Press the button when "Average" is highlighted.
2. Press the and buttons to select the number of measurements
to be used to calculate the average value between 1 and 32.
3. Press the button to conrm selection.
continued...
REED Instruments

12
c) Material
1. Press the button when "Material" is highlighted.
2. Press the and buttons to select the appropriate material
being tested.
For hardness testing, you can select between the following
materials: Cast Steel, Cold Work Tool Steel, Stainless Steel, Gray Cast
Iron, Nodular Cast Iron, Cast Aluminum Alloys, Copper-Zinc Alloys
Copper-Aluminum Alloys, Wrought Copper and Wrought Steel.
For strength testing, you can select between the following materials:
Mild Steel, High-Carbon Steel, Cr Steel, Cr-V Steel, Cr-Ni Steel, Cr-Mo
Steel, Cr-Ni-Mo Steel, Cr-Mn-Si Steel, Super Strength Steeland
Stainless Steel.
3. Press the button to conrm selection.
d) Hardness Scale
1. Press the button when "Hardness Scale" is highlighted.
2. Press the and buttons to select the appropriate hardness
scale for the material under test.
Note: The material under test must rst be selected before selecting the
hardness scale.
3. Press the button to conrm selection.
e) Tolerance Limit
1. Press the button when "Tolerance Limit" is highlighted.
Note: In this function, the Min/Max Tolerance Limits must be set according
the meters measuring range capabilities for each available scale.
2. Press the button to skip to the required digit.
3. Press the and buttons until the desired value is reached.
4. Press the button to conrm and skip to the next digit.
5. After each value has been selected and conrmed, it will
automatically exit the "Tolerance Limit setup" screen.
continued...
REED Instruments

13
f) Hard/ b (Hardness/Strength Testing)
1. Press the button when "Hard or b" is highlighted between hard
(hardness testing) or b (strength testing).
2. Press the or buttons to skip to the next function
when complete.
g) Probe Type
1. Press the button when "Probe Type" is highlighted to select the
appropriate probe.
2. Press the or buttons to skip to the next function
when complete.
h) Standard
1. Press the button when "Standard" is highlighted to select the
appropriate standard.
2. Press the or buttons to skip to the next function
when complete.
Memory Manager
This function allows a user to view, transfer, and delete a le/group
previously saved in memory.
Press the and buttons to scroll through the following parameters
within the Memory Manager function.
a) View From No.1
b) View From End
c) View From No.
d) Transfer
e) Delete By No.
f) Delete All
Follow the instructions below to adjust each setting.
Note: If there is no data in the memory, it will display "No Memory!", and
return to the menu screen.
continued...
REED Instruments

14
a,b) View from No.1/View from End
The data group displays test results, average result, sample material and
impact direction.
1. Press the button to enter the selected parameter.
2. Press the button again to activate les to view.
3. Press the and buttons to scroll the list of saved les.
4. Press the button see details of the measurement data.
5. Press the and buttons to scroll through the details of the
measurement data.
6. Press the button to return to the previous screen at any time.
c) View from No.
This function allows a user to search within a specic group of data les.
1. Press the button to enter the selected parameter.
2. Press the button again to skip to the required digit.
3. Press the and buttons until the desired value is reached.
4. Press the button to conrm and skip to the next digit.
5. After each value has been selected and conrmed, it will
automatically search for the data les matching the search criteria.
d) Transfer
Allows a user to transfer saved data les to the included software by
pressing the button.
e) Delete by No.
This function allows a user to delete les within a specic group.
1. Press the button to enter the selected parameter.
2. Press the button again to skip to the required digit.
3. Press the and buttons until the desired value is reached.
4. Press the button to conrm and skip to the next digit.
5. After each value has been selected and conrmed, the meter will ask
to conrm deletion of the specic groups.
continued...
REED Instruments

15
6. Press the and buttons to select between "Yes" or "No".
7. Press the button to conrm selection.
f) Delete All
1. Press the button to enter the selected parameter.
2. Press the and buttons to select between "Yes" or "No".
3. Press the button to conrm selection.
System Set
Press the and buttons to scroll through the following
setup parameters.
1. Auto Save: Off/On
2. Auto Delete: Off/On
3. Auto Transfer: On/Off
4. Auto Off: On/Off
5. Time Date Set
Follow the instructions below to adjust each setting.
Enabling/Disabling Auto Save
1. Press the button to turn Auto Save On or Off.
2. Press the or buttons to skip to the next parameter
when complete.
Enabling/Disabling Auto Delete
1. Press the button to turn Auto Delete On or Off.
2. Press the or buttons to skip to the next parameter
when complete.
Enabling/Disabling Auto Transfer
1. Press the button to turn Auto Transfer On or Off.
2. Press the or buttons to skip to the next parameter
when complete.
continued...
REED Instruments

16
Enabling/Disabling Auto Shutoff
1. Press the button to turn Auto Shutoff On or Off.
2. Press the or buttons to skip to the next parameter
when complete.
Setting the Time and Date
1. Press the button to enter the selected parameter.
2. Press the and buttons to adjust the month as
indicated by "mm."
3. Press the button to conrm and skip to the next digit.
4. Repeat steps 2 and 3 to set the day, year, hour and minutes as
indicated by (dd/yyyy/h/m).
5. After each value has been selected and conrmed, it will
automatically exit the Setting the time and date setup screen.
Quick Setup Mode
1. While in normal operation, press the button to enter the Quick
Measurement Setup Mode.
2. The meter will automatically default to the previously selected
Hardness Scale preset.
3. Press the button to select the appropriate hardness scale for the
material under test.
4. Press the button to conrm selection and jump to the next
parameter (Impact Direction).
5.
Press the button to scroll through the 360° measuring direction list.
6. Press the button to conrm selection and jump to the next
parameter (Material).
7. Press the button to select the appropriate material being tested.
8. Press the button to conrm selection and jump to the next
parameter (Average).
9. Press the button to select the number of measurements to be
used to calculate the average value between 1 and 32.
continued...
REED Instruments

17
10. Press the button to exit Quick Setup Mode and resume
normal operation.
Calibration Procedure
1. While the meter is off, press and hold the button while turning the
meter on.
2. Release the button until the meter enters the calibration mode as
indicated on-screen by "Calibration 0/5 times".
3. The required number of measurements to be used to complete
calibration is automatically set to 5.
Note: The selected impact direction should be vertically down on the
Leeb hardness test block.
4. The average value will appear on the screen at the end of
the 5 measurements.
5. If the value exceeds the standard value, press the and
buttons to adjust the nominal value.
6. Press the key to nish calibration and resume normal operation.
Note: Calibration range is ±15HL.
Connecting to a Computer
The instrument is equipped with a micro-usb port. Using the included
cable, the hardness tester has the ability to connect to a computer, or
external storage device/mini-printer. Measurement data stored in the
memory of the gauge can be transferred to the computer through the
micro-usb port.
continued...
REED Instruments

18
Launching the R9030 Software
1. Visit www.reedinstruments.com/software & drivers to download the
R9030 software.
2. Double click on the software labeled DV-R9030 located in the REED
Hardness Tester Dataview folder to launch.
3. If the meter fails to connect, it may require that the driver be
installed separately.
4. The application can be saved to your computer by Extracting all the
les to a specic folder.
Full specications and Operating System compatibility can be found
on the product page at www.reedinstruments.com. If you have specic
questions related to your application and/or questions related to software
setup and functionality please contact the nearest authorized distributor
Battery Charging and Replacement
When the battery is empty, recharge the Lithium rechargeable battery.
Connect the USB battery cable to the micro USB port and then connect
the other end of the cable to an AC source or computer.
Battery life expectancy with regular use is 3 years. Should you require a
new battery please contact the nearest authorized distributor or Customer
REED Instruments

19
Applications
• Ideal for hardness testing of large and heavy objects
• In production lines of mass produced components
• Materials identication in stores and warehouses
• In locations with difcult access, or in conned spaces
Appendix A: Hardness Scale Tables
The R9030 includes D impact device. Please note that impact devices DL,
DC, D+15 and C can be ordered seperately. For more information please
Non conventional impact devices DC(D)/DL D+15 C
Impacting energy 11mJ 11mJ 2.7mJ
Mass of impact body 5.5g/7.2g 7.8g 3.0g
Test tip Hardness 1600HV 1600HV 1600HV
Diameter of test tip 3mm 3mm 3mm
Material of test tip Tungsten
carbide
Tungsten
carbide
Tungsten
carbide
Impact device Diameter 20mm 20mm 20mm
Impact device Length 86(147)/
75mm 162mm 141mm
Impact device Weight 50g 80g 75g
Max. hardness of workpiece 940HV 940HV 1000HV
Mean roughness of workpiece surface
of the Ra 1.6μm 1.6μm 0.4μm
Min. weight of sample:
Measure directly
Need support rmly
Need coupling tightly
>5kg >5kg >1.5kg
2-5kg 2 to 5kg 0.5 to 1.5kg
0.05-2kg 0.05 to 2kg 0.02 to 0.5kg
Min. thickness of sample:
Coupling tightly
Min.layer thickness for surface harden
5mm 5mm 1mm
≥0.8mm ≥0.8mm ≥0.2mm
Hardness 300HV Indentation diameter 0.54mm 0.54mm 0.38mm
Indentation depth 24μm 24μm 12μm
Hardness 600HV Indentation diameter 0.54mm 0.54mm 0.32mm
Indentation depth 17μm 17μm 8μm
continued...
REED Instruments

20
Non conventional impact devices DC(D)/DL D+15 C
Hardness 800HV Indentation diameter 0.35mm 0.35mm 0.35mm
Indentation depth 10μm 10μm 7μm
Available type of
impact device
D: General test
DC: Hole or hollow-cylindrical test
DL: Slender narrow groove
or hole test
D+15:
groove or
reentrant
surface
C: small,
light, thin
parts or
surface of
hardened
layer
Type of
impact device
Hardness value
of standard Leeb
hardness block
Error of
displayed value
Repeatability of
displayed value
D (included) 760±30HLD ±6HLD 6HLD
530±40HLD ±10HLD 10HLD
DC (optional) 760±30HLDC ±6HLDC 6HLD
530±40HLDC ±10HLDC 10HLD
DL (optional) 878±30HLDL ±12HLDL 12HLDL
736±40HLDL
D+15 (optional) 766±30HLD+15 ±12HLD+15 12HLD+15
544±40HLD+15
C (optional) 822±30HLC ±12HLC 12HLC
590±40HLC
continued...
REED Instruments
Table of contents
Other Reed Instruments Test Equipment manuals

Reed Instruments
Reed Instruments R5500 User manual

Reed Instruments
Reed Instruments R7200 User manual

Reed Instruments
Reed Instruments R5710 User manual

Reed Instruments
Reed Instruments BX-500 User manual

Reed Instruments
Reed Instruments R2810 User manual

Reed Instruments
Reed Instruments R5700 User manual

Reed Instruments
Reed Instruments R5800 User manual

Reed Instruments
Reed Instruments R5600 User manual

Reed Instruments
Reed Instruments R5320 User manual

Reed Instruments
Reed Instruments R5820 User manual