Rehau EVERLOC+ XL Instruction sheet

EVERLOC+™XL POWER TOOL
Product Instructions


1. Scope 4
2. Parts / Accessories 5
3. Technical Data / Equipment Description 6
4. Certications 7
5. Tool Preparation 7
6. Using the Tool 8
7. Fitting Assembly 11
8. Important Notes 11
9. Maintenance Notes 11
10. Troubleshooting Notes 12
11. Safety Warnings 13
CONTENTS
For updates to this publication and the most current technical instructions, safety information and manufacturer’s recommendations, visit na.rehau.com/resourcecenter
3

1. SCOPE
This technical information applies to the use of the
EVERLOC+™XL power tool for assembly of the EVERLOC+
compression-sleeve system.
Persons using this guide must be experienced and appropriately
licensed contractors who have an understanding of the principles and
practices for the installation of hydronic and hot/cold water systems.
The information presented in this guide is intended to demonstrate the
proper use and function of the EVERLOC+ power tool. This guide
does not supersede the recommendations of other manufacturers
regarding their components nor does this guide supersede national
and local code requirements. If there is conicting information, the
contractor must consult with the local authority having jurisdiction
and/or REHAU prior to planning and installing the EVERLOC+
compression-sleeve system.
The contractor should also review the REHAU PEXa Limited Warranty
and pertinent REHAU Technical Guidelines prior to installation of a
REHAU hydronic system. Contractors should also check the REHAU
Resource Center (na.rehau.com/resourcecenter) for the latest updates
to REHAU Technical Guidelines.
This symbol is used to call your attention to hazards or unsafe
practices which could result in personal injury. The signal word,
as dened below, indicates the severity of the hazard. The
message after the signal word provides information for
preventing or avoiding the hazard. If you don't avoid the
hazardous situation:
- DANGER! Will result in death or serious injury
- WARNING! Could result in death or serious injury
- CAUTION! Can result in minor or moderate injury
The signal word NOTICE is used to help you avoid property damage.
We cannot warn of all hazards; you must also use your own good
judgment.
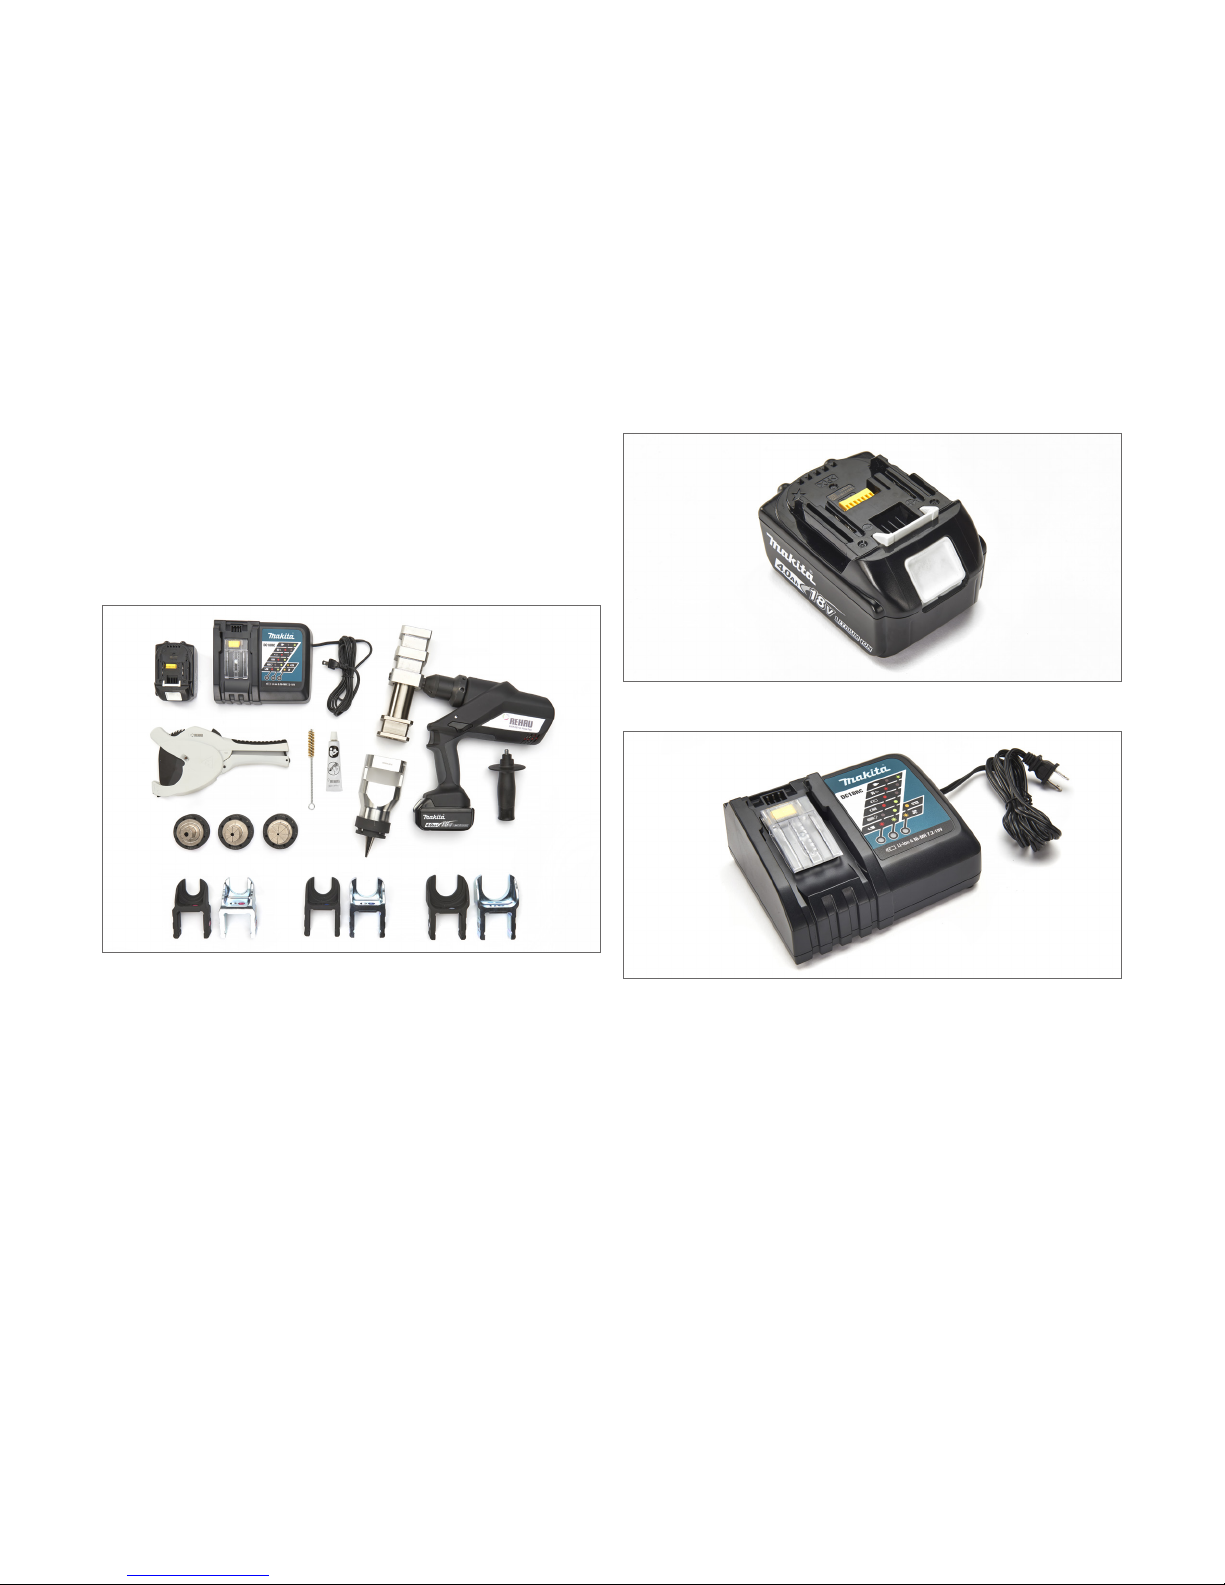
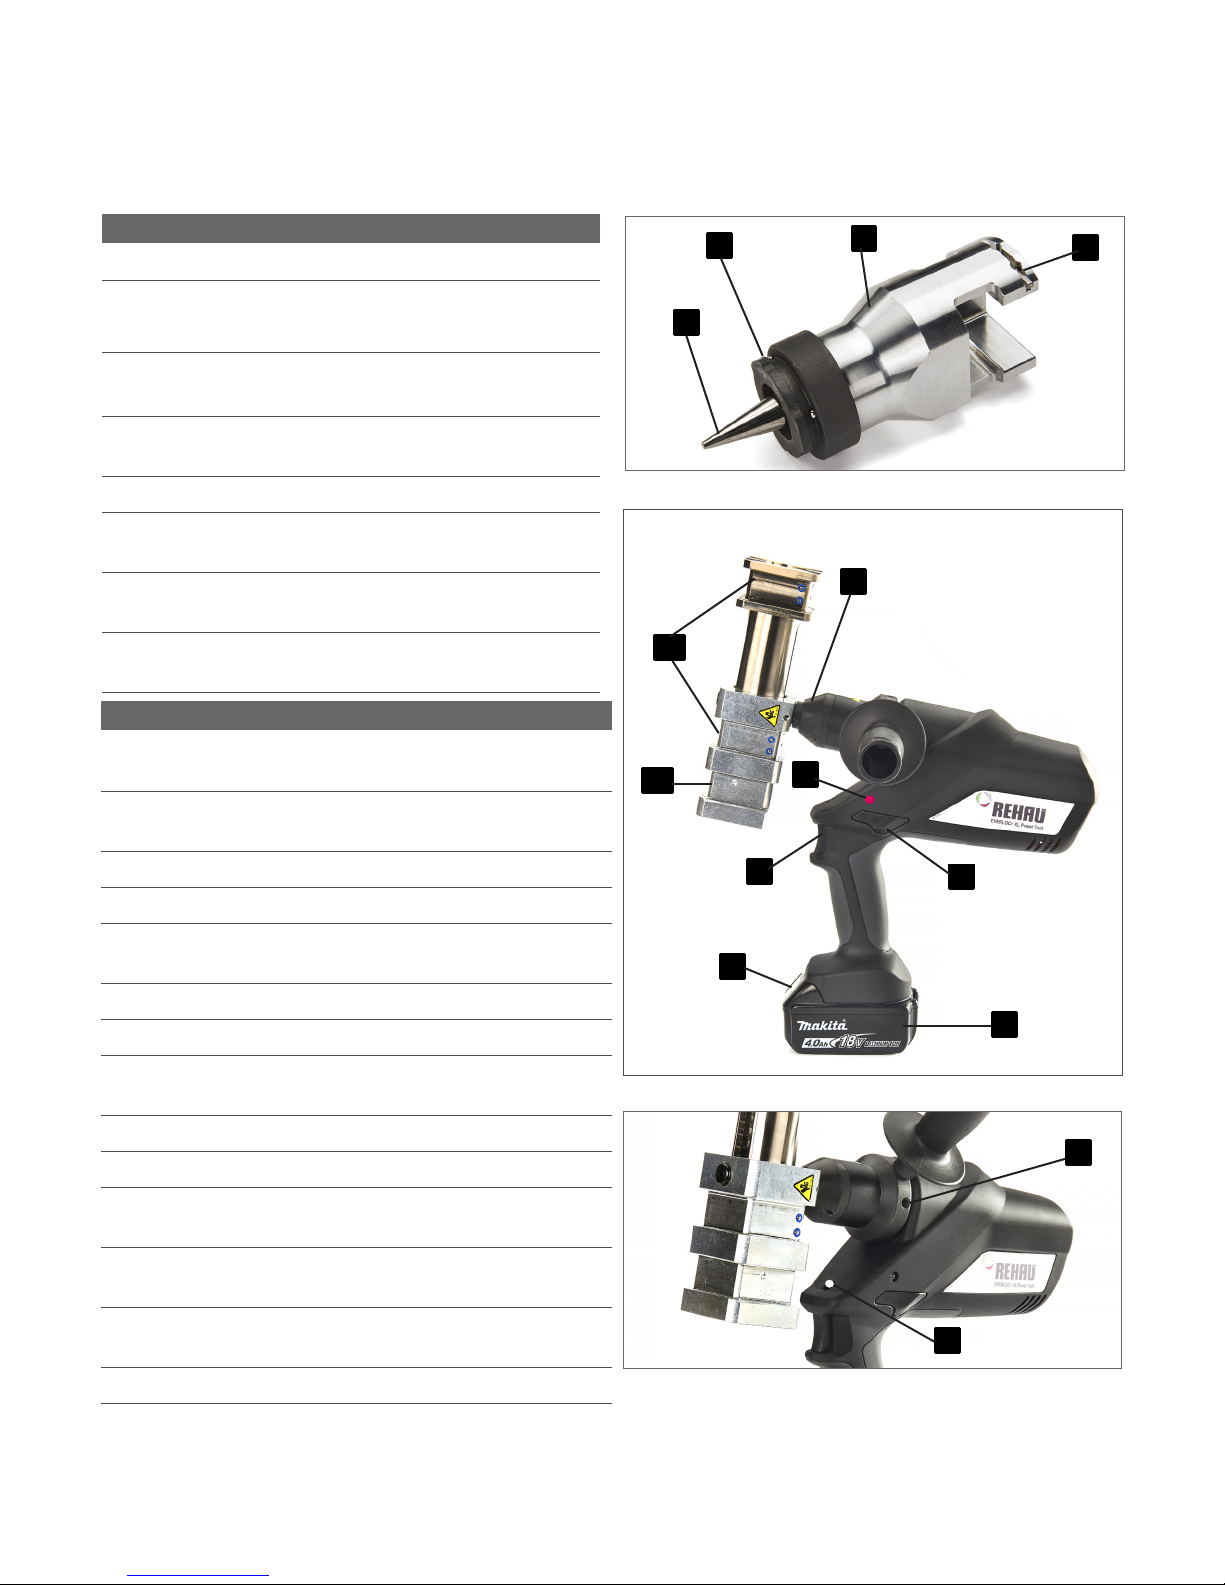
This tool is intended to be used with EVERLOC+ expander heads and
compression jaws in sizes 1 1/4 to 2 in.
EVERLOC®is a registered trademark of REHAU.
MAKITA® is a trademark of Makita Corporation, or an afliate thereof.
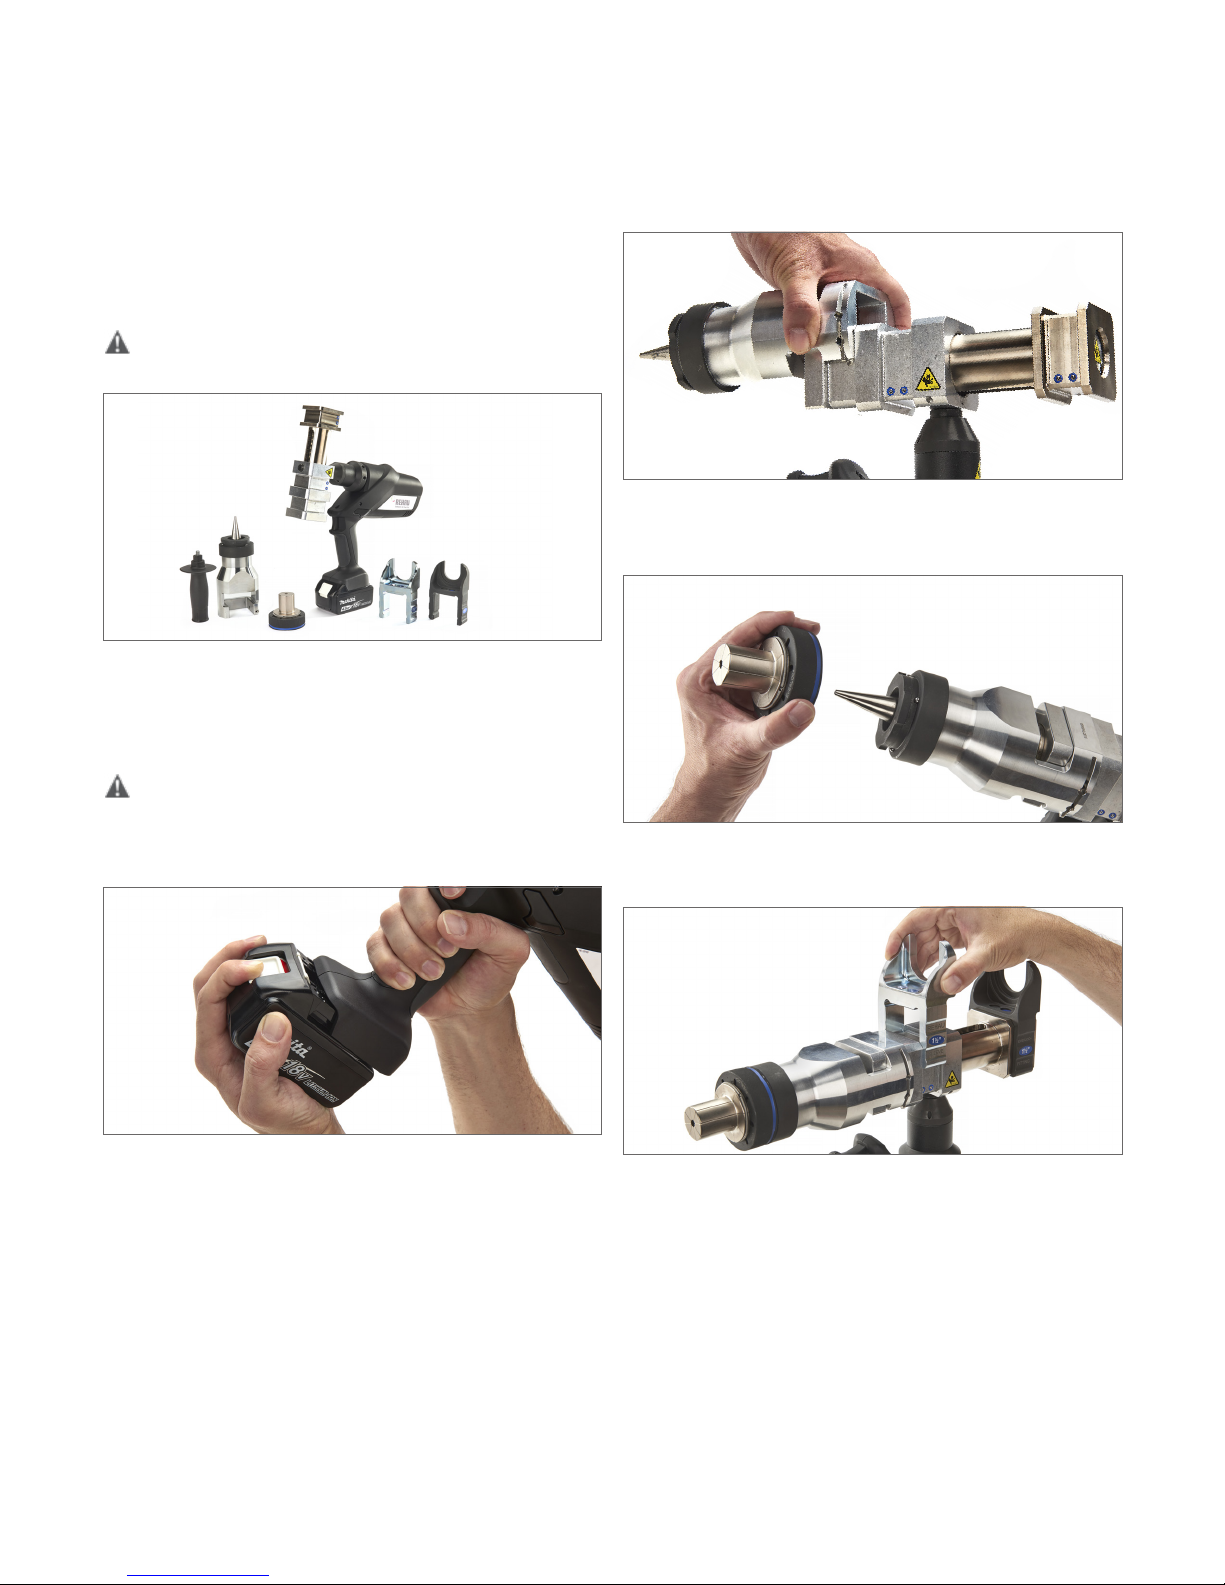
WARNING! Read all safety warnings, instructions, illustrations
and specications provided with this power tool, including those for
the battery and charger, before operating this tool.
4

EVERLOC+ XL Power Tool Standard Kit
Art. 105733-001
- Base tool EVERLOC+ XL power tool
- Expander adapter
- 1 1/4, 1 1/2 and 2 in. EVERLOC+ expander heads (quick change)
- 1 1/4, 1 1/2 and 2 in. EVERLOC+ compression jaws
- MAKITA 18V Li-ion battery (2 batteries per kit)
- MAKITA 18V Li-ion charger 120VAC
- Pipe cutter
- Grease tube
- Cleaning brush
- Tool case
- Operating instructions
Accessories
- EVERLOC+ XL Expander Tool Standard Kit, Art. 106096-001
- EVERLOC+ XL Expander Base Tool, Art. 105419-001
Spare, MAKITA 18V Li-ion Battery (BL1840B)
Spare, MAKITA 18V Li-ion Charger 120VAC (DC18RC)
Contact MAKITA to purchase these items from your most convenient
retailer.
2. PARTS / ACCESSORIES
5

3. TECHNICAL DATA / EQUIPMENT DESCRIPTION
Technical Data
Battery voltage 18V
Battery technology MAKITA®LXT®Lithium-ion
BL1830B, BL1840B or BL1850B
Battery charge time Approx. 30 mins. for BL1840B
with DC18RC
Tool and battery 14°F to 104°F
operating temperature (-10°C to +40°C)
Noise level < 75 dB (A) at 3 ft (1 m) distance
Vibration level < 2.5 m/s²
(weighted eff. value of the acceleration)
Weight Approx. 17.4 lbs (7.9 kgs) (basic tool
with adapter, handle and battery)
Charger operating 50°F to 104°F
temperature (+10°C to +40°C)
Item No. Tool Element Function
1 Operating trigger Switch for actuating the
expansion and compression steps
2 Reset button Switch for opening the hydraulic
release valve
3a Expansion slot Slot for expansion adapter
3b Compression slots Slots for compression jaws
4 Expansion adapter Adapter for quick change
expansion heads
5 Battery Rechargeable Li-ion battery
6 Battery release Button for releasing the battery
7 Red LED Information on the battery charge
levels and tool maintenance
8 White LED Light for illuminating work space
9 Rotating housing Head rotation
10 Adapter release lever Lever for releasing the adapter
from the 3A expansion slot
11 Expansion cone Slide for opening the expander
head
12 Quick change Connection technology of the
expander head to the adapter
13 Handle connection Positions (5x) for securing handle
11
1
2
4
3a
3b
5
6
7
8
9
10
12
13
6

5. TOOL PREPARATION
Checking the Tool Status
The red/white LEDs and the signal tone together with the electronic control system serves to provide information about the battery charge levels
and the tool.
Red White Signal
LED LED Tone Information Cause
Self-test! If the red LED ashes two times after the battery is inserted, this
2x means the electronic control has performed its self-test satisfactorily.
To perform the self test, rst remove the battery, pull the operating
trigger, then insert a battery into the tool.
Battery is empty! If the red LED displays a steady light for about 20 seconds after a
20s work operation, the battery is empty and needs to be charged.
Service! If the red LED slowly ashes for about 20 seconds upon completion
20s of a work operation, this means maintenance needs to be carried out.
slow ash The tool should be sent to a REHAU authorized service center as soon
as possible.
Battery is empty! If the red LED lights up for 20 seconds and then ashes, this means the
20s+ Service! battery is empty and also that maintenance is due.
20s slow ash
Overheating! If the red LED ashes quickly for about 20 seconds, this means that the
20s fast ash tool is overheated. Allow the device to cool down before using it again.
Compression force! If the red and white LEDs ash once and tool emits a signal tone during
1x 1x the compression step, either the necessary compression force was not
reached or the compression step was manually interrupted. The con-
nection may not have been properly completed and must be inspected.
Compression force! If the red and white LEDs ash three times and tool emits a signal tone
3x 3x Service! during the compression step, then there is a serious malfunction. The
necessary compression force is not being reached when the motor
is running. The connection may not have been properly completed and
must be inspected. The tool should be sent to the REHAU authorized
service center for repair as soon as possible.
Charging the Battery
Refer to the MAKITA instruction manual for charging the battery and safe operation of the battery charger.
4. CERTIFICATIONS
The tool with the attached battery is listed to the relevant US and Canadian standards under UL 60745 and CSA C22.2. The charger is listed to
the relevant US and Canadian standards under UL 1012 and CSA C22.2 No. 107.2.
7

1. Check the tool and tool components for damage or visible wear
prior to every use. Damaged tool components must not be used.
Damaged tools should be sent back to the REHAU authorized
service center for repair.
WARNING! Improper handling of the tool can result in injury and
property damage.
2. To remove the battery, withdraw it from the tool while depressing
the button on the front of the battery.
WARNING! Disconnect the battery pack from the power tool
before making any adjustments or changing accessories. Such
preventative measures reduce the risk of starting the power tool
accidentally.
6. USING THE TOOL
3. Slide the expansion adapter into the correct slot.
4. Securely lock the expander head into position.
5. Slide the compression jaws into the correct slots.
8

6. Install the handle to the tool. The handle must be installed
securely before operation.
WARNING! Always hold the tool rmly with your second hand on
the handle to avoid trapping your ngers from moving parts.
7. The black jaw must be placed on the tting and the silver jaw
must be placed behind the sleeve.
8. If necessary, rotate the tool housing to make it easier to assemble
the tting.
9. If necessary, index the compression jaws from the top to the side
of the tool (+/- 90°) to make it easier to compress the tting
assembly.
10. If necessary, swap and ip the compression jaws to make it easier
to compress the tting assembly.
9

11. If necessary, remove the expansion adapter to make it easier to
compress the tting assembly. Press the release lever and slide
the adapter off the slot to remove.
12. To insert the battery, push it completely into the foot of the tool
housing until it locks into position. NOTICE: For use only with
MAKITA batteries BL1830B, BL1840B or BL1850B
13. Press the operating trigger for expansion or compression.
WARNING! Do not touch moving parts. Avoid trapping ngers.
14. If necessary, press the reset button to return tool to initial
position.
15. Always return the tool to the initial position before installing/
removing the expander head or the adapter, or storing.
10

7. FITTING ASSEMBLY
8. IMPORTANT NOTES
Refer to the REHAU EVERLOC+ Compression-sleeve System Product Instructions for the assembly of EVERLOC+ ttings with this tool.
Failure to observe these precautions may result in property damage
and damage to the tool.
- The sound of the relief valve and the piston automatically retracting
indicates a completed cycle. If you do not hear the sound of the relief
valve or the piston does not automatically retract, the mechanical
connection must be inspected.
- Never use a damaged expander head as this will damage the pipe
and could result in leaks and property damage.
- This tool shall not be used in damp or wet environments. Electric-
hydraulic tools should not be operated in pouring rain or under water.
Damage may result when the electrical components are soaked.
Keep the tool, the batteries and the charger away from moisture,
extreme heat, oil and solvents. The charger is only intended for use
in dry, indoor rooms.
- Do not operate the tool in extreme hot or cold conditions. Processing
at temperatures below 14°F (-10°C) and above 104°F (+40°C)
might result in damage to the tool.
- Do not use this tool for continuous use. Too intensive use can cause
heat damage to the tool. To prevent the motor from overheating, do
not operate at maximum pressure for a prolonged period. After
about 50 consecutive compressions, let the tool rest for at least
15 min. to allow it to cool.
- Regularly grease the expansion cone with the lubricant tube included
in the kit. To avoid excess grease entering the pipe, do not grease
the cone too much. Do not grease the expander head segments that
are in contact with the pipe.
9. MAINTENANCE NOTES
Regular Inspections
- Inspect the tool, head and components for damage or defects (e.g.,
oil leaks from the tool, bent compression cylinders, damage or
visible wear of the jaw sets). Check whether the moving parts are
working properly, not jammed and not damaged. All parts must be
correctly assembled and satisfy all of the conditions to ensure
proper tool operation. Maintain power tools thoroughly. Check for
functionality or jamming of moving parts, breakage of parts and any
other condition that may affect the power tool's operation.
- Regularly grease the expansion cone. Do not apply grease to the
surface of the expander head segments. Should excess grease
reach the segments, the segments must be thoroughly cleaned with
cleaning solvent and then dried.
- Always remove the battery before cleaning and inspecting the tool.
Avoid risk of injury from unintended tool starts.
- Always keep jaw sets, expander heads and tool head clean. When
soiled, clean with a brush and oil these components. Then store the
tool in a dry place.
- Before every use, check the tool and tool components for damage or
visible wear. Damaged tools must not be used and should immedi-
ately be sent to an authorized service center for repair.
Repairs
- Do not perform any repairs on the tool yourself. Repairs should only
be carried out by the REHAU authorized service center. Hydraulic
leaks can cause serious injury.
- Contractors should contact the local REHAU sales ofce or visit
na.rehau.com for directions on sending the tool for service.
- Contractors should contact MAKITA®at www.makita.com or
1-800-462-5482 for service on the battery and charger.
11

Warranty
- When sending parts for service, it is important to include the original
purchase documentation to maximize the warranty period.
- Refer to the REHAU PEXa Limited Warranty for details about the
warranty on the tool.
- Contact MAKITA for warranty terms and conditions for the battery
and charger.
Storage
- Never store the tool if wet. Dry the tool and properly lubricate it.
Then store it in a dry place.
- As a matter of principle, store the tool in the initial position to extend
its service life.
- Do not store the tool, battery or charger below -4°F (-20°C) or
above 122°F (50°C). Damage can result.
Transportation
- Transport and store the tool with a tted expander head to reduce
risk of injury or contamination.
10. TROUBLESHOOTING NOTES
Observation Cause Correction
Motor does not run Tool/battery contacts dirty
Tool/battery contacts damaged
Battery not correctly locked into the tool
Battery empty
Battery faulty
Tool faulty
Clean contacts when dry with non-conducting material
Send tool/battery to the service center
Reinsert battery; pay attention to locking mechanism
Charge battery
Send battery to the service center or independently give it to the
recycling system
Send tool/battery to the service center
Tool loses oil Leak in oil tank or release valve Do not open the tool and do not remove or damage the tool seal;
send tool to the service center
Tool does not reach
initial pressure
Leak in oil tank or release valve
Air in the hydraulic system
Tool faulty
Do not open the tool and do not remove or damage the tool seal;
send tool to the service center
Interrupt the process. Hold reset slider under tension and at the
same time continuously actuate the operating trigger for about 10
seconds. If this does not correct the defect, send tool to the service
center.
Send tool to the service center
Universal tool case for the storage of the EVERLOC+ XL power tool and components
12

11. SAFETY WARNINGS
The term "power tool" in the warnings refers to the mains-operated
(corded) power tool or battery operated (cordless) power tool.
13

14

15

Instructions de Sécurité
Le terme "outil électrique" se réfère à votre outil alimenté par le
réseau (branché) ou par la batterie (sans l).
16

17

18

19

For updates to this publication, visit na.rehau.com/resourcecenter
The information contained herein is believed to be reliable, but no representations, guarantees or warranties of any kind are made as to its accuracy, suitability for particular applications or the results to be obtained therefrom. Before using, the user will
determine suitability of the information for user’s intended use and shall assume all risk and liability in connection therewith. © 2017 REHAU Printed In USA 855.728 05.2017
Table of contents
Other Rehau Power Tools manuals