Relyon plasma piezobrush PZ3 User manual

BA-PZ3_ML / F0354401
EN Operating instructions for piezobrush® PZ3 handheld device 3
DE
Betriebsanleitung piezobrush® PZ3 Handgerät 27
FR Manuel d’utilisation de l’appareil portatif piezobrush® PZ3 51
ES Manual de instrucción de la unidad manual piezobrush® PZ3 75
JP
ピエゾブラッシュ取扱説明書® ハンドヘルド型プラズマ発生装置
PZ3 99
CN
piezobrush®使用说明书 PZ3 手持式等离子设备 123
www.relyon-plasma.com
All rights reserved


Operating instructions for:
-piezobrush® PZ3 handheld device
-piezobrush® PZ3 professional set
BA-PZ3_ML / F0354401

4
BA-PZ3_ML / F0354401
EN
Thank you for purchasing a relyon plasma GmbH branded product. To get the best from your device,
please read these instructions carefully.
Important!
Read these instructions carefully before assembling, installing and starting up the
device!
Always follow the safety instructions! Failure to follow the safety instructions may result in
accidents, serious injury and serious damage to the device.
Train your staff! The operator / user is responsible for ensuring that personnel have fully
understood the operation of the device and the safety requirements.
© Copyright relyon plasma GmbH 2020.
All rights reserved.
Text, images and diagrams and their layout are protected by copyright and other laws. Unauthorized
copying and distribution of this document and the utilization and communication of its contents are strictly
prohibited unless expressly authorized. Offenders will be held liable for the payment of damages. All rights
reserved in the event of a patent, utility model or ornamental design registration are granted.

BA-PZ3_ML / F0354401
5
EN
1Safety.........................................................................................................................................6
1.1 Residual risks....................................................................................................................................6
1.2 Information and obligations for the operator.....................................................................................8
1.3 Impermissible operating conditions...................................................................................................8
1.4 Emissions..........................................................................................................................................8
2Description of device................................................................................................................9
2.1 Intended use .....................................................................................................................................9
2.2 Scope of delivery...............................................................................................................................9
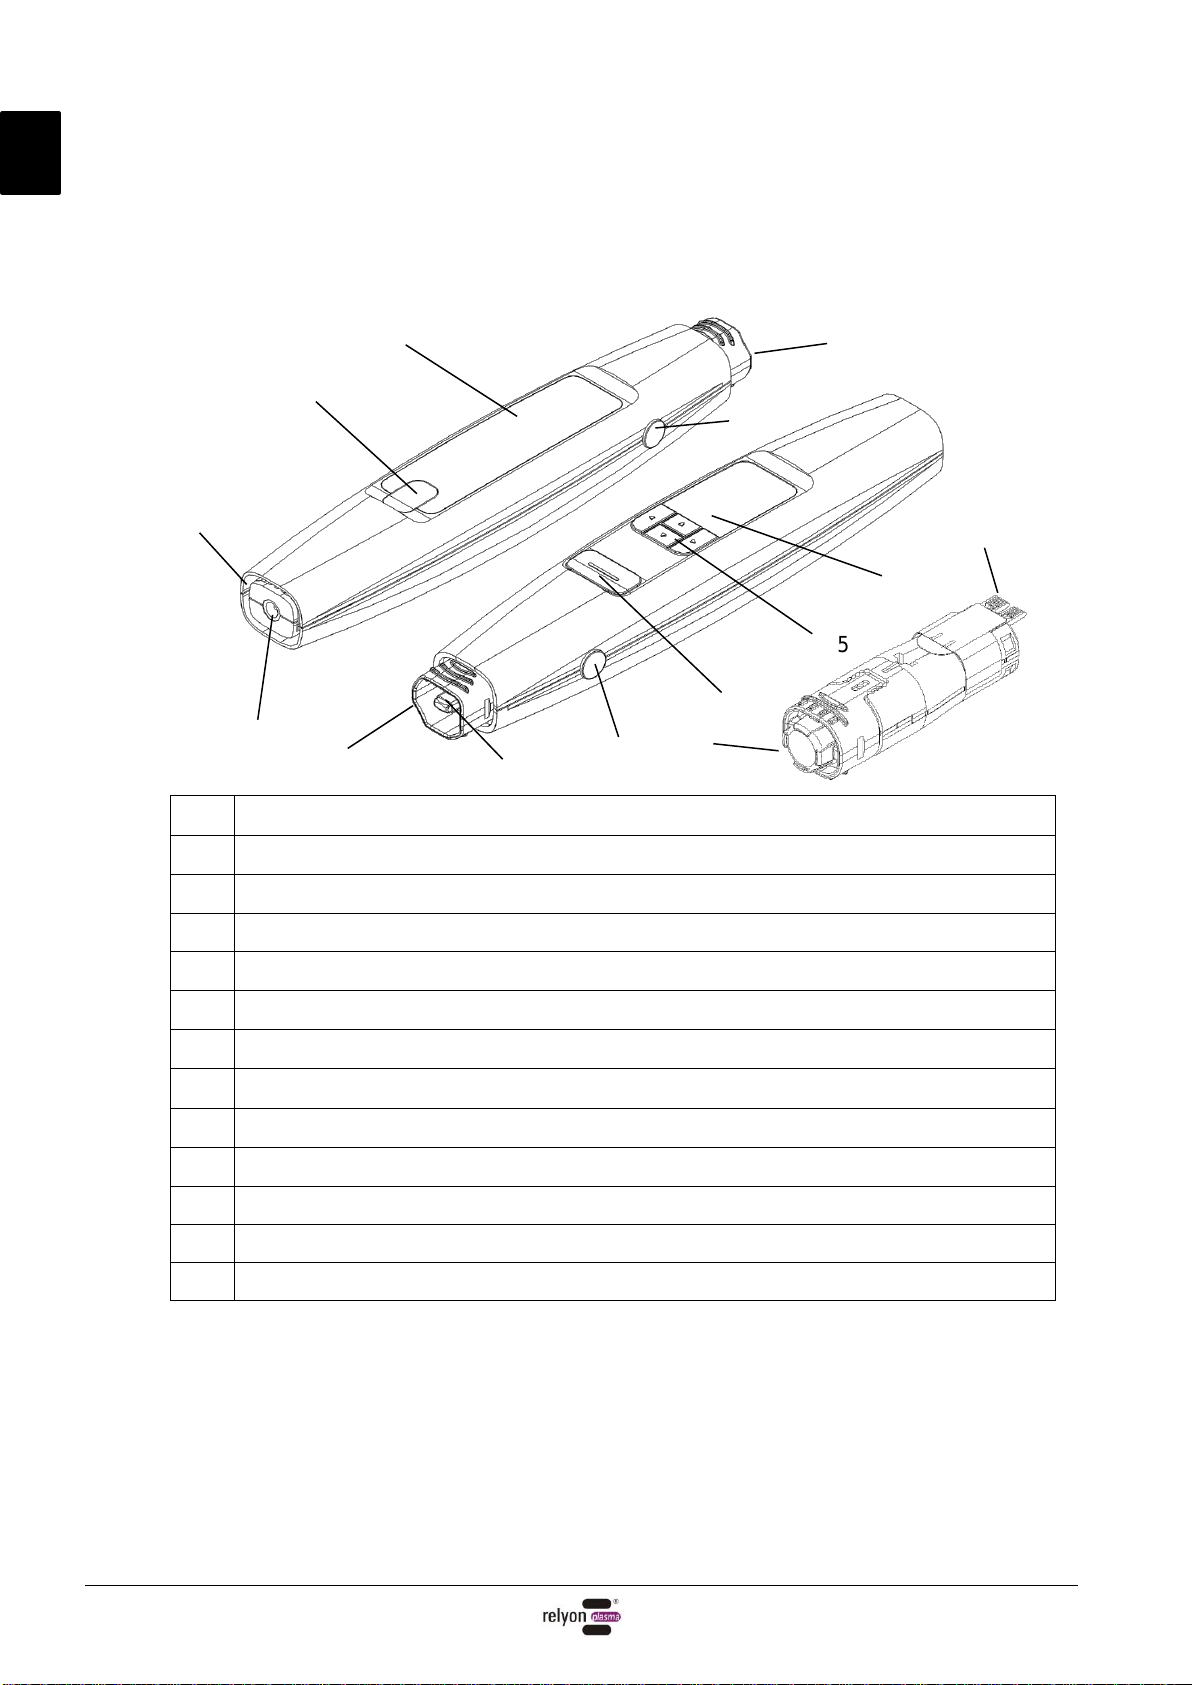
2.3 Description of device.......................................................................................................................10
3Technical data.........................................................................................................................12
4Transport / storage .................................................................................................................12
5Installation...............................................................................................................................12
6Special note on the operation of the plasma process..........................................................13
6.1 General description.........................................................................................................................13
6.2 Carrying out surface treatment .......................................................................................................14
6.3 Measures to take after the surface treatment.................................................................................14
7Operation.................................................................................................................................15
7.1 Inserting / removing the module......................................................................................................15
7.2 Installation.......................................................................................................................................16
7.3 User menu.......................................................................................................................................18
7.4 Process tools...................................................................................................................................20
7.5 Working with module „Standard“.....................................................................................................21
7.6 Working with module „Nearfield“ .....................................................................................................21
7.7 Working with other modules............................................................................................................21
8Taking out of service ..............................................................................................................22
9Maintenance............................................................................................................................22
9.1 Cleaning..........................................................................................................................................22
9.2 Replacing a module ........................................................................................................................22
10 Troubleshooting .....................................................................................................................23
11 Environment............................................................................................................................24
11.1 Disposal ..........................................................................................................................................24
12 Conformity / standards...........................................................................................................24
12.1 CE ...................................................................................................................................................24
12.2 FCC.................................................................................................................................................24
12.3 Product standards...........................................................................................................................24
12.4 Licenses..........................................................................................................................................24
13 Spare parts..............................................................................................................................25

EN
6
BA-PZ3_ML / F0354401
1Safety
This device is built according to corresponding international standards. Like with every
technical product incorrect or not intended use can however be dangerous.
Follow the instructions in this operating manual in addition to the general safety regulations.
Caution - Danger!
When working with the device, please note and observe the safety instructions and
requirements in these operating instructions because non-compliance may result in
serious or fatal injury.
1.1 Residual risks
This device has been manufactured in accordance with the current state of the art.
However, it is impossible to eliminate residual risks.
Always adhere to the following safety instructions:
Caution –Electrical voltage!
Only use the external power plug provided.
Danger from mains voltage. If the external power plug is visibly damaged:
- Do not use the damaged part.
- Have the damaged parts repaired by a qualified person or replace them.
Danger from sparks on the piezo element and the substrate to be treated:
- Do not reach into the area of the plasma discharge.
- Electrically conductive substrates must be grounded or protected against touching.
Attention –Emissions!
Dangerous amounts of the reaction gas ozone (O3) may be produced during device
operation.
- Volumes of ozone in excess of 0.2 mg/m³ may be produced.
- Note that national health and safety measures must be observed when operating
the device.
- Only use the device in well ventilated areas or in conjunction with a suitable
extraction device.
- Do not leave the device running unattended.
- Do not point the device at people when in operation.

EN
BA-PZ3_ML / F0354401
7
Attention –Damage to device!
Under no circumstances may the fan cover on the rear side of the device be closed. This
would interrupt the supply of cooling medium required in operation.
Never touch the piezo element at the front of the device with sharp-edged objects. This
component may be damaged by improper handling.
Protect the device from falls or other hard impacts which may damage the electronics or
piezo element.
Caution –hot surface!
The exchange modules can become hot during operation. Do not touch them until they
have cooled down and take care not to damage thermally sensitive surfaces when working
with the exchange modules.
The workpiece to be treated can also heat up during the plasma process, depending on the
process parameters. If necessary, allow the workpiece to cool down before touching it.
Attention! Device for use in industrial environment
Due to the presence of both conducted and radiated interference, this device may have
difficulty in ensuring electromagnetic compatibility in other environments.

EN
8
BA-PZ3_ML / F0354401
1.2 Information and obligations for the operator
•The system may emit interference.
- The system has been tested in accordance with EMC legislation.
- The operator must verify and assure electromagnetic compatibility with other
electrical and electronic equipment in the immediate vicinity of the system.
•Ensure that:
- Operating personnel have read and understood these operating instructions.
- Anyone working near the device is made aware of the dangers and is provided with
the necessary protective equipment.
- Repairs are only carried out by qualified persons.
•In particular, make operating personnel aware of the safety instructions in this
document.
•Always keep the system in fully functional condition.
•Any modifications made to the device will invalidate the operating license and the
warranty. Exception: Such modifications are expressly authorized by the manufacturer.
1.3 Impermissible operating conditions
The device must not be operated under the following conditions:
•In explosive (Ex) zones
•In areas with severe build-up of dust
•In environments where the humidity is too high (see chapter 3 Technical data )
•At altitudes of more than 2.000 m above sea level
•Where there are strong vibrations
1.4 Emissions
The connected device produces the following emissions:
•Ozone (O3)
Plasma gas
Gas flow
Ozone
Air
approx. 8 l/min
< 0,1 g/h
Note!
As a precautionary measure, we recommend an extraction system with about 100 m³/h in
the direct vicinity of the plasma outlet.

EN
BA-PZ3_ML / F0354401
9
2Description of device
2.1 Intended use
The piezobrush® PZ3 is a handheld device for generating technical plasma. It is used to
pre-treat a wide range of material surfaces before processes such as gluing or printing. It is
also possible to use the cleaning effect of the plasma.
Only use the device for the intended purposes. Failure to do so may restrict product
liability.
2.2 Scope of delivery
piezobrush®PZ3 handheld device (1000 650 000)
The scope of delivery includes the following components:
•Handheld device
•Plug-in power supply (cable length 1,5 m; with adaptors EU, US, UK, AUS)
•Operating instructions
piezobrush®PZ3 professional set (1000 660 000)
The scope of delivery includes the following components:
•Handheld device
•Module “Standard“
•Module “Nearfield“
•Plug-in power supply (cable length 1,5 m; with adaptors EU, US, UK, AUS)
•Operating instructions

EN
10
BA-PZ3_ML / F0354401
2.3 Description of device
The individual parts of the device are shown and named in the diagram below. These terms
are used throughout the operating instructions.
No.
Component description
1
Module „Standard“ (inserted)
2
Piezo element in module (embedded in module)
3
Module release button (on both sides)
4
Start/Stop button
5
Menu buttons
6
Display
7
Air inlet
8
Type plate
9
Service port cover (only for service by relyon plasma GmbH)
10
DC socket for plug-in power supply
11
Module „Nearfield“ (not inserted)
12
Contact board on module
1
2
3
4
10
7
3
5
6
9
8
11
12
1

EN
BA-PZ3_ML / F0354401
11
No.
Component description
13
Plug-in power supply
14
Compartments for optional modules
15
Foam insert
Attention!
The piezo element is an oscillating component that vibrates mechanically at high
frequency. Due to its design, this component cannot be fixed rigidly. For this reason, the
component can lie off-center in the interchangeable modules within certain limits. This is
not an error or quality defect.
Due to the vibration, audible frequencies may also occur under certain circumstances.
This is also normal and not a fault or quality defect.
15
14
13

EN
12
BA-PZ3_ML / F0354401
3Technical data
Electrical data
•Supply voltage
24 V DC (device) / 110 –230 V AC (power supply)
•Power consumption
max. 18 W
•Model
Handheld device with plug-in power supply
Dimensions
•Weight
110 g (not including plug-in power supply)
•Length
215 mm
•Diameter max.
38 mm
•Diameter min.
27 mm
•Cable length
1500 mm
Typical application parameters (exemplary for module „Standard“)
•Plasma temperature
< 50 °C
•Treatment distance
2 –10 mm
•Width of treatment
5 - 29 mm depending on process parameters (see chapter 6)
•Treatment speed
0 –20 mm/s
Operating conditions
•Air humidity
< 80 % rel. (non-condensing)
•Temperature
10 –40 °C; 50 –104 °F
Storage conditions
•Air humidity
< 80% rel. (non-condensing)
•Temperature
0 –60 °C; 32 –140 °F
4Transport / storage
•Store the device in a dry place. This will prevent corrosion of the electrical
contacts. It is best to use the provided case for storage and transport.
•Protect the device from dirt and foreign objects.
•Protect the device from falls or other hard impacts.
5Installation
•Remove the device from the packaging.
•Use the external power plug to establish the power supply.
•Ensure that the workplace is well ventilated.
Attention - Damage to device!
In order to prevent damage to the device, please ensure that you follow the advice in
chapter 7.

EN
BA-PZ3_ML / F0354401
13
6Special note on the operation of the plasma process
6.1 General description
Treating surfaces with atmospheric plasma has several advantages. These are e.g. the
increase of surface energy to improve the wettability of the surface. An optimal surface
wetting is the first and often decisive step to achieve excellent print quality,
homogeneous coating, uniform varnishing or an integrally bonded application of
adhesives. The bond at this interface often determines the durability and adhesive
strength of this material pairing.
Atmospheric pressure plasma increases throughput in many industrial processes, while
at the same time saving costs for solvents or chemical primers. We have successfully
integrated our plasma products into the following fields of application:
•Ultra-fine cleaning of metal, glass and plastics
•Surface activation and surface functionalization for optimized wettability
•Plasma-assisted laminating process
•Plasma-assisted adhesive bonded joints
•Plugging and sealing
•Plasma induced reduction of metal surfaces
•Chemical-free bleaching of textiles
•Handling of food products for quality and shelf life
•Multi-component injection molding
Practically all technical material classes can be efficiently processed under atmospheric
pressure:
•Metals and metal alloys
•Plastics and composite materials
•Glass, ceramics, inorganic composites and natural stone
•Real leather and imitation leather
•Natural fibers, wood and paper
Since the plasma treatment is always just one part of the entire process, it is important to
know the overall influences on the surface properties in order to achieve an optimal result.
Typical influencing factors are:
•Plasma process: Distance to the substrate, speed, module design
•Substrate / workpiece: Material composition, contamination, electrical conductivity,
thermal conductivity, moisture content
•Workpiece treatment: Contamination before or after the plasma process, the time
between the plasma process and the follow-up process
Treatment examples can be requested directly from relyon plasma GmbH.
Please note that the selected plasma system is suitable for the desired application.
Additional information on applications, as well as publications, can be found on the
website www.relyon-plasma.com.

EN
14
BA-PZ3_ML / F0354401
6.2 Carrying out surface treatment
Depending on the type and condition of your substrate, pre-cleaning before the plasma
process can improve the overall outcome.
The effect of the treatment depends on the working distance, treatment time, speed
and consistency of movement as well as the material to be treated.
Treatment examples can be requested directly from relyon plasma GmbH.
6.3 Measures to take after the surface treatment
To achieve an optimal result, it is important that as little time as possible elapses after
the plasma treatment and that the treated surface is not touched or contaminated.
Cleaning the surface AFTER the plasma treatment is not recommended.
Since the workpiece can heat up depending on the type and duration of the plasma
process, it may be necessary to allow the workpiece to cool down first before the next
process step is executed in order to not negatively affect the follow-up process through
the introduction of heat (e.g. certain bonding processes).
Caution –Hot surface!
The workpiece to be treated can become heated up by the plasma process depending on
the process parameters. If necessary, allow the workpiece to cool down before handling it.

EN
BA-PZ3_ML / F0354401
15
7Operation
7.1 Inserting / removing the module
The modules are provided with labels in different colors for easy identification. Please do
not remove these labels.
To insert a module, take it out of the packaging and hold it in the area of the nozzle outlet
without touching the piezo element (picture 1).
Please note that the contact board of the module must be on the same side as the
display of the device to allow insertion.
Carefully insert the module into the device as shown in the picture without using force
until the module locks into place.
When the device is switched on, the type of module detected is now shown in the display.
To remove a module, wait until it has cooled down. Depending on the type of module,
operation can lead to a significant increase in temperature.
Hold the device in one hand, press both release buttons simultaneously and keep them
pressed. With the other hand, hold the module in the area of the nozzle outlet without
touching the piezo element and carefully pull the module out of the device (picture 2).
Caution –hot surface!
The exchange modules can become hot during operation. Do not touch them until they
have cooled down and take care not to damage thermally sensitive surfaces when
working with the exchange modules.
Attention –Damage to device!
Do not reach into the interior of the unit if no module is inserted and do not insert any
objects into the opening of the unit other than the modules provided for this purpose.
Hold the modules only in the front area as described above and avoid touching the
contact board and the piezo element.
Insert and remove the modules carefully.
1
2

EN
16
BA-PZ3_ML / F0354401
7.2 Installation
•Make sure that a module is inserted in the device.
•Make sure that the air inlet and nozzle outlet are not covered so that a sufficient flow of
ambient air can be drawn in by the unit.
•Hold the unit only in the area of the button (picture 4), not in the area in front of it
(picture 3).
•If the unit is to be mounted stationary, please observe the instructions below regarding
electrically conductive objects (picture 5 to 8).
•Ensure that the ventilation / extraction of the working area is sufficient.
•Press the Start/Stop button to generate plasma
The device stops plasma activation after 5 minutes at the latest and goes into standby
mode (in the case of special modules, plasma activation can stop after a shorter period of
time).
You can return to the active mode by simply pressing the Start/Stop button and restart the
activation by pressing the Start/Stop button again.
Do not reach into the work area during plasma generation. This can disturb the plasma
discharge and can also cause skin irritation or be perceived as slightly painful.
Attention - Damage to device!
The device can be damaged if it is operated without air supply.
This would interrupt the supply of the cooling medium required during operation.
Never cover the air inlet and/or the nozzle outlet during operation.
The device can be damaged if electrically conductive objects are closer than 60 mm to the
front third of the device during operation.
Exception: Substrates in front of the module when using modules designed for this
purpose, e.g. the Module „Nearfield“.
3
4

EN
BA-PZ3_ML / F0354401
17
Note!
Under certain circumstances, the electric fields generated by the device can damage
sensitive electronic components. Make sure that the components of your application are
not affected by the plasma process.
5
6
7
8

EN
18
BA-PZ3_ML / F0354401
7.3 User menu
The device starts in the menu item "Home".
The home menu provides you with an
overview of various pieces of information
while you work with the device.
To navigate through the menu items, use the
"<" (left) and ">" (right) buttons on the keypad.
To change the settings in the menu items, use
the buttons "∧" (up) and "∨" (down). In the
menu items 3 to 8 you can return to the menu
item "Home" by pressing the Start/Stop
button.
Please note that the direction of the arrow
keys also changes accordingly when the
display orientation is changed.
Nr.
Description
Function
1
Module type
Displays currently inserted module
2
Process tool mode
Displays selected process tool
3
Time value
Displays the current time value
4
Time bar
Graphical representation of the time lapse
5
Power setting
Displays currently selected power value
6
Status plasma
Grey: not active Green: OK Yellow: critical Red: Error
7
Status fan
Grey: not active Green: OK Yellow: critical Red: Error
8
Status temperature
Grey: not active Green: OK Yellow: critical Red: Error
9
Arrow keys left / right
Navigation through menu items
10
Arrow keys up / down
Setting within the menu items
11
Start/Stop button
Starts and stops plasma treatment;
return to “Home”; confirm errors
1
2
3
4
5
8
9
10
6
7
11

EN
BA-PZ3_ML / F0354401
19
#
Menu item/description
Settings
Display
1
Start:
Device is booting and switches to the menu item
"Home" when ready
-
2
Home:
Overview: pressing the Start/Stop button starts or
stops the plasma activation
-
3
Process:
Selection of the various process tools
- Stopwatch
- Countdown
- Metronome
4
Timing:
Setting the duration for the selected process tool
1s to 5min in
increments of 1s
5
Power:
Setting the plasma power
30% to 100% in
increments of
5%
6
Plasma Error:
Set the behavior of the device when a plasma error
is detected.
“failure”: device stops / red error
“warning”: device does not stop / yellow warning
- failure
- warning
7
Buzzer Volume:
Setting the volume of the acoustic feedback
0 to 5 in
increments of 1
8
Display:
Setting the display orientation
3 different
orientations
selectable
9
Module Info:
Information about the currently inserted module
-
10
Info:
Information about the hardware and software
version of the device
-
11
Reset:
By holding the Start/Stop button for 5 seconds, all
device settings are reset to the factory settings
-

EN
20
BA-PZ3_ML / F0354401
Attention –Damage to device!
The setting in menu “Plasma Error” is per default “failure”. This stops the device to
protect the module of situations that might damage the piezo element. It is also an
indicator, that the plasma discharge might be not suitable for this material causing a not
satisfying surface activation.
Some materials (e.g. compound materials or liquids) might be difficult to treat with the
“failure” setting. By switching to “warning” mode, be aware that the module might be
damaged, depending on your material and or process parameters.
7.4 Process tools
As described in section 7.3, the device provides various functions as tools to support the
plasma treatment process.
•Stopwatch
The device measures the duration of plasma generation in one second steps from
start to stop triggered by pressing of the Start/Stop button. The value measured
last remains in the home menu until the next plasma generation is started.
This function can be used, for example, as an aid in process development to
record the different treatment times of different samples.
The adjustability in the menu item "Timing" is deactivated in this mode (display
"not applicable").
•Countdown
In countdown mode, a duration of plasma generation can be pre-set via the menu
item "Timing". The unit is started using the Start/Stop button but stops activation
automatically after the set duration has elapsed. The plasma generation can be
stopped by pressing the Start/Stop button.
This function can be used, for example, if many samples are to be treated with
plasma for the same amount of time.
•Metronome
In this mode the plasma generation is not deactivated after the time has elapsed,
as it is in the "Countdown" mode, but rather a regular acoustic signal is emitted.
This function can be used, for example, when large substrates are treated in lines
and each line should have approximately the same duration.
Table of contents
Languages:
Other Relyon plasma Laboratory Equipment manuals
Popular Laboratory Equipment manuals by other brands

CORNING
CORNING CamSplice FBC-017 Assembly

Isotech
Isotech B8-30-130 User & maintenance manual

D-Link
D-Link DKT-200 Quick installation guide

Parker Research Corp
Parker Research Corp DA-1500 operating instructions

BioNano Genomics
BioNano Genomics Irys user guide

Stryker
Stryker RemB 6400-276-000 Instructions for use