Renz LAMIGO A3 PRO User manual

www.renz.com
Danke, dass Sie sich für ein hochwertiges RENZ - Produkt entschieden haben.
Der Lamigo A3 PRO verfügt über die RENZ 4RSH - Technologie.
4-Roll-Short-Heat sorgt für eine äußerst komfortable, einfache Bedienung.
Thank you for purchasing a high - quality RENZ product.
The RENZ 4RSH-technology guarantees an extremely short heating-up time
of just 45 - 60 seconds and a perfect transport with four rolls which ensures
an excellent laminating result.
Gracias por haber elegido un producto RENZ de alta calidad.
Lamigo A3 PRO lleva incorporada la tecnología RENZ 4RSH.
4-Roll-Short-Heat permite un manejo extremadamente cómodo y sencillo.
LAMIGO A3 PRO
TASCHENLAMINATOR / POUCH LAMINATOR / PLASTIFICADORA UTILITARIA
D BEDIENUNGSANLEITUNG
E OPERATION MANUAL
ESP MANUAL DE INSTRUCCIONES

Einlaufschacht
Pouch entry
Bandeja de entrada
Grenzmarkierung
Border mark
Marca límite
Kaltlaminieren
Cold button
Plastificar en frío
Rücklauf
Reverse button
Retroceso
Foliendicke / Temperatur
Pouch button
Grosor de lámina /
temperatura
Ein/AUS Schalter
On/Off button
Interruptor de
CONEXIÓN/
DESCONEXIÓN
LED Bereitschaftsanzeige „Ready“
LED Ready light
Indicador LED de disponibilidad
“Ready“ (listo)
Hauptschalter
Power switch
Interruptor principal
Auslaufschacht
Outlet
Bandeja de salida
Auslaufhalterung
Outlet bracket
Soporte de salida

1
ALLGEMEINE SICHERHEITSHINWEISE ●GENERAL SAFEGUARDS ●INDICACIONES DE SEGURIDAD GENERALES
D
●Lesen Sie vor Gebrauch die Bedienungsanleitung.
●Stellen Sie das Gerät auf eine stabile Unterlage.
●Verwenden Sie das Laminiergerät NICHT, wenn das Netzkabel beschädigt ist.
●Stellen Sie sicher, dass das Laminiergut frei ist von Metallgegenständen wie Heft-oder Büroklammern.
●Versuchen Sie nicht das Gerät zu öffnen oder anderweitig zu reparieren.
●Schützen Sie das Gerät vor Wärme und Feuchtigkeit.
●Achten Sie darauf, dass Kinder dieses Gerät nicht benutzen.
●Schalten Sie das Gerät nach jedem Gebrauch aus.
●Ziehen Sie den Netzstecker, wenn Sie das Gerät längere Zeit nicht benutzen.
●Keine leeren Folientaschen laminieren.
●Verwenden Sie immer die entsprechenden RENZ Folientaschen.
●Beachten Sie die Anweisungen auf dem Gerät.
●Halten Sie das Ausgabefach frei.
E
●
Read the manual before use.
●
Plac
e your machine on a stable surface.
●DO NOT use the laminator if its power cord is damaged.
●Ensure no lamination runs with metal objects like staples, paper clips.
●DO NOT attempt to open or otherwise repair the machine.
●Keep the machine including its power cord away from heat and water sources.
●DO NOT allow children to use this machine.
●Turn off the machine after each use.
●Unplug the machine when not in use for an extended period.
●DO NOT laminate an empty pouch.
●Use RENZ pouches required for the appropriate pouch setting.
●Follow the instructions and specifications shown on the machine as well.
●Leave the Pouch exit tray clear of any objects.
ESP
●Antes de utilizar el aparato, lea el manual de instrucciones.
●Coloque el aparato sobre una base estable.
●NO utilice la plastificadora si el cable de red está dañado.
●Asegúrese de que la lámina esté exenta de objetos metálicos como grapas o clips.
●No intente abrir o reparar el aparato.
●Proteja el aparato contra calor y humedad.
●Evite que los niños usen este aparato.
●Desconecte el aparato después de cada uso.
●Si no utiliza el aparato durante un periodo de tiempo prolongado, extraiga el enchufe de red.
●No plastifique fundas para plastificar vacías.
●Utilice siempre las fundas para plastificar RENZ adecuadas.
●Respete las instrucciones reflejadas en el aparato.
●Mantenga libre la bandeja de salida.
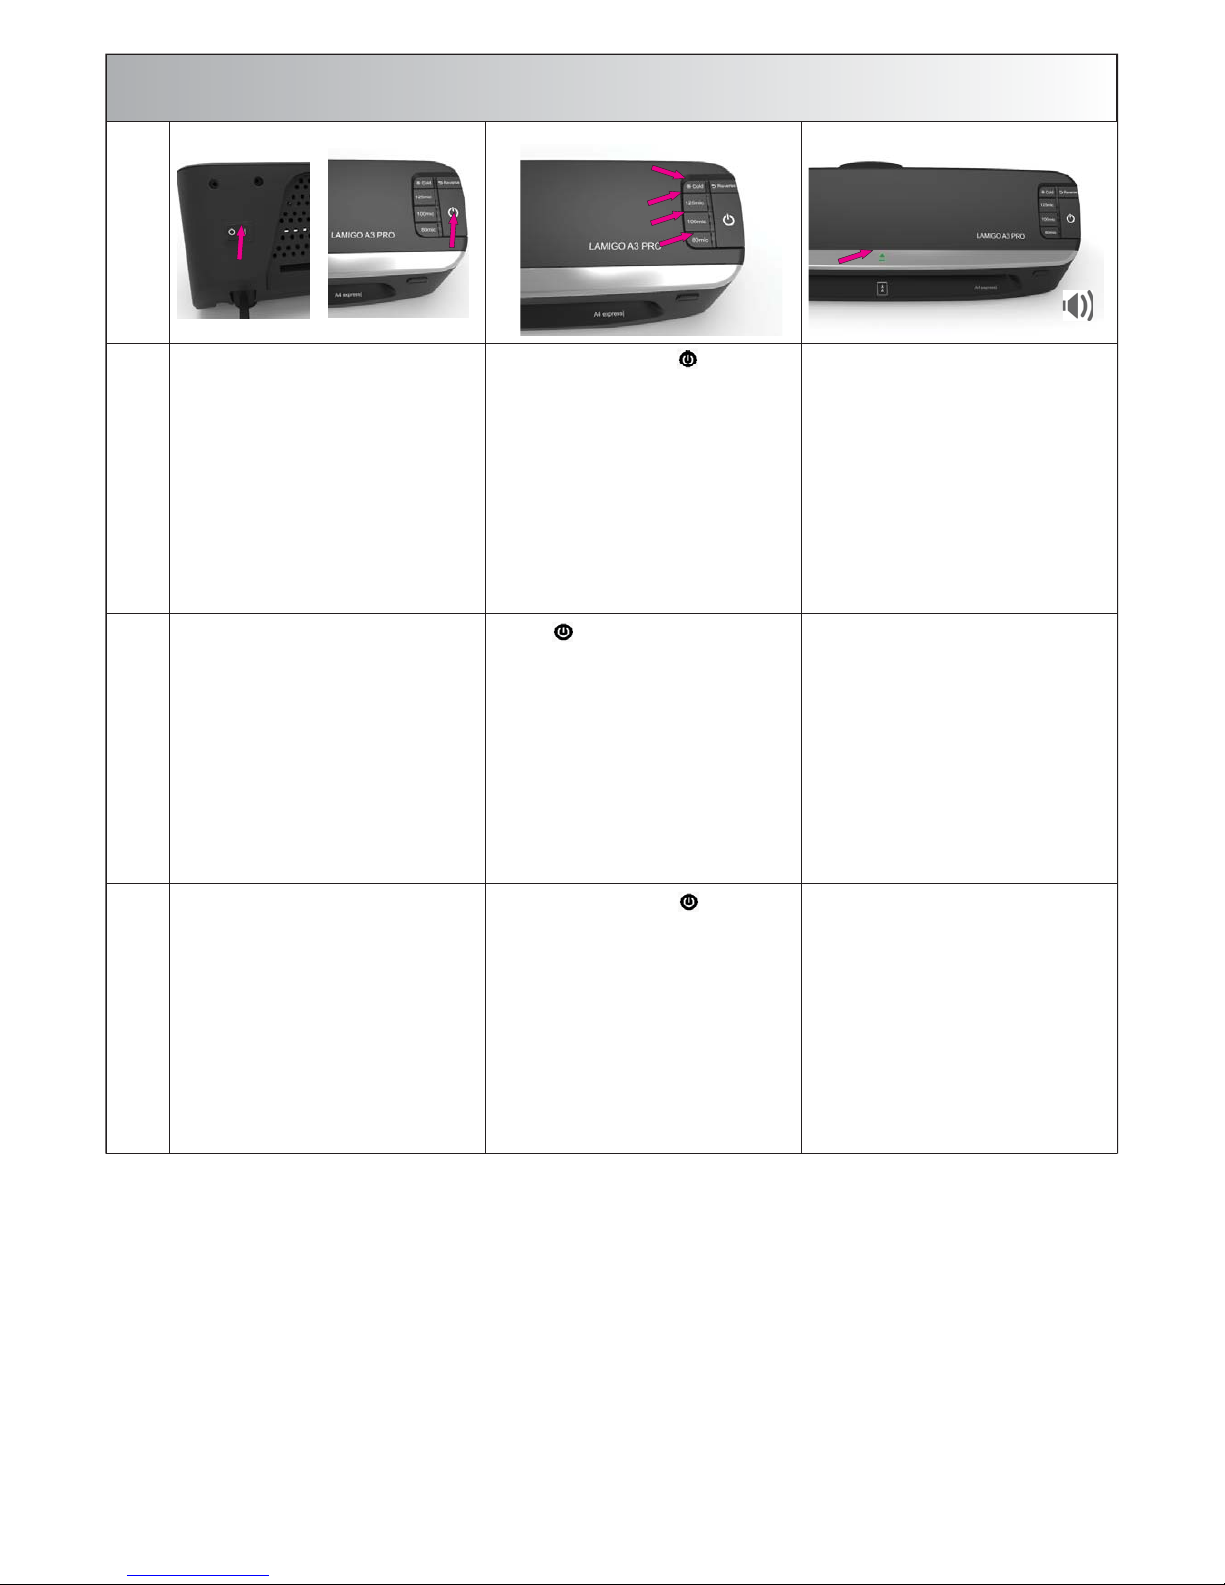
2AUFSTELLEN UND ANSCHLIESSEN ●SETUP AND CONNECT ●COLOCACIÓN Y CONEXIÓN
D
Gerät aus der Verpackung nehmen.
Lieferumfang prüfen:
- Laminiergerät
- Bedienungsanleitung
- Auslaufhalterung
Richtigen Standort wählen.
Achten Sie auf ausreichend
Platz an der Rückseite
des Laminiergeräts.
Stecken Sie die Auslaufhalterung
in die dafür vorgesehene
Aussparung an der Rückseite
des Laminators.
Elektrokabel nur an Steckdosen
mit Schutzkontakt anschließen.
Achten Sie immer auf die richtige
Laminiertemperatur.
Die Folie kann sich wieder
vom Dokument lösen,
wenn zu kalt laminiert wurde.
Das Dokument kann wellig werden,
wenn zu heiß laminiert wurde.
E
Remove machine and check
contents of the box.
You should have:
- Laminating Machine
- Manual
- Outlet bracket
Make sure you have enough
space at the back of the laminator.
Please attach the outlet bracket
at the backside of the laminator
into the recess.
Cable connect the machine only
to plugs which are grounded.
Make sure to always set the correct
laminating temperature as the film
may detach from the document
if the temperature was too low
or the document turns out wavy
if the temperature was set too high.
ESP
Sacar el aparato del embalaje.
Com probar el volumen de suministro:
- Plastificadora
- Manual de instrucciones
- Soporte de salida
Elegir el emplazamiento correcto.
Procure que exista espacio suficiente
en la parte posterior de la plastifica-
dora.
Inserte el soporte de salida en la
ranura prevista para ello en la parte
posterior de la plastificadora.
El cable eléctrico sólo debe conec-
tarse en tomas de corriente con
contacto de protección.
Asegúrese de que la temperatura
de la plastificadora sea siempre
correcta. La lámina puede
desprenderse de nuevo del
documento si el plastificado se ha
realizado a una temperatura
demasiado fría.
El documento puede ondularse
si el plastificado se ha realizado
a una temperatura demasiado
caliente.

3
LAMINIEREN ●LAMINATING ●PLASTIFICADO
D
Schalten Sie den Hauptschalter ein und drücken
Sie den Ein / Aus -Schalter.
Schalten Sie das Gerät mit der Taste ein.
Überprüfen Sie die Foliendicke und drücken Sie
die entsprechende Temperatur-Taste.
Für Kaltlaminieren Taste „Cold“ wählen.
Achtung:
Die Maschine ist für die Verwendung
von Foliendicken von 2x80 micron, 2x100 micron
und 2x125 micron ausgelegt.
Eine falsche Temperaturauswahl kann
zu einem schlechten Laminierergebnis oder
sogar zum Verbrennen der Dokumente
oder Fotos führen.
Wenn die
LED
Bereitschafts „Ready“
grün leuchtet, und ein Piepton ertönt -
ist die Maschine bereit zum Laminieren.
E
Turn on the power switch,
and press the On / Off switch. Press the button to switch on the machine.
Press the right Pouch button,
corresponding to the pouch used.
For cold laminating, press the Cold button.
Attention:
The machine is designed to use foil
pouch thickness of 2x80 micron,
2x100 micron and 2x125 micron.
A wrong temperature selection may result
in bad lamination or even burn the
documents or photos.
When
READY light
turns green,
and you hear the beeping sound,
the machine is ready to start laminating.
ESP
Conecte el interruptor principal y presione el inte-
rruptor de conexión / desconexión. Conecte el aparato con la tecla .
Verifique el grosor de la lámina y presione
la tecla de temperatura correspondiente.
Para plastificar en frío, seleccione
la tecla “Cold“ (frío).
Atención:
La máquina está diseñada para utilizar grosores
de láminas de 2x80, 2x100 y 2x125 micras.
Una selección de temperatura errónea puede
provocar un plastificado deficiente o incluso
quemar los documentos o fotos.
Si el LED de disponibilidad “Ready“
luce en verde y suena un pitido - la máquina
está lista para plastificar.
dd

3LAMINIEREN ●LAMINATING ●PLASTIFICADO
D
Die Laminiervorlage in eine entsprechende
Folientasche stecken und auf gleichmäßigen
Folienrand achten. Optimal sind 3 mm Folienrand.
Überrüfen Sie, ob die gewünschte
Laminiertemperatur erreicht wurde:
dies ist der Fall, wenn die
Bereitschaftsanzeige „READY“ grün leuchtet.
Schieben Sie die Folientasche mit der
geschlossenen Seite voran, gerade in den
Einlaufschacht, bis das Dokument von den
Laminierwalzen erfasst und eingezogen wird.
Das Dokument wird durch das Gerät gezogen
und auf der Rückseite hinaus transportiert.
Achtung:
Schieben Sie immer zuerst die bereits
geschlossene Seite der Folientasche ein.
A3 - kurze Seite
A4 Hochformat - kurze Seite
A4 Querformat (Express A4) - lange Seite
A5 - kurze Seite
Entnehmen Sie das fertig laminierte Dokument
von der Ablage, bevor Sie das nächste
Dokument laminieren, um Stau
und evtl. Verschmutzung zu vermeiden.
E
Put the original to be laminated into the correct
pouch and make sure to have an equal edge
on all sides. Ideal would be 3 mm at each side.
Check if the desired laminating temperature is
reached. This is the case if the temperature light
„READY“ lights permanently green.
Insert the laminating pouch with the closed side
first into the entry slot until the document is
seized by the laminating rollers and is
transported into the laminator.
The document is transported through the laminator
and comes out at the back of the machine.
Attention:
Always insert the already closed side
of the foil pouch in first.
A3 - short side
A4 portrait - short side
A4 horizontal format (Express A4) - long side
A5 - short side
Pull out the laminated foil pouch immediately
and gently after it comes out of the outlet
and stops moving to avoid overheat
(smudging and blistering).
ESP
Insertar el modelo de plastificado en una funda para
plastificar adecuada y asegurarse de que el borde
de la lámina sea uniforme. El borde de lámina
óptimo asciende a 3 mm.
Verifique si se ha alcanzado la temperatura de
plastificado deseada: éste es el caso si el indicador
de disponibilidad “READY“ luce en verde.
Empuje la funda para plastificar hasta la bandeja
de entrada con el lado cerrado hacia adelante,
hasta que el documento sea agarrado por los
rodillos de plastificado e introducido.
El documento es extraído por el aparato
y transportado hacia fuera por la parte posterior.
Atención:
Empuje siempre primero el lado ya cerrado
de la funda para plastificar.
A3 - lado corto
A4 Formato alto - lado corto
A4 Formato transversal (Express A4) - lado largo
A5 - lado largo
Antes de plastificar el documento siguiente,
retire el documento plastificado de la bandeja,
para evitar atascos y eventual suciedad.

4
RÜCKLAUFFUNKTION ●RETURN ●AUSSCHALTEN ●SWITCH OFF ●FUNCIÓN DE RETROCESO ●DESCONEXIÓN
D
Falls die Folientasche verklemmt, drücken Sie die Taste „Reverse“
und halten diese gedrückt.
Wenn Sie den Piepton hören, wird das eingeklemmte
Laminiergut aus dem Gerät heraustransportiert.
Automatische Abschaltung:
Wenn die Maschine 30 Minuten nicht gebraucht wird,
schaltet sie sich automatisch in den Standby Modus.
Nach Beendigung der Laminierarbeiten das Gerät mit
der Taste ausschalten. Danach laufen die Rollen zum Abkühlen
noch 30 Minuten nach. Anschließend den Netzschalter drücken
und den Netzstecker ziehen.
Lassen Sie das Gerät vollständig abkühlen, bevor Sie es verstauen.
E
In case of pouch jam, press the Reverse button, keep it pressed
and you hear the beeping sound.
The jammed paper is being transported out of the machine.
Intelligent auto turn off:
If the machine is left for 30 minutes without use,
she automatically shuts to standby mode.
In order to cool down, the rolls will continue running for 30 min.
When the laminating tasks had been finished, press the button
to switch off the machine, then switch off the power switch
and disconnect from power.
Let the machine fully cooldown before you put it away.
ESP
Si la funda para plastificar se atasca,
presione la tecla “Reverse“ (retroceso) y manténgala presionada.
Cuando oiga el pitido, la lámina atascada se transporta fuera del aparato.
Desconexión automática:
Si la máquina no se utiliza durante 30 minutos, la misma cambia
automáticamente al modo de espera.
Al finalizar los trabajos de plastificar, desconectar el aparato con la tecla .
Posteriormente, los rodillos siguen funcionando por inercia durante
30 minutos para que se enfríen. A continuación, presionar el interruptor
de alimentación y extraer el enchufe de red.
Antes de guardar el aparato, deje que se enfríe por completo.
3
3
0 m
0 m
e
e
5SICHERHEITSDATENBLATT ●POUCH JAM ALERT ●HOJA DE DATOS DE SEGURIDAD
D
●Befolgen Sie die richtige Einführrichtung.
●Führen Sie einen Laminierauftrag nur innerhalb der Grenzmarke aus.
●Führen Sie einen Laminierauftrag nur dann aus, wenn die LED Bereitschaftsanzeige „Ready“ grün leuchtet.
●Stellen Sie sicher, dass genügend freier Raum (min. 500 mm) hinter der Maschine vorhanden ist.
E
●Follow the right document/pouch insert direction.
●Only run an lamination job within the Border mark.
●Only run an lamination job when READY light turns green.
●Check there is enough clear space (min. 500 mm, 20“) behind the machine.
ESP
●Siga la dirección de inserción correcta.
●Ejecute un encargo de plastificado sólo dentro de la marca límite.
●Ejecute un encargo de plastificado sólo cuando el indicador LED de disponibilidad “Ready“ luzca en verde.
●Asegúrese de que exista espacio libre suficiente (al menos 500 mm) detrás de la máquina.

6WARTUNG ●MAINTENANCE ●MANTENIMIENTO
D
Walzen-Reinigung:
Nach der Nutzung bitte einen
glatten starken Graukarton ohne
Folientasche durch den noch
warmen Laminierschacht laufen
lassen.
Dadurch werden mögliche
Klebereste von den Walzen
entfernt!.
Reinigung:
Bei ausgestecktem Netzschalter
mit trockenem oder leicht feuchtem
Tuch abwischen.
Keine Lösungsmittel verwenden.
Gerät nicht öffnen.
Gerät darf nur von Fachpersonal
geöffnet werden.
Wird das Gerät geöffnet -
erlischt die Garantie!
Entsorgung:
Dieses Symbol (durchgestrichenes
Abfalleimer) zeigt an, dass das nicht
mehr funktionsfähige
Produkt an ein zugelassenes
Recycling-Zent
rum oder Sammelstelle
abgegeben werden sollte.
Dieses Symbol gilt nur in
Mitgliedsstaaten des EWR1.
E
Cleaning of the rolls:
After use, run a smooth and strong
cardboard through the warm
laminating rollers.
This will remove residual glue
from the rollers.
Cleaning:
Power must be disconnected !
Wipe with a dry or slighty moist cloth.
Do not use solvents.
Do not open the machine.
The machine should only to be
opened and serviced by an
authorized service center.
Every guarantee expires if the
device is opened.
Disposal:
This symbol (crossed out waste bin)
indicates that the product must be
returned to an authorised recycling
centre or collection point when it
has reached the end of its
service life.
This symbol only applies in
member states of the EEA1.
ESP
Limpieza de rodillos:
Tras el uso del aparato, introduzca
un cartón duro y liso de color gris
sin funda para plastificar por la
bandeja de plastificado que aún
se encuentra caliente.
Con ello se eliminan posibles restos
de pegamento de los rodillos.
Limpieza:
Limpiar el aparato mediante un
paño seco o ligeramente
humedecido con el interruptor
de alimentación desconectado.
No utilizar disolventes.
No abrir el aparato.
El aparato sólo debe abrirse por
personal especializado.
¡Si el aparato se abre, se extingue
la garantía!
Eliminación:
Este símbolo (cubo de basura
tachado) indica que, como el producto
ha dejado de ser funcional, el mismo
debe entregarse a un centro de
reciclaje o un punto de recogida
autorizado.
Este símbolo sólo es
válido en los países miembros de la
EEA1 (Europäische Wirtschaftsraum
- Espacio Económico Europeo).
7FEHLERLISTE ●TROUBLE SHOOTING ●LISTA DE ERRORES
D
Gerät läuft nicht.
Gerät am Stromnetz angeschlossen?
Strom vorhanden?
Folientasche ist nicht vollständig transparent und /
oder der Rand ist nicht gut versiegelt.
Die Laminierung kann nur bei der richtigen Temperatur erfolgen,
nachdem die grüne LED Bereitschaftsanzeige „Ready“ leuchtet.
Prüfen Sie, ob der Schalter entsprechend der Foliendicke gewählt wurde.
Laminieren Sie die gleiche Folientasche wieder,
um die Laminierungsqualität zu verbessern.
Vergewissern Sie sich, dass die Folientasche für das Dokument
nicht zu klein ist.
E
The laminator does not run.
Is the laminator plugged in correctly?
Is power available ?
Laminated foil is not completely transparent and /
or the edge is not well sealed.
The lamination can only be done at the correct temperature,
which is after the green LED READY light indicator is on.
Check if the button is correctly chosen according
to the pouch thickness.
Laminate the same foil again to improve the lamination quality.
Ensure there is sufficient border around the item in the pouch.
ESP
El aparato no funciona.
¿Está conectado el aparato en la red eléctrica?
¿Hay tensión eléctrica?
a funda para plastificar no es totalmente transparente y /
o el borde no está bien sellado.
El plastificado sólo puede realizarse a la temperatura correcta después
de que el indicador LED de disponibilidad “Ready“ verde luzca.
Compruebe si el interruptor se ha seleccionado de acuerdo
con el grosor de la lámina.
Plastifique de nuevo la misma funda para plastificar para mejorar
la calidad del plastificado.
Asegúrese de que la funda para plastificar no sea demasiado
pequeña para el documento.

8TECHNISCHE DATEN ●TECHNICAL DATA ●DATOS TÉCNICOS
LAMIGO A3 PRO EU LAMIGO A3 PRO US
Arbeitsbreite
Working width
Anchura de trabajo 330 mm (up to A3) 12.5“
Folienstärke
Film thickness
Grosor de lámina
min. 80 micron - max. 125 micron
mín. 80 micras - máx. 125 micras
from 80 microns - 125 microns
mín. 80 micras - máx. 125 micras
Max Laminierstärke
Max. laminating thickness
Máx. grosor de plastificado 0.5 mm 0.5 mm
Laminiergeschwindigkeit
Laminating speed
Velocidad de plastificado 0.48m / min 0.48m / min
Laminiertemperatur einstellbar vor:
Adjustable laminating temperature for:
Temperatura de plastificado ajustable para:
kalt / 80 / 100 / 125
frío / 80 / 100 / 125
cold / 80 / 100 / 125
frío / 80 / 100 / 125
Temperaturkontrolle automatisch
Automatic temperature control
Control de temperatura automático
Rücklauffunktion
Reverse - Function
Función de retroceso
Vorheizzeit / Sekunden
Preheating Time / seconds
Tiempo de precalentamiento / segundos
ca. 45 s at 80 microns
ca. 60 s at 125 microns
aprox. 45 s con 80 micras
aprox. 60 s con 125 micras
ca. 45 s at 80 microns
ca. 60 s at 125 microns
aprox. 45 s con 80 micras
aprox. 60 s con 125 micras
Standby Funktion
Stand by mode
Función de espera
Heizung
Heating system
Calefacción
2 heiße Walzen + 2 kalte Walzen
2 rolls hot (hot shoe) + 2 rolls cold
2 rodillos calientes + 2 rodillos fríos
2 heiße Walzen + 2 kalte Walzen
2 rolls hot (hot shoe) + 2 rolls cold
2 rodillos calientes + 2 rodillos fríos
Stromverbrauch + Spannung
Power requirement + Tension
Consumo de corriente + tensión
230V - 250V / 50 HZ
1200W (Ø 650W) 6,0 A / Ø 2.8 A
110V / 60Hz
1200W (Ø 650W) 6,0 A / 2.8 A
Gewicht:
Weight:.
Peso: 2.8 kg 2,8 kg
Länge x Breite x Höhe
Length x Width x Height
Longitud x anchura x altura 470 mm x 146 mm x 123 mm 18,5“ x 5,75“ x 4,875“

9EG-Konformitäts-Erklärung im Sinne der EG-Richtlinien
EC conformity declaration according to the EC guidelines
Declaración de conformidad de acuerdo con las directivas CE
für Maschinen 2006/42/EG, Anhang II
for machines 2006/42/EC, appendix II
para directiva de máquinas 2006/42/CE, anexo II
für Elektromagnetische Verträglichkeit 04/108/EG
for electromagnetic consistency 04/108/EC
para compatibilidad electromagnética 04/108/CE
Niederspannung 2006/95/EG
Low tension 2006/95/EC
Directiva de baja tensión 2006/95/CE
Die Anlage bzw. Maschine ●The construction of the machine ●La instalación o la máquina
Fabrikat: ●Model: ●Modelo: LAMIGO A3 Pro
Elektrischer Taschenlaminator ●Electric Pouch Laminator ●Plastificadora utilitaria eléctrica
wurde entwickelt, konstruiert und gefertigt in Übereinstimmung mit den o.g. EG-Richtlinien, in alleiniger Verantwortung von:
was developed, constructed and produced in accordance with the EG guidelines and with the sole responsibility of:
se ha desarrollado, diseñado y fabricado de acuerdo con las directivas CE mencionadas arriba, bajo la responsabilidad exclusiva de:
Firma: ●Company: ●Empresa: Chr. Renz GmbH, 73540 Heubach / Germany
Folgende harmonisierte Normen wurden angewandt:
The following harmonized specifications were applied:
Se han aplicado las normas armonizadas siguientes:
EN ISO 12100
Sicherheit von Maschinen, Geräten und Anlagen
Security of machines, units and systems
Seguridad de máquinas, aparatos e instalaciones
DIN EN 60204-1
elektrische Ausrüstung von Maschinen
electrical equipment for industrial machines
Equipamiento eléctrico de máquinas
Eine Technische Dokumentation ist vollständig vorhanden. Die entsprechende Betriebsanleitung liegt in folgenden
europäischen Sprachen vor:
Deutsch, Englisch, Spanisch.
A complete technical documentation as well as the relevant manual are available in the European languages:
German, English, Spanish.
Existe una documentación técnica completa. Las instrucciones de servicio correspondientes se hallan disponibles en los
idiomas europeos siguientes: alemán, inglés, español.
Ort, Datum
Heubach,15.12.2016 General Manager / Director / Director general
Michael Schubert
Other manuals for LAMIGO A3 PRO
2
Table of contents
Other Renz Laminator manuals

Renz
Renz HT330Dual User manual

Renz
Renz HT 330 L User manual

Renz
Renz HT 330 Dual User manual

Renz
Renz HT 330 L User manual

Renz
Renz Renz ERW User manual

Renz
Renz LAMIGO A4 User manual

Renz
Renz LAMIGATOR IQ User manual

Renz
Renz LAMIGATOR IQ User manual

Renz
Renz LAMIGO A3 PRO User manual

Renz
Renz LAMIGO A3 PRO User manual