Renz LAMIGO A3 PRO User manual

www.renz.com
Danke, dass Sie sich für ein hochwertiges RENZ - Produkt entschieden haben.
Der Lamigo A3 PRO verfügt über die RENZ 4RSH - Technologie.
4-Roll-Short-Heat sorgt für eine äußerst komfortable, einfache Bedienung.
Thank you for purchasing a high - quality RENZ product.
The RENZ 4RSH-technology guarantees an extremely short heating-up time of just 45 - 60 seconds
and a perfect transport with four rolls which ensuresan excellent laminating result.
Gracias por haber elegido un producto RENZ de alta calidad.
Lamigo A3 PRO lleva incorporada la tecnología RENZ 4RSH.
4-Roll-Short-Heat permite un manejo extremadamente cómodo y sencillo.
Merci d‘avoir choisi un produit de très haute qualité RENZ. La technologie 4RSH de RENZ permet
une utilisation très rapide du Lamigo A3 PRO grâce à une mise en chauffe ultra rapide de 45-60 secondes
ainsi qu‘un excellent transport du document assuré par 4 rouleaux pour une plastification parfaite.
Děkujeme, že jste se rozhodli pro vysoce kvalitní výrobek značky RENZ.
Přístroj Lamigo A3 PRO využívá technologii RENZ 4RSH.
4-Roll-Short-Heat zajišťuje maximálněpohodlnou a snadnou obsluhu.
Hartelijk dank dat u gekozen heeft voor een hoogwaardig RENZ-product.
De Lamigo A3 PRO beschikt over de RENZ 4RSH-technologie.
4-roll-short-heat zorgt voor een uitermate comfortabele, eenvoudige bediening.
Мы благодарим вас за приобретение высококлассного изделия компании RENZ.
Ламинатор Lamigo A3 PRO работает сиспользованием технологии 4RSH компании RENZ.
Технология 4-Roll-Short-Heat обеспечивает невероятно удобное, простое управление.
Grazie per aver scelto un prodotto RENZ di alta qualità.
La Lamigo A3 PRO è dotata di tecnologia RENZ 4RSH.
La tecnologia 4-Roll-Short-Heat assicura un utilizzo estremamente comodo e semplice.
LAMIGO A3 PRO
LAMINATOR ●LAMINATOR ●PLASTIFICADORA A ●PLASTIFIEUSE ●LAMINÁTOR ●
LAMINEERAPPARAAT ●ЛАМИНАТОР ●PLASTIFICATRICE
BEDIENUNGSANLEITUNG ●OPERATION MANUAL ●MANUAL DE INSTRUCCIONES ●
INSTRUCTIONS ●NÁVOD K POUŽITÍ ●GEBRUIKSAANWIJZING ●ИНСТРУКЦИЯ ПО ЭКСПЛУАТАЦИИ ●
MANUALE DI ISTRUZIONI

Einlaufschacht
Pouch entry
Bandeja de entrada
Fente d‘alimentation
Vstupní otvor
Invoer
Vano di inserimento
Grenzmarkierung
Border mark
Marca límite
Repère de limite
Mezní znaka
Grensmarkering
Marcatura limite
Kaltlaminieren
Cold button
Plastificar en frío
Sélection plastification à froid
Laminace za studena
Koud lamineren
Plastificazione a freddo
Rücklauf
Reverse button
Retroceso
Bouton retour
Zptný chod
Terugloop
Ritorno
Foliendicke / Temperatur
Pouch button
Grosor de lámina / temperatura
Sélection épaisseur / température
Tlouška fólie / teplota
Foliedikte / temperatuur
/
Spessore pellicola /Temperatura
Ein / Aus Schalter
On / Off button
Interruptor de conexión / desconexión
Bouton On / Off
Tlaítko zap. / vyp.
Aan / Uit-schakelaar
/
Interruttore ON / OFF
LED Bereitschaftsanzeige „READY“
LED READY light
Indicador LED de disponibilidad “READY“ (listo)
LED machine prête
LED kontrolka pipravenosti „READY“
LED stand-byweergave „READY“
«READY» («»)
LED di macchina pronta «READY»
Hauptschalter
Power switch
Interruptor principal
Interrupteur principal
Hlavní vypína
Hoofdschakelaar
Interruttore principale
Auslaufschacht
Outlet
Bandeja de salida
Guide de sortie
Výstupní otvor
Uitvoerschacht
Vano di uscita
Auslaufhalterung
Outlet bracket
Soporte de salida
Support de sortie
Výstupní držák
Uitvoerhouder
Supporto di uscita

1ALLGEMEINE SICHERHEITSHINWEISE ●GENERAL SAFEGUARDS ●INDICACIONES DE SEGURIDAD
GENERALES ●CONSEILS DE SÉCURITÉ
D
Lesen Sie vor Gebrauch die Bedienungsanleitung.
Stellen Sie den LAMIGO A3Pro auf eine stabile Unterlage.
Verwenden Sie dn LAMIGO A3Pro NICHT, wenn das Netzkabel beschädigt ist.
Stellen Sie sicher, dass das Laminiergut frei ist von Metallgegenständen wie Heft-oder Büroklammern.
Versuchen Sie nicht den LAMIGO A3Pro zu öffnen oder anderweitig zu reparieren.
Schützen Sie den LAMIGO A3Pro vor Wärme und Feuchtigkeit.
Achten Sie darauf, dass Kinder den LAMIGO A3Pro nicht benutzen.
Schalten Sie den LAMIGO A3Pro nach jedem Gebrauch aus.
Ziehen Sie den Netzstecker, wenn Sie den LAMIGO A3Pro längere Zeit nicht benutzen.
Keine leeren Folientaschen laminieren.
Verwenden Sie immer die entsprechenden RENZ Folientaschen.
Beachten Sie die Anweisungen auf dem LAMIGO A3Pro.
Halten Sie das Ausgabefach frei.
E
Read the manual before use.
Plac
e your LAMIGO A3Pro on a stable surface.
DO NOT use the LAMIGO A3Pro if its power cord is damaged.
Ensure no lamination runs with metal objects like staples, paper clips.
DO NOT attempt to open or otherwise repair the LAMIGO A3Pro.
Keep the LAMIGO A3Pro including its power cord away from heat and water sources.
DO NOT allow children to use the LAMIGO A3Pro.
Turn off the LAMIGO A3Pro after each use.
Unplug the LAMIGO A3Pro when not in use for an extended period.
DO NOT laminate an empty pouch.
Use RENZ pouches required for the appropriate pouch setting.
Follow the instructions and specifications shown on the LAMIGO A3Pro as well.
Leave the Pouch exit tray clear of any objects.
ESP
Antes de utilizar el LAMIGO A3Pro, lea el manual de instrucciones.
Coloque el LAMIGO A3Pro sobre una base estable.
NO utilice la plastificadora si el cable de red está dañado.
Asegúrese de que la lámina esté exenta de objetos metálicos como grapas o clips.
No intente abrir o reparar el LAMIGO A3Pro.
Proteja el LAMIGO A3Pro contra calor y humedad.
Evite que los niños usen este aparato.
Desconecte el LAMIGO A3Pro después de cada uso.
Si no utiliza el LAMIGO A3Pro durante un periodo de tiempo prolongado, extraiga el enchufe de red.
No plastifique fundas para plastificar vacías.
Utilice siempre las fundas para plastificar RENZ adecuadas.
Respete las instrucciones reflejadas en el LAMIGO A3Pro.
Mantenga libre la bandeja de salida.
F
Veuillez lire le mode d’emploi avant utilisation de l’appareil.
Posez l’LAMIGO A3Pro sur une surface stable.
N’utilisez pas l’LAMIGO A3Pro lorsque le cordon d’alimentation est endommagé.
Assurez vous qu’il n’y ai pas d’agrafe ou de trombone lors de plastification.
Ne pas ouvrir ou tenter de réparer l’LAMIGO A3Pro.
Protégez l’LAMIGO A3Pro de source de chaleur ou d’humidité.
Cet LAMIGO A3PRo ne peut pas être utilisé par des enfants.
Après utilisation éteignez l’LAMIGO A3Pro.
Retirez la prise d’alimentation si cet LAMIGO A3Pro n’est pas utilisé pour une longue période.
Ne pas plastifier de pochettes vides.
Utilisez toujours des pochettes de plastification préconisées par RENZ.
Respectez les consignes d’utilisation de l’LAMIGO A3Pro.
Le guide de sortie doit toujours être libre.

1VŠEOBECNÉ BEZPEČNOSTNÍ PODMÍNKY ●ALGEMENE VEILIGHEIDSVOORWAARDEN ●
ОБЩИЕ УСЛОВИЯ БЕЗОПАСНОСТИ ●AVVERTENZE GENERALI SULLA SICUREZZA
CZ
Ped použitím si pette návod.
Postavte LAMIGO A3Pro na stabilní podklad.
LAMIGO A3Pro NIKDY nepoužívejte s poškozeným elektrickým kabelem.
Zkontrolujte, že laminovaný materiál neobsahuje kovové pedmty jako sešitové a kanceláské sponky.
LAMIGO A3Pro se nepokoušejte otevírat ani jiným zpsobem opravovat.
Chrate LAMIGO A3Pro ped teplem a vlhkem.
Zajistte, aby LAMIGO A3Pro nepoužívaly dti.
Po každém použití LAMIGO A3Pro vypnte.
Nebudete-li LAMIGO A3Pro delší dobu používat, vytáhnte zástrku ze zásuvky.
Nelaminujte prázdné laminovací kapsy.
Používejte vždy vhodné laminovací kapsy RENZ .
Dodržte pokyny uvedené na LAMIGO A3Pro.
Udržujte výstupní ást vždy volnou.
NL
Lees voor gebruik de bedieningshandleiding.
Plaats het LAMIGO A3Pro op een stabiele onderlaag.
Gebruik het LAMIGO A3Pro NIET, wanneer de netkabel beschadigd is.
Zorg ervoor, dat het te lamineren product vrij is van metalen voorwerpen zoals nietjes of paperclips.
Probeer het LAMIGO A3Pro niet te openen of anderszins te repareren.
Bescherm het LAMIGO A3Pro tegen warmte en vocht.
Let erop dat kinderen het LAMIGO A3Pro niet gebruiken
Schakel het LAMIGO A3Pro na elk gebruik uit.
Trek de stekker uit het stopcontact, wanneer u het LAMIGO A3Pro langere tijd niet gebruikt.
Geen lege lamineerfolies lamineren.
Gebruik altijd de bijbehorende RENZ-lamineerfolies.
Neem de instructies op het LAMIGO A3Pro in acht.
Houd het uitvoervak vrij.
RUS
LAMIGO A3Pro .
LAMIGO A3Pro .
LAMIGO A3Pro, .
, , , .
LAMIGO A3Pro .
LAMIGO A3Pro .
LAMIGO A3Pro .
LAMIGO A3Pro .
LAMIGO A3Pro , .
.
RENZ.
, LAMIGO A3Pro.
, .
IT
Leggere il manuale di istruzioni prima dell‘uso.
Appoggiare l‘LAMIGO A3Pro su una base stabile.
Non utilizzare la plastificatrice se il cavo di alimentazione è danneggiato.
Assicurarsi che l‘oggetto da plastificare non contenga oggetti metallici come punti o graffette.
Non tentare di aprire l‘LAMIGO A3Pro o di ripararlo in altro modo.
Proteggere l‘LAMIGO A3Pro dal calore e dall‘umidità.
Assicurarsi che i bambini non utilizzino questo LAMIGO A3Pro.
Spegnere l‘LAMIGO A3Pro dopo ogni utilizzo.
Staccare la spina di alimentazione quando l‘LAMIGO A3Pro non viene utilizzato per un periodo di tempo prolungato.
Non plastificare buste di pellicola vuote.
Utilizzare sempre le apposite buste di pellicola RENZ.
Seguire le istruzioni sull‘LAMIGO A3Pro.
Tenere libero lo scomparto di uscita.

2AUFSTELLEN UND ANSCHLIESSEN ●SETUP AND CONNECT ●COLOCACIÓN Y CONEXIÓN ●
MISE EN PLACE ●SESTAVENÍ A ZAPOJENÍ ●PLAATSEN EN AANSLUITEN ●УСТАНОВKA ●
MESSA IN FUNZIONE
D
Gerät aus der Verpackung nehmen.
Lieferumfang prüfen:
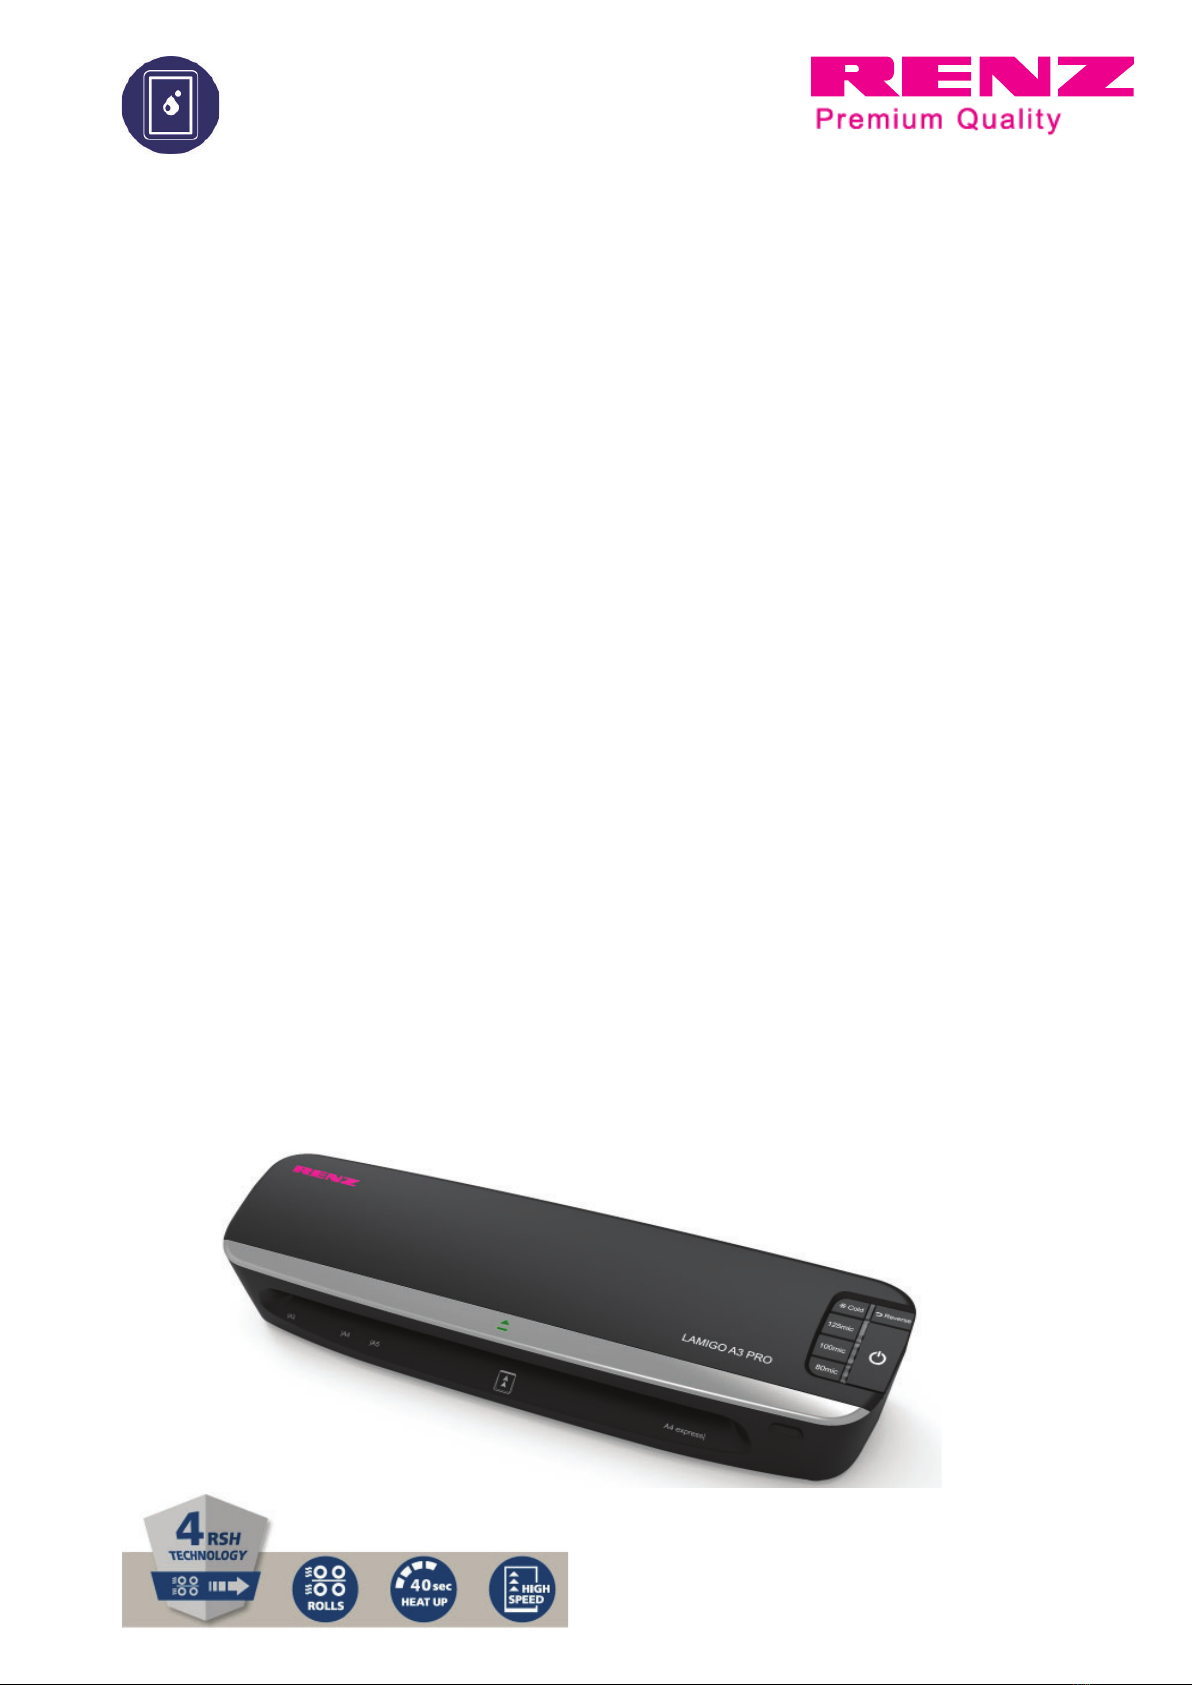
-Laminiergerät LAMIGO A3 PRO
-Bedienungsanleitung
-Auslaufhalterung
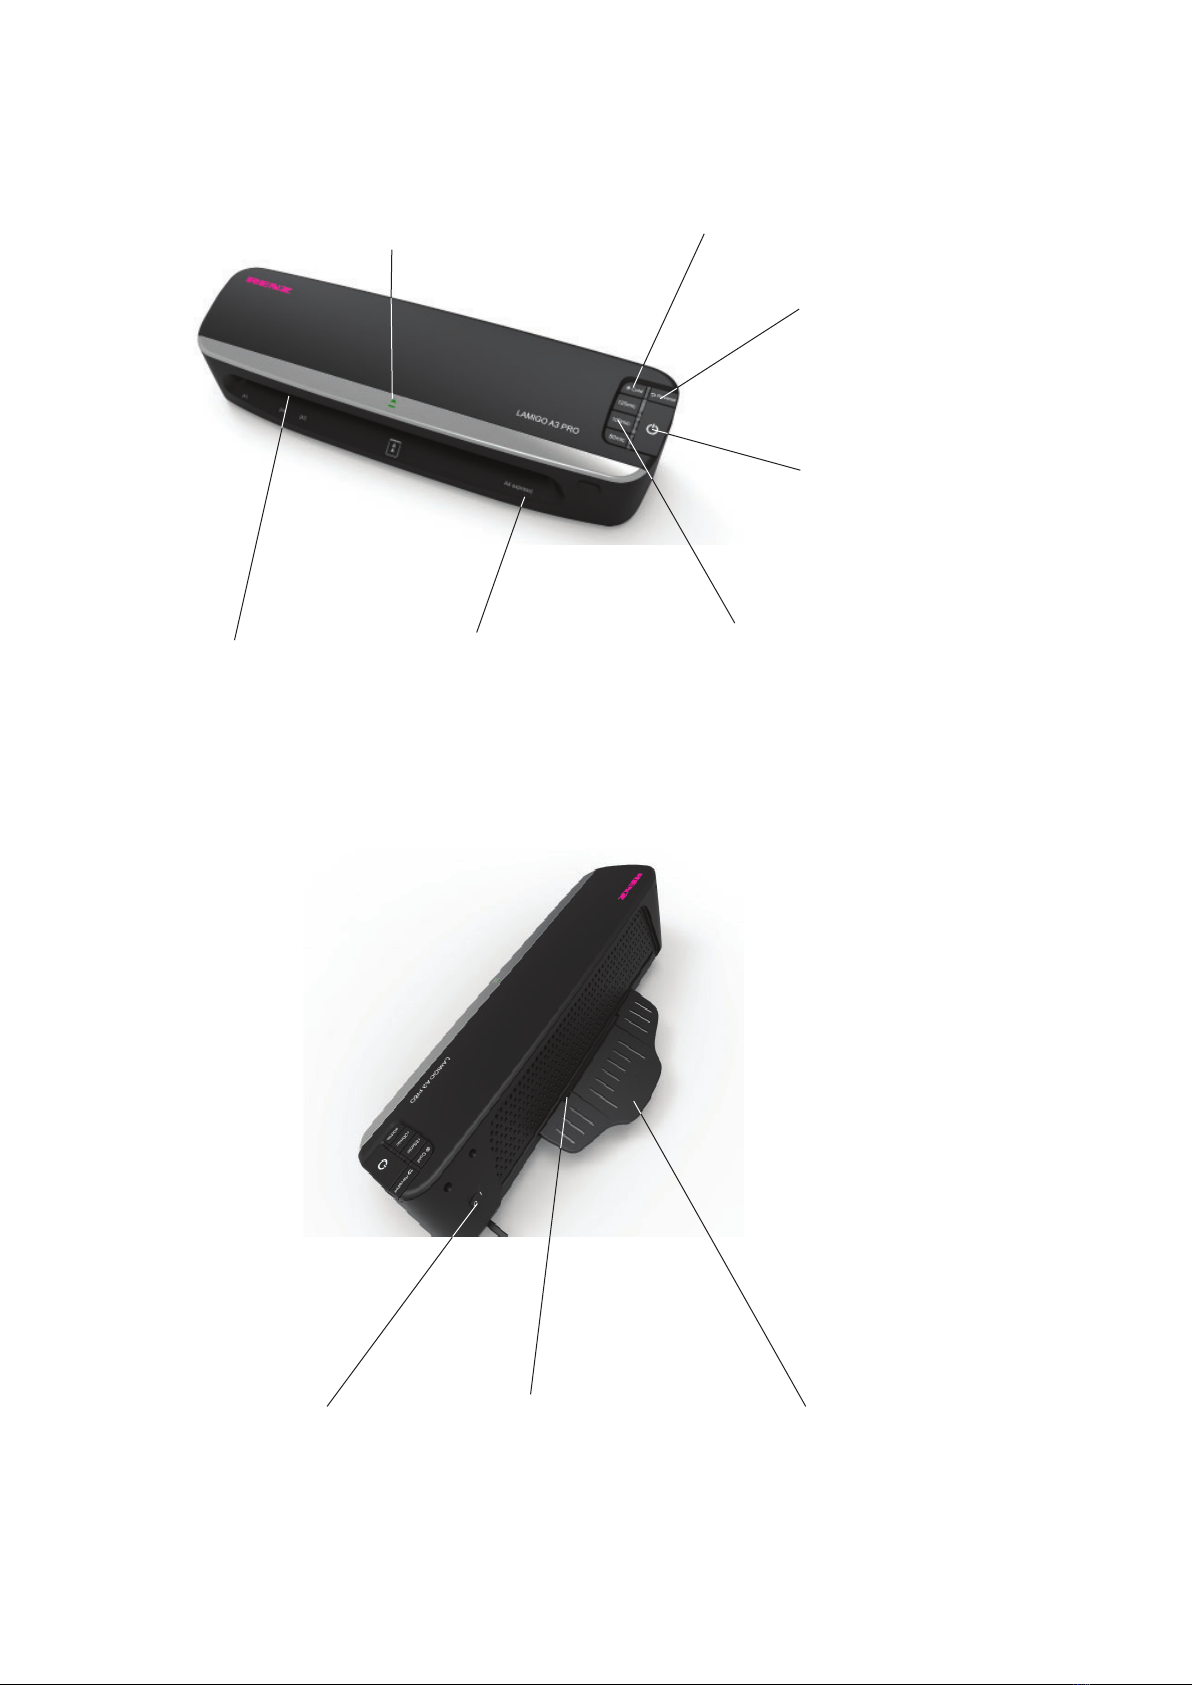
Richtigen Standort wählen.
Achten Sie auf ausreichend Platz
an der Rückseite des Laminiergeräts.
Stecken Sie die Auslaufhalterung
in die dafür vorgesehene
Aussparung an der Rückseite
des Laminators.
Elektrokabel nur an Steckdosen
mit Schutzkontakt anschließen.
Achten Sie immer auf die richtige
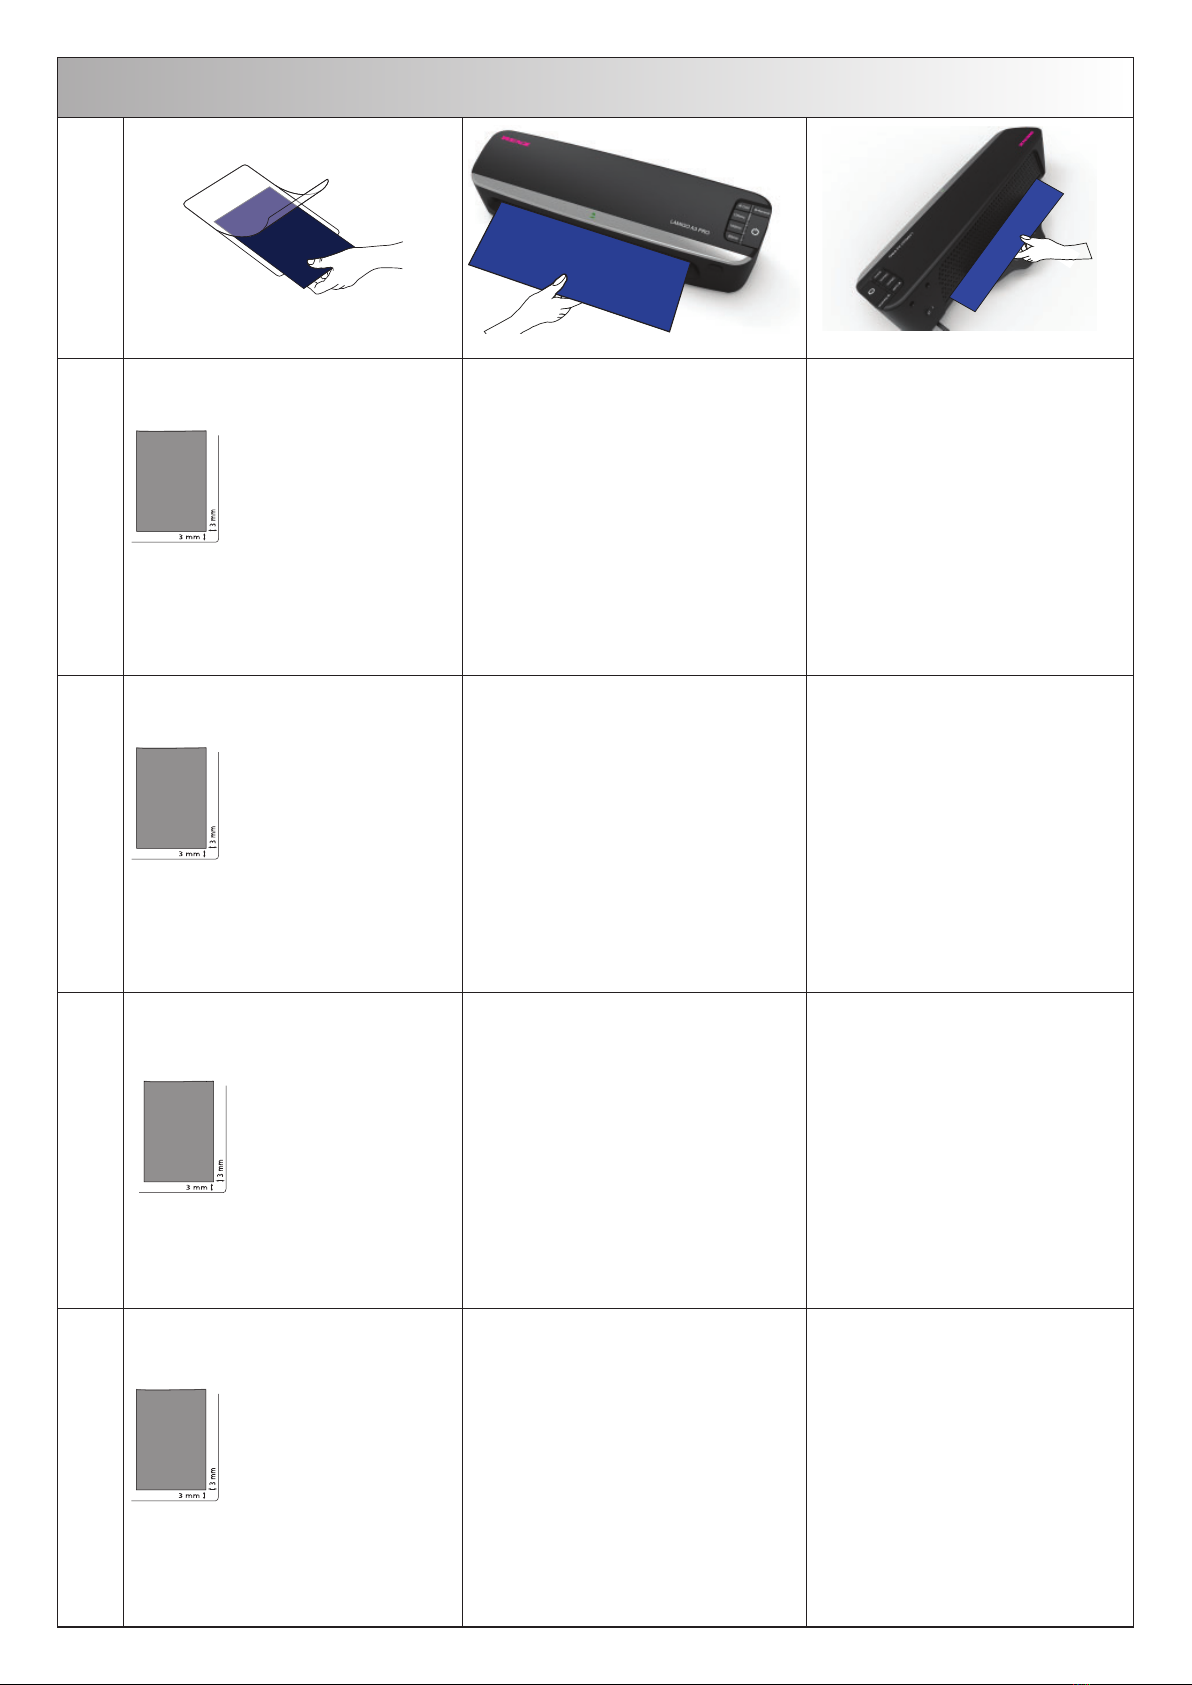
Laminiertemperatur.
Die Folie kann sich wieder vom
Dokument lösen, wenn zu kalt
laminiert wurde.
Das Dokument kann wellig werden,
wenn zu heiß laminiert wurde.
E
Remove machine and check
contents of the box.
-Laminating machine
LAMIGO A3 PRO
-User Manual
-Outlet bracket
Make sure you have enough
space at the back of the laminator.
Please attach the outlet bracket
at the backside of the laminator
into the recess.
Cable connect the machine only
to plugs which are grounded.
Make sure to always set the correct
laminating temperature as the film
may detach from the document
if the temperature was too low
or the document turns out wavy
if the temperature was set too high.
ESP
Sacar el aparato del embalaje.
Comprobar el volumen de suministro:
-Plastificadora LAMIGO A3 PRO
-Manual de instrucciones
-Soporte de salida
Elegir el emplazamiento correcto.
Procure que exista espacio
suficiente en la parte posterior
de la plastificadora.
Inserte el soporte de salida en la
ranura prevista para ello en la parte
posterior de la plastificadora.
El cable eléctrico sólo debe
conectarse en tomas de corriente
con contacto de protección.
Asegúrese de que la temperatura de
la plastificadora sea siempre correcta.
La lámina puede desprenderse de
nuevo del documento si el plastificado
se ha realizado a una temperatura
demasiado fría.
El documento puede ondularse si el
plastificado se ha realizado a una
temperatura demasiado caliente.
F
Sortez la machine de son emballage.
Vérifiez le contenu de livraison:
-La plastifieuse LAMIGO A3 PRO
-Le câble d’alimentation
-Le mode d’emploi
Choisissez un emplacement.
Assurez vous qu’il y ai suffisamment
de place à l’arriéré de la plastifieuse.
Positionnez le support de sortie
à l’emplacement prévu à cet effet
à l’arrière de la plastifieuse.
Branchez le câble d‘alimentation.
Ne le branchez que sur des prises
ayant un contact de mise à la terre.
Veillez à maintenir toujours la bonne
température de plastification,
car il se peut que la feuille se
redétache du document en cas de
température insuffisante lors de la
plastification ; ou bien que le
document devienne trop ondulé
en cas de température excessive
lors de la plastification.
CZ
Pístroj vybalte.
Zkontrolujte obsah dodávky:
-Laminátor LAMIGO A3 PRO
-Elektrický kabel
-Návod k obsluze
Zvolte správné stanovišt.
Zajistte dostatek místa na zadní
stranlaminátoru.
Nasate výstupní držák do
píslušných úchytna zadní
stranlaminátoru.
Zapojte elektrický kabel do zásuvky.
Používejte jen zásuvky
s ochranným kontaktem.
Laminujte vždy za správné teploty.
Laminováním za nedostatené
teploty se mže stát, že se folie
od dokumentu opt odlepí,
a naopak neúmrnvysokou
teplotou by se dokument zvlnil.
NL
Apparaat uit verpakking verwijderen.
Levering controleren:
-Lamineerapparaat LAMIGO A3 PRO
-Kabel
-Gebruiksaanwijzing
Juiste locatie kiezen.
Let erop dat er voldoende plaats
is aan de achterzijde van het
lamineerapparaat.
Steek de uitvoerhouder in de
daarvoor bedoelde uitsparing aan de
achterzijde van het lamineerapparaat.
Sluit de stekker in het geaarde
stopcontact aan.
Zorg altijd voor de juiste
lamineertemperatuur, omdat
de folie anders loslaat van het
document als er te koud wordt
gelamineerd.
Evenzo kan document gaan
golven als de temperatuur te
hoog ingesteld is.
RUS
.
- LAMIGO A3 PRO
-
-
.
.
.
.
.
.
.
IT
Rimuovere l‘apparecchio
dall‘imballaggio. Controllare il
contenuto della confezione:
-Plastificatrice LAMIGO A3 PRO
-Manuale di istruzioni
-Supporto di uscita
Scegliere un luogo adatto per l‘uso.
Assicurarsi che vi sia spazio
sufficiente sul retro della
plastificatrice.
Inserire il supporto di uscita
nell‘apposito spazio sul retro
della plastificatrice.
Collegare il cavo elettrico
solo a prese elettriche con
contatto di protezione.
Controllare sempre che la
temperatura di plastificazione
sia corretta.
La pellicola può staccarsi
nuovamente dal documento
se la plastificazione è avvenuta
a temperatura troppo bassa.
Il documento può risultare ondulato se
la plastificazione è avvenuta
a temperatura troppo alta.

3
LAMINIEREN ●LAMINATING ●PLASTIFICADO ●PLASTIFICATION
D
Schalten Sie den Hauptschalter ein und drücken
Sie den Ein / Aus -Schalter.
Schalten Sie das Gerät mit der Taste ein.
Überprüfen Sie die Foliendicke und drücken Sie
die entsprechende Temperatur-Taste.
Für Kaltlaminieren Taste „Cold“ wählen.
Achtung:
Die Maschine ist für die Verwendung
von Foliendicken von 2x80 micron, 2x100 micron
und 2x125 micron ausgelegt.
Eine falsche Temperaturauswahl kann
zu einem schlechten Laminierergebnis oder
sogar zum Verbrennen der Dokumente
oder Fotos führen.
Wenn die
LED
Bereitschafts „READY“
grün leuchtet, und ein Piepton ertönt -
ist die Maschine bereit zum Laminieren.
E
Turn on the power switch,
and press the On / Off switch. Press the button to switch on the machine.
Press the right Pouch button,
corresponding to the pouch used.
For cold laminating, press the Cold button.
Attention:
The machine is designed to use foil
pouch thickness of 2x80 micron,
2x100 micron and 2x125 micron.
A wrong temperature selection may result
in bad lamination or even burn the
documents or photos.
When
READY light
turns green,
and you hear the beeping sound,
the machine is ready to start laminating.
ESP
Conecte el interruptor principal y presione el
interruptor de conexión / desconexión. Conecte el aparato con la tecla .
Verifique el grosor de la lámina y presione
la tecla de temperatura correspondiente.
Para plastificar en frío, seleccione
la tecla “Cold“ (frío).
Atención:
La máquina está diseñada para utilizar grosores
de láminas de 2x80, 2x100 y 2x125 micras.
Una selección de temperatura errónea puede
provocar un plastificado deficiente o incluso
quemar los documentos o fotos.
Si el LED de disponibilidad “READY“
luce en verde y suena un pitido - la máquina
está lista para plastificar.
F
Pour la mise sous tension de l’appareil,
appuyez sur l’interrupteur principal On / Off.
Pour démmarer l’appareil appuyez sur
le bouton .
Réglez la température en fonction de
l’épaisseur de la pochette de plastification.
Pour la plastification à froid sélectionnez
le bouton “Froid.
Attention:
La machine est conçue pour l’utilisation
de film de 2x80 micron, 2x100 micron
et 2x125 micron.
Une mauvaise sélection de température peut
entrainer un défaut de plastification et même
la détérioration du document ou de la photo.
Si la LED verte s’allume et un son retenti,
l’appareil est prête pour la plasification.
dd

3
LAMINOVÁNÍ ●LAMINEREN ●ЛАМИНИРОВАНИE ●PLASTIFICAZIONE
CZ
Zapnte hlavní vypínaa stisknte tlaítko
zap. / vyp.
Zapnte pístroj tlaítkem .
Zkontrolujte tloušku fólie a stisknte
píslušné tlaítko teploty.
Pro laminaci za studena zvolte tlaítko „Cold“.
Pozor:
Pístroj je uren pro použití s fóliemi tloušky
2x80 mikr., 2x100 mikr. a 2x125 mikr.
Chybná volba teploty mže zpsobit špatný
výsledek laminace nebo dokonce spálení
dokumenta fotografií.
Po rozsvícení zelené
LED kontrolky
připravenosti „READY“
a zaznní akustického
signálu je laminátor pipraven k laminaci.
NL
Schakel de hoofdschakelaar in en druk
op de aan / uit-schakelaar.
Schakel het apparaat met de toets in.
Controleer de foliedikte en druk op de
desbetreffende temperatuur-toets.
Voor koud lamineren de toets „Cold“ kiezen.
Let op:
De machine is voor de toepassing van foliediktes
2x80 micron, 2x100 micron en 2x125 micron
ontworpen.
Een verkeerde temperatuurinstelling kan tot
een slecht lamineerresultaat of zelfs tot het
verbranden van documenten of foto‘s leiden.
Als de
LED standbyweergave „READY“
groen brandt, en een signaal klinkt - is de
machine gereed voor het lamineren.
RUS
/ .
.
.
«Cold» («»).
Внимание:
2x80 , 2x100 2x125 .
.
, зеленый
светодиодный указатель
готовности «READY» («Готов»)
,
.
IT
Accendere l‘interruttore principale e premere
l‘interruttore ON / OFF. Accendere l’apparecchio con il tasto .
Controllare lo spessore della pellicola e premere
il tasto per la temperatura corrispondente.
Per la plastificazione a freddo premere
il tasto «Cold».
Attenzione:
La macchina è progettata per l’utilizzo di pellicole
spesse 2x80 micron, 2x100 micron e 2x125 micron.
Se si seleziona una temperatura errata,
si possono ottenere risultati di plastificazione
scadenti o bruciare i documenti o le fotografie.
Quando il LED di macchina pronta
«READY» verde si accende e viene emesso
un segnale acustico, la macchina è pronta
per la plastificazione.
dd

3LAMINIEREN ●LAMINATING ●PLASTIFICADO ●PLASTIFICATION
D
Die Laminiervorlage in eine entsprechende
Folientasche stecken und auf gleichmäßigen
Folienrand achten. Optimal sind 3 mm Folienrand.
Überrüfen Sie, ob die gewünschte
Laminiertemperatur erreicht wurde:
dies ist der Fall, wenn die
Bereitschaftsanzeige „READY“ grün leuchtet.
Schieben Sie die Folientasche mit der
geschlossenen Seite voran, gerade in den
Einlaufschacht, bis das Dokument von den
Laminierwalzen erfasst und eingezogen wird.
Das Dokument wird durch das Gerät gezogen
und auf der Rückseite hinaus transportiert.
Achtung:
Schieben Sie immer zuerst die bereits
geschlossene Seite der Folientasche ein.
A3 - kurze Seite
A4 - Hochformat - kurze Seite
A4 - Querformat (Express A4) - lange Seite
A5 - kurze Seite
Entnehmen Sie das fertig laminierte Dokument
von der Ablage, bevor Sie das nächste
Dokument laminieren, um Stau
und evtl. Verschmutzung zu vermeiden.
E
Put the original to be laminated into the correct
pouch and make sure to have an equal edge
on all sides. Ideal would be 3 mm at each side.
Check if the desired laminating temperature is
reached. This is the case if the temperature light
„READY“ lights permanently green.
Insert the laminating pouch with the closed side
first into the entry slot until the document is
seized by the laminating rollers and is
transported into the laminator.
The document is transported through the laminator
and comes out at the back of the machine.
Attention:
Always insert the already closed side
of the foil pouch in first.
A3 - short side
A4 - portrait - short side
A4 - horizontal format (Express A4) - long side
A5 - short side
Pull out the laminated foil pouch immediately
and gently after it comes out of the outlet
and stops moving to avoid overheat
(smudging and blistering).
ESP
Insertar el modelo de plastificado en una funda
para plastificar adecuada y asegurarse de que
el borde de la lámina sea uniforme. El borde de
lámina óptimo asciende a 3 mm.
Verifique si se ha alcanzado la temperatura de
plastificado deseada: éste es el caso si el indicador
de disponibilidad “READY“ luce en verde.
Empuje la funda para plastificar hasta la bandeja
de entrada con el lado cerrado hacia adelante,
hasta que el documento sea agarrado por los
rodillos de plastificado e introducido.
El documento es extraído por el aparato
y transportado hacia fuera por la parte posterior.
Atención:
Empuje siempre primero el lado ya cerrado
de la funda para plastificar.
A3 - lado corto
A4 - Formato alto - lado corto
A4 - Formato transversal (Express A4) - lado largo
A5 - lado largo
Antes de plastificar el documento siguiente,
retire el documento plastificado de la bandeja,
para evitar atascos y eventual suciedad.
F
Introduisez le document à plastifier dans une
pochette à plastifier adéquate et veillez
à ce que la marge de la feuille soit régulière.
Une marge de 3 mm serait parfaite.
Vérifiez si la température de plastification
souhaitée a été atteinte : C‘est le cas lorsque
l‘indicateur de température (4) est allumé en vert.
Glissez la pochette transparente, son côté fermé
étant devant, tout droit dans la fente
d‘alimentation jusqu’à ce que le document soit
saisi par les rouleaux de transport et ressorte
par l’arriéré de la machine.
Attention:
Inserez en premier la partie fermée de la
pochette:
A3 - coté court
A4 - Portrait: coté court
A4 - Paysage: coté long
A5 - coté court
Retirez le document plastifié se trouvant sur
le support de sortie avant d’engager la
nouvelle plastification pour éviter tout risque
de bourrage ou encrassement.

3LAMINOVÁNÍ ●LAMINEREN ●ЛАМИНИРОВАНИE ●PLASTIFICAZIONE
CZ
Laminovaný materiál zasute do vhodné
laminovací kapsy.
Okraje fólie by mly být stejnomrnširoké.
Optimální je okraj fólie o šíce 3mm.
Zkontrolujte, zda byla dosažena požadovaná
laminovací teplota: její dosažení poznáte
podle nepetržitzelensvítící teplotní
indikace „READY“.
Kapsovitou fólii zasute uzavenou stranou rovn
do vstupního otvoru laminátoru, kde jej pevezmou
laminovací válce, které jej vtáhnou do nitra
pístroje. Dokument prochází celým pístrojem,
který opouští zadní stranou.
Pozor:
Laminovací kapsu zasunujte vždy již uzavenou
stranou naped.
A3 - krátká strana
A4 na výšku - krátká strana
A4 na šíku (Express A4) - dlouhá strana
A5 - krátká strana
Ped laminací dalšího dokumentu vyjmte hotový
(právzalaminovaný) dokument z držáku,
aby nedošlo k ucpání nebo zneištní.
NL
Leg uw document in het lamineerhoesje en let
op een gelijkmatige rand.
Ideaal is 3 mm aan elke kant.
Controleer of de gewenste lamineertemperatuur
bereikt is: dit is het geval wanneer het
temperatuurlicht groen is.
Schuif de hoes met de gesloten kant naar voren,
gelijkmatig in de invoer, totdat het document
gegrepen wordt door het lamineerrollen.
Het document wordt door het apparaat getrokken
en komt aan de achterkant uit de machine.
Let op:
Schuif altijd eerst de reeds gesloten kant
van de lamineerfolie in.
A3 - korte zijde
A4 - staand - korte zijde
A4 - liggend (Express A4) - lange zijde
A5 - korte zijde
Verwijder het voltooide gelamineerde
document uit het uitvoervak voordat u het
volgende document lamineert om opstopping
en mogelijke verontreiniging te voorkomen.
RUS
.
– 3
,
:
«READY» («»).
, ,
.
.
Внимание:
.
A3 -
A4 - -
A4 - (Express A4) -
A5 -
,
.
IT
Inserire il documento da plastificare in
un‘apposita busta di pellicola e controllare
che il bordo della pellicola sia uniforme.
L‘ideale è un bordo di pellicola di 3 mm.
Verificare che sia stata raggiunta la temperatura
di plastificazione desiderata: in questo caso,
l‘indicatore di macchina pronta «READY» è verde.
Spingere la busta di pellicola nel vano di
inserimento tenendola diritta e con il lato chiuso
in avanti fino a quando il documento viene
preso dai rulli di plastificazione e tirato all‘interno
dell‘apparecchio. Il documento attraversa
l‘apparecchio e viene trasportato all‘esterno
sul retro.
Attenzione:
Inserire sempre per primo il lato già chiuso della
busta di pellicola.
A3 - lato corto
A4 - verticale - lato corto
A4 - orizzontale (Express A4) - lato lungo
A5 - lato corto
Prendere il documento plastificato dagli appoggi
prima di plastificare il documento successivo
per evitare inceppamenti ed eventuali impurità.

4RÜCKLAUFFUNKTION ●RETURN ●FUNCIÓN DE RETROCESO ●FUNKCE REVERZNÍHO POHYBU ●
TERUGLOOPFUNCTIE ●ФУНКЦИЯ BOЗBPATA ●FUNZIONE DI RITORNO
●●●AUSSCHALTEN ●
SWITCH OFF ●DESCONEXIÓN ●ÉTEINDRE ●VYPNOUT ●UITSCHAKELEN ●
ВЫКЛЮЧЕНИЕ ●SPEGNIMENTO
D
Falls die Folientasche verklemmt,
drücken Sie die Taste „Reverse“ und halten diese gedrückt.
Wenn Sie den Piepton hören, wird das eingeklemmte
Laminiergut aus dem Gerät heraustransportiert.
Automatische Abschaltung:
Wenn die Maschine 30 Minuten nicht gebraucht wird,
schaltet sie sich automatisch in den Standby Modus.
Nach Beendigung der Laminierarbeiten das Gerät mit der Taste
ausschalten. Danach laufen die Rollen zum Abkühlen noch 30 Minuten nach.
Anschließend den Netzschalter drücken und den Netzstecker ziehen.
Lassen Sie das Gerät vollständig abkühlen, bevor Sie es verstauen.
E
In case of pouch jam, press the Reverse button,
keep it pressed and you hear the beeping sound.
The jammed paper is being transported out of the machine.
Intelligent auto turn off:
If the machine is left for 30 minutes without use,
she automatically shuts to standby mode.
In order to cool down, the rolls will continue running for 30 min.
When the laminating tasks had been finished, press the button to switch
off the machine, then switch off the power switch and disconnect from power.
Let the machine fully cooldown before you put it away.
ESP
Si la funda para plastificar se atasca,
presione la tecla “Reverse“ (retroceso) y manténgala presionada.
Cuando oiga el pitido,
la lámina atascada se transporta fuera del aparato.
Desconexión automática:
Si la máquina no se utiliza durante 30 minutos,
la misma cambia automáticamente al modo de espera.
Al finalizar los trabajos de plastificar, desconectar el aparato con la tecla .
Posteriormente, los rodillos siguen funcionando por inercia durante
30 minutos para que se enfríen. A continuación, presionar el interruptor
de alimentación y extraer el enchufe de red.
Antes de guardar el aparato, deje que se enfríe por completo.
F
Au cas où la pochette se coince, utilisez la touche retour
et maintenez la appuyée.
Si vous entendez le “Bip” le document coincé sera
évacué vers l’extérieur.
Désactivation automatique de la plastifieuse:
Si la machine n’est plus utilisée sur une période supérieure à 30min
celle si se met automatiquement en mode Stand-by.
Après utilisation de la plastifieuse, appuyez sur la touche pour l’éteindre.
Les rouleaux continuent de tourner pour refroidir (30min environ).
Aprèes le processus de refroidissement vous pouvez couper l’alimentation
générale par l’interrupteur principal puis retirer la prise.
Laissez la machine complètement refroidir avant de la ranger.
CZ
Dojde-li k uvíznutí laminovací kapsy v pístroji,
stisknte a podržte tlaítko zptného chodu „Reverse“.
Akustický signál informuje, že probíhá odvoz uvízlého
materiálu z pístroje.
Automatické vypnutí:
Není-li pístroj 30 minut používán, pepne se automaticky
do pohotovostního režimu.
Po dokonení laminace pístroj vypnte tlaítkem .Válce poté ješt
30 minut dobíhají, aby vychladly. Poté vypnte hlavní vypínaa vytáhnte
zástrku ze zásuvky. Ped uskladnním nechte pístroj zcela vychladnout.
NL
Indien de lamineerfolie klem komt te zitten,
op de knop „Reverse“ drukken en deze ingedrukt houden.
Wanneer u de pieptoon hoort, wordt het vastgelopen
te laminerenproduct uit het apparaat gevoerd.
Automatische uitschakeling:
Als de machine 30 minuten niet gebruikt wordt,
schakelt het zich automatisch in de standby-modus.
Na beëindiging van de lamineerwerkzaamheden het apparaat met de toets
uitschakelen. Daarna lopen de rollen nog 30 minuten door om af te koelen.
Aansluitend de netschakelaar indrukken en de stekker uit het stopcontact
trekken. Laat het apparaat geheel afkoelen, voordat u het opbergt.
RUS
«Reverse» («») .
.
Автоматическое отключение:
30 ,
.
.
30 .
.
, .
IT
Se la busta di pellicola si incastra,
premere e tenere premuto il tasto «Reverse».
Se si sente il segnale acustico,
l’oggetto da plastificare incastrato viene trasportato
all’esterno dell’apparecchio.
Spegnimento automatico:
Se la macchina non viene usata per 30 minuti,
passa automaticamente alla modalità stand-by.
Dopo aver terminato l’operazione di plastificazione, spegnere l’apparecchio
con il tasto . I rulli continuano a girare per altri 30 minuti per
raffreddarsi.Quindi premere l’interruttore di alimentazione e staccare la spina.
Far raffreddare completamente l’apparecchio prima di riporlo.
g
g
g
g
g
va
va
e
e
rm
rm

5SICHERHEITSDATENBLATT ●POUCH JAM ALERT ●HOJA DE DATOS DE SEGURIDAD ●
DE DONNÉES DE SÉCURITÉ ●BEZPEČNOSTNÍ LIST ●VEILIGHEID GEGEVENSBLAD ●
ЛИСТОK БЕЗОПАСНОСТИ ●SCHEDA DI SICUREZZA
D
●Schieben Sie die Laminierfolie immer mit der geschlossenen Seite zuerst ein.
●Schieben Sie die Laminierfolie immer innerhalb der Markierungen ein.
●Führen Sie einen Laminierauftrag nur dann aus, wenn die LED Bereitschaftsanzeige „READY“ grün leuchtet.
●Stellen Sie sicher, dass genügend freier Raum (min. 500 mm) hinter der Maschine vorhanden ist.
E
Follow the right document/pouch insert direction.
●Only run an lamination job within the Border mark.
●Only run an lamination job when READY light turns green.
●Check there is enough clear space (min. 500 mm, 20“) behind the machine.
ESP
●Siga la dirección de inserción correcta.
●Ejecute un encargo de plastificado sólo dentro de la marca límite.
●Ejecute un encargo de plastificado sólo cuando el indicador LED de disponibilidad “READY“ luzca en verde.
●Asegúrese de que exista espacio libre suficiente (al menos 500 mm) detrás de la máquina.
F
●Respectez le sens d’introduction.
●Plastifiez uniquement dans les zones à l’intérieur des repères.
●Plastifiez uniquement lorsque la LED verte est allumée et indique que la machine est prête.
●Assurez vous qu’il y a suffisamment de place libre à l’arrière de la machine (minimum 500mm).
CZ
●Dodržte správný směr vkládání.
●Laminaci provádějte jen v rozsahu vymezeném značkou.
●Laminaci provádějte jen při rozsvícené zelené LED kontrolce připravenosti „READY“.
●Zkontrolujte, že je za přístrojem k dispozici dostatek místa (min. 500 mm).
NL
●Volg de juiste invoerrichting.
●Voer alleen een lamineerlaag uit binnen het grensmerk.
●Voer een lamineeropdracht alleen dan uit, als de LED stand-byweergave „READY“ groen brandt.
●Zorg ervoor, dat voldoende vrije ruimte (min. 500 mm) achter de machine aanwezig is.
RUS
●Соблюдайте правильное направление подачи материала.
●Выполняйте ламинирование только впределах ограничительной метки.
●Выполняйте ламинирование только втом случае, если светится светодиодный указатель
готовности «READY» («Готов»).
●Убедитесь вналичии достаточного пространства (не менее 500 мм) позади машины.
IT
●Rispettare la giusta direzione di inserimento.
●Eseguire un‘operazione di plastificazione solo all‘interno del segno limite.
●Eseguire un‘operazione di plastificazione solo se il LED di macchina pronta «READY» verde è acceso.
●Assicurarsi che vi sia spazio libero sufficiente (min. 500 mm) dietro la macchina.

6WARTUNG ●MAINTENANCE ●MANTENIMIENTO ●MAINTENANCE ●ÚDRŽBA ●
ONDERHOUD ●УХОД ●MANUTENZIONE
D
Walzen-Reinigung:
Nach der Nutzung bitte einen
glatten starken Graukarton ohne
Folientasche durch den noch warmen
Laminierschacht laufen lassen.
Dadurch werden mögliche
Klebereste von den Walzen
entfernt!.
Reinigung:
Bei ausgestecktem Netzschalter
mit trockenem oder leicht feuchtem
Tuch abwischen.
Keine Lösungsmittel verwenden.
Gerät nicht öffnen.
Gerät darf nur von Fachpersonal
geöffnet werden.
Wird das Gerät geöffnet -
erlischt die Garantie!
Entsorgung:
Dieses Symbol (durchgestrichenes
Abfalleimer) zeigt an, dass das nicht
mehr funktionsfähige Produkt an ein
zugelassenes Recycling-Zent
rum
oder Sammelstelle
abgegeben werden
sollte. Dieses Symbol gilt nur in
Mitgliedsstaaten des EWR1.
E
Cleaning of the rolls:
After use, run a smooth and strong
cardboard through the warm
laminating rollers.
This will remove residual glue
from the rollers.
Cleaning:
Power must be disconnected !
Wipe with a dry or slighty moist cloth.
Do not use solvents.
Do not open the machine.
The machine should only to be
opened and serviced by an
authorized service center.
Every guarantee expires if the
device is opened.
Disposal:
This symbol (crossed out waste bin)
indicates that the product must be
returned to an authorised recycling
centre or collection point when it has
reached the end of its service life.
This symbol only applies in
member states of the EEA1.
ESP
Limpieza de rodillos:
Tras el uso del aparato,
introduzca un cartón duro y liso de
color gris sin funda para plastificar
por la bandeja de plastificado que
aún se encuentra caliente.
Con ello se eliminan posibles restos
de pegamento de los rodillos.
Limpieza:
Limpiar el aparato mediante un
paño seco o ligeramente
humedecido con el interruptor
de alimentación desconectado.
No utilizar disolventes.
No abrir el aparato.
El aparato sólo debe abrirse por
personal especializado.
¡Si el aparato se abre,
se extingue la garantía!
Eliminación:
Este símbolo (cubo de basura tachado)
indica que, como el producto ha dejado
de ser funcional, el mismo debe
entregarse a un centro de reciclaje
o un punto de recogida autorizado.
Este símbolo sólo es válido en los
países miembros de la EEA1
(Espacio Económico Europeo).
F
Nettoyage des rouleaux :
Après l‘utilisation passer une feuille
sans pochette de plastification dans
l’appareil encore en marche.
Ainsi les résidus de colle se trouvant
sur les rouleaux se fixeront sur le
papier.
Nettoyage:
Essuyer avec un chiffon sec
ou peu humide.
Ne pas utiliser de solvant.
Ne pas ouvrir l‘apparail.
Seul un technicien peut ouvrir
l‘appareil.
A ouvert le dispositif -
annuler la garantie!
Mise au rebut:
Ce symbole (poubelle avec une croix)
indique que cette appareil doit être
envoyé dans un centre de traitement
ou de collecte agréé.Ce symbole n’est
valable que dans les pays membre de
la EWR1.
CZ
Čištění válců:
Po použití prosím nechte probhnout
hladkou silnou šedou lepenku
(karton) skrz ještteplou laminovací
šachtu bez fóliových kapes (obal).
Tímto se odstraní možné pilepené
zbytky z válc!“
Čištění :
Otírejte suchou nebo mírn
navlhenou utrkou.
Nepoužívejte rozpouštdla.
Pístroj neotvírejte. Laminátor smí
otevít jen odbornkvalifikovaný
personál.
Otevření stroje způsobí
ztrátu záruky!
Likvidace:
Tento symbol (peškrtnutá popelnice)
vyjaduje, že je vysloužilý výrobek
nutné odevzdat na schváleném
recyklaním nebo sbrném míst.
Tento symbol platí jen v lenských
státech EHP1.
NL
Reiniging:
Na het gebruik een glad stuk
grijsbord karton, zonder folie hoesje
door de nog warme lamineerschacht
laten lopen.
Hiermee worden mogelijke lijmresten
van de walsen verwijdert.
Reiniging :
Met droge of meen vochtige doek
afwissen.
Geen oplosmiddel gebruiken,
opdruk kan hierdoor vervagen.
Het apparaat niet openen.
Dit mag slechts door een vakman
gedaan worden.
Als het apparaat wordt geopend -
vervalt de garantie!
Verwijdering:
Dit symbool (doorgestreepte
afvalbak) geeft aan dat het product
niet langer functioneel is en moet
worden ingeleverd bij een erkend
recyclingcentrum of inzamelpunt.
Dit symbool is alleen geldig in de
lidstaten van de EER1.
RUS
Очистка роликов:
.
!
Очистка:
.
.
.
.
После вскрытия устройства
происходит потеря права на
гарантийное обслуживание!
Утилизация:
(
)
,
.
-
1.
IT
Pulizia dei rulli:
Dopo l‘uso far passare un foglio di
cartone grigio robusto e liscio,
senza busta di pellicola, attraverso
il vano di plastificazione ancora caldo.
In questo modo gli eventuali residui
di colla vengono rimossi dai rulli.
Pulizia:
Dopo aver scollegato l’interruttore
di alimentazione, pulire con
un panno asciutto o leggermente
umido.
Non utilizzare solventi.
Non aprire l‘apparecchio.
L‘apparecchio deve essere aperto
solo da personale specializzato.
La garanzia viene annullata in caso
di apertura dell‘apparecchio.
Smaltimento:
Questo simbolo (bidone dei rifiuti
sbarrato) indica che il prodotto,
se non più funzionante,
deve essere conferito a un centro
autorizzato per il riciclaggio o per la
raccolta. Questo simbolo è valido
solo nei Paesi membri dello SEE1.

7FEHLERLISTE ●TROUBLE SHOOTING ●LISTA DE ERRORES ●LISTE DE RECHERCHE
DES PANNES
D
Gerät läuft nicht.
Gerät am Stromnetz angeschlossen?
Strom vorhanden?
Folientasche ist nicht vollständig transparent und /
oder der Rand ist nicht gut versiegelt.
Die Laminierung kann nur bei der richtigen Temperatur erfolgen,
nachdem die grüne LED Bereitschaftsanzeige „READY“ leuchtet.
Prüfen Sie, ob der Schalter entsprechend der Foliendicke gewählt wurde.
Laminieren Sie die gleiche Folientasche wieder,
um die Laminierungsqualität zu verbessern.
Vergewissern Sie sich,
dass die Folientasche für das Dokument nicht zu klein ist.
E
The laminator does not run.
Is the laminator plugged in correctly?
Is power available ?
Laminated foil is not completely transparent and /
or the edge is not well sealed.
The lamination can only be done at the correct temperature,
which is after the green LED READY light indicator is on.
Check if the button is correctly chosen according
to the pouch thickness.
Laminate the same foil again to improve the lamination quality.
Ensure there is sufficient border around the item in the pouch.
ESP
El aparato no funciona.
¿Está conectado el aparato en la red eléctrica?
¿Hay tensión eléctrica?
A funda para plastificar no es totalmente transparente
y / o el borde no está bien sellado.
El plastificado sólo puede realizarse a la temperatura correcta después
de que el indicador LED de disponibilidad “READY“ verde luzca.
Compruebe si el interruptor se ha seleccionado
de acuerdo con el grosor de la lámina.
Plastifique de nuevo la misma funda para plastificar para mejorar
la calidad del plastificado.
Asegúrese de que la funda para plastificar no sea demasiado
pequeña para el documento.
F
La machine ne fonctionne pas.
La machine est-elle branchée sur le secteur ?
Y a-t-il du courant disponible ?
Le fusible est-il défectueux ?
La pochette de plastification n’est pas complètement
transparente / ou le bord n’est pas bien fermé.
La plastification ne peut fonctionner qu’à partir du moment
où l’appareil est à température souhaitée et la LED
verte “machine prête” allumée.
Vérifiez que la température en fonction de l’épaisseur de
plastification a bien été sélectionnée.
Repassez la pochette de plastification une deuxième fois pour
améliorer le résultat.
Assurez vous que la pochette de plastification n’est pas trop
petite par rapport à votre document.

7PŘEHLED CHYB ●BIJ PROBLEMEN ●СПИСОК НЕИСПРАВНОСТЕЙ ●ELENCO DEGLI ERRORI
CZ
Přístroj nefunguje.
Je zapojen do zásuvky?
Je zásuvka v provozu?
Laminovací kapsa není zcela průhledná a / nebo okraj není
dobře uzavřený.
Laminace mže probíhat jen pi správné teplota až po rozsvícení
zelené LED kontrolky pipravenosti „READY“.
Zkontrolujte, zda jste stiskli správné tlaítko s ohledem na tloušku fólie.
Pro zlepšení výsledné kvality zalaminujte danou laminovací kapsu
ještjednou.
Ujistte se, že laminovací kapsa není pro dokument píliš malá.
NL
Apparaat werkt niet
Apparaat op het stroomnet aangesloten?
Stroom beschikbaar?
Lamineerfolie is niet geheel doorzichtig en / of de rand is
niet goed verzegeld.
Het lamineren kan uitsluitend bij de juiste temperatuur plaatsvinden,
nadat de groene LED stand-byweergave „READY“ brandt.
Controleer, of de schakelaar volgens de foliedikte gekozen is.
Lamineer dezelfde lamineerfolie opnieuw, om de lamineerkwaliteit
te verbeteren.
Zorg ervoor, dat de lamineerfolie niet te klein is voor het document.
RUS
Устройство не работает.
?
?
Конверт для ламинирования не полностью
прозрачен и/ или край некачественно заварен.
, ,
«READY» («»).
,
.
.
,
.
IT
L’apparecchio non funziona.
L’apparecchio è collegato alla rete elettrica?
La corrente elettrica è presente?
La busta di pellicola non è completamente trasparente
e / o il bordo non è ben sigillato.
La plastificazione può aver luogo solo alla temperatura corretta dopo
l‘accensione dell‘indicatore LED verde «READY» di macchina pronta.
Controllare che sia stato scelto l‘interruttore corretto
per lo spessore della pellicola.
Plastificare nuovamente la stessa busta di pellicola per migliorare
la qualità della plastifi
cazione.
Assicurarsi che la busta di pellicola non sia troppo piccola
per il documento.

8TECHNISCHE DATEN ●TECHNICAL DATA ●DATOS TÉCNICOS ●DONNÉES TECHNIQUES ●
TECHNICKÁ DATA ●TECHNISCHE GEGEVENS ●ТЕХНИЧЕСКИЕ ХАРАКТЕРИСТИКИ●DATI TECNICI
LAMIGO A3 PRO EU LAMIGO A3 PRO US
Arbeitsbreite
Working width
Anchura de trabajo
Largeur de travail
Pracovní šíka
Werkbreedte
Formato max.
330 mm (up to A3) 12.5“
Folienstärke
Film thickness
Grosor de lámina
Epaisseur de pochettes
Tlouška fólie
Foliedikte
Spessore pellicola
von 80 Mikrometer bis zu 125 Mikron
min. 80 micron - max. 125 micron
mín. 80 micras - máx. 125 micras
de 80 microns - à 125 microns
od 80 mikrondo 125 mikron
van 80 micron tot 125 micron
80 - 125
fino a max. 125 mic.
von 80 Mikrometer bis zu 125 Mikron
from 80 microns - 125 microns
mín. 80 micras - máx. 125 micras
de 80 microns - à 125 microns
od 80 mikrondo 125 mikron
van 80 micron tot 125 micron
80 - 125
fino a max. 125 mic.
Max Laminierstärke
Max. laminating thickness
Máx. grosor de plastificado
Epaisseur de plastification
Max. tlouška laminovaného materiálu
Max. lamineerdikte
.
Spessore max. di plastificazione
0.5 mm 0.5 mm
Laminiergeschwindigkeit
Laminating speed
Velocidad de plastificado
Vitesse de plastification
Rychlost laminace
Lamineersnelheid
Velocità di plastificazione
0.48m / min 0.48m / min
Laminiertemperatur einstellbar vor:
Adjustable laminating temperature for:
Temperatura de plastificado ajustable para:
Température de plastification réglable
Nastavitelná laminovací teplota
Lamineertemperatuur instelbaar
, :
Temperatura di plastificazione regolabile prima
kalt / 80 / 100 / 125
cold / 80 / 100 / 125
frío / 80 / 100 / 125
froid / 80/100/125
studená / 80/100/125
koud / 80/100/125
/ 80/100/125
freddo / 80 / 100 / 125
kalt / 80 / 100 / 125
cold / 80 / 100 / 125
frío / 80 / 100 / 125
froid / 80/100/125
studená / 80/100/125
koud / 80/100/125
/ 80/100/125
freddo / 80 / 100 / 125
Temperaturkontrolle automatisch
Automatic temperature control
Control de temperatura automático
Contrôle automatique de la température
Automatická kontrola teploty
Temperatuurcontrole automatisch
Controllo di temperatura automatico

8TECHNISCHE DATEN ●TECHNICAL DATA ●DATOS TÉCNICOS ●DONNÉES TECHNIQUES ●
TECHNICKÁ DATA ●TECHNISCHE GEGEVENS ●ТЕХНИЧЕСКИЕ ХАРАКТЕРИСТИКИ ●DATI TECNICI
LAMIGO A3 PRO EU LAMIGO A3 PRO US
Rücklauffunktion
Reverse - Function
Función de retroceso
Fonction fetour
Funkce zptného chodu
Terugloopfunctie
Funzione di ritorno
Vorheizzeit / Sek.
Preheating Time / seconds
Tiempo de precalentamiento / seg.
Temps de préchauffe/sec.
Zahívací doba / sek.
Voorverwarmtijd/sec.
/.
Tempo di preriscaldamento/sec.
ca.45 s mit 80 m / ca. 60 mit 125 Mikron
approx. 45 s with 80 micras/approx. 60 s with125 micras
aprox. 45 s con 80 micras / aprox. 60 s con 125 micras
env. 45 s avec 80 micras / env. 60 s avec 125 micras
cca. 45 s s80 micrami /cca. 60 s 125 micrami
ong. 45 s met 80 microns / ca. 60 s met 125 microns
. 45 80 / . 60 125
circa 45 s per 80 m / circa 60 per 125 micron
ca.45 s mit 80 m / ca. 60 mit 125 Mikron
approx. 45 s with 80 micras/approx. 60 s with 125micras
aprox. 45 s con 80 micras / aprox. 60 s con 125 micras
env. 45 s avec 80 micras / env. 60 s avec 125 micras
cca. 45 s s80 micrami /cca. 60 s 125 micrami
ong. 45 s met 80 microns / ca. 60 s met 125 microns
. 45 80 / . 60 125
circa 45 s per 80 m / circa 60 per 125 micron
Standby Funktion
Stand by mode
Función de espera
Fonction Stand-by
Funkce pohotovostního režimu
Standby-functie
Funzione di stand-by
Heizung
Heating system
Calefacción
Chauffages
Ohev
Verwarming
Riscaldamento
2 heiße Walzen + 2 kalte Walzen
2 rolls hot (hot shoe) + 2 rolls cold
2 rodillos calientes + 2 rodillos fríos
2 rouleaux chauds + 2 rouleaux froids
2 horké válce + 2 studené válce
2 rollen warm + 2 rollen koud
2 e + 2 e
2 rulli caldi + 2 rulli freddi
2 heiße Walzen + 2 kalte Walzen
2 rolls hot (hot shoe) + 2 rolls cold
2 rodillos calientes + 2 rodillos fríos
2 rouleaux chauds + 2 rouleaux froids
2 horké válce + 2 studené válce
2 rollen warm + 2 rollen koud
2 e + 2 e
2 rulli caldi + 2 rulli freddi
Stromverbrauch + Spannung
Power requirement + Tension
Consumo de corriente + tensión
Consommation + Alimentation
Spoteba energie + naptí
Stroomverbruik + spanning
. +
Consumo di corrente + tensione
230V - 250V / 50 Hz
1200W (Ø 650W) 6,0 A / Ø 2.8 A
110V / 60Hz
1200W (Ø 650W) 6,0 A / 2.8 A
Gewicht:
Weight:.
Peso:
Poids:
Hmotnost:
Gewicht:
:
Peso:
2.8 kg 2,8 kg
Länge x Breite x Höhe
Length x Width x Height
Longitud x anchura x altura
Longueur, largeur, hauteur
Délka x šíka x výška
Lengte x breedte x hoogte
Lunghezza x Larghezza x Altezza
470 mm x 146 mm x 123 mm 18,5“ x 5,75“ x 4,875“

9EG-KONFORMITÄTS-ERKLÄRUNG IM SINNE DER EG-RICHTLINIEN ●EC CONFORMITY DECLARATION
ACCORDING TO THE EC GUIDELINES ●DECLARACIÓN DE CONFORMIDAD DE ACUERDO CON LAS
DIRECTIVAS CE ●DÉCLARATION DE CONFORMITÉ CE SELON LES DIRECTIVES CE ●PROHLÁŠENÍ
O SHODĚS PŘEDPISY ES V DUCHU SMĚRNIC ES ●EG-CONFORMITEITSVERKLARING VOLGENS
EG-RICHTLIJNEN ●ДЕКЛАРАЦИЯ СООТВЕТСТВИЯ СОГЛАСНО ТРЕБОВАНИЯМ EC ●
DICHIARAZIONE DI CONFORMITA’ SECONDO LE LINEE GUIDE UE
für Maschinen 2006/42/EG, Anhang II
for machines 2006/42/EC, appendix II
para directiva de máquinas 2006/42/CE, anexo II
pour machines 2006/42/CE, appendice II
pro Strojní zaízení 2006/42/ES, Píloha II
voor Apparaten 2006/42/EG Bijlage II
2006/42/EC, II
per macchine 2006/42/CE, appendice II
Die Anlage bzw. Maschine The construction of the machine La instalación o la máquina
La construction de la machine Strojní zaízení resp. stroj De constructie van de machine
La costruzione della macchina
Fabrikat: ●Model: ●Modelo: ●Modèle: ●
Modelu: ●Model: ●Наименование: ●Modello: LAMIGO A3 Pro
Elektrischer Laminator Electric laminator Plastificadora eléctrica Laminateur electric Elektrický laminátor
Elektrisch lamineerapparaat
Plastificatrice elettrica
wurde entwickelt, konstruiert und gefertigt in Übereinstimmung mit den o.g. EG-Richtlinien, in alleiniger Verantwortung von:
was developed, constructed and produced in accordance with the EG guidelines and with the sole responsibility of:
se ha desarrollado, diseñado y fabricado de acuerdo con las directivas CE mencionadas arriba, bajo la responsabilidad exclusiva de:
a été développé, construit et fabriqué en conformité des directives Européennes susnommés, sous la seule responsabilité de:
byl vyvinut, zkonstruován a vyroben v souladu se shora uvedenými smrnicemi ES jediným odpovdným subjektem:
is ontwikkeld, gebouwd en geproduceerd in overeenstemming met de EG-richtlijnen en op enige verantwoordelijkheid van:
EC :
è stata progettata e costruita in conformità alle direttive comunitarie precedentemente citate sotto la responsabilità esclusiva della:
Firma: ●Company: ●Empresa: ●Société: ●Firmou: ●Firma: ●Фирма: Società:
Chr. Renz GmbH, 73540 Heubach / Germany

9EG-KONFORMITÄTS-ERKLÄRUNG IM SINNE DER EG-RICHTLINIEN ●EC CONFORMITY DECLARATION
ACCORDING TO THE EC GUIDELINES ●DECLARACIÓN DE CONFORMIDAD DE ACUERDO CON LAS
DIRECTIVAS CE ●DÉCLARATION DE CONFORMITÉ CE SELON LES DIRECTIVES CE ●PROHLÁŠENÍ
O SHODĚS PŘEDPISY ES V DUCHU SMĚRNIC ES ●EG-CONFORMITEITSVERKLARING VOLGENS
EG-RICHTLIJNEN ●ДЕКЛАРАЦИЯ СООТВЕТСТВИЯ СОГЛАСНО ТРЕБОВАНИЯМ EC ●
DICHIARAZIONE DI CONFORMITA’ SECONDO LE LINEE GUIDE UE
Folgende harmonisierte Normen wurden angewandt:
The following harmonized specifications were applied:
Les normes harmonisées suivantes ont été appliquées:
Se han aplicado las siguientes normas armonizadas:
Uplatnné harmonizovane normy:
De volgende harmoniserende specificaties zijn toegepast:
:
Sono state applicate le seguenti normative:
EN ISO 12100: 2010
Sicherheit von Maschinen, Geräten und Anlagen
Security of machines, units and systems
Sécurité des machines, unités et système
Seguridad de máquinas, instalaciones y equipos
Bezpenost strojních zaízení, vybavení a zaízení
Veiligheid van machines, apparaten en toestellen
,
Sicurezza del macchinario
DIN EN 60204-1
Elektrische Ausrüstung von Maschinen
Electrical equipment for industrial machines
Equipamiento eléctrico de maquinas
Equipement électrique pour des machines industrielles
Elektrické zaízení stroj
Elektrische uitrusting van machines
Equipaggiamenti elettrici
Eine Technische Dokumentation ist vollständig vorhanden. Die entsprechende Betriebsanleitung liegt in folgenden europäischen Sprachen vor:
Deutsch, Englisch, Französisch, Spanisch, Tschechisch, Holländisch, Russisch, Italienisch.
A complete technical documentation as well as the relevant manual are available in the European languages:
German, English, French, Spanish, Czech, Dutch, Russian, Italian.
Se dispone de una documentación técnica completa y de las instrucciones de servicio pertenecientes a la máquina en los siguientes idiomas europeos:
Alemán, inglés, frances, español, checo, holandés, ruso, italiano.
Une documentation complète technique ainsi que la notice d‘utilisation sont disponibles dans les langages européens:
Allemand, anglais, français, espagnol, tchèque, néerlandais, russe, italien.
Existuje píslušná kompletní technická dokumentace. Návod k obsluze existuje v tchto evropských jazycích:
Nmina, anglitina, francouzština, španlština, eština, holandština, ruština, italština.
Een technische documentatie is volledig aanwezig. De gebruiksaanwijzing is in de volgende Europese talen aanwezig:
Duits, Engels, Frans, Spaans, Tsjechisch, Nederlands, Russisch, Italiaans.
:
, , , , , , P, .
C‘è una documentazione tecnica completa e le istruzioni di servizio che appartengono alla macchina in le seguenti lingue europee:
Tedesco, inglese, francese, spagnolo, ceco, olandese, russo, italiano.
Heubach, 01. 04. 2012
General Manager
Director
Gerente
Gérant
Generální editel
Algemeen Directeur
Michael Schubert Direttore
Other manuals for LAMIGO A3 PRO
2
Table of contents
Other Renz Laminator manuals

Renz
Renz HT 330 L User manual

Renz
Renz HT 330 Dual User manual

Renz
Renz LAMIGO A3 PRO User manual

Renz
Renz LAMIGO A3 PRO User manual

Renz
Renz Renz ERW User manual

Renz
Renz LAMIGO A4 User manual

Renz
Renz HT330Dual User manual

Renz
Renz HT 330 L User manual

Renz
Renz LAMIGATOR IQ User manual

Renz
Renz LAMIGATOR IQ User manual