Renz LAMIGO A4 User manual

www.renz.com
LAMIGO A4 / LAMIGO A3
TASCHENLAMINATOR / POUCH LAMINATOR / PLASTIFICADORA UTILITARIA
D BEDIENUNGSANLEITUNG
E OPERATION MANUAL
ESP MANUAL DE INSTRUCCIONES
Danke, dass Sie sich für ein hochwertiges RENZ - Produkt entschieden haben.
Die Systeme Lamigo A4 / Lamigo A3 verfügen über die RENZ 4RSH - Technologie.
4-Roll-Short-Heat sorgt für eine äußerst komfortable, einfache Bedienung.
Thank you for purchasing a RENZ product.
Protect and finish your important documents in perfect quality.
The RENZ 4RSH-technology guarantees an extremely short heating-up time
of just 40-60 seconds and a perfect transport with four rolls which ensures
an excellent laminating result.
Gracias por haber elegido un producto RENZ de alta calidad.
Los sistemas Lamigo A4 / A3 llevan incorporada la tecnología RENZ 4RSH.
4-Roll-Short-Heat permite un manejo extremadamente cómodo y sencillo.

Hebel zur Staubeseitigung
Jam Release Lever
Palanca para eliminación de atasco
Auslaufschacht
Outlet
Bandeja de salida
Einlaufschacht
Feed - in slot
Bandeja de entrada
LED Bereischaftsanzeige „Ready“ grün
LED indicator for „Ready“ green
Indicador LED de disponibilidad “Ready“ verde
LED Bereitschaftsanzeige „POWER“ rot
LED Indicator for „Power“ red
Indicador LED de disponibilidad “POWER“ (alimentación) rojo
Hauptschalter
Power Switch
Interruptor principal
Auslaufhalterung
Outlet Bracket
Soporte de salida
Netzkabel
Power cable
Cable de alimentación
LAMIGO A4 / LAMIGO A3
TASCHENLAMINATOR / POUCH LAMINATOR / PLASTIFICADORA UTILITARIA
1
ALLGEMEINE SICHERHEITSHINWEISE ●GENERAL SAFEGUARDS ●INDICACIONES DE SEGURIDAD GENERALES
D
●Lesen Sie vor Gebrauch die Bedienungsanleitung!
●Stellen Sie das Gerät auf eine stabile Unterlage.
●Verwenden Sie das Laminiergerät NICHT, wenn das Netzkabel beschädigt ist.
●Stellen Sie sicher, dass das Laminiergut frei ist von Metallgegenständen wie Heft-oder Büroklammern.
●Versuchen Sie nicht das Gerät zu öffnen oder anderweitig zu reparieren.
●Schützen Sie das Gerät vor Wärme und Feuchtigkeit.
●Achten Sie darauf, dass Kinder dieses Gerät nicht benutzen.
●Schalten Sie das Gerät nach jedem Gebrauch aus.
●Ziehen Sie den Netzstecker, wenn Sie das Gerät längere Zeit nicht benutzen.
●Keine leeren Folientaschen laminieren.
●Verwenden Sie immer die entsprechenden RENZ Folientaschen.
●Beachten Sie die Anweisungen auf dem Gerät.
●Halten Sie das Ausgabefach frei.
E
●Read the manual before use.
●
Plac
e your machine on a stable surface.
●DO NOT use the laminator if its power cord is damaged.
●Ensure no lamination runs with metal objects like staples, paper clips.
●DO NOT attempt to open or otherwise repair the machine.
●Keep the machine including its power cord away from heat and water sources.
●DO NOT allow children to use this machine.
●Turn off the machine after each use.
●Unplug the machine when not in use for an extended period.
●DO NOT laminate an empty pouch.
●Use RENZ pouches required for the appropriate pouch setting.
●Follow the instructions and specifications shown on the machine as well.
●Leave the Pouch exit tray clear of any objects.
ESP
●Antes de utilizar el aparato, lea el manual de instrucciones.
●Coloque el aparato sobre una base estable.
●NO utilice la plastificadora si el cable de red está dañado.
●Asegúrese de que la lámina esté exenta de objetos metálicos como grapas o clips.
●No intente abrir o reparar el aparato.
●Proteja el aparato contra calor y humedad.
●Evite que los niños usen este aparato.
●Desconecte el aparato después de cada uso.
●Si no utiliza el aparato durante un periodo de tiempo prolongado, extraiga el enchufe de red.
●No plastifique fundas para plastificar vacías.
●Utilice siempre las fundas para plastificar RENZ adecuadas.
●Respete las instrucciones reflejadas en el aparato.
●Mantenga libre la bandeja de salida.

2AUFSTELLEN UND ANSCHLIESSEN ●SETUP AND CONNECT ●COLOCACIÓN Y CONEXIÓN
D
Gerät aus der Verpackung nehmen.
Lieferumfang prüfen:
- Laminiergerät
- Bedienungsanleitung
- Auslauf-Halterung 2x
Richtigen Standort wählen.
Achten Sie auf ausreichend Platz
auf der Rückseite des Laminiergeräts.
A4 / min. 32cm
A3 / min. 45cm
Elektrokabel nur an Steckdosen
mit Schutzkontakt anschließen.
Achten Sie immer auf die richtige
Laminiertemperatur.
Die Foile kann sich wieder vom
Dokument lösen, wenn zu kalt
laminiert wurde.
Das Dokument kann wellig werden,
wenn zu heiß laminiert wurde.
E
Remove machine and check
contents of the box.
You should have:
- Laminating Machine
- Manual
- Outlet bracket 2x
Make sure you have enough
space at the back of the laminator.
A4 / min. 32cm
A3 / min. 45cm
Cable connect the machine only
to plugs which are grounded.
Make sure to always set the correct
laminating temperature as the film
may detach from the document
if the temperature was too low
or the document turns out wavy
if the temperature was set too high.
ESP
Sacar el aparato del embalaje.
Comprobar el volumen de suministro:
- Plastificadora
- Manual de instrucciones
- Soporte de salida 2x
Elegir el emplazamiento correcto.
Procure que exista espacio suficiente
en la parte posterior de la plastificadora.
A4 / mín. 32 cm
A3 / mín. 45 cm
El cable eléctrico sólo debe
conectarse en tomas de corriente con
contacto de protección.
Asegúrese de que la temperatura
de la plastificadora sea siempre
correcta.
La lámina puede desprenderse de
nuevo del documento si el
plastificado se ha realizado a una
temperatura demasiado fría.
El documento puede ondularse
si el plastificado se ha realizado
a una temperatura demasiado
caliente.

3
EINSTELLEN ●ADJUST ●AJUSTE
D
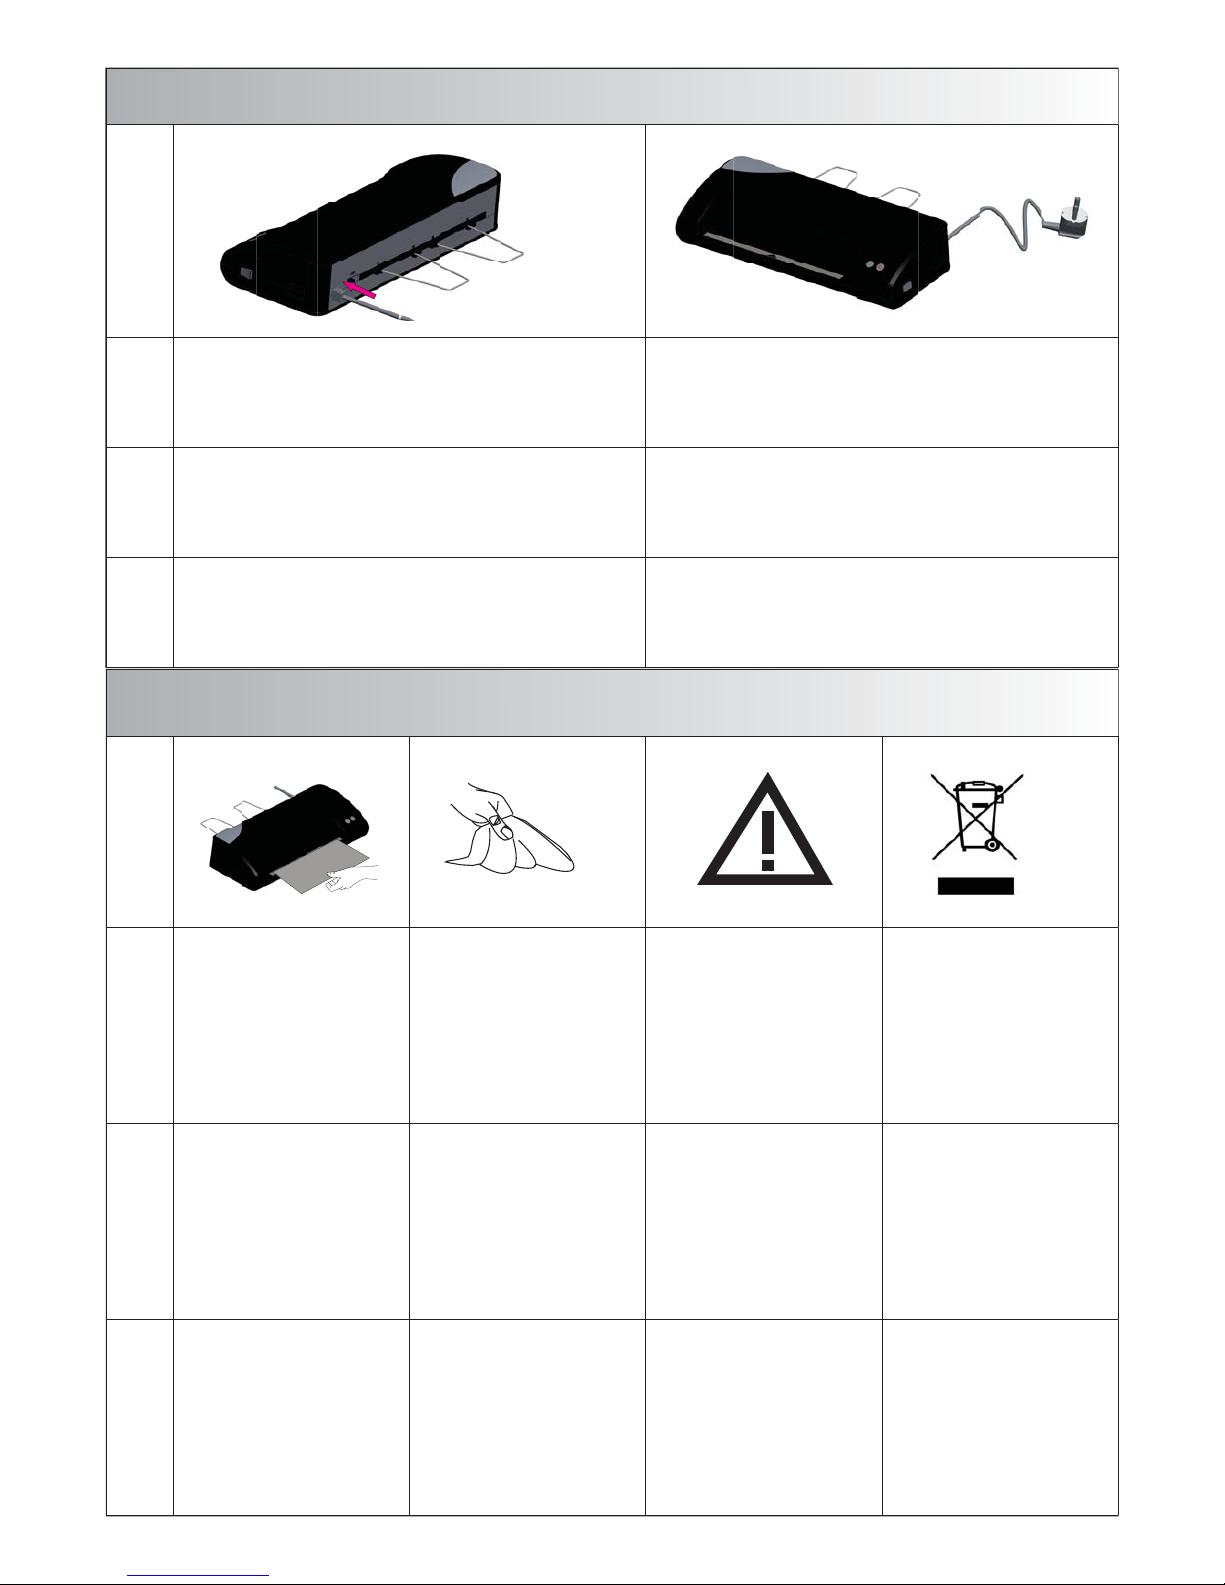
Bitte montieren Sie die zwei
mitgelieferten Auslauf-Halterungen,
die an der Rückseite des Laminators
befestigt werden.
Achten Sie darauf, daß die
Halterungen auf der gleichen
Höhe sind. Die Auslauf-Halterungen
sorgen für ein optimales
Laminierergebnis.
Schließen Sie das Netzkabel
an eine Steckdose an.
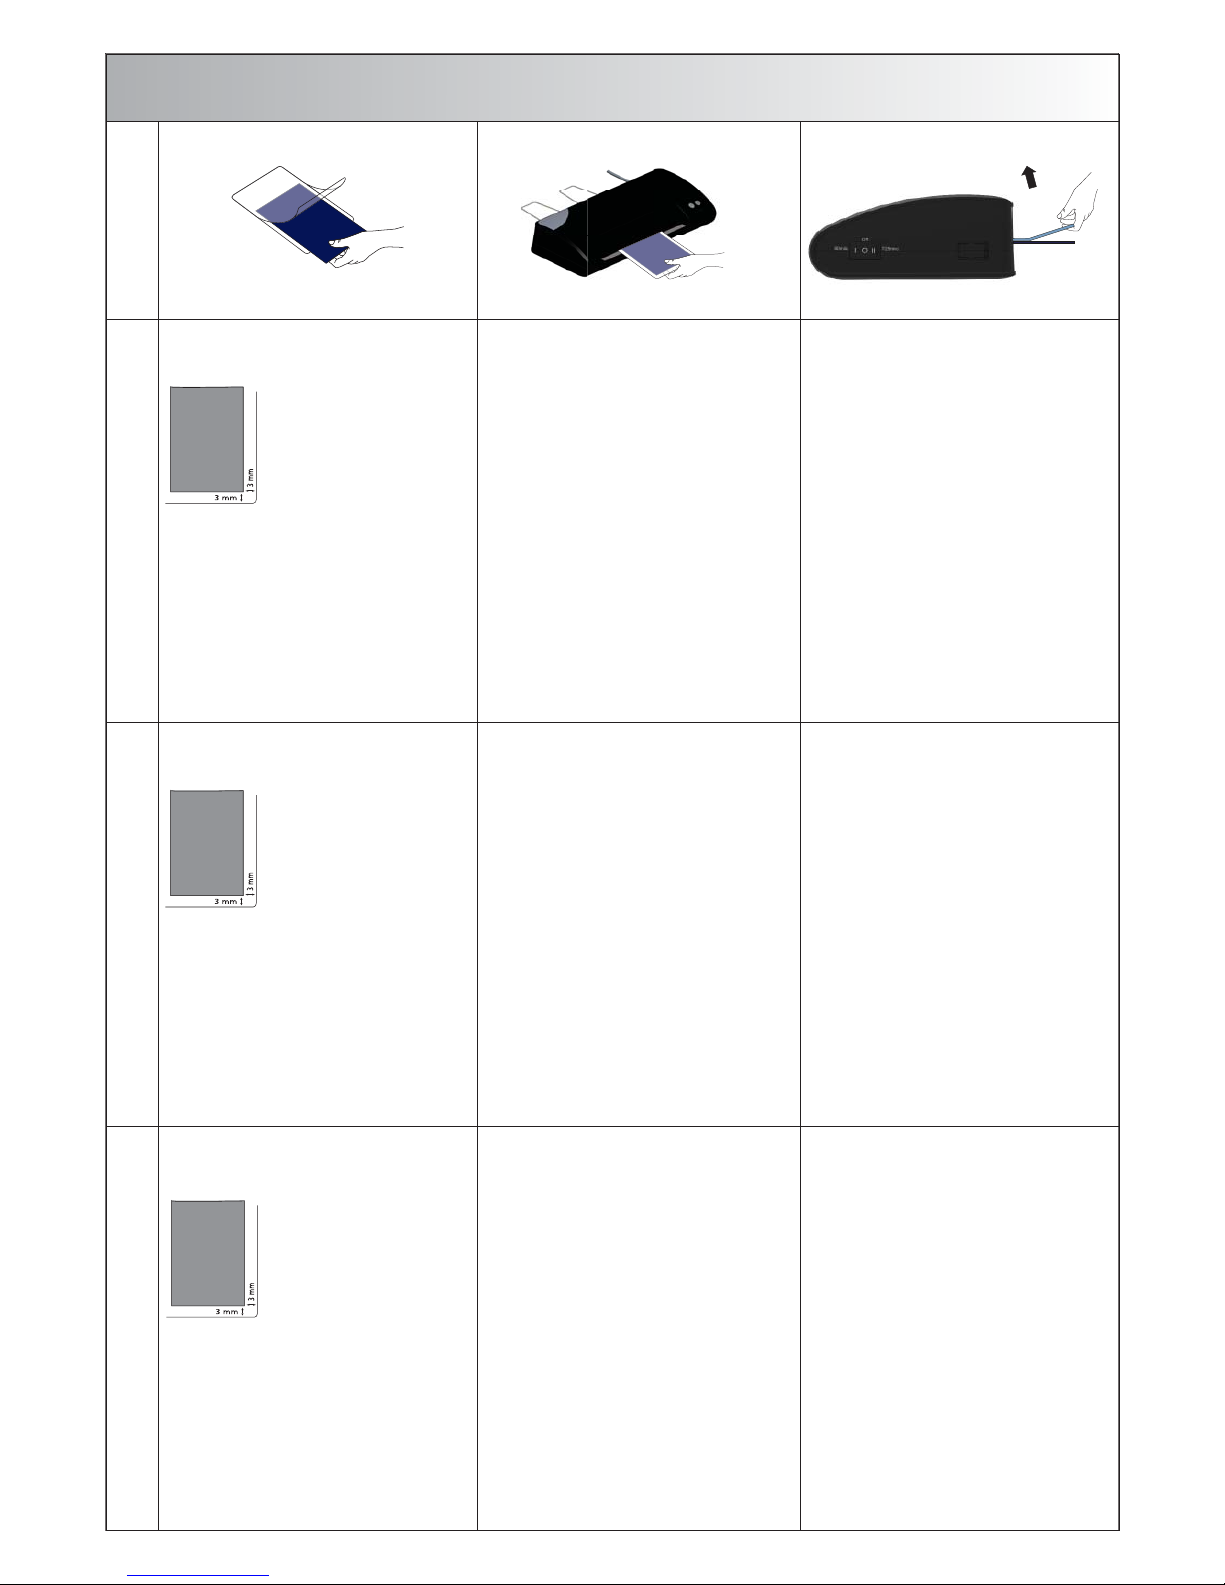
Überprüfen Sie die Foliendicke
und stellen Sie sicher, dass der
Hauptschalter richtig eingestellt ist.
Achtung:
Die Maschine ist für die Verwendung
von Foliendicken von 2x80 micron
und 2x125 micron ausgelegt. Sie
müssen mit dem Schalter die jeweils
richtige Temperatur für 80 micron
oder 125 micron auswählen.
Eine falsche Temperaturauswahl
kann zu einem schlechten
Laminier Ergebnis oder sogar zum
Verbrennen der Dokumente oder
Fotos führen.
Es ist sehr wichtig, den
Schalter entsprechend der
Foliendicke einzustellen.
Heißlaminieren:
Jetzt leuchtet die rote LED-Anzeige
für POWER und das Gerät befindet
sich in der Aufheizphase.
LAMIGO A4
ca. 30 Sekunden bei 80 micron
ca. 60 Sekunden bei 125 micron
LAMIGO A3
ca. 40 Sekunden bei 80 micron
ca. 60 Sekunden bei 125 micron
Die grüne LED-Anzeige für READY
leuchtet auf, sobald die korrekte
Betriebstemperatur erreicht ist.
Das Gerät ist nun zum Laminieren
bereit.
E
For better laminating results,
please mount the two extra supplied
metal shelves on the backside
of the machine.
Make sure they are fixed
at the same level.
Connect the power cable to an
electrical socket that has the required
voltage and power rating.
Check the thickness of the pouches
and make sure the power switch is
turned to the correct side according
to the pouch thickness.
Attention:
The machine is designed to use foil
pouch thickness of 2x80 micron and
2x125 micron. You must use the
switch to select the correct
temperature for 80 or 125 micron
pouches.
A wrong temperature selection may
result in bad lamination or even burn
the documents or photos.
It is very important to turn the
switch to set the correct
temperature according to
pouch thickness.
Hot laminating:
Then the red LED indicator for
POWER will be lit and the machine
will be in warm-up phase which takes
LAMIGO A4
ca. 30 seconds at 80 micron
ca. 60 seconds at125 micron
LAMIGO A3
ca. 40 secondsat 80 micron
ca. 60 seconds at 125 micron
The green LED indicator for READY
will turn on when the correct operating
temperature has been reached.
The laminator is ready for use when
the green LED is lit.
ESP
Monte los dos soportes de salida su-
ministrados, los cuales se sujetan en
la parte posterior de la plastificadora.
Asegúrese de que los soportes se
encuentren a la misma altura. Los
soportes de salida permiten un plasti-
ficado óptimo.
Conecte el cable de red en una toma
de corriente.
Verifique el grosor de la lámina y ase-
gúrese de que el interruptor principal
esté ajustado correctamente.
Atención:
La máquina se ha diseñado para la
utilización de grosores de láminas
de 2x80 y 2x125 micras. Con el
interruptor tiene que seleccionar la
temperatura correcta para 80 ó
125 micras.
Una selección de temperatura erró-
nea puede provocar un plastificado
deficiente o incluso quemar los
documentos o fotografías.
Es muy importante ajustar el
interruptor de acuerdo con el
grosor de la lámina.
Plastificar en caliente:
El indicador LED rojo de POWER
luce ahora, y el aparato se encuentra
en la fase de calentamiento.
LAMIGO A4
aprox. 30 segundos con 80 micras
aprox. 60 segundos con 125 micras
LAMIGO A3
aprox. 40 segundos con 80 micras
aprox. 60 segundos con 125 micras
El indicador LED verde de READY
luce tan pronto como la temperatura
de funcionamiento correcta se haya
alcanzado.
El aparato ya está listo para plastificar.

4LAMINIEREN ●LAMINATING ●PLASTIFICADO
D
Die Laminiervorlage in eine entsprechende
Folientasche stecken und auf gleichmäßigen
Folienrand achten. Optimal sind 3 mm Folienrand.
Überrüfen Sie, ob die gewünschte
Laminiertemperatur erreicht wurde:
Dies ist der Fall, wenn die
Temperaturanzeige „Ready“ grün leuchtet.
Schieben Sie die Folientasche mit der
geschlossenen Seite voran, gerade in den
Einlaufschacht, bis das Dokument von den
Laminierwalzen erfasst und eingezogen wird.
Das Dokument wird durch das Gerät gezogen
und auf der Rückseite hinaus transportiert.
Achtung:
Schieben Sie immer zuerst die bereits
geschlossene Seite der Folientasche ein.
A3 - kurze Seite
A4 Hochformat - kurze Seite
A4 Querformat (Express A4) - lange Seite
A5 - kurze Seite
Entnehmen Sie das fertig laminierte Dokument
von der Metallablage bevor Sie das nächste
Dokument laminieren, um Stau und evtl.
Verschmutzung zu vermeiden.
E
Put the original to be laminated into the correct
pouch and and make sure to have an equal edge
on all sides. Ideal would be 3 mm at each side.
Check if the desired laminating temperature
is reached. This is the case if the „Ready“
temperature light lights permanently green.
Insert the laminating pouch with the closed
side first into the entry slot until the document
is seized by the laminating rollers and is
transported into the laminator.
The document is transported through the laminator
and comes out at the back of the machine.
Attention:
Always insert the already closed side of
the foil pouch in first.
A3 - short side
A4 portrait - short side
A4 horizontal format (Express A4) - long side
A5 - short side
Pull out the laminated foil pouch immediately
and gently after it comes out of the outlet
and stops moving to avoid overheat
(smudging and blistering).
ESP
Insertar el modelo de plastificado en una funda
para plastificar adecuada y asegurarse de que
el borde de la lámina sea uniforme.
El borde de lámina óptimo asciende a 3 mm.
Verifique si se ha alcanzado la temperatura
de plastificado deseada:
éste es el caso si el indicador de temperatura
“Ready“ luce en verde.
Empuje la funda para plastificar hasta la bandeja
de entrada con el lado cerrado hacia adelante,
hasta que el documento sea agarrado por los
rodillos de plastificado e introducido.
El documento es extraído por el aparato y
transportado hacia fuera por la parte posterior.
Atención:
Empuje siempre primero el lado ya
cerrado de la funda para plastificar.
A3 - lado corto
A4 Formato alto - lado corto
A4 Formato transversal (Express A4) - lado largo
A5 - lado largo
Antes de plastificar el documento siguiente,
retire el documento plastificado
de la bandeja de metal, para evitar atascos
y eventual suciedad.

5RÜCKLAUFFUNKTION ●RETURN ●AUSSCHALTEN ●SWITCH OFF ●FUNCIÓN DE RETROCESO
●APAGAR
D
Wenn die Folientasche verklemmt, schalten Sie das Gerät aus
und schieben Sie den Hebel zur Staubeseitigung nach links.
Halten Sie ihn in dieser Position und entfernen Sie dabei
gleichzeitig das gestaute Laminiergut.
Nach Beendigung der Laminierarbeiten den Hauptschalter
ausschalten und den Netzstecker ziehen.
Automatische Abschaltung:
Wenn die Maschine 30 Minuten nicht gebraucht wird,
schaltet sie sich automatisch in den Standby Modus.
E
If the foil jams, turn the machine off, slide the Jam Release lever
to the left and hold it in this position while removing
the jammed laminating pouch.
When the laminating tasks had been finished,
switch off the power switch and disconnect from power.
Intelligent auto turn off:
If the machine is left for 30 minutes without use,
she automatically shuts to standby mode.
ESP
Si la funda para plastificar se atasca, desconecte el aparato y empuje la
palanca hacia la izquierda para eliminar el atasco.
Manténgala en esa posición y retire al mismo tiempo la lámina atascada.
Al finalizar los trabajos de plastificar, desconectar el interruptor
principal y extraer el enchufe de red.
Desconexión automática:
Si la máquina no se utiliza durante 30 minutos, la misma cambia
automáticamente al modo de espera.
6WARTUNG ●MAINTENANCE ●MANTENIMIENTO
D
Laminierrollen-Reinigung:
Nach der Nutzung bitte einen
glatten starken Graukarton ohne
Folientasche durch den noch
warmen Laminierschacht laufen
lassen.
Dadurch werden mögliche
Klebereste von den Walzen
entfernt!.
Reinigung:
Bei ausgestecktem Netzschalter
mit trockenem oder leicht feuchtem
Tuch abwischen.
Keine Lösungsmittel verwenden.
Gerät nicht öffnen.
Gerät darf nur von Fachpersonal
geöffnet werden.
Wird das Gerät geöffnet -
erlischt die Garantie!
Entsorgung:
Dieses Symbol (durchgestrichenes
Abfalleimer) zeigt an
dass das nicht mehr funktionsfähige
Produkt an ein zugelassenes
Recycling-Zentrum oder
Sammelstelle abgegeben werden
sollte.
Dieses Symbol gilt nur in
Mitgliedsstaaten des EWR1.
E
Cleaning of the rolls:
After use, run a smooth and strong
cardboard through the warm
laminating rollers.
This will remove residual glue from
the rollers.
Cleaning:
Power must be desconnected!
Wipe with a dry or slighty moist cloth.
Do not use solvents.
Do not open the machine.
The machine should only to be
opened and serviced by an
authorized service center.
Every guarantee expires if the
device is opened.
Disposal:
This symbol (crossed out waste bin)
indicates that the product must be
returned to an authorised recycling
centre or collection point when it
has reached the end of its
service life.
This symbol only applies in
member states of the EEA1.
ESP
Limpieza de rodillos de plastificado:
Tras el uso del aparato, introduzca
un cartón duro y liso de color gris sin
funda para plastificar por la bandeja
de plastificado que aún se encuentra
caliente.
Con ello se eliminan posibles restos
de pegamento de los rodillos.
Limpieza:
Limpiar el aparato mediante un paño
seco o ligeramente humedecido
con el interruptor de alimentación
desconectado.
No utilizar disolventes.
No abrir el aparato.
El aparato sólo debe abrirse por
personal especializado.
¡Si el aparato se abre, se extingue
la garantía!
Eliminación:
Este símbolo (cubo de basura
tachado) indica que, como el
producto ha dejado de ser funcio-
nal, el mismo debe entregarse a un
centro de reciclaje o un punto de
recogida autorizado.
Este símbolo sólo es válido en los
países miembros de la EEA1
(Europäische Wirtschaftsraum -
Espacio Económico Europeo).

7FEHLERLISTE ●TROUBLE SHOOTING ●LISTA DE ERRORES
D
Gerät läuft nicht.
Gerät am Stromnetz angeschlossen?
Strom vorhanden?
Folientasche ist nicht vollständig transparent und / oder
der Rand ist nicht gut versiegelt.
Die Laminierung kann nur bei der richtigen Temperatur erfolgen,
nachdem die grüne LED-Bereitschaftsanzeige READY leuchtet.
• Prüfen Sie, ob der Schalter entsprechend der Foliendicke
in die richtige Position gebracht wurde.
• Laminieren Sie die gleiche Folientasche wieder,
um die Laminierungsqualität zu verbessern.
• Vergewissern Sie sich, dass die Folientasche
für das Dokument nicht zu klein ist.
E
The laminator does not run.
Is the laminator plugged in correctly?
Is power available ?
Laminated foil is not completely transparent and / or
the edge is not well sealed.
The lamination can only be done at the correct temperature,
which is after the green LED ready indicator is on.
• Check if the switch has been turned to the correct position
according to the pouch thickness.
• Laminate the same foil again to improve the lamination quality.
• Ensure there is sufficient border around the item in the pouch.
ESP
El aparato no funciona.
¿Está conectado el aparato en la red eléctrica?
¿Hay tensión eléctrica?
La funda para plastificar no es totalmente transparente y / o
el borde no está bien sellado.
El plastificado sólo puede realizarse a la temperatura correcta
después de que el indicador LED de disponibilidad “Ready“ verde luzca.
• Compruebe si el interruptor se ha colocado en la posición correcta
de acuerdo con el grosor de la lámina.
• Plastifique de nuevo la misma funda para plastificar para mejorar
la calidad del plastificado.
• Asegúrese de que la funda para plastificar no sea demasiado
pequeña para el documento.

8TECHNISCHE DATEN ●TECHNICAL DATA ●DATOS TÉCNICOS
LAMIGO A4 LAMIGO A3
Arbeitsbreite
Working width
Anchura de trabajo
230 mm
230 mm / 9“
230 mm
330 mm
330 mm / 13“
330 mm
Folienstärke
Film thickness
Grosor de lámina
bis max. 125 mic.
from min. 80 micron - max. 125 micron
mín. 80 micr. hasta máx. 125 micr.
bis max. 125 mic
from min. 80 micron - max.125 micron
mín. 80 micr. hasta máx. 125 micr.
Max Laminierstärke
Max. laminating thickness
Máx. grosor de plastificado
0.5 mm 0.5 mm
Laminiergeschwindigkeit
Laminating speed
Velocidad de plastificado
0.45 m / min 0.45 m / min
Laminiertemperatur einstellbar
Adjustable laminating temperature
Temperatura de plastificado ajustable
Temperaturkontrolle automatisch
Automatic temperature control
Control de temperatura automático
Fotolaminierung
Photo lamination
Plastificado de fotografías
Anti - Stau - Freigabehebel
Anti Jam Release Lever
Palanca de habilitación antiatasco
Nennstrom
Corriente nominal
6,0 A / Ø 2.8 A 6,0 A / Ø 2.8 A
Spannung
Power suply
Tensión
220-240V/AC, 50-60Hz
AC220V-240V - 50-60Hz
220-240 V/AC, 50-60 Hz
220-240V/AC, 50-60Hz
AC220V-240V - 50-60Hz
220-240 V/AC, 50-60 Hz
Energieverbrauch
Power consumption
Consumo de potencia
1400W (Ø 650W) 1400W (Ø 650W)
Vorheizzeit / Sekunden
Preheating Time / seconds
Tiempo de precalentamiento / segundos
ca. 30 s at 80 microns
ca. 60 s at 125 microns
aprox. 30 s con 80 micras
aprox. 60 s con 125 micras
ca. 40 s at 80 microns
ca. 60 s at 125 microns
aprox. 40 s con 80 micras
aprox. 60 s con 125 micras
Automatische Abschaltung
Auto Turn-off
Desconexión automática
Automatische Abschaltung nach 30 Minuten
Intelligent auto turn off in 30 minutes
Desconexión automática al cabo de 30 minutos
Automatische Abschaltung nach 30 Minuten
Intelligent auto turn off in 30 minutes
Desconexión automática al cabo de 30 minutos
Heizung
Heating system
Calefacción
2 heiße Walzen + 2 kalte Walzen
2 hot rollers + 2 cold rollers
2 rodillos calientes + 2 rodillos fríos
2 heiße Walzen + 2 kalte Walzen
2 hot rollers + 2 cold rollers
2 rodillos calientes + 2 rodillos fríos
Gewicht:
Weight:.
Peso:
2 kg 2,8 kg
Länge x Breite x Höhe
Length x Width x Height
Longitud x anchura x altura
360 x 150 x 78 mm 454 x 150 x 78 mm

9EG-Konformitäts-Erklärung im Sinne der EG-Richtlinien
EC conformity declaration according to the EC guidelines
Declaración de conformidad de acuerdo con las directivas CE
für Maschinen 2006/42/EG, Anhang II
for machines 2006/42/EC, appendix II
para directiva de máquinas 2006/42/CE, anexo II
für Elektromagnetische Verträglichkeit 04/108/EG
for electromagnetic consistency 04/108/EC
para compatibilidad electromagnética 04/108/CE
Niederspannung 2006/95/EG
Low tension 2006/95/EC
Directiva de baja tensión 2006/95/CE
Die Anlage bzw. Maschine ●The construction of the machine ●La instalación o la máquina
Fabrikat: ●Model: ●Modelo: LAMIGO A4 / LAMIGO A3
Elektrischer Taschenlaminator ●Electric Pouch Laminator ●Plastificadora utilitaria eléctrica
wurde entwickelt, konstruiert und gefertigt in Übereinstimmung mit den o.g. EG-Richtlinien, in alleiniger Verantwortung von:
was developed, constructed and produced in accordance with the EG guidelines and with the sole responsibility of:
se ha desarrollado, diseñado y fabricado de acuerdo con las directivas CE mencionadas arriba, bajo la responsabilidad exclusiva de:
Firma: ●Company: ●Empresa: Chr. Renz GmbH, 73540 Heubach / Germany
Folgende harmonisierte Normen wurden angewandt:
The following harmonized specifications were applied:
Se han aplicado las normas armonizadas siguientes:
EN ISO 12100
Sicherheit von Maschinen, Geräten und Anlagen
Security of machines, units and systems
Seguridad de máquinas, aparatos e instalaciones
DIN EN 60204-1
elektrische Ausrüstung von Maschinen
electrical equipment for industrial machines
Equipamiento eléctrico de máquinas
Eine Technische Dokumentation ist vollständig vorhanden. Die entsprechende Betriebsanleitung liegt in folgenden
europäischen Sprachen vor:
Deutsch, Englisch, Spanisch.
A complete technical documentation as well as the relevant manual are available in the European languages:
German, English, Spanish.
Existe una documentación técnica completa. Las instrucciones de servicio correspondientes se hallan disponibles
en los idiomas europeos siguientes:
alemán, inglés, español.
Ort, Datum
Heubach,15.12.2016 General Manager / Director / Director general
Michael Schubert
This manual suits for next models
1
Other Renz Laminator manuals

Renz
Renz LAMIGO A3 PRO User manual

Renz
Renz Renz ERW User manual

Renz
Renz HT330Dual User manual

Renz
Renz LAMIGATOR IQ User manual

Renz
Renz HT 330 L User manual

Renz
Renz LAMIGATOR IQ User manual

Renz
Renz LAMIGO A3 PRO User manual

Renz
Renz HT 330 Dual User manual

Renz
Renz HT 330 L User manual

Renz
Renz LAMIGO A3 PRO User manual