manuals.online logo
Brands
  1. Home
  2. •
  3. Brands
  4. •
  5. REVELL
  6. •
  7. Motorized Toy Car
  8. •
  9. REVELL Control TWO SIDE User manual

REVELL Control TWO SIDE User manual

www.revell-control.de
© 2014 Revell GmbH,
Henschelstr. 20-30, D-32257
Bünde. A subsidiary of Hobbico,
Inc. REVELL IS THE REGISTERED
TRADEMARK OF REVELL GMBH,
GERMANY. Made in China.
Light
V 01.06
8+
Alter:
Age:
24608 - 24609
Das Fahrzeug stets im Auge behalten,
um die Kontrolle über das Fahrzeug
nicht zu verlieren. Ein unachtsamer und
sorgloser Einsatz kann erhebliche
Schäden verursachen. Das Fahrzeug
nicht in der Nähe von Personen, Tieren,
Gewässern und Stromleitungen fahren.
Always keep an eye on the vehicle to
ensure that you do not lose control.
Careless or irresponsible use may
cause serious damage. Do not operate
the vehicle near people, animals,
water or power cables.
Garder en permanence le contact
visuel avec le véhicule afin de ne
pas perdre le contrôle. Une utilisation
imprudente et sans précaution peut
provoquer des dommages considé-
rables.Ne pas faire circuler le véhicule
à proximité de personnes, d’animaux,
de cours d’eau ou de lignes électriques.
Hiermit erklärt die
Revell GmbH, dass
sich dieses Produkt in
Übereinstimmung mit
den grundlegenden
Anforderungen und den übrigen
einschlägigen Bestimmungen
der Richtlinie 1999/5/EC befindet.
Die Konformitätserklärung ist unter
www.revell-control.de zu finden.
Revell GmbH hereby declares that
this product conforms with the basic
requirements and the additional
applicable provisions of Directive
1999/5/EC. The Declaration
of Conformity can be found at
www.revell-control.de.
Revell GmbH déclare par la présente
que ce produit est conforme aux
exigences et autres dispositions de la
directive 1999/5/CE. La déclaration
de conformité est consultable sur le
site www.revell-control.de.
Réglementation sur les déchets d‘équipement
électrique et électronique : À la fin de leur
utilisation, retirer toutes les piles et les
éliminer séparément. Remettre les vieux
appareils électriques aux centres de collecte
des déchets d‘équipement électrique et
électronique de votre commune. Le reste
peut être jeté dans les ordures ménagères.
Merci pour votre collaboration !
Electrical and electronic waste ordinance:
After the end of use, remove all batteries
and separately dispose of all electrically
operated devices at the communal collection
centres for electrical and electronic waste.
Dispose of the remaining parts with house-
hold waste. Thank you for your cooperation!
Elektroschrott-
gesetz: Nach
Gebrauchsende
bitte alle Batte-
rien entnehmen
und separat
entsorgen Alte elektrisch betriebene Geräte bei
den Sammelstellen der Gemeinden für Elektro-
schrott abgeben. Die übrigen Teile gehören in
den Hausmüll. Danke für die Mithilfe!
24608 - 24609
Sicherheitshinweise / Safety guidelines / Consignes de sécurité
D
- Ungleiche Batterietypen oder neue und
gebrauchte Batterien dürfen nicht zusammen
verwendet werden.
- Es dürfen nur die empfohlenen Batterien oder
die eines gleichwertigen Typs verwendet
werden.
- Leere Batterien müssen aus der Fernsteuerung
herausgenommen werden.
- Die Batterien niemals anzünden oder einem
Feuer aussetzen, sie laufen aus. Es besteht
Explosionsgefahr!
- Die Anschlussklemmen dürfen nicht
kurzgeschlossen werden.
- Batterien müssen mit der richtigen Polarität
(+ und -) eingelegt werden.
- Nicht auadbare Batterien dürfen nicht geladen
werden.
- Auadbare Batterien dürfen nur unter Aufsicht
von Erwachsenen geladen werden.
- Auadbare Batterien müssen vor dem Auaden
aus der Fernsteuerung herausgenommen
werden.
- Batterien aus der Fernsteuerung nehmen,
wenn sie nicht im Einsatz ist.
- Diese Bedienungsanleitung bitte aufbewahren
GB
- Different types of battery or new and used
batteries must not be used together.
- You may only use recommended batteries or
those which are of a similar type.
- Empty batteries must be removed from
the remote control.
- Never light batteries or expose to re –
they leak. There is danger of explosion!
- Do not short-circuit the connectors.
- Batteries must be inserted in the correct
polarity (+ und -).
- Batteries which cannot be recharged must not
be charged.
- Chargeable batteries may only be charged
under adult supervision.
- Chargeable batteries must be taken out
of the remote control before recharging.
- Remove batteries from the remote control
when not in use.
- Please keep these operating instructions.
FR
- Des types de piles non similaires ou des piles
nouvelles ou usagées ne doivent pas être
utilisées ensembles.
- Uniquement les piles recommandées ou de
type similaire doivent être utilisées.
- Les piles vides doivent être retirées de la
télécommande.
- Ne jamais enammer des piles ou les mettre
au feu, elles coulent. Il y a risque d’explosion !
- Les bornes de raccordement ne doivent pas
être court-circuitées.
- Les piles doivent être insérées avec la bonne
polarité (+ et -).
- Les piles non rechargeables ne doivent pas être
chargées.
- Les piles rechargeables doivent être chargées
uniquement sous la surveillance des adultes.
- Les piles rechargeables doivent être retirées
avant le chargement de la télécommande.
- Les piles de la télécommande doivent être
retirées si elles ne sont pas utilisées.
- Conserver cette notice d’utilisation.
24124 - 24125
Fernsteuerung / Remote
control / Télécommande
D
1. Power-LED
2. Lenkung
3. Geschwindig-
keitsregler
4. Ladeanzeige
5. Knopf für
Geschwindig-
keitsstufen
6. Geschwindig-
keitsstufen
7. Ladekabelfach
8. Turbo-Knopf
9. Gastrimmung
Inhalt / Contents / Contenu
Fernsteuerung / Remote control /
Télécommande
Antenne / Antenna / Antenne
USB-Kabel / USB-cable / Câble USB
Stunt-Car / Stunt Car / Bolide miniature
D
1. ON/OFF-
Schalter
2. Spureinstellung
3. Ladekabel-
anschluss
GB
1. ON/OFF
switch
2. Alignment
3. Charging cable
connection
FR
1. Interrupteur ON / OFF
2. Ajustement de
la trajectoire
3. Prise pour câble de
chargement
GB
1. Power LED
2. Steering
3. Speed
controller
4. Charge indicator
5. Button for the
speed levels
6. Speed levels
7. Charging cable
compartment
8. Turbo-button
9. Throttle trim
FR
1. Diode témoin
2. Direction
3. Régulateur
de vitesse
4. Témoin de charge
5. Bouton Niveau
de vitesse
6. Niveaux de vitesse
7. Compartiment du
câble de chargement
8. Bouton turbo
9. Trim de gaz
3.
1.
2.
DAchtung! Für Kinder unter 36 Monaten nicht geeignet. Kleine Teile. Erstickungsgefahr! Die Verpackung muss aufbewahrt werden, da sie
wichtige Informationen enthält. Farbliche und technische Änderungen bleiben vorbehalten.
GB Warning ! Not suitable for children under 36 month. Small parts. Choking hazard ! The packaging must be saved, because it contains
important information. Changes to the colour and technical modications reserved.
FR Attention ! Ne convient pas aux enfants de moins de 36 mois. Petites pièces. Danger d’étouffement. Conservez l‘emballage car il contient
des informations importantes.
DAchtung: Die Gebrauchsanleitung bitte sorgfältig lesen, bevor die Fernsteuerung und das Stunt-Car zum ersten Mal gestartet werden.
Produkteigenschaften: Fahrzeit: ca. 6-10 Minuten (Batterien/Akkus sind besonders leistungsstark nach mehreren Lade- und
Entladevorgängen) / Reichweite der Fernsteuerung: ca. 10 Meter / Stromversorgung Modell: DC 3,7 V / 0,44 Wh / 1x3,7V auadbarer
LiPo-Akku (integriert) / Kapazität: 120 mAh. Fernsteuerung: DC 6V / 4x1,5V “AA” (Batterien nicht mitgeliefert)
GB Please note: Read the instructions carefully before starting the remote control and the Stunt Car for the rst time. Product Features:
Drive Time: ca. 6-10 Minutes (batteries/accumulators are especially efcient after several charge and de-charge cycles) / Reach of
remote control: ca. 10 m / Power Supply Model: DC 3,7 V / 0.44 Wh / 1x3,7V rechargeable LiPo battery (integrated) / Capacity: 120
mAh. Transmitter: DC 6V / 4x1.5V “AA” (Battery not included)
FR Remarque: Lire attentivement la notice d’utilisation avant de mettre en marche pour la première fois la télécommande et le bolide
miniature radio télécommandé. Caractéristiques du produit : Temps de conduite : env. 6-10 minutes (les piles/accus sont puissants
après plusieurs processus de charge et de décharge) / Portée de la télécommande : environ 6 mètres / Alimentation Maquette : DC
3,7 V / 0,44 Wh / Piles : 1 batterie LiPo rechargeable de 3,7 V (intégrée) / capacit : 120 mAh. Emetteur : DC 6V / Piles : 4x1,5V “AA”
(Batterien non fournies)
9.
1.
5.
4.
2.
7.
6.
3.
8.
D
1. Die Batteriefachabdeckung der Fernsteuerung
aufschrauben und öffnen. Vier Batterien mit
der richtigen Polarität einlegen. Die Batterie-
fachabdeckung wieder schließen.
2. Die Antenne in die Antennenbuchse der
Fernsteuerung einschrauben.
3. Das Ladekabelfach öffnen und das Ladekabel
vorsichtig herausnehmen.
4. Das Ladekabel mit dem Ladekabelanschluss an
der Seite des Stunt-Cars verbinden. Der Stecker
muss sich leicht in die Ladebuchse stecken
lassen – KEINE GEWALT ANWENDEN. Wird der
Stecker nicht richtig in die Ladebuchse gesteckt,
kann das Stunt-Car beschädigt werden und
unter Umständen Verletzungsgefahr bestehen.
Sobald der Ladevorgang läuft, leuchtet die
Ladeanzeige der Fernsteuerung.
Sie können Ihr Fahrzeug auch mit dem Computer
laden: Das USB-Ladegerät in einen USB-Hub oder
einen USB-Port an einem Computer stecken. Ist
das Ladegerät betriebsbereit, leuchtet die LED an
der Oberseite rot. Nun den Stecker des Ladegeräts
an der Seite des Modells einstecken (4). Der Lade-
vorgang beginnt automatisch. Während des Lade-
vorgangs erlischt die Power-LED am Ladegerät
und leuchtet wieder rot, wenn der Akku voll ist.
Trennen Sie nach dem Laden den Akku vom
Ladegerät und und ziehen das Ladegerät aus der
USB-Schnittstelle.
Nach ca. 40 Minuten ist das Stunt-Car aufgeladen.
Die Ladeanzeige erlischt, wenn der Ladevorgang
beendet ist. Nach dem Laden das Ladekabel vor-
sichtig vom Auto trennen. Das Stunt-Car hat jetzt
Power für ca. 6-10 Minuten.
GB
1. Unscrew and open the battery compartment
cover on the remote control. Insert four
batteries with the correct polarity. Replace the
battery compartment cover.
2.
Screw the antenna into the antenna socket
of the remote control.
3. Open the charging cable compartment and
carefully remove the charging cable.
4. Connect the charging cable to the charging
cable connection on the side of the Stunt Car.
The plug must be gently inserted into the
charging socket – DO NOT USE FORCE. If the
plug is not correctly inserted into the charging
socket, the Stunt Car may become damaged
and, under certain circumstances, become
an injury risk. The charge display on the
remote control illuminates as soon as the
chargingprocess begins.
You can also charge your vehicle using a compu-
ter: Plug the USB charger into a USB hub or a USB
port on a computer. If the charger is ready for use,
the LED on the top will be red. Now plug the con-
nector on the charger into the side of the model.
Charging will begin automatically. The power LED
on the charger will go out during the charging
process and light up red again when the battery is
fully charged. Once charging is complete, discon-
nect the battery from the charger and remove the
charger from the USB port.
The Stunt Car is fully charged after approx.
40 minutes. The charge display goes out when
the charging process is nished. Carefully dis-
connect the charging cable from the car when
the charging is nished. The Stunt Car now has
power for approx. 6–10 minutes.
FR
1. Dévisser et ouvrir le couvercle du compartiment
à piles de la radiocommande. Insérer
quatre piles en respectant la polarité. Refermer
le couvercle du compartiment à piles.
2. Visser l‘antenne dans la douille d‘antenne de
la télécommande.
3. Ouvrir le compartiment du câble de charge-
ment et extraire le câble de chargement avec
précaution.
4. Connecter le câble de chargement à sa prise de
raccordement, située sur le côté du bolide
miniature. La che doit s’enfoncer facilement –
NE PAS FORCER. Connecter le câble de charge-
ment à sa prise de raccordement, située sur le
côté du bolide miniature. Dès que le processus
de charge est en cours, le témoin de charge de
la radiocommande s’allume.
Vous pouvez également charger votre véhicule à
l‘aide de votre PC : Insérer le chargeur USB dans
le concentrateur USB ou dans le port USB du PC. Si
le chargeur est opérationnel, la diode située sur la
partie supérieure s‘allume (rouge). Insérer alors la
che du chargeur dans la prise prévue à cet effet,
sur le côté de la maquette (4). Le processus de
chargement démarre automatiquement. Pendant
le chargement, le témoin d‘alimentation du
chargeur s‘éteint, puis s‘allume de nouveau en
rouge une fois la batterie chargée. Le chargement
terminé, déconnectez la batterie du chargeur et
retirez le chargeur de l‘interface USB.
Le bolide miniature est chargé au bout de 40
minutes. Le témoin de charge s’éteint lorsque le
processus de chargement est terminé. Après la
phase de chargement, déconnecter le câble de
chargement de la voiture avec précaution. Il peut
alors fonctionner pendant 6 à 10 minutes
Vorbereitung / Preparation / Préparation
1.
Bedienung / Operation / Manipulation
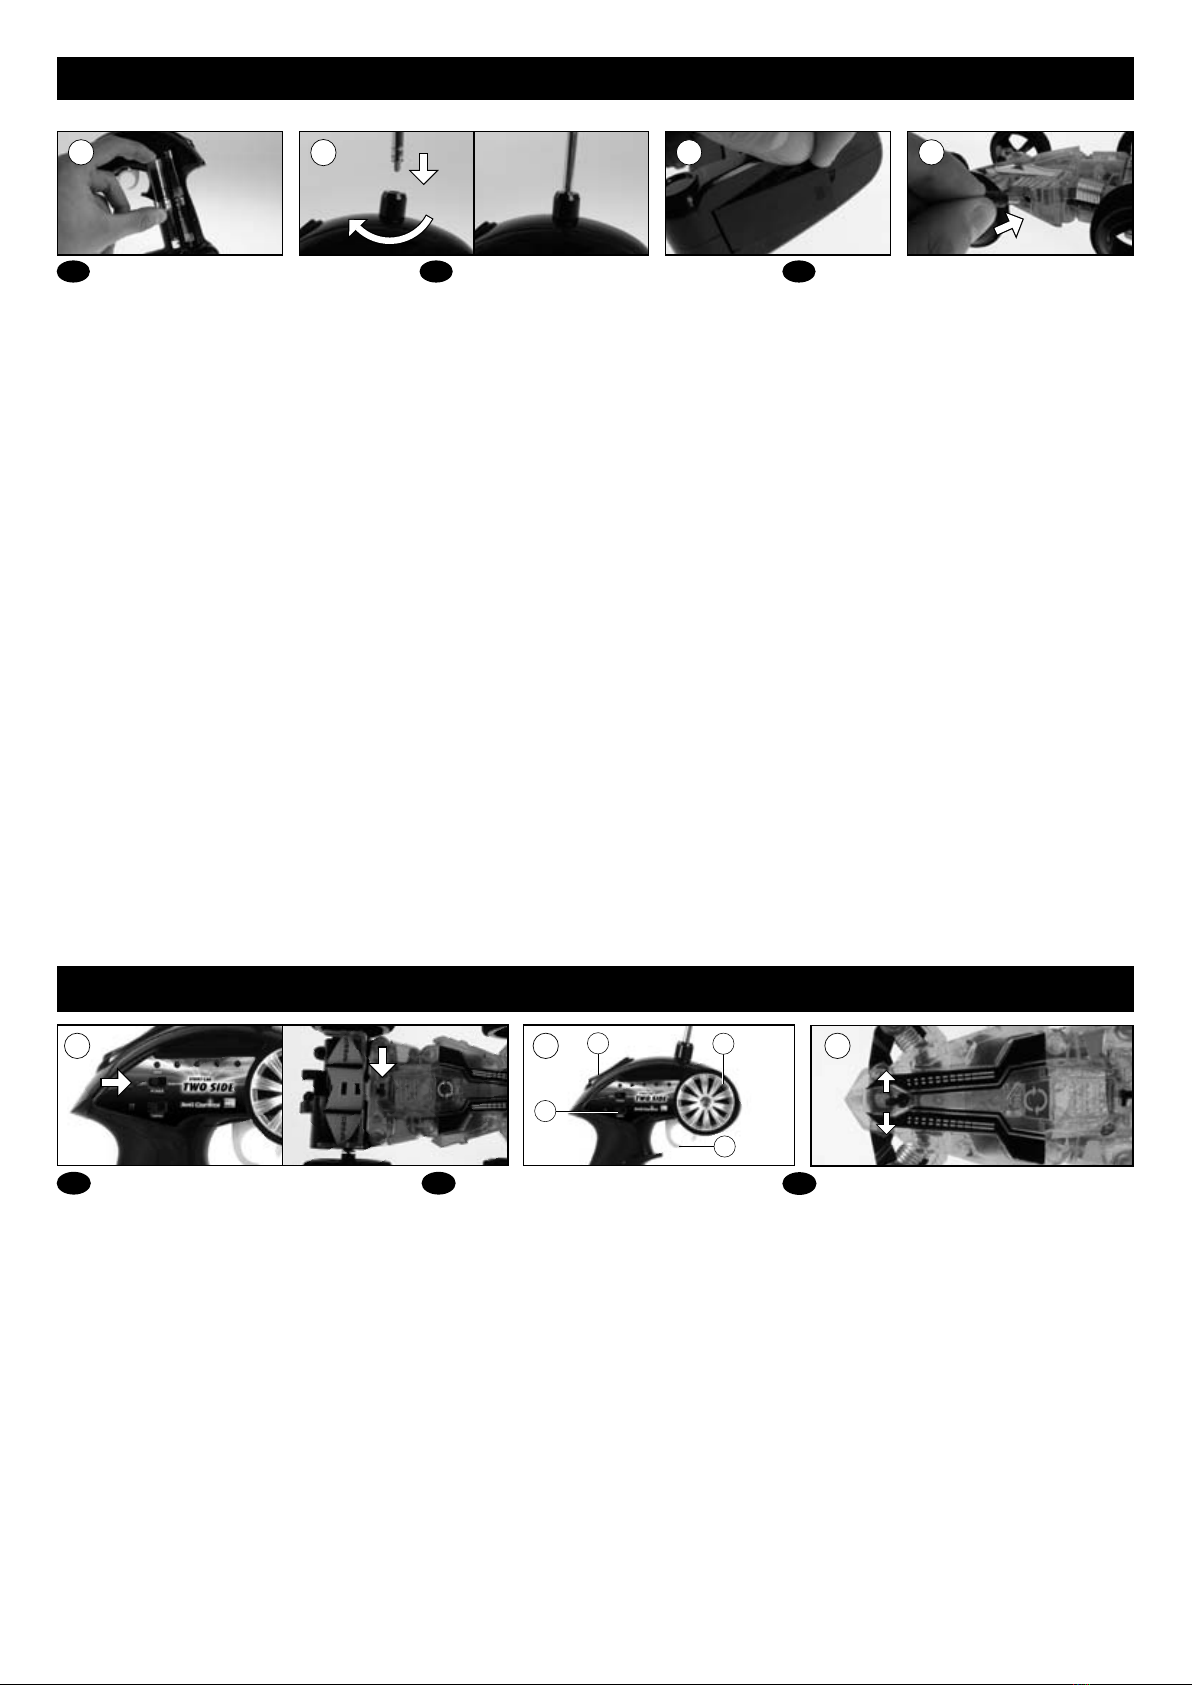
D
5. Den ON/OFF-Schalter des Stunt-Cars und der
Fernsteuerung auf „ON” stellen.
6. Um zu starten und nach vorn zu fahren, den
Geschwindigkeitsregler (A) vorsichtig anziehen
Um schneller zu fahren, den Geschwindigkeits-
regler vorsichtig weiter anziehen. Zum Bremsen
den Geschwindigkeitsregler vorsichtig nach vorne
schieben, bis der Two Side stillsteht oder
langsamer wird. Um rückwärts zu fahren, den
Geschwindigkeitsregler nochmals nach vorne
schieben. Um Linkskurven zu fahren, die Lenkung
(B) nach links drehen, sofern das Fahrzeug mit
dem Heck zum Fahrer zeigt. Um nach rechts zu
fahren, die Lenkung nach rechts drehen, sofern
das Fahrzeug mit dem Heck zum Fahrer zeigt.
Um einen Überschlag zu machen, Bremsen und
schnell Wenden oder mit Höchstgeschwindigkeit
(Turbo-Knopf (C)) vorwärts fahren und stark
bremsen. Achtung: Der Überschlag kann nur ab
Geschwindigkeitsstufe 2 stattnden. Diese kann
man mit dem Knopf der Geschwindigkeitsstufe
(D) regeln.
7. Mit der Spureinstellung kann der Geradeauslauf
des Stunt-Cars korrigiert werden.
GB
5. Set the ON/OFF switch on the Stunt Car and
the remote control to the “ON” position.
6. To start and drive forward, carefully pull back on
the speed controller. To drive faster, carefully pull
the speed controller further back. To brake,
carefully push the speed controller forward until
the vehicle comes to a stop or slows down. To
drive in reverse, push the speed controller
forward again. To drive along a left-handed
curve, turn the steering (B) to the left as long as
the rear end faces the driver. To drive along a
righthanded curve, turn the steering to the right
as long as the rear end faces the driver. To drive
to the right, turn the steering to the right as long
as the rear of the vehicle is facing the driver. To
perform a rollover, brake and turn quickly or drive
forwards at top speed (turbo button (C)) and
brake hard. Attention: The rollover can only be
performed at speed level 2 or faster. This can be
controlled using the speed level button (D).
7. The alignment function can be used to
correct the directional stability of the Stunt
Car.
FR
5. Mettre l’interrupteur ON/OFF du bolide
miniature et de la télécommande sur la
position «ON».
6. Pour démarrer et avancer, pressez doucement le
régulateur de vitesse. Pour accélérer, continuez
de presser doucement le régulateur de vitesse.
Pour freiner, poussez doucement le régulateur de
vitesse vers l’avant, jusqu’à ce que le véhicule
ralentisse ou s’arrête. Pour reculer, poussez
encore une fois le régulateurde vitesse vers
l’avant. Pour les virages à gauche, tourner la
commande vers la gauche si le véhicule est dos
au conducteur. Pour les virages à droite, tourner
la commande vers la droite si le véhicule est dos
au conducteur. Pour les virages à droite, tourner
la direction vers la droite si le véhicule est dos au
conducteur. Pour faire capoter le bolide, freiner et
tourner rapidement ou rouler à la vitesse maximale
(bouton Turbo (C)), faire rouler le bolide puis
freiner brusquement. Attention : Le capotage du
bolide n‘est possible qu‘à une vitesse supérieure
ou égale à 2. Celle-ci peut être réglée à l‘aide du
bouton Niveau de vitesse (D).
7. L’ajustement de trajectoire permet de corriger
la stabilité directionnelle du bolide miniature.
3.
2.
5. 7.
B
6. D
A
C
4.

Other REVELL Motorized Toy Car manuals

REVELL 0892 User manual

REVELL

REVELL 0892 User manual

REVELL Ferrari California 4925 User manual

REVELL

REVELL Ferrari California 4925 User manual

REVELL SLT 50-3 Elefant User manual

REVELL

REVELL SLT 50-3 Elefant User manual

REVELL John Greenwood’s Star and Stripes Corvette SEBRING... User manual

REVELL

REVELL John Greenwood’s Star and Stripes Corvette SEBRING... User manual

REVELL 4910 User manual

REVELL

REVELL 4910 User manual

REVELL AUDI R8 SPYDER User manual

REVELL

REVELL AUDI R8 SPYDER User manual

REVELL 85-1943 User manual

REVELL

REVELL 85-1943 User manual

REVELL 91 FORD F-350 DUALLIE PICKUP User manual

REVELL

REVELL 91 FORD F-350 DUALLIE PICKUP User manual

REVELL KIT 1507 User manual

REVELL

REVELL KIT 1507 User manual

REVELL Mercedes Benz 560 SEC User manual

REVELL

REVELL Mercedes Benz 560 SEC User manual

REVELL Control  DAKAR User manual

REVELL

REVELL Control DAKAR User manual

REVELL DREMEL Grand-Prix Model User manual

REVELL

REVELL DREMEL Grand-Prix Model User manual

REVELL FOOSE CUSTOM CADILLAC ELDORADO User manual

REVELL

REVELL FOOSE CUSTOM CADILLAC ELDORADO User manual

REVELL SnapTite 2017 FORD GT User manual

REVELL

REVELL SnapTite 2017 FORD GT User manual

REVELL 2010 FORD SHELBY GT 500 User manual

REVELL

REVELL 2010 FORD SHELBY GT 500 User manual

REVELL 8 Dale Earnhardt, Jr. Budwaiser 2003 Monte... User manual

REVELL

REVELL 8 Dale Earnhardt, Jr. Budwaiser 2003 Monte... User manual

REVELL '06 Shelby GT-H User manual

REVELL

REVELL '06 Shelby GT-H User manual

REVELL KIT 1945 User manual

REVELL

REVELL KIT 1945 User manual

REVELL AUDI R8 SPYDER User manual

REVELL

REVELL AUDI R8 SPYDER User manual

REVELL 01014 User manual

REVELL

REVELL 01014 User manual

REVELL '67 Chevelle Pro street User manual

REVELL

REVELL '67 Chevelle Pro street User manual

REVELL KIT 1916 User manual

REVELL

REVELL KIT 1916 User manual

REVELL Corvette C6-R Le Mans Winner 2006 User manual

REVELL

REVELL Corvette C6-R Le Mans Winner 2006 User manual

REVELL KIT 1545 User manual

REVELL

REVELL KIT 1545 User manual

Popular Motorized Toy Car manuals by other brands

PENELOPE PITLANE AW Sport 250 Chassis manual

PENELOPE PITLANE

PENELOPE PITLANE AW Sport 250 Chassis manual

Little Tikes LTXtreme AIR CHARGERS 3-IN-1 STUNT LOOP TRACK... Assembly lnstructions

Little Tikes

Little Tikes LTXtreme AIR CHARGERS 3-IN-1 STUNT LOOP TRACK... Assembly lnstructions

Eduard Zoom M-1025 Humvee placards quick start guide

Eduard

Eduard Zoom M-1025 Humvee placards quick start guide

Jconcepts BJ4 manual

Jconcepts

Jconcepts BJ4 manual

Team Losi BND SUPER BAJA REY instruction manual

Team Losi

Team Losi BND SUPER BAJA REY instruction manual

Ofna Racing nitro OB 4 instruction manual

Ofna Racing

Ofna Racing nitro OB 4 instruction manual

Xray GTX8 instruction manual

Xray

Xray GTX8 instruction manual

Tamiya ACU-01 user manual

Tamiya

Tamiya ACU-01 user manual

Moni SUPER POWER CROSS instruction manual

Moni

Moni SUPER POWER CROSS instruction manual

Team Losi XXX NT SPORT RTRII Operation guide

Team Losi

Team Losi XXX NT SPORT RTRII Operation guide

Tamiya LOWRIDE PUMPKIN manual

Tamiya

Tamiya LOWRIDE PUMPKIN manual

Carson Street Rebel instruction manual

Carson

Carson Street Rebel instruction manual

Jamara Mercedes-AMG GLC 63 S Coupe 4 WD Instruction

Jamara

Jamara Mercedes-AMG GLC 63 S Coupe 4 WD Instruction

Tamiya NEO SCORCHER manual

Tamiya

Tamiya NEO SCORCHER manual

THUNDER TIGER TS-4E SPORT V.2 manual

THUNDER TIGER

THUNDER TIGER TS-4E SPORT V.2 manual

Lenoxx PR4411 Operational instructions

Lenoxx

Lenoxx PR4411 Operational instructions

Amewi C instruction manual

Amewi

Amewi C instruction manual

Team Losi XXX-T Sport Operation guide

Team Losi

Team Losi XXX-T Sport Operation guide

manuals.online logo
manuals.online logoBrands
  • About & Mission
  • Contact us
  • Privacy Policy
  • Terms and Conditions

Copyright 2025 Manuals.Online. All Rights Reserved.