Ricoh 2051 - Aficio B/W Laser User manual

Paper type: OK Prince Eco G100(55kg), Paper Thickness=80 µm // Pages in book=168 // Print scale=81%
Gap (when printed at 81% scale) = Pages in book ×Paper thickness / 2 = 6.720000 mm
B1416607
Operating Instructions
Copy Reference
Read this manual carefully before you use this product and keep it handy for future reference. For safe and correct use, please be sure to read
the Safety Information in the "General Settings Guide" before using the machine.
Placing Originals
Copying
Connect Copy
Troubleshooting
User Tools (Copier/Document Server Features)
Specifications
Type for 4051/DSm651/LD151/Aficio 2051
Type for 4060/DSm660/LD160/Aficio 2060
Type for 4075/DSm675/LD175/Aficio 2075
Printed in Japan
EN USA B141-6607

Paper type: OK Prince Eco G100(55kg), Paper Thickness=80 µm // Pages in book=168 // Print scale=81%
Gap (when printed at 81% scale) = Pages in book ×Paper thickness / 2 = 6.720000 mm
In accordance with IEC 60417, this machine uses the following symbols for the main power switch:
a
aa
ameans POWER ON.
c
cc
cmeans STAND BY.
Introduction
This manual describes detailed instructions on the operation and notes about the use of this machine.
To get maximum versatility from this machine, all operators are requested to read this manual carefully
and follow the instructions. Please keep this manual in a handy place near the machine.
Notes:
Some illustrations in this manual might be slightly different from the machine.
Certain options might not be available in some countries. For details, please contact your local dealer.
Caution:
Use of controls or adjustments or performance of procedures other than those specified in this manual
might result in hazardous radiation exposure.
Notes:
The model names of the machines do not appear in the following pages. Check the type of your ma-
chine before reading this manual. (For details, see P.3 “Machine Types”.)
• Type 1: 4051/DSm651/LD151/Aficio 2051
• Type 2: 4060/DSm660/LD160/Aficio 2060
• Type 3: 4075/DSm675/LD175/Aficio 2075
Certain types might not be available in some countries. For details, please contact your local dealer.
Two kinds of size notation are employed in this manual. With this machine refer to the inch version.
For good copy quality, the supplier recommends that you use genuine toner from the supplier.
The supplier shall not be responsible for any damage or expense that might result from the use of parts
other than genuine parts from the supplier with your office products.
Power Source
120V, 60Hz, 16A or more
Please be sure to connect the power cord to a power source as above. For details about power source,
see “Power Connection” in the General Settings Guide.
Copyright © 2004

i
Manuals for This Machine
The following manuals describe the operational procedures of this machine. For
particular functions, see the relevant parts of the manual.
Note
❒Manuals provided are specific to machine type.
❒Adobe Acrobat Reader is necessary to view the manuals as a PDF file.
❒Two CD-ROMs are provided:
• CD-ROM 1 “Operating Instructions for Printer/Scanner”
• CD-ROM 2 “Scanner Driver & Document Management Utilities”
❖
❖❖
❖General Settings Guide (this manual)
Provides an overview of the machine and describes System Settings (such as
Tray Paper Settings), Document Server functions, and troubleshooting.
❖
❖❖
❖Security Reference
This manual is for administrators of this machine. It describes security func-
tions that the administrators can use to protect data from being tampered, or
prevent the machine from unauthorized use.
Also refer to this manual for the procedures for registering administrators, as
well as setting user and administrator authentication.
❖
❖❖
❖Network Guide (PDF file - CD-ROM1)
Provides information about configuring and operating the printer in a net-
work environment or using software.
This manual covers all models, and therefore contains functions and settings
that may not be available for your model. Images, illustrations, functions, and
supported operating systems may differ from those of your model.
❖
❖❖
❖Copy Reference
Describes operations, functions, and troubleshooting for the machine's copier
function.
❖
❖❖
❖Printer Reference
Describes operations, functions, system settings and troubleshooting for the
machine's printer function.
❖
❖❖
❖Scanner Reference (PDF file - CD-ROM1)
Describes operations, functions, and troubleshooting for the machine's scan-
ner function.
MartiniC2_EN_Copy-F1_FM.book Page i Tuesday, July 27, 2004 1:43 PM

ii
❖
❖❖
❖Manuals for DeskTopBinder Lite
DeskTopBinder Lite is a utility included on the CD-ROM labeled “Scanner
Driver & Document Management Utilities”.
•DeskTopBinder Lite Setup Guide (PDF file - CD-ROM2)
Describes installation of, and the operating environment for DeskTop-
Binder Lite in detail. This guide can be displayed from the [Setup]display
when DeskTopBinder Lite is installed.
•DeskTopBinder Introduction Guide (PDF file - CD-ROM2)
Describes operations of DeskTopBinder Lite and provides an overview of
its functions. This guide is added to the [Start]menu when DeskTopBinder
Lite is installed.
•Auto Document Link Guide (PDF file - CD-ROM2)
Describes operations and functions of Auto Document Link installed with
DeskTopBinder Lite. This guide is added to the [Start]menu when Desk-
TopBinder Lite is installed.
MartiniC2_EN_Copy-F1_FM.book Page ii Tuesday, July 27, 2004 1:43 PM

iii
What You Can Do with This Machine
Functions differ depending on machine type and options. See p.4 “Functions Re-
quiring Optional Configurations”.
2-sided 2 Pages 2-sided 1 Page p.49
" 2 Sided 4 Pages Combine 2 Side"
Front
Front
Back
Back
Front
Back
Front Back
Types of Duplex Copies
1-sided 4 Pages 2-sided 1 Page p.49
" 1 Sided 4 Pages Combine 2 Side"
2-sided 4 Pages 2-sided 1 Page p.50
" 2 Sided 8 Pages Combine 2 Side"
1-sided 8 Pages 2-sided 1 Page p.49
" 1 Sided 8 Pages Combine 2 Side"
1-sided 16 Pages
2-sided 1 Page
p.49
" 1 Sided 16 Pages Combine 2 Side"
1-sided 2 Pages 2-sided 1 Page p.45
" 1 Sided 2 Sided"
2-sided 1 Page 2-sided 1 Page p.45
" 2 Sided 2 Sided"
2-sided 8 Pages
2-sided 1 Page
p.50
" 2 Sided 16 Pages Combine 2 Side"
Front/Back Bound Originals 2-sided Pages p.51
" Front & Back 2 Sided"
Bound Originals 2-sided Pages p.51
" Book 2 Sided"
MartiniC2_EN_Copy-F1_FM.book Page iii Tuesday, July 27, 2004 1:43 PM

iv
Copying Book Originals
1-sided 4 Pages Booklet ( P.54 " 1 Sided Booklet")
4
3
2
1
4
32
1
Open to Left
3
1
Open to Right
3
1
4
3
2
1
1
23
4
2-sided 2 Pages Booklet ( P.54 " 2 Sided Booklet")
Open to Left
Open to Right
Open to Left
Open to Right
1-sided Magazine ( P.54 " 1 Sided Magazine")
2
1
8
7
8
72
16
54
3
2
1
8
7
1
27
83
45
6
13
5
31
5
Open to Left
Open to Right
2-sided Magazine ( P.54 " 2 Sided Magazine")
13
5
31
5
3
1
3
1
MartiniC2_EN_Copy-F1_FM.book Page iv Tuesday, July 27, 2004 1:43 PM

v
Combining Multiple Pages onto a Single Page ( p.47 "1 Sided Combine")
1-sided 2 Pages 1-sided 1 Page 2-sided 1 Page 1-sided 1 Page
1-sided 4 Pages 1-sided 1 Page 2-sided 2 Pages 1-sided 1 Page
1-sided 8 Pages 1-sided 1 Page
Bound Originals 1-sided Pages
Bound Originals 2-sided Pages
Front/Back Bound Originals
2-sided Pages
2-sided 4 Pages 1-sided 1 Page
Copying Originals Such as Books
( p.50 "Series Copies")
2-sided 1 page 1-sided 2 pages
Copying 2-Sided Pages onto 1-Sided Pages
( P.52 "2 Sided 1 Sided")
MartiniC2_EN_Copy-F1_FM.book Page v Tuesday, July 27, 2004 1:43 PM

vi
TABLE OF CONTENTS
Manuals for This Machine ......................................................................................i
What You Can Do with This Machine..................................................................iii
Notice......................................................................................................................1
How to Read This Manual .....................................................................................2
Machine Types .......................................................................................................3
Functions Requiring Optional Configurations....................................................4
Control Panel..........................................................................................................5
Display Panel .............................................................................................................7
1. Placing Originals
Originals .................................................................................................................9
Sizes and Weights of Recommended Originals.........................................................9
Sizes Detectable by Auto Paper Select ...................................................................10
Missing Image Area .................................................................................................12
Direction-fixed paper or 2-sided paper.....................................................................13
Placing Originals..................................................................................................14
Original Orientation ..................................................................................................14
Placing Originals on the Exposure Glass.................................................................15
Placing Originals in the Auto Document Feeder ......................................................15
2. Copying
Basic Procedure...................................................................................................19
Interrupt Copy ..........................................................................................................20
Left Original Beeper .................................................................................................20
Copy Face Up ..........................................................................................................20
Job Preset ................................................................................................................21
Copying onto Tab Stock...........................................................................................22
Auto Start .................................................................................................................23
Copying from the Bypass Tray...........................................................................24
Copier Functions .................................................................................................26
Adjusting Copy Image Density.................................................................................26
Selecting the Original Type ......................................................................................26
Selecting Copy Paper ..............................................................................................27
Preset Reduce/Enlarge ............................................................................................ 29
Zoom ........................................................................................................................30
Auto Reduce/Enlarge ...............................................................................................31
Size Magnification ....................................................................................................32
Directional Magnification (%) ...................................................................................32
Directional Size Magnification (Inch)........................................................................ 33
Sort...........................................................................................................................34
Stack ........................................................................................................................36
Staple .......................................................................................................................37
Punch .......................................................................................................................39
Z-fold ........................................................................................................................43
Duplex ......................................................................................................................45
1 Sided Combine......................................................................................................47
2 Sided Combine......................................................................................................49
Series Copies...........................................................................................................50
MartiniC2_EN_Copy-F1_FM.book Page vi Tuesday, July 27, 2004 1:43 PM

vii
2 Sided→1 Sided .....................................................................................................52
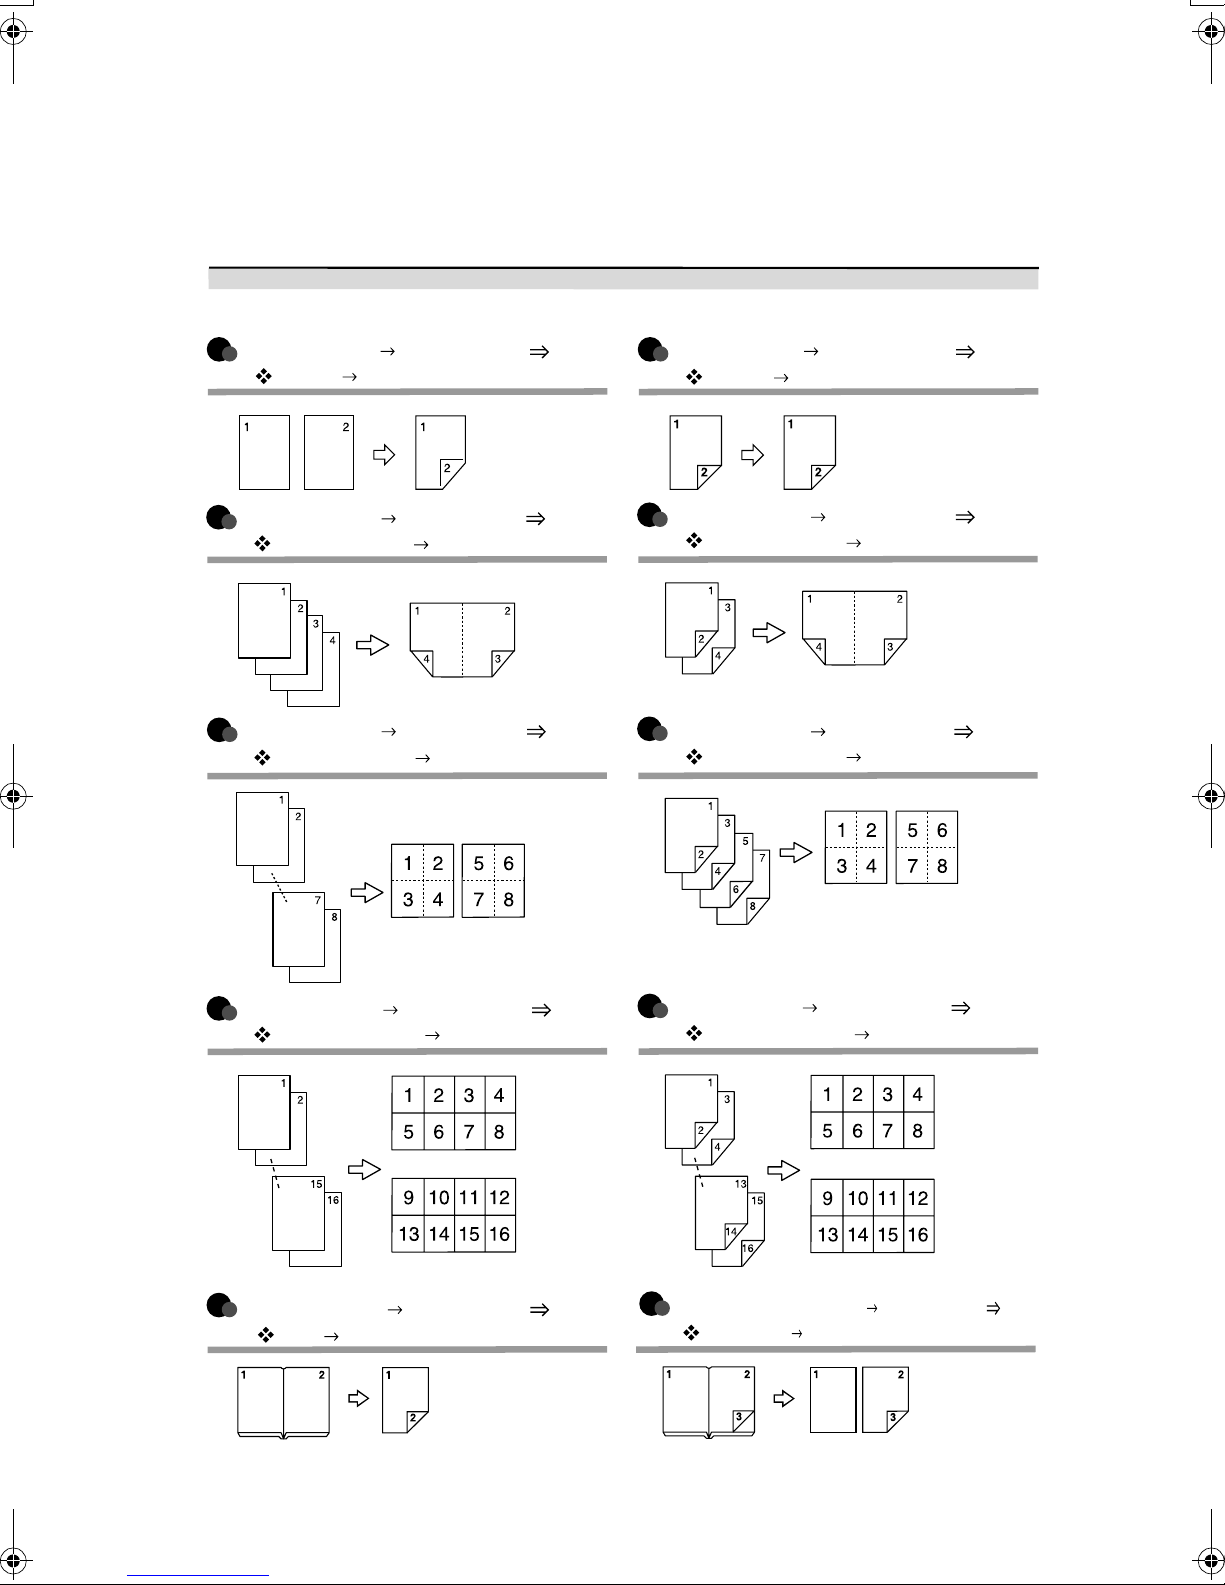
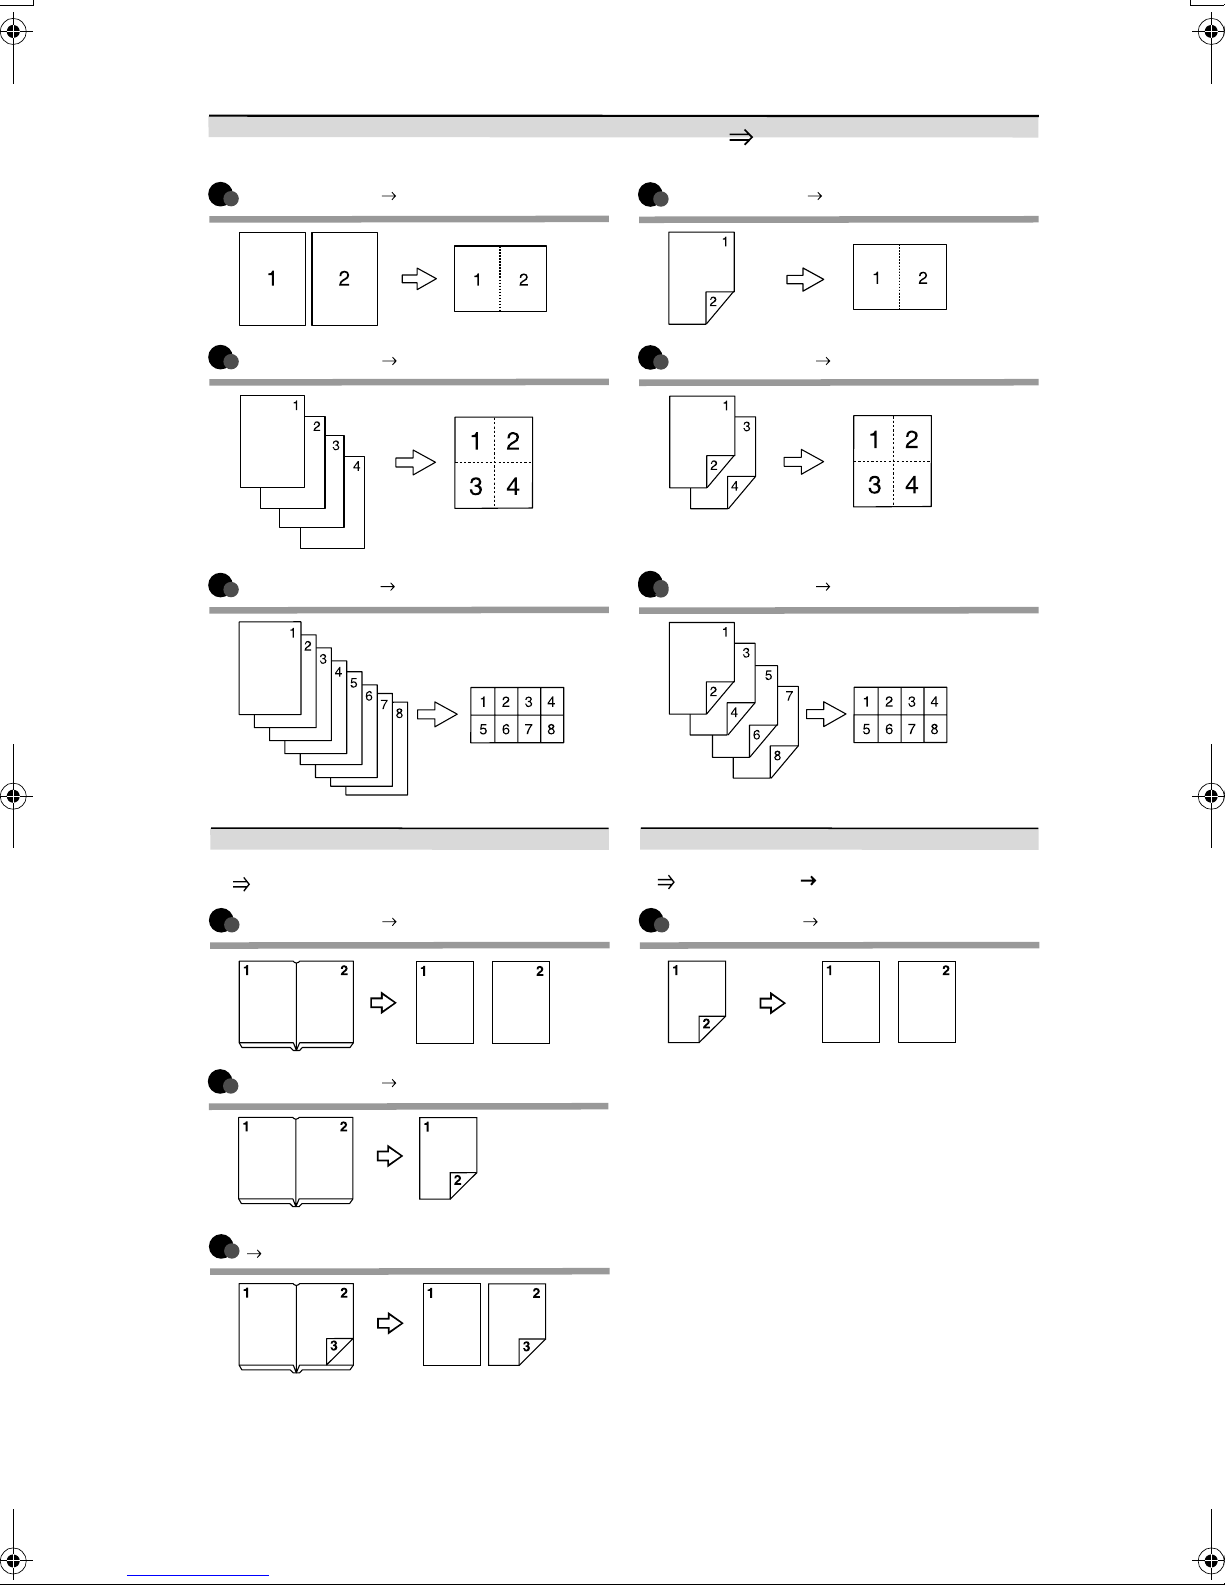
Copying Book Originals............................................................................................53
Image Repeat...........................................................................................................55
Double Copies..........................................................................................................56
Centering..................................................................................................................57
Scanning Position ....................................................................................................57
Erase........................................................................................................................58
3 Edges Full Bleed ...................................................................................................63
Margin Adjustment ...................................................................................................64
Positive/Negative .....................................................................................................64
Background Numbering ...........................................................................................65
Preset Stamp ...........................................................................................................65
User Stamp ..............................................................................................................66
Date Stamp ..............................................................................................................69
Page Numbering ......................................................................................................70
Covers......................................................................................................................74
Designate .................................................................................................................75
Chapter ....................................................................................................................76
Blank Slip Sheets .....................................................................................................76
Slip Sheets ...............................................................................................................77
Storing Data in the Document Server ................................................................79
Programs ..............................................................................................................81
Storing a Program ....................................................................................................81
Changing a stored program .....................................................................................82
Deleting a Program ..................................................................................................82
Recalling a Program.................................................................................................82
3. Connect Copy
What is Connect Copy?.......................................................................................83
How It Works............................................................................................................84
Connect Copy Display Panel ..............................................................................86
Display panel of the sub-machine ............................................................................87
Using Connect Copy............................................................................................88
Exiting Connect Copy...............................................................................................90
Copying Stored Documents Using Connect Copy ...................................................91
Using Job Preset in Connect Copy ....................................................................93
Connect Copy Job Flow ......................................................................................94
When One of the Two Machines is Idle ...................................................................94
When Both Machines are in Use..............................................................................95
System Settings on Main and Sub-machines ...................................................97
Copier/Document Server Features on Main and Sub-machines ...................101
4. Troubleshooting
If Your Machine Does Not Operate As You Want............................................105
When a Message Is Displayed...............................................................................105
Display During Connect Copy ................................................................................107
If Connect Copy is Cancelled.................................................................................108
If You Cannot Exit from Connect Copy ..................................................................109
If You Cannot Make Clear Copies.....................................................................110
If You Cannot Make Copies As You Want .......................................................111
When Memory Is Full .............................................................................................113
MartiniC2_EN_Copy-F1_FM.book Page vii Tuesday, July 27, 2004 1:43 PM

viii
5. User Tools (Copier/Document Server Features)
User Tools Menu (Copier/Document Server Features) ..................................115
Accessing User Tools (Copier/Document Server Features)..........................122
Changing Default Settings .....................................................................................122
Exiting User Tools ..................................................................................................122
Settings You Can Change with User Tools .....................................................123
General Features P.1/5...........................................................................................123
General Features P.2/5...........................................................................................125
General Features P.3/5...........................................................................................125
General Features P.4/5...........................................................................................126
General Features P.5/5...........................................................................................126
Reproduction Ratio P.1/2........................................................................................126
Reproduction Ratio P.2/2........................................................................................127
Edit P.1/2................................................................................................................128
Edit P.2/2................................................................................................................129
Stamp.....................................................................................................................131
Input/Output P.1/2...................................................................................................133
Input/Output P.2/2...................................................................................................135
6. Specifications
Combination Chart.............................................................................................137
Supplementary Specifications..........................................................................139
INDEX....................................................................................................... 156
MartiniC2_EN_Copy-F1_FM.book Page viii Tuesday, July 27, 2004 1:43 PM

1
Notice
Do not copy or print any item for which reproduction is prohibited by law.
Copying or printing the following items is generally prohibited by local law:
bank notes, revenue stamps, bonds, stock certificates, bank drafts, checks, pass-
ports, driver's licenses.
The preceding list is meant as a guide only and is not inclusive. We assume no
responsibility for its completeness or accuracy. If you have any questions con-
cerning the legality of copying or printing certain items, consult with your legal
advisor.
This machine is equipped with a function that prevents making counterfeit bank
bills. Due to this function the original images similar to bank bills may not be
copied properly.
MartiniC2_EN_Copy-F1_FM.book Page 1 Tuesday, July 27, 2004 1:43 PM

2
How to Read This Manual
Symbols
This manual uses the following symbols:
R
WARNING:
This symbol indicates a potentially hazardous situation that might result in
death or serious injury if you misuse the machine by not following the instruc-
tions under this symbol. Be sure to read the instructions, all of which are includ-
ed in the Safety Information section in the General Settings Guide.
R
CAUTION:
This symbol indicates a potentially hazardous situation that might result in mi-
nor or moderate injury or property damage that does not involve personal injury
when you misuse the machine without following the instructions under this
symbol. Be sure to read the instructions, all of which are included in the Safety
Information section in the General Settings Guide.
•WARNINGS and CAUTIONS are notes for your safety.
Important
If these instructions are not followed, paper might misfeed, originals might be
damaged, or data might be lost. Be sure to read these instructions.
Preparation
This symbol indicates prior knowledge or preparations are required before op-
eration.
Note
This symbol indicates precautions for operation, or actions to be taken following
user error.
Limitation
This symbol indicates numerical limits, functions that cannot be used together,
or conditions in which a particular function cannot be used.
Reference
This symbol indicates where further relevant information can be found.
[]
Keys that appear on the machine's display panel.
{}
Keys built into the machine's control panel.
MartiniC2_EN_Copy-F1_FM.book Page 2 Tuesday, July 27, 2004 1:43 PM

3
Machine Types
This machine comes in three models which vary by copy speed. To confirm
which model you have, see the inside front cover of this manual.
Type 1 Type 2 Type 3
Copy speed 51 copies/minute
(A4K, 81/2" ×11"K)
60 copies/minute
(A4K, 81/2" ×11"K)
75 copies/minute
(A4K, 81/2" ×11"K)
MartiniC2_EN_Copy-F1_FM.book Page 3 Tuesday, July 27, 2004 1:43 PM

4
Functions Requiring Optional
Configurations
Certain functions require special machine configuration and extra options. See
the table below.
❍: Required options
*1 The paper tray unit is required in order to install the finisher.
*2 To use the Z-folding unit, the Booklet Finisher is required.
Functions
Copying onto the Tab Stock
Shift Sort
Stack
Staple
Staple (Saddle Stitch)
Punch
Z-fold
Connect Copy
Options
Tab Sheet Holder ❍
Finisher 3000M
(50-sheet staples)
❍❍❍ ❍
*1
Booklet Finisher ❍❍❍❍❍
*1
Finisher 3000B
(100-sheet staples)
❍❍❍ ❍
*1
Z-folding unit ❍
*2
Copy Connector ❍
MartiniC2_EN_Copy-F1_FM.book Page 4 Tuesday, July 27, 2004 1:43 PM

5
Control Panel
This illustration shows the control panel of a machine with options
fully installed.
1. Screen Contrast knob
Adjusts the brightness of the display pan-
el.
2. Indicators
These indicators show the status of the
machine or indicate errors. See “Control
Panel”, General Settings Guide.
3. {
{{
{User Tools/Counter}
}}
}key
•User Tools
Press to change the default settings
and conditions to meet your require-
ments. See p.115 “User Tools (Copi-
er/Document Server Features)”.
•Counter
Press to check or print the Counter
value. See “Counter”, General Settings
Guide.
•Inquiry
Shows where to order expendable
supplies and where to call when a
malfunction occurs. You can also print
these details. See “Inquiry”, General
Settings Guide.
4. Display panel
Shows operation status, error messages,
and function menus. See “Display Pan-
el”, General Settings Guide.
5. {
{{
{Check Modes}
}}
}key
Press to check the entered copy job set-
tings.
6. {
{{
{Program}
}}
}key
Press to store or recall a program. See
p.81 “Programs”.
7. {
{{
{Clear Modes}
}}
}key
Press to clear previously entered copy job
settings.
8. {
{{
{Energy Saver}
}}
}key
Press to switch to and from Energy Saver
mode. See “Saving Energy”, General Set-
tings Guide.
9. {
{{
{Interrupt}
}}
}key
Press to interrupt a long copy job to make
copies. See p.20 “Interrupt Copy”.
10. Main power indicator, On indi-
cator
The main power indicator goes on when
the main power switch is turned on and
goes off when the switch is turned off.
The On indicator goes on when the oper-
ation switch is turned on and goes off
when the switch is turned off.
Important
❒Do not turn the main power off
while the On indicator is flashing.
The hard disk may malfunction.
ZGVS300N
MartiniC2_EN_Copy-F1_FM.book Page 5 Tuesday, July 27, 2004 1:43 PM

6
11. Operation switch
Press this switch to turn the power on
(the On indicator goes on). To turn the
power off, press this switch again (the On
indicator goes off). See ”Turning On the
Power”, General Settings Guide.
12. Clip Tray
Holds clips and staples.
13. {
{{
{Sample Copy}
}}
}key
Use this key to make a single sample
copy before starting a long copy run. By
checking the sample copy and making
any necessary changes to the image qual-
ity settings before you make multiple
copies, you can save time and paper. See
p.36 “Sample copy”.
14. {
{{
{Start}
}}
}key
Press to start copying. Press to start scan-
ning and printing in Document Server
mode.
15. {
{{
{Clear/Stop}
}}
}key
•Clear
Press to delete a number entered.
•Stop
Press to stop a copy job in progress.
Press to stop Scanning and printing in
Document Server mode.
16. {
{{
{#}
}}
}key
Press to enter a value.
17. Number keys
Use to enter the desired number of cop-
ies, and data for selected modes.
18. Function keys
These keys switch display to the operat-
ing screen of each function. Follow the in-
structions displayed by switching
between screen with the function keys.
19. Function Status indicator
These show the status of the above func-
tions:
•Green: the function is active.
•Red: the function has been interrupt-
ed.
MartiniC2_EN_Copy-F1_FM.book Page 6 Tuesday, July 27, 2004 1:43 PM

7
Display Panel
The display panel shows machine status, error messages and function menus.
The function items displayed serve as selector keys. You can select or specify an
item by lightly pressing them.
When you select or specify an item on the display panel, it is highlighted like
this: . Keys appearing as cannot be used.
❖
❖❖
❖Initial copy display
1. Original function, Image Density
and Special Original function.
2. Operational status and messages.
3. You can register up to three fre-
quently used reduce/enlarge ratios
other than the fixed reduce/enlarge
ratios. See p.126 “Shortcut R/E”.
4. Numbers of originals scanned
into memory, copies set, and copies
made.
5. Sort, Stack, Staple, Punch and Z-
fold functions.
6. Displays contents of the Shortcut
keys. You can register frequently
used functions in these keys. See
p.125 “Copy Function Key: F1-F5”.
7. Displays available functions.
Press a function name to display its
menu. For example, press [Reduce/En-
large]to bring up the Reduce/Enlarge
menu.
8. A clip mark indicates the current-
ly selected function.
ADH030S
MartiniC2_EN_Copy-F1_FM.book Page 7 Tuesday, July 27, 2004 1:43 PM

8
MartiniC2_EN_Copy-F1_FM.book Page 8 Tuesday, July 27, 2004 1:43 PM

9
1. Placing Originals
Originals
Sizes and Weights of Recommended Originals
❖
❖❖
❖Metric version
❖
❖❖
❖Inch version
Note
❒The maximum number of originals that can be placed in the ADF is about 100.
❒The weight range for originals when using Mixed Size mode is 52–81.4 g/m2,
13.8–21.7 lb.
Where original is placed
Original size Original weight
Exposure glass Up to A3 --
ADF One-sided originals:
A3L–B6 JIS (Japanese Industri-
al Standard) KL
40–128 g/m2
Two-sided originals:
A3L–A5KL
52–105 g/m2
Where original is placed
Original size Original weight
Exposure glass Up to 11" ×17" --
ADF One-sided originals:
11" ×17"L–51/2" ×81/2"KL
11–34 lb.
Two-sided originals:
11" ×17"L–51/2" ×81/2"KL
14–28 lb.
MartiniC2_EN_Copy-F1_FM.book Page 9 Tuesday, July 27, 2004 1:43 PM

Placing Originals
10
1
Originals not recommended for the Auto Document Feeder (ADF)
Placing the following types of originals in the ADF can cause paper misfeeds or
result in damage to the originals. Place these originals on the exposure glass in-
stead.
•Originals other than those specified on p.9 “Sizes and Weights of Recom-
mended Originals”.
•Stapled or clipped originals
•Perforated or torn originals
•Curled, folded, or creased originals
•Pasted originals
•Originals with any kind of coating, such as thermal fax paper, art paper, alu-
minum foil, carbon paper, or conductive paper
•Originals with perforated lines
•Originals with indexes, tags, or other projecting parts
•Sticky originals such as translucent paper
•Thin originals that have low stiffness
•Thick originals such as postcards
•Originals of inappropriate weight
•Bound originals such as books
•Transparent originals such as OHP transparencies or translucent paper
Note
❒The original might become dirty if it is written on with a pencil or a similar
instrument.
Sizes Detectable by Auto Paper Select
❍: Detectable size ×: Undetectable size
❖
❖❖
❖Metric version
*1 You can select from 81/2" ×13", 81/4" ×13", 8" ×13" with User Tools (System Settings).
*2 If you wish to switch detectable paper size from 8KLto 11" ×13"L, please contact
your service representative.
*3 If you wish to switch detectable paper size from 16KKL to 81/2" ×11"KL, please
contact your service representative.
Size A3
L
B4
JIS
L
A4
K
L
B5
JIS
K
L
A5
K
L
B6
JIS
K
L
11"
×
17"
L
81/2
" ×
14"
L
81/2
" ×
11"
K
L
51/2
" ×
81/2
"K
L
81/2
" ×
13"
L
*1
8K
L
16K
K
L
*3
Location of the
original
Exposure glass ❍❍❍❍ ××××××❍××
ADF ❍❍❍❍❍❍❍ ×❍×❍❍*2 ❍
MartiniC2_EN_Copy-F1_FM.book Page 10 Tuesday, July 27, 2004 1:43 PM
Other manuals for 2051 - Aficio B/W Laser
2
This manual suits for next models
11
Table of contents
Other Ricoh All In One Printer manuals

Ricoh
Ricoh Aficio MP 5500 S/P User manual

Ricoh
Ricoh Pro 8120s User manual

Ricoh
Ricoh G188 User manual

Ricoh
Ricoh MP 2554SP Series User manual

Ricoh
Ricoh Aficio 615C Owner's manual

Ricoh
Ricoh Aficio MP 5002SP User manual

Ricoh
Ricoh PT3 Quick start guide

Ricoh
Ricoh 4506 User manual

Ricoh
Ricoh VD0107571 User manual

Ricoh
Ricoh MP W7100 User manual