manuals.online logo
Brands
  1. Home
  2. •
  3. Brands
  4. •
  5. Ridea
  6. •
  7. Bicycle Accessories
  8. •
  9. Ridea RD3 User manual

Ridea RD3 User manual

Other Ridea Bicycle Accessories manuals

Ridea 6CBB ITA30 User manual

Ridea

Ridea 6CBB ITA30 User manual

Ridea SPM2 Series User manual

Ridea

Ridea SPM2 Series User manual

Ridea OSPW+ RD5 User manual

Ridea

Ridea OSPW+ RD5 User manual

Ridea OSPW+ MD2 C48 User manual

Ridea

Ridea OSPW+ MD2 C48 User manual

Ridea BSA24 User manual

Ridea

Ridea BSA24 User manual

Ridea 6CBB T47A User manual

Ridea

Ridea 6CBB T47A User manual

Popular Bicycle Accessories manuals by other brands

Galeo Galeo user guide

Galeo

Galeo Galeo user guide

Shimano DURA-ACE FC-R9100 Dealer's manual

Shimano

Shimano DURA-ACE FC-R9100 Dealer's manual

BAFANG BT C01.340.UART Customer's manual

BAFANG

BAFANG BT C01.340.UART Customer's manual

Minshine T154 Series manual

Minshine

Minshine T154 Series manual

Cateye TRIPLE SHOT PRO HL-EL830RC instruction manual

Cateye

Cateye TRIPLE SHOT PRO HL-EL830RC instruction manual

Navad Trail 200 Quick manual guide

Navad

Navad Trail 200 Quick manual guide

Specialized Elite CylcoComputer user manual

Specialized

Specialized Elite CylcoComputer user manual

Sigma BC 16.16 manual

Sigma

Sigma BC 16.16 manual

Playcore Dero Setbacks installation instructions

Playcore

Playcore Dero Setbacks installation instructions

VDO Cyclecomputing x3dw instruction manual

VDO Cyclecomputing

VDO Cyclecomputing x3dw instruction manual

Cateye RAPID X2 manual

Cateye

Cateye RAPID X2 manual

buratti meccanica Clorofilla Trail Use and maintenance manual

buratti meccanica

buratti meccanica Clorofilla Trail Use and maintenance manual

Shimano SG-8R20 Service instructions

Shimano

Shimano SG-8R20 Service instructions

BOB YAK owner's manual

BOB

BOB YAK owner's manual

APLIC 303303/20190717TW012 user manual

APLIC

APLIC 303303/20190717TW012 user manual

Polini HI-SPEED E-BIKE quick start guide

Polini

Polini HI-SPEED E-BIKE quick start guide

SRAM AXS BlipBox user manual

SRAM

SRAM AXS BlipBox user manual

Shimano FD-RX810 Dealer's manual

Shimano

Shimano FD-RX810 Dealer's manual

manuals.online logo
manuals.online logoBrands
  • About & Mission
  • Contact us
  • Privacy Policy
  • Terms and Conditions

Copyright 2025 Manuals.Online. All Rights Reserved.

Greater than
0 degrees
Less than
30 degrees
BigBig
Rear Derailleur Cage (RD3)
SRAM RED / FORCE / RIVAL / APEX (2x11 versions)
RIDEA GROUP Limited
www.rideabikes.com
ser[email protected]
TEL: +886 4 7715639
FAX: +886 4 7720539
Best position after installation
3
rd
Edition April 2019
@CyclingRidea
Congratulations, your RD3 C35/C60
OSPW+system is now installed!
Note: Due to the variability of rear derailleurs on the market, your
OSPW+is provided with two groups of tension holes: A-B (A for
higher tension and B for lower tension) and C-D (C for higher
tension and D for lower tension). The correct choice between
A-B or C-D will depend on your rear derailleur model and its
production year.
Included accessories:
RD W15 (included): On some frames with slim rear dropouts, the
shifting performance on the higher gears (smaller sprockets) can
be sup-optimal after you upgrade your derailleur with Ridea’s
OSPW+. To solve this, some users may require installing RD W15
washer between the rear derailleur body and the rear derailleur
hanger of the frame.
9
This installation manual is suitable for Ridea
OSPW+RD3 C35/C60 rear derailleur cage
OSPW+
OverSized Pulley Wheel System +
Greater than
10 degrees
Less than
30 degrees
Small
Small
AB
C D
Thank you for your purchase. Please read thoroughly
this installation manual before proceeding with the
upgrade of your rear derailleur.
Warranty void if manual is not read and followed
Exploded view
A: Rear derailleur body
B: Tension spring
C: Body screw
D: Original pulley cage
A. 2mm Phillips screwdriver
B. Needle nose pliers
C. Cable tie
Required tools
For the installation of your new RD3 C35/C60 Oversized Pulley
Wheel System (henceforth referred as OSPW+) you will need
the following tools:
Insert the tension spring in the
derailleur body and make sure
that the internal hook is inside
the tension hole.
4
5
If required, use a needle nose plier to
remove the body screw. (Attention:
Before you fully remove the body
screw, please press the pulley cage
against the derailleur to avoid an
abrupt release of the spring tension.)
Carefully allow the pulley cage to
unwind, opening the spring
compartment.
3
Keep holding both pieces together
and reinstall the body screw. Tight
(2 N.m) it with a 2 mm Phillips
screwdriver.
8
To facilitate access to the body screw, extend the derailleur
body and fix it in extended position with cable ties. If you are
working with the derailleur installed on your bike, just shift to
the largest cog.
1
Align the external hook of the spring with the correct group of
tension holes of your OSPW+(see note below). To know
which group of tension holes is the correct one, when aligning
your OSPW+with the spring, it should form an angle of approx.
90owith the derailleur body and the lower pulley should be
pointing up and forward. Choose the proper hole according to
your tension preferences (see note below) and insert the spring
hook in it.
6
A D
B
C
Use a 2 mm Phillips screwdriver to
release the partly threaded body
screw.
2
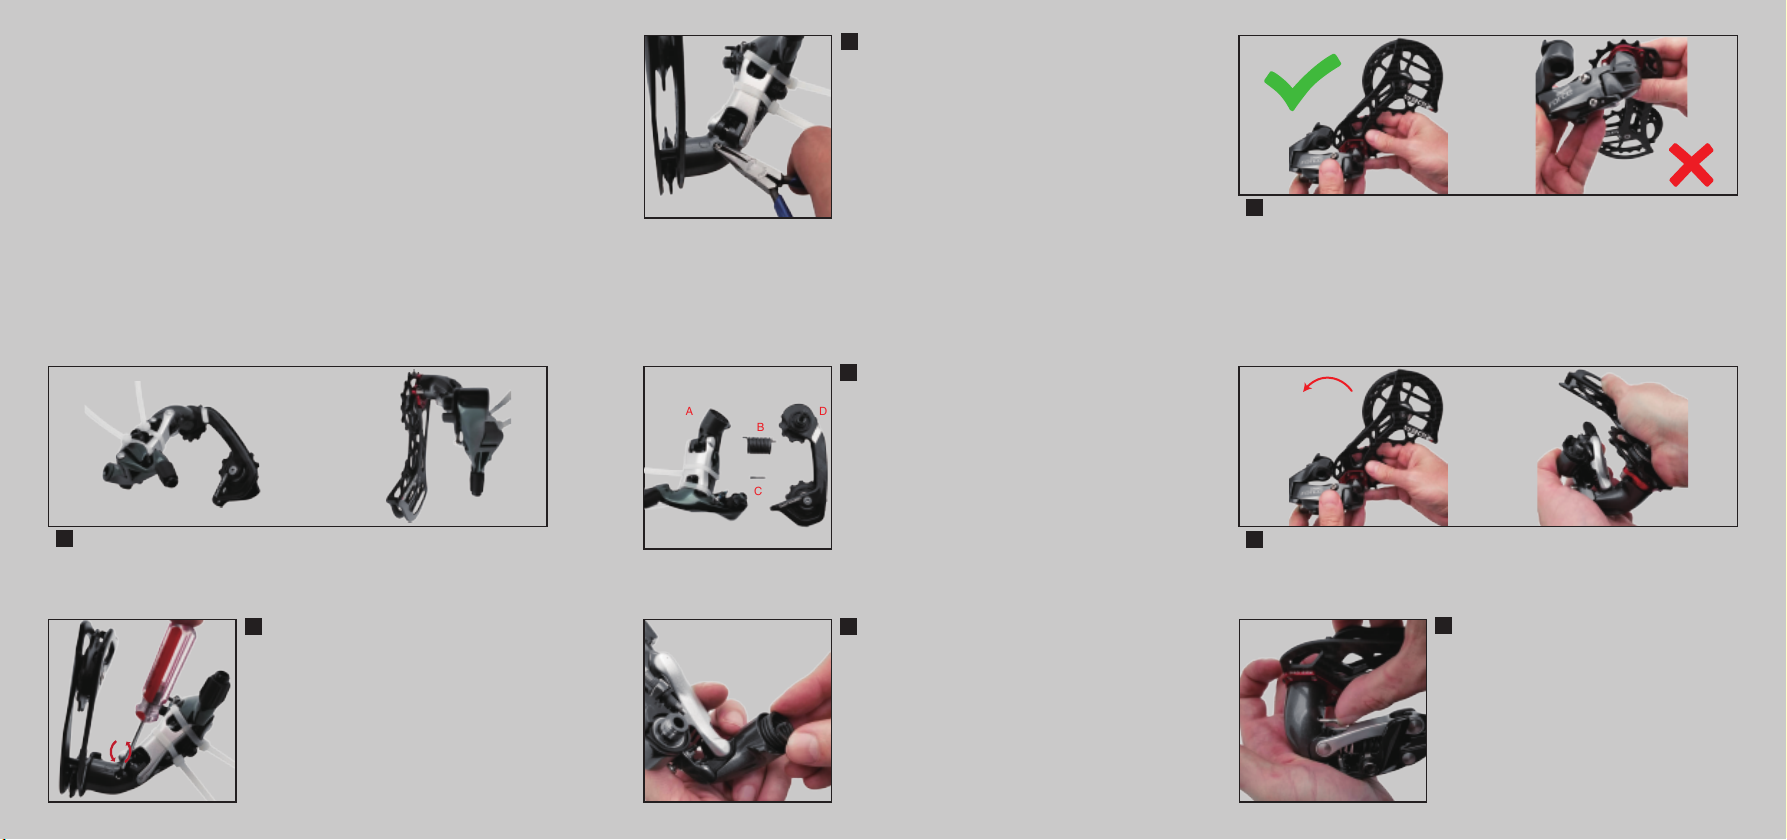
Gently hold both parts together and rotate counterclockwise
the OSPW+until the pulley cage stop screw overpass the
bulge of the derailleur body. Then press firmly to fully
insert the OSPW+into the derailleur body.
7