Rightest GM700 Pro 2 User manual

101-3GM762-XXX
EN(US)
Rev. Date: 2021-01
User’s Manual
GM700 Pro 2
Rx Only
BIONIME CORPORATION
No. 100, Sec. 2, Daqing St., South Dist.,
Taichung City 40242, Taiwan
Tel: +886 4 2369 2388
Fax: +886 4 2261 7586
Email: [email protected]om
http://www.bionime.com
Made in Taiwan
USA Customer Service Center:
Ontario, CA 91761, USA
Tel: +1 888 481 8485
Fax: +1 909 781-6970
http://www.bionimeusa.com
Service hour: Mon. to Fri.
8:00 AM to 5:00 PM PST.
For EMERGENCY, please contact the
healthcare professional.
Blood Glucose Monitoring System

1
Preface
Thank you for choosing the RIGHTEST Blood Glucose Monitoring System GM700 Pro 2. This
product is manufactured by Bionime Corporation and distributed by authorized dealers. Please
read this manual carefully before use and follow the instructions. If you have any questions
regarding this product, please call our customer service +1 888 481 8485 (Service hour: Mon. to
Fri. 8:00 AM to 5:00 PM PST), or contact a local distributor.
The RIGHTEST Blood Glucose Monitoring System GM700 Pro 2 should be used with RIGHTEST
Test Strip GS770 or GS700 and RIGHTEST Control Solution GC700.

2 3
CLIA Complexity Indication for Use
This test is WAIVED for capillary (draw from ngertip, palm and forearm) and venous whole
blood under the Clinical Laboratory Improvements Amendments of 1988 (CLIA).
Laboratories with a Certicate of CLIA waiver can perform this test in a waived setting and must
follow the manufacturer’sinstructions for performing the test. If a laboratory modies the test
instructions, the test will no longer be considered waived.
(Refer to the section of "CLIA Waiver Study Results/System Accuracy Result").
This manual provides all necessary instructions for the routine operation and maintenance of the
RIGHTEST Blood Glucose Meter GM700 Pro 2. Please read this manual carefully. It has been
prepared to help you attain optimum performance from your Meter.
The RIGHTEST Blood Glucose Monitoring System GM700 Pro 2 consists of the The RIGHTEST
Blood Glucose Meter GM700 Pro 2 and The RIGHTEST Blood Glucose Test Strip GS770.
The RIGHTEST Blood Glucose Monitoring System GM700 Pro 2 is intended for Point-of-care, in
vitro diagnosis, multiple-patients use for quantitative determination of glucose in capillary blood
(draw from ngertip, palm and forearm) and venous whole blood. Whole blood glucose results
are equivalent to plasma results with biochemical analyzer.
The system is intended for use at clinical environments (ie. genenral primary care centers,
outpatient settings for endocrinology and metabolism).
When testing from the ngertip, only single-use, auto-disabling lanceing device should be used.
For alternative site test, single person use lancing device should be used, and the testing could
only perform during steady state time (when there is no rapid change in glucose).
The system is not intended for the screening or diagnosis of diabetes mellitus.

4 5
RIGHTEST Blood Glucose Monitoring System
1.1 RIGHTEST Blood Glucose Monitoring System
1.2 RIGHTEST Blood Glucose Meter GM700 Pro 2
1.3 RIGHTEST Charging Hub
1.4 RIGHTEST Test Strips
1.5 Auto-Code Holder
1.6 Sample Size Example
1.7 Interfering Substances
1.8 Limitation
1.9 Product safety and important Information
Installation
2.1 Installing RIGHTEST GM700 Pro 2
2.2 Installing the Charging Hub
2.3 System Connection
2.4 Recharging the Battery
General Operation
3.1 Power on/o
3.2 Power saving mode and waking up
3.3 User login
3.4 Device information
3.5 Bluetooth connection
Blood Glucose Measurement
4.1 Patient search
4.2 How to enter test strip information
4.3 Wait for the test strip to be detected
4.4 Sample collection
4.5 Checking test results
4.6 Making a test note
4.7 Patient prole
Quality Control
5.1 Select control solution concentration
5.2 How to enter the control solution information
5.3 How to enter the test strip information
5.4 Wait for the test strip to be detected
5.5 Prepare the control solution and take a measurement
5.6 Check the test result
Table of Contents Table of Contents
7
8
9
10
12
13
13
13
15
19
19
19
20
20
21
21
22
22
23
24
25
26
31
32
33
34
35
35
36
37
38

6 7
RIGHTEST Blood Glucose Monitoring SystemTable of Contents
5.7 Making a QC fail note
Advanced Quality Control
6.1 Linear quality control
6.2 External quality control
Maintenance and Care
7.1 Maintenance
7.2 Cleaning and disinfecting procedure
7.3 Cleaning the metal contact point
Error Messages and Troubleshooting
Specications
Customer Service/Warranty
Symbols
CLIA Waiver Study Results/System Accuracy Result
FEDERAL COMMUNICATIONS COMMISION (FCC) STATEMENT
38
39
40
41
44
45
46
48
50
51
52
54
1.1 RIGHTEST Blood Glucose Monitoring System
Your RIGHTEST Blood Glucose Monitoring System GM700 Pro 2 contains the following:
1. RIGHTEST Meter GM700 Pro 2 (with built-in rechargeable lithium battery)
2. Charging hub
3. Power cable*
4. Network cable*
5. User's manual
6. RIGHTEST Test Strip GS770 (with insert)*
7. RIGHTEST lancing device GD500 (with insert)*
8. Transparent cap for lancing device*
9. RIGHTEST lancet*
10. RIGHTEST Control Solution GC700 (Level 1, 2, 4) (with insert)*
(Contents may vary. Items marked with "*" may be supplied separately.)

8 9
RIGHTEST Blood Glucose Monitoring System RIGHTEST Blood Glucose Monitoring System
1.2 RIGHTEST Blood Glucose Meter GM700 Pro 2 1.3 RIGHTEST Charging Hub
Test Strip Port
Insert test strips here.
Power Button
QR code/
Barcode Scanner
Auto-Code
Holder
LCD Display/
Touch Screen
Displays
information and
support touching
operation.
Main Button Product Label
Information
includes model,
batch number
and serial number. Network socket Power port

10 11
RIGHTEST Blood Glucose Monitoring System RIGHTEST Blood Glucose Monitoring System
1.4 RIGHTEST Test Strips
The RIGHTEST Blood Glucose meter GM700 Pro 2 can only be used with RIGHTEST Blood
Glucose Test Strip GS770 and the strip should be used with RIGHTEST Control Solution GC700.
Sample Port
Apply a drop of blood or control solution.
Handle Bar
Hold the handle
when moving
the strip around.
Electrode Contact
Sensor signal output
terminal.
Noble Metal
Electrodes
Electrochemical
sensor.
Indication Symbol
Insert the test strip with the indication
symbol fpointing towards the meter.
Viewing Window
The viewing window appears yellow before
blood is applied. It turns red after being lled
with blood.
Important information
- Please refer to the Blood Glucose Test Strip GS770 insert for details.
- If the blood glucose meter or test strip are exposed to a sudden increase or drop in
temperature or been placed outside the recommended operating temperature range
(43 - 111°F or 6 - 44°C), please wait 60 minutes before using the meter and 30
minutes before using the test strip.

12 13
1.6 Sample Size Example
The recommend sample volume is 0.75 to 3.0μL. Too large sample may contaminate the auto-
code holder, too small sample may lead to the error message (error code 1004). If this occurs,
repeat the test with a new test strip (For detail indication about sample size, please refer to Blood
Glucose Test Strip GS770 Insert).
1.7 Interfering Substances
Before use, please refer to the RIGHTEST Blood Glucose Test Strip GS770 Insert for information
on interfering substances.
1.8 Limitation
- This product is not intended for use at more than 10,745 feet (3,275m) above sea level.
- This product is not intended for plasma or serum testing. Please use a whole blood sample.
- Before use, please carefully read the RIGHTEST Blood Glucose Test Strip GS770 Insert. (which
contains information on blood samples, hematocrit, and interfering substances).
RIGHTEST Blood Glucose Monitoring System RIGHTEST Blood Glucose Monitoring System
1.5 Auto-Code Holder
The auto-code holder automatically detects the code of a test strip. Our test strips deliver
consistent performance without manual coding. The auto-code holder is reusable. When
the auto-code holder is contaminated or damaged, please contact our customer service for
replacement and installation.
Important information
- The auto-code holder automatically calibrates the strip when inserted into the device.
The auto-code holder is reusable unless damaged of contaminated. However, strips
are intented for single use only.
- If the auto-code holder is not functioning properly, please contact our customer
service. Do not try to remove it on your own.

14 15
RIGHTEST Blood Glucose Monitoring System RIGHTEST Blood Glucose Monitoring System
1.9 Product safety and important Information
1.9.1 General safety information
Please carefully read the following sections to ensure safe use of the device.
- To ensure your safety during operation, please read the entire user's manual, test strip insert,
and other instructional materials thoroughly before starting usage.
- We recommend a performance comparison test between the device and and a laboratory
reference device once per year. If any problems arise, please contact our customer service.
1.9.2 Battery
The device uses a rechargeable lithium battery. If the battery does not recharge or is damaged,
please contact customer service for a replacement. Do not try to remove or replace the battery
on your own.
1.9.3 RIGHTEST Charging Hub
- Do not use alcohol or any liquid to wipe the network socket or power port on the back of the
charging hub.
- The charging status will be on when the device is on the charging hub. The charging status will
display through the main button on device. Orange means the device is charging. Green means
the device is fully charged. Do not use the device while charging.
Warning
- Keep the device away from strong electromagnetic radiation to prevent interference
with proper operation of the meter.
- Keep your meter and test strip away from dust, water or any other liquid.
- Disposal of this product: This product contains lithium batteries. The entire system
become infectious during the course of use. Please discard it in accordance with local
regulations for biohazardous waste. If you don't know what to do, please contact our
customer service.

16 17
RIGHTEST Blood Glucose Monitoring System RIGHTEST Blood Glucose Monitoring System
1.9.4 Touch Screen
The touch screen is designed to be operated with a ngertip or stylus. Do not use any other kind
of pen or sharp object as this may damage the touch screen.
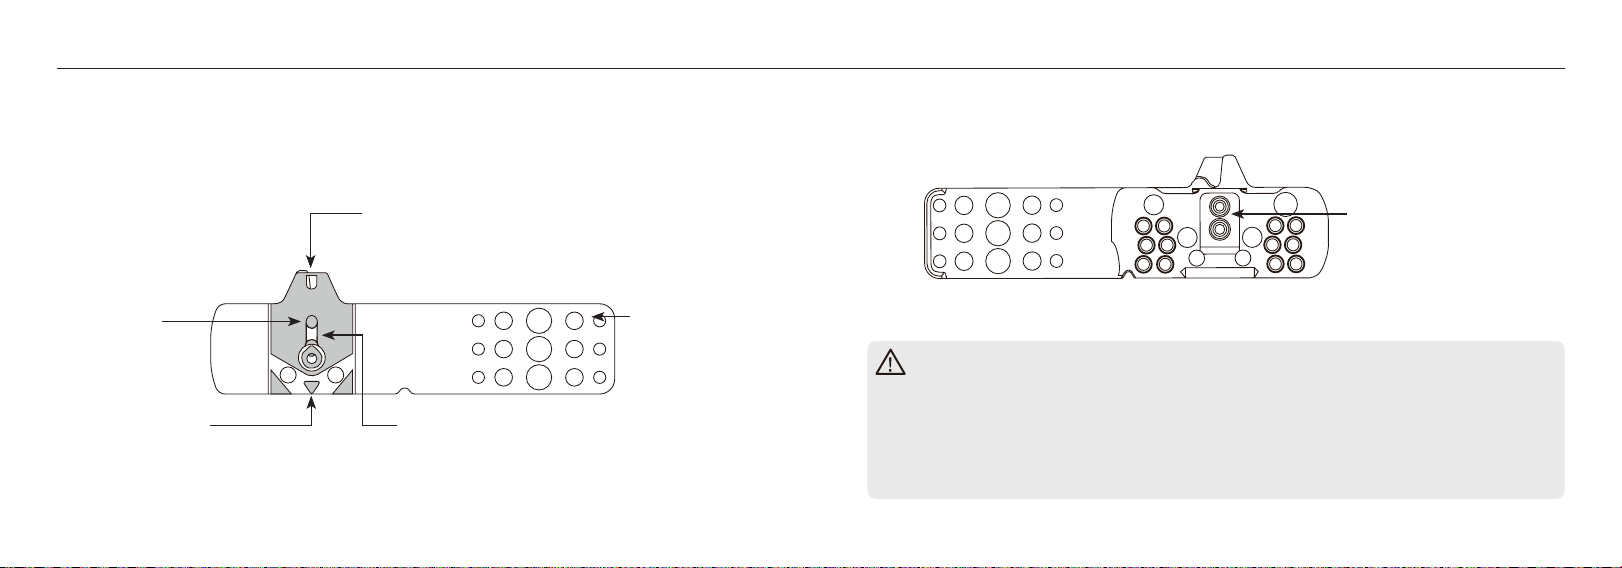
1.9.5 Barcode Scanning
- Do not scratch the barcode scanning lens at the bottom of the device as this may cause issues
with scanning. Do not look directly into the light or point it at another person's eyes when the
scanner is on.
- Please hold the scanner approximately 7 cm above a barcode and allow the light to cover the
entire barcode. Adjust the position of the scanner until the barcode can be read successfully.
1.9.6 Static Electricity Protection
- Keep the device away from strong electromagnetic radiation sources to prevent interference
with proper operation of the meter.
1.9.7 Network Security
- Communication mode: WiFi, LAN (Ethernet hub), and Bluetooth (4.0).
- User management: Login requires an account number and password. Switch user as needed to
manage login access.
- Users are responsible for information security over the Internet and the setup of a secure IT
environment. Use of the device is subject to the information security guidelines of the system to
which the device is connected.
1.9.8 LAN Connection
- When the device is LAN-enabled. Test results can be uploaded to hospital systems via HTTPS.
1.9.9 WiFi Connection
- When device is WiFi-enabled. Test results can be uploaded to hospital systems via HTTPS.
- Please set up a WiFi connection according to the WiFi connection requirements of your
individual hospital.
- WiFi signals are vulnerable to the surrounding environment. The actual transmission distance
and performance will be aected by the user's surroundings.
- When connecting the device to the Internet, please check the security settings.
- The WiFi connection should be congured by your system administrator according to your local
environment.
1.9.10 Biohazardous
The used strip, auto-disabling lancing devices, and lancet should be considered biohazards
waste. Collect these wastes in suitable puncture-proof containers with biohazard labels and
discard them in accordance with local regulations.

18 19
RIGHTEST Blood Glucose Monitoring System Installation
Important information
- Please read the user's manual before use. All pictures shown are for illustration
purposes only.
- Healthcare professional users should complete appropriate training as required by their
hospitals.
- Use single-use disposable lancing device for ngertip test only.
- Keep your meter free from dust, water or any other liquid. Do not immerse the device or
place it underwater.
- While testing for multiple patients, ensure to clean and disinfect the device properly
every time before you test for dierent patient.
- Wear/change new gloves every time prior to test for dierent patients.
- The device should be cleaning and disinfecting as described in the section 7.2 Cleaning
and Disinfecting Procedures.
2.1 Installing RIGHTEST GM700 Pro 2
The device should be initialized by our service engineer before the it could be regular use.
2.2 Installing the Charging Hub
2.2.1 Cables and Connection
LAN transfer and charging power:
1. Connect LAN and Charging hub with the Ethernet cable.
2. Connect power supply and Charging hub with the power cable.
2.3 System Connection
Our service engineer will set the parameters and environment variables according to our system
needs. During the initial setup of the system, our service engineers will set up this function
according to the needs of the organization.
2.3.1 LAN/Wi Conguration
Our service engineers will set up the Ethernet/Wi connection according to the environment.
LAN conguration can be found in the system settings and administration.

20 21
Installation General Operation
2.4 Recharging the Battery
The battery comes partially charged to enable initialization. Please charge the battery for 4 hours
or more before rst use.
The display will show the charging status when the device is inserted into the charging hub.
The charging status will also be indicated by the light of the main button. Orange means
charging. Green means fully charged.
If the device does not recharge:
- Please make sure the device is fully connected to the RIGHTEST Charging Hub.
- Check if the metal point at the bottom of the device or the metal pins of the charging hub are
dirty. Please refer to Section 7.3 Cleaning the metal contact point
3.1 Power on/o
3.1.1 Power on
Press and hold the power button for more than 2 seconds and the device will start the boot
procedure.
3.1.2 Power o
Press and hold the power button for 5 seconds and the device will ask for shutdown conrmation.
3.2 Power saving mode and waking up
When the screen is not touched for a certain length of time, it will turn o to save power. The
length of time can adjusted in the management system.
When the screen is o, press the power/main button to wake the device.
3.3 User login
Login access of healthcare professionals (users) will be authorized by
your system administrator. During the initial setup of the system, our
service engineers will set up this function according to the needs of the
organization.
- The system will display a user login screen on startup.
- The user will be asked to enter the password after their account ID if
necessary.
- The user will be automatically logged out after a period of idle (default 5
mins). Users need to Log in again for use.
NOTE
When the battery power is low, the main button will ash orange, please charge the
device immediately when you see it.

22 23
General Operation Blood Glucose Measurement
3.4 Device information
- Users can adjust the volume and brightness from the setup page.
- Device version information can also be found in the setup page.
Setup: To be adjusted by the user as needed.
Equipment: To allow quality control by the user.
3.5 Bluetooth connection
User can sync the device with other Bionime Bluetooth glucose meter blood glucose record while
their Bluetooth connection (Optional function, default o, our service engineers will set up this
function according to the needs of the organization).
This section is about the blood glucose test procedure and related important information.
Press the button on the home screen to start the procedure.
4.1 Patient search
Multiple patient search modes
- Patient list
- Manual patient search
- QR code/Barcode patient search
QR code/Barcode
patient search
Warning
- Do not look directly into the light or point it at another person's eyes when using the
QR code/barcode scanner.

24 25
Blood Glucose Measurement Blood Glucose Measurement
4.2 How to enter test strip information
With the vial of strip you are going to use for test, there are
3 ways you could do:
1. Scan the barcode on the test strip label.
2. Manually enter the test strip information on strip label.
3. Select the test strip number from the list according to strip
label.
If the number is valid, the system will proceed to the next
step. Otherwise an error message will be displayed. Please
try again.
Warning
- Do not test the patient's blood before the test strip is detected and "Apply Blood
Sample" instruction shown. Apply sample too early may result in error message (error
code 1008).
4.3 Wait for the test strip to be detected
Follow the instruction on display, to make sure to test successfully.
Wait for test strip to be
detected
When you see
"Insert strip" on display,
insert the test strip
When you see "Apply Blood
Sample" on display, apply
the blood sample

26 27
Blood Glucose Measurement Blood Glucose Measurement
4.4 Sample collection
4.4.1 Fingertip capillary sample
Please use single-use, auto-disabling lancing devices, to collect ngertip capillary blood samples
for the patient.
The sample collection procedure brief described as follow:
1. Clean the patient's ngertip with an alcohol swab/pads (or other proper cleaners applicable),
ensure that the ngers are completely dry after cleaning.
2. Puncture the patient's ngertip, squeeze the nger to form a drop of blood.
3. Apply the blood sample to the Strip port for testing (make sure the "apply blood sample" show
on display when you conduct this step).
4. The display will count down for 5 seconds and then show the test result.
4.4.2 Alternative site testing-palm or forearm blood sampling
For alternative sampling site (palm and forearm), we recommend using the
RIGHTEST Lancing Device GD500 (with clear cap), this device is for single patient
use only, and should be using with sterilized lancet (see 4.4.3 section for the
instruction of how to use lancing device).
The sample collection procedure brief described as follow:
1. Clean and Massage the target area on the palm or forearm for a few seconds to
increase blood ow.
2. Immediately after massaging, press and hold the lancing device against the
target area.
3. Press the release button, continue holding the lancing device against the skin.
Gradually push the device against your skin with increasing pressure until the
blood droplet formed enough size for testing.
4. Apply the blood sample to the Strip port for testing (make sure the “apply blood
sample” show on display when you conduct this step).
5. The display will count down for 5 seconds and then show the test result. Pressing for
a few seconds
Releasing
button
Forearm
Palm

28 29
Blood Glucose Measurement Blood Glucose Measurement
4.4.3 Preparing the Lancing Device
1. Hold the depth adjustable cap in one hand and hold the hub in the other hand. Bend the cap
towards the down side, until a gap appears between the cap and hub.
2. Pull the cap and hub o in opposite directions, remove the cap.
3. Insert a new disposable lancet rmly into lancet carrier.
4. Twist o and set aside the protective cover of the disposable lancet.
5. Replace the depth adjustable cap.
6. Choose a depth of penetration by rotating the top portion of the depth adjustable cap until the
setting depth matches the window. Settings are based on skin type " " for soft or thin skin;
" " for average skin; " " for thick or calloused skin.
7. Hold the hub in one hand and pull on the plunger in the other hand. The device will be cocked.
Release the plunger, it will automatically move back to its original position near the hub.
1 3 62 54 7
Important information
- Fingertip samples can show rapid changes in glucose faster than palm or forearm
samples.
- Test results may vary if blood samples are taken from dierent sites.
- Do not test the blood sample from palm or forearm when glucose is changing rapidly
(scenarios: after drinking, after meal, after exercise).
- Do not test on the palm or forearm if the testing aims for insulin dose calculations
or hypoglycemia (low blood glucose) or calibrating continuous glucose monitoring
systems (CGMS).

30 31
Blood Glucose Measurement Blood Glucose Measurement
Warning
- Check the expiration date printed on the strip label and the opening date recorded on
the label every time before using the test strip. Do not use any expired test strips.
- Use test strips immediately after taking it out from the vial.
- Do not reuse test strips.
- If the blood glucose meter or test strip is exposed to a sudden increasing
or dropping temperature, please wait for at least 60 minutes before using
the meter, at least 30 minutes before using the test strip.
- Do not use the syringe to inject blood into the sample port directly. Doing
so may contaminate or damage the device.
4.5 Checking test results
- A successful test will show the test result and patient information.
- Select the patient information.
- The test results are classied into 3 conditions, please follow the instruction on screen for
further operation. The condition level will be defined according to organization, our service
engineers will set up this function according to customer needs).
Patient
information
Test result
Warning
The used strip, auto-disabling lancing devices, and lancet should be considered
biohazards waste which may potentially transmit infectious diseases. Collect these
wastes in suitable puncture-proof containers with biohazard labels and discard them in
accordance with local regulations.

32 33
Blood Glucose Measurement Blood Glucose Measurement
4.6 Making a test note
To make a test note, press the "Notes" button, and a list of preset notes will be displayed. Press
to select a note. Press "OK" to nish making a test note.
- If the blood glucose level is outside the measuring range, the system will display a message as
follows: HI: above the measuring range (600 mg/dL).
LO: below the measuring range (10 mg/dL).
- To note the test period, press "Test Period" or "Glycemic Period" and a list of test periods will
be displayed. Select your choice. Available choices can be set by your organization.
Important information
- If a blood test result is unusually high or low or if you suspect an error has occurred,
please use a new strip and repeat the test. Alternatively, run a quality control test to
check whether the meter and test strips are working correctly.
4.7 Patient prole
4.7.1 Overall status
- Multiple time periods.
- HbA1c.
- Mean blood glucose.
- Blood glucose distribution.
- Blood glucose levels by period.
4.7.2 Blood glucose readings
Display patient test results by time and date.

34 35
Quality Control Quality Control
This section is about the quality control procedure and important related information.
Please perform a quality control test to ensure your blood glucose monitoring system works
properly.
Recommended Quality Control Frequency
- If the system is for daily use, please perform quality control before starting the rst testing every day.
- If the system is not for daily use, please perform quality control every time before starting a test.
Press "Quality Control" on the setup screen to enter the quality control screen. Press "QC now" and
the system will start the quality control procedure.
QC lock function:
The test function will be locked if the last QC record is out
of validated time, the system will demand user to perform
the QC test then unlock the test function. (This function is
default o, the validated time period could be customized,
our service engineers will set up this function according to
the needs of the organization).
Warning
- Make sure to select the correct control solution level you are going to use.
QC Lock Quality control
5.2 How to enter the control solution information
- Scan the barcode on the control solution label.
- Manually enter the control solution information according to the control
solution label.
- According to the label, select the control solution number from the list.
- If the number is valid, the system will proceed to the next step. Otherwise
an error message will display. Please try again.
5.3 How to enter the test strip information
- Scan the barcode on the test strip label.
- Manually enter the test strip information according to the strip label.
- According to the label, select the strip number from the list.
- If the number is valid, the system will proceed to the next step. Otherwise
an error message will display. Please try again.
5.1 Select control solution concentration
Select the control solution concentration to be tested. The applicable control solution for this device is
RIGHTEST Control Solution GC700.

36 37
Quality Control Performing a Quality Control Test
5.4 Wait for the test strip to be detected
Follow the on-screen instructions and insert the test strip. Wait for the test strip to be detected
before apply the control solution.
Wait for the test strip to
be detected
When you see
"Insert strip" on display,
insert the test strip
When you see "Apply Control
Solution" on display, apply the
blood sample
Warning
- Do not Apply the control solution before the test strip is detected This may result in an
error message (error code 1008).
5.5 Prepare the control solution and take a measurement
1. Gently invert the bottle several times to ensure that the control solution is
thoroughly mixed before use. There should not be any bubbles. Remove the
cap and place it on a at surface.
2. Place a drop of control solution on the top of the cap.
3. Touch the drop of solution with the sample port of test strip.
1
32
Open
Important information
- Do not drop control solution onto the sample port of the test strip directly. Doing so
may contaminate or damage the device.
- Do not touch the tip of the control solution bottle. If contact with the skin
occurs, wash the tip with water and discard two droplets of solution.
- Please refer to the Control Solution Insert for detailed information of
control solution.
Table of contents
Other Rightest Blood Glucose Meter manuals

Rightest
Rightest GT200 User manual

Rightest
Rightest GS100 User manual

Rightest
Rightest Max Tel User manual

Rightest
Rightest GT333 User manual

Rightest
Rightest GM700S User manual

Rightest
Rightest Wiz User manual

Rightest
Rightest GT333 User manual

Rightest
Rightest GM700SB User manual

Rightest
Rightest GS100 User manual

Rightest
Rightest GT100 User manual