Roav C1 PRO User manual

DASHCAM C1 PRO
Owner’s Manual
Model: R2120-INT
51005000626 V01

01 English
16 日本語
30 简体中文
44

日本語 简体中文
DashCam
充電ケーブル
カーチャージャー
取り付けマウント(2個)
調整用バール
取扱説 明書
microSDカード
DashCam
电源线
车充
底座(2片)
小撬棍
用户手册
microSD 卡
English
DashCam
microSD
DashCam
Charging cable
Car charger
Mount (2 pieces)
Crowbar
Manual
microSD card
microSD card
Owner’s Manual
DASHCAM C1
DashCam
Charging cable Crowbar
Car charger Manual
Mount (2 pcs)

01 English English 02
Speaker
Microphone
Power button with LED indicator
• Red: recording in progress
• Green: no recording status
Camera lens
LCD screen
Touch buttons
Memory card slot
Air vent
Micro USB charging port
Reset slot
Please read and understand all instructions before using
this product. If damage is caused by failure to follow the
instructions, the warranty does not apply.
• Keep these instructions.
• Do not drop, puncture or disassemble this product.
• This product shall not be exposed to dripping or splashing.
• Avoid long exposure to direct sunlight, which may cause damage.
• Exposing this product to open flames may cause explosion.
• Use original accessories only.
• Do not install this product where it will block the driver’s view of
the road or the deployment of the airbag.
• Keep your attention on the road. Do not operate the controls of
this product while driving.
• Ensure the camera lens is kept clean and there is nothing
blocking the lens.
• Setup time and date accurately before using this product.
• Do not use the charger if the cord is damaged or broken.
• Remove this product from your vehicle when not in use for a long
period.
• Keep out of reach of children.
• Use clean, soft cloth to clean. Do not use any corrosive cleaner/
oil to clean.
• The Company is NOT responsible for the loss of any data/
content during operation.

03 English English 04
Do not remove or insert microSD / TF card when this
product is powered on, which may damage the card.
For reliable operation, use a Class 10 microSD / TF card. For a
64GB/128GB card, format it before using. It is recommended
to format the card regularly.
Card Capacity 32 GB 64 GB 128 GB
1440P 30FPS 220 min 440 min 880 min
1080P 60FPS 240 min 480 min 960 min
1080P 30FPS 320 min 640 min 1280 min
720P 60FPS 360 min 720 min 1440 min
720P 30FPS 480 min 960 min 1920 min
Insert a microSD / TF card with the
gold contacts facing the screen side
of the DashCam. Push the card until
it clicks into place.
To remove the card, gently push its
top edge inward until it clicks, and
then pull it out of the slot.
Never install this product while driving.
Install this product near the rear-view mirror to
obtain the best open-field view. Do not install in a
location that will obstruct your required driving view.
Make sure that the lens is within the wiping range of
the windscreen wiper to ensure a clear view even
when it rains.
Do not touch the lens with your fingers. Finger grease
may be left on the lens and will result in unclear
videos.
The mount is adhesive and may be destroyed if it is
removed from the windshield.
Attach the DashCam onto the mount.

05 English English 06
Select a location (A or B) on the windshield behind the rear-
view mirror, clean with clear water and wait until fully dry.
Remove 3M adhesive sticker and firmly affix the mount onto
the windshield.
Use the crowbar to press and hide the charging cable
into the seams and weatherstrips around the edge of the
dashboard.
Adjust the lens viewing angle to ensure that it is aligned
with the road ahead.
Connect the car charger and DashCam by using the
charging cable.
Plug the other end of the car charger to your vehicle’s
cigarette lighter socket.
Once the car engine is started, DashCam will automatically
power on and start recording. Once the car engine is shut
down, DashCam automatically saves the recording and
turns off within 60 seconds.

07 English English 08
Search “Roav” in App Store or Google Play to Download.
Connect DashCam with Smartphone
When successfully connected with your smartphone via
built-in Wi-Fi, you can save and playback the driving recording
videos on your smartphone. You can also change settings of the
DashCam via Roav app.
When successfully connected, DashCam stops
recording.
Android phones cannot access internet data while
connected to DashCam’s Wi-Fi. iOS devices should
still function normally.
Tap , select "WIFI" > "On" to enable WiFi on DashCam.
Enable WiFi on your smartphone, find “Roav DashCam
C1 Pro” on the list and connect it, enter password (initial
password: goroavcam) if required.
Follow the instructions on your smartphone to complete the
connection.
As a driver, you have full responsibility to drive safely
and adhere to all applicable trac regulations.
Record Videos
When connected to a car charger, DashCam automatically
starts recording, is displayed and red dot flashes on the
screen, the current recording duration is displayed, and the
current date and time is displayed.
To enable / disable the audio recording, tap .
Protect the Current Recording
By default, DashCam uses a sensor to automatically detect
accidental collisions and protect the video file with duration of
30 seconds, and is displayed. This indicates that those
recordings have been locked and will not be overwritten by new
video clips.
To protect the current recording manually, tap .
TThe locked video clips will be saved in “RO” folder under
root directory of the memory card.

09 English English 10
Playback Videos
The DashCam stops recording while viewing videos
or settings.
Tap to view all saved videos.
Select a video to playback.
Touch Button Virtual Button Function
Play / Pause
Delete Current / Delete All
Lock Current / Unlock
Current
Back to previous menu
To adjust DashCam’s settings, tap .
Menu Options Description Available Options
Resolution Set a desired video
resolution.
720P 30FPS / 720P
60FPS / 1080P 30FPS
/ 1080P 60FPS /
1440P 30FPS
Loop Recording Set the duration of each
recording video clip.
1 min / 3 min / 5
min / 10 min
Sensitivity
Sensitivity for gravity helps
to detect vibration and
shock while driving and
makes DashCam to respond
appropriately.
Low / Medium /
High / Off
Parking
Monitor
Enable to keep DashCam in
standby mode. Motion will
be detected for 15 times and
DashCam starts recording a
30 second
video each time.
Low / Medium /
High / Off
WIFI Connect with smartphone On / Off
Date Set date and time
Tap / to adjust
the value, tap to
next option, tap
to save
Language Set on-screen display
menu language.
English / Deutsch
/ 日本語 / 简体中
文/ 繁体中文 /
Español / Italiano /
Français / ةيبرعلا

11 English English 12
GPS
Enable / disable GPS
positioning module to record
the complete driving
path.
On / Off
LCD Auto Off Turn off the screen backlight
after a period of inactivity.
30 Seconds /
60 Seconds / Off
Machine Sound
Mute or unmute. On / Off
Default Reset all options to the
default settings. Cancel / OK
Format
Format the memory card and
all the data will be deleted.
Cancel / OK
Water Mark Display / hide the date and
time on the recordings. On / Off
Frequency
Match the video frequency of
DashCam with the electrical
frequency of your location.
50 Hz (EU / China) /
60 Hz (US / Japan)
About Check the current version
number.
Touch Button Virtual Button Function
Click repeatedly to select a setting
Click to confirm a selection
Toggle the next setting
Toggle the previous setting
Back to recording mode
Specifications are subject to change without notice.
Screen: 2.4” LCD color TFT (320 x 240)
Camera sensor: OV 4689
Camera lens: wide-angle lens 145°
Chipset: Novatek NT96660
Power input: 5V 1A
Max video resolution: 1440P 30FPS
Video clip format: .MP4
Wi-Fi: 2.4GHz Band
Battery capacity: 470 mAh
Operating temperature range: -10°C to 65°C / 14°F to 149°F
Storage temperature range: -29°C to 71°C / -20°F to 160°F
Weight: Approx. 119 g / 4.2 oz
Size: 86*66*36 mm / 3.4*2.6*1.4 in

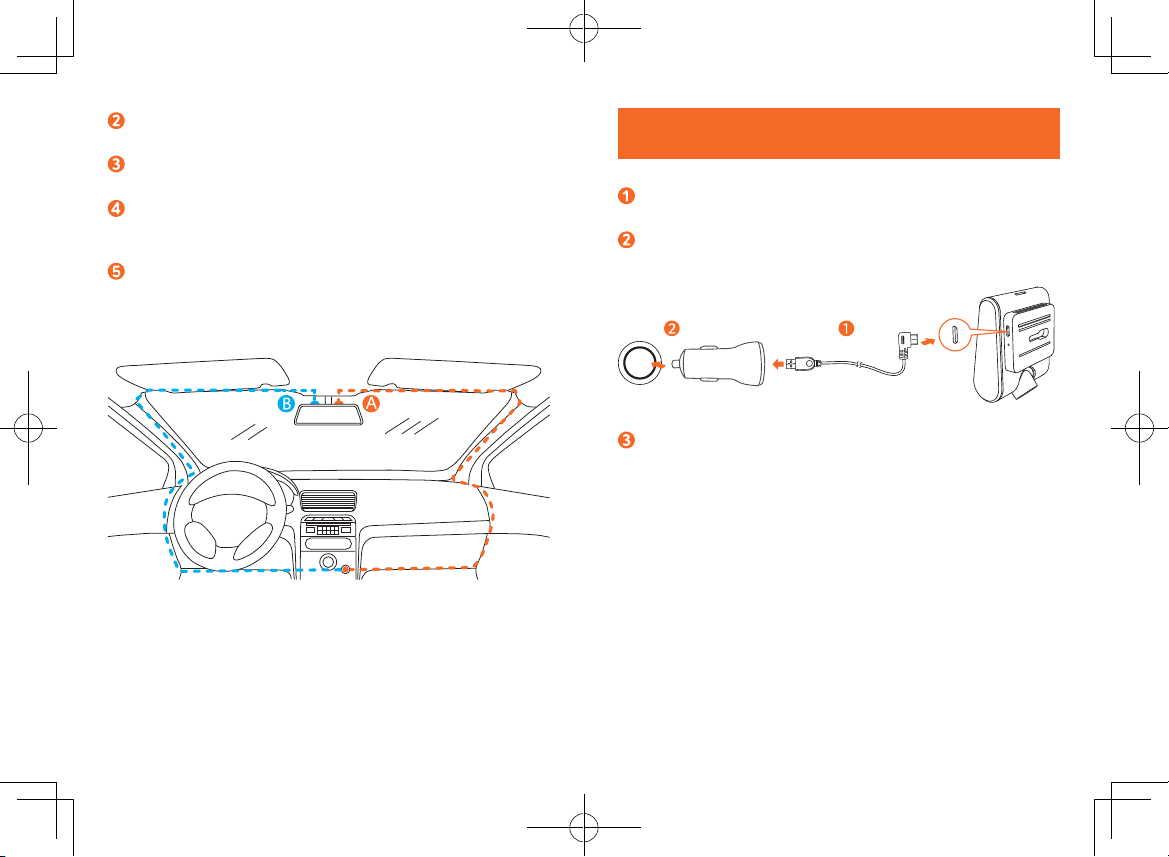
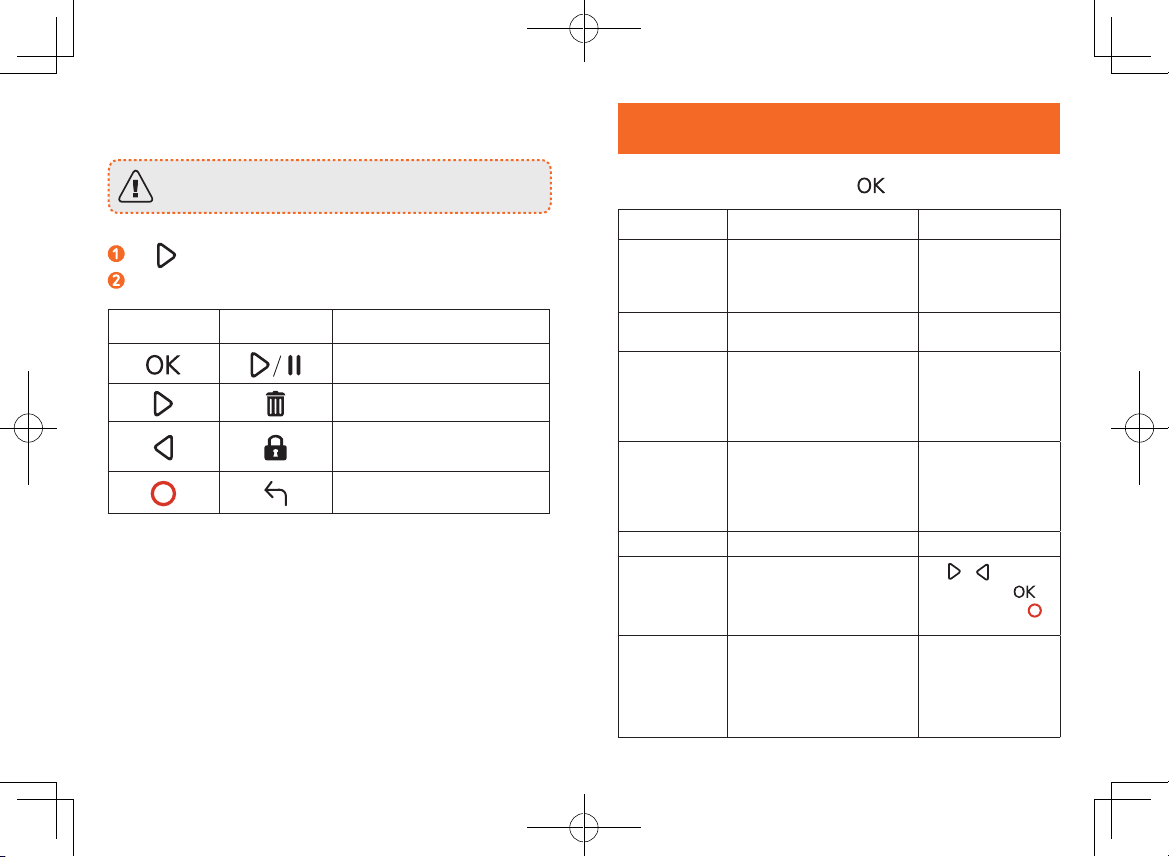
13 English English 14
FAQ
Can not record?
• Check if the memory card is inserted properly and there is
enough free capacity.
• Check the battery level.
Blurred image?
• Use a clean, soft lens-cleaning cloth to gently clean the
lens.
Malfunction or crash?
• Press and hold the Reset slot by using a sharp pin for at
least 2 seconds.
Blank screen?
• The screen saver is activated. Change settings to “Off” if
required.
Fail to view and playback videos on your smartphone?
• Check on your smartphone if Wi-Fi is successfully
connected to the DashCam.
How to enable parking monitor?
• Tap , select “Parking Monitor” > “On”.
Worry about the memory card is full?
• Continuous loop recording allows to overwrite the old
unlocked files.
Will my data be used when my smartphone is connected
with DashCam?
• No. Data will be used only if you share the saved videos
via social apps.
This product complies with the radio interference
requirements of the European Community.
Operating Frequency Range: 2400-2483.5 MHz;
Max Output Power: 15 dBm
This product is designed and manufactured with
high quality materials and components, which can
be recycled and reused.
This symbol means the product must not be
discarded as household waste, and should be
delivered to an appropriate collection facility for
recycling. Follow local rules and never dispose of
the product and rechargeable batteries with normal
household waste. Correct disposal of old products
and rechargeable batteries helps prevent negative
consequences for the environment and human
health. Removal of the built-in battery invalidates
the warranty and may destroy the product. Always
bring your product to a professional to remove the
built-in battery.
FCC Statement
This device complies with Part 15 of the FCC Rules. Operation
is subject to the following two conditions: (1) This device may
not cause harmful interference, and (2) This device must accept
any interference received, including interference that may cause
undesired operation.
Warning: Changes or modifications not expressly approved by the
party responsible for compliance could void the user's authority to
operate the equipment.

日本語 16
15 English
Note: This equipment has been tested and found to comply with
the limits for a Class B digital device, pursuant to Part 15 of the FCC
Rules. These limits are designed to provide reasonable protection
against harmful interference in a residential installation.
This equipment generates, uses and can radiate radio frequency
energy and, if not installed and used in accordance with
the instructions, may cause harmful interference to radio
communications. However, there is no guarantee that interference
will not occur in a particular installation. If this equipment does
cause harmful interference to radio or television reception, which
can be determined by turning the equipment off and on, the user is
encouraged to try to correct the interference by one or more of the
following measures: (1) Reorient or relocate the receiving antenna.
(2) Increase the separation between the equipment and receiver.
(3) Connect the equipment into an outlet on a circuit different from
that to which the receiver is connected. (4) Consult the dealer or
an experienced radio / TV technician for help.
This device is acting as slave and operating in the 2.4 GHz (2412-
2462 MHz).
FCC Radio Frequency Exposure Statement
The device has been evaluated to meet general RF exposure
requirements. The device can be used in portable exposure
conditions without restriction.
Apple and the Apple logo are trademarks of Apple Inc., registered
in the U.S. and other countries. App Store is a service mark of
Apple Inc., registered in the U.S. and other countries.
Google Play and the Google Play logo are trademarks of Google Inc.
“Android” is a registered trademark of Google Inc. in the United
States and other countries.
“iOS” is a registered trademark of Apple Inc. in the United States
and other countries.
安全上のご注意
本製品をご使用になる前に必ず本説明書内の全ての項目に目を通して
ください。説明書の記載に沿わないご使用による製品の故障について
は、保証の対象外となります。
• 本説明書をお手元に大切に保管してください。
• 本製品を落下させたり、傷つけたり、改造をしないでください。
• 本製品に水がかからないようにしてください。
• 長時間、直射日光の当たる環境下に置くことは避けてください。
故障の原因となる場合があります。
• 爆発の危険性があるので、本製品を直接火に近づけないでくだ
さい。
• 本製品の純正の付属品のみお使いください。
• 運転手の視界の妨げとなる位置やエアバッグが開く場所に本製品を
設置しないでください。
• 運転中に本製品を操作しないでください。前方を注意しながら運転
してください。
• カメラレンズを綺麗に保ち、レンズの視界を妨げるものがないこと
を確認してください。
• 本製品をご使用になる前に、日付と時刻を正確に設定してくだ
さい。
• ケーブルが破損している場合は充電器を使用しないでください。
• 長時間の使用や、直射日光下に置いていて過熱している際は本製品
に直接触れないでください。
• 長期間ご使用にならない場合は、車から取り外してください。
• 子供の手の届かない場所に保管してください。
• 清潔で柔らかい布で掃除をしてください。洗剤や油は使用しないで
ください。
• 当社は本製品の操作におけるいかなるデータならびに情報の紛失に
関する責任を負いかねます。

17 日本語 日本語 18
外観
スピーカー
マイク
電源ボタン (LEDランプ搭載)
• LEDが赤:録画中
• LEDが緑:録画可能
カメラレンズ
液晶画面
タッチボタン
メモリーカードスロット
換気口
Micro USB充電ポート
リセットボタン
メモリーカードの挿入方法
故障の原因となりますので、本製品の電源が点いている時にメモ
リーカード(マイクロSDやTFカード)を抜き差ししないでください。
信頼性のある動作を保証するため、Class 10のマイクロSDまた
はTFカードをお使いください。64GB / 128GBのメモリーカー
ドはご使用前にフォーマットしてください。また、定期的に
カードをフォーマットすることを推奨します。
メモリーカー
ド容量 32 GB 64 GB 128 GB
1440P 30FPS 220 分間 440 分間 880 分間
1080P 60FPS 240 分間 480 分間 960 分間
1080P 30FPS 320 分間 640 分間 1280 分間
720P 60FPS 360 分間 720 分間 1440 分間
720P 30FPS 480 分間 960 分間 1920 分間
スクリーン側に金メッキ端子が向
くようにメモリーカード(マイクロ
SDやTFカード)を挿入してくださ
い。カチッと音が鳴るまで押し込ん
でください。
カードを取り出す時は、カチッと
音が鳴るまで上部をゆっくりと押
し、スロットから取り出してくだ
さい。

19 日本語 日本語 20
DashCamの設置方法
運転中に本製品を取り付けないでください。
視界の開けたアングルを確保するため、バックミラーの
近くに取り付けてください。運転の視界の妨げとなるよ
うな場所には設置しないでください。
雨天時でもクリアな映像を撮れるように、カメラレンズ
がフロントガラスのワイパーが届く範囲内に設置してく
ださい。
レンズを直接指で触らないでください。手の油等がつい
て、クリアな映像を撮れなくなる場合があります。
取り付けマウントは粘着性があるので、フロントガラス
から取り外すと壊れてしまう場合があります。
DashCam本体を取り付けマウントの上に取り付けてください。
フロントガラスのバックミラーに近い位置(A または B)
に設置箇所を決め、水拭きし、十分に乾燥させください。
取り付けマウント上のステッカーを剥がして、取り付けマウ
ントをフロントガラス上にしっかりと固定してください。
調整用バールを使い、充電ケーブルをダッシュボードの端
付近の継ぎ目やウェザーストリップ部分に押し込み、隠し
てください。
前方の道路が映るようにカメラのアングルを調節してく
ださい。

21 日本語 日本語 22
電源への接続方法
充電ケーブルを使って、カーチャージャーとDashCam本体
を接続してください。
カーチャージャーを車のシガーソケットに挿入してくださ
い。
車のエンジンがかかると、自動的に電源が入り、録画が開
始されます。エンジンが切れると、録画を保存し、60秒以
内に電源が切れます。
Roav Appのダウンロード方法
App StoreまたはGoogle Playで「Roav」と検索してアプリをダ
ウンロードしてください。
DashCamとスマートフォンの接続
本製品の内蔵Wi-Fiを通してお使いのスマートフォンと正しく
接続すると、録画した映像をスマートフォンで再生、保存で
きます。Roavのアプリを用いて本製品の設定を変更すること
もできます。
正しく接続されると、録画が中断されます。
Android端末の場合、本製品の内蔵Wi-Fiに接続時は
インターネットにアクセスすることができません。
iOS端末の場合は問題なくアクセス可能です。
をタップし、「WIFI」を選択して、「オン」を選択す
ると本製品のWiFiが起動します。
お使いのスマートフォン上で「設定」内の「Wi-Fi」に進
み、起動してください。「Roav DashCam C1 Pro」を選択
し、パスワードを入力してください(初期設定時、パスワ
ードは「goroavcam」に設定されています。)
スマートフォン上の指示に従い、接続を完了してください。

23 日本語 日本語 24
DashCamの使用方法
交通法規を遵守し、安全に留意して運転を行って
ください。
ビデオの録画
カーチャージャーに接続すると、自動的に録画が開始されま
す。録画中は画面に が表示され、赤いランプが点滅し、
録画中の映像の継続時間と日付と時刻が映し出されます。
録音のオン/オフを切り替える場合は を押してください。
映像の保護
本製品は衝突事故を感知するセンサーを搭載しており、衝突
を感知すると30秒間の映像を保護し、 が表示されます。
この表示がされると映像が保護され、新たな映像に上書きさ
れることはありません。
マニュアル操作で現在録画中の映像を保護する際は を押し
てください。
T保護された動画はメモリーカードのルートディレクトリ
内にあるROフォルダに保存されます。
映像の再生
映像の再生時や設定時は録画が停止します。
保存されている映像を閲覧するには を押してください。
再生する映像を選択してください。
タッチボタン バーチャルボタン 意味
再生/停止
最新の映像を削除する/
全ての映像を削除する
最新の映像を保護する/
保護を解除する
前のメニューに戻る

25 日本語 日本語 26
システム設定
DashCamの設定を行う際は、 を押してください。
メニュー 説明 設定オプション
解像度 映像の解像度の設定。
720P 60FPS / 720P
30FPS/1080P30FPS
ループ録画の
長さ
それぞれの録画映像の長
さの設定。
1分間 / 3分間 /
5分間 / 10分間
感度
重力感度の設定することに
より、振動や衝撃の探知を
助け、DashCamが適切に反
応するようになります。
低/ 中/ 高/ オフ
駐車モニター
DashCamをスタンバイモー
ドにしておくことができま
す。15回動作を感知するご
とにそれぞれ30秒間ずつの
映像を録画します。
低/ 中/ 高/ オフ
WIFI スマートフォンとの接続。 オン / オフ
日付 日付と時刻の設定。 / : 値を調整,
: 次の項目へ,
: 保存
言語 メニューで表示される言
語の設定。
English / Deutsch
/ 日本語 / 简体中
文/ 繁体中文 /
Español / Italiano /
Français / ةيبرعلا
GPS
走行履歴を記録するため
にGPS位置情報を有効 / 無
効にする。
オン / オフ
液晶画面自動
オフ
一定時間使用しないと、
スクリーンのバックライ
トが自動で消灯します。
30 秒/ 60 秒/
オフ
機械音 ミュートまたはミュート
解除。 オン / オフ
デフォルト 全ての設定を初期設定に
戻す。 キャンセル / OK
フォーマット
メモリーカードを初期化し、
すべてのデータを削除。
キャンセル / OK
透かし表示 録画中、日付と時刻を表
示/非表示。 オン / オフ
周波数
映像の周波数の設定(※地
域により異なります)。
50 Hz / 60 Hz
情報 現在のバージョンを確認。
タッチボタン バーチャルボタン 意味
何度も押す:設定を選択;
一度押す:設定を決定
次の設定に切り替える
前の設定に戻る
録画モードに戻る

27 日本語 日本語 28
仕様
仕様は予告なく変更されることがあります。
スクリーン:2.4”LCD color TFT (320 x 240)
カメラセンサー:OV 4689
カメラレンズ:wide-angle lens 145°
チップセット:Novatek NT96660
入力:5V 1A
最高解像度(動画):1440P 30FPS
映像フォーマット:.MP4
Wi-Fi:2.4GHz バンド
バッテリー容量:470mAh
使用時適正温度:-10°C から 65°C
長期保管時適正温度: -29°C から 71°C
重さ:約 119 g
サイズ:約 86*66*36 mm
よくあるご質問
録画できません。
• メモリーカードが正しく挿入されているか、また十分な
容量があるか確認してください。
• 電池残量を確認してください。
映像が不鮮明です。
• 清潔で柔らかいレンズ清掃用の布などでレンズを優しく
拭いてください。
誤作動しているか、故障したようです。
• 細いピンを使用し、リセットボタンを2秒以上押し続け
て、リセットしてください。
画面が真っ白です。
• スクリーンセーバーが作動しています。必要でなければ
「オフ」に設定を変更してください。
スマートフォンで映像を見ることができません。
• 本製品のWi-Fiに正しく接続されているか確認してください。
駐車モニターの使用方法
• を押して、「駐車モニター」の設定を「オン」に変
更してください。
メモリーカードの容量がいっぱいで録画ができないのでは
ないかと心配です。
• 容量がいっぱいになると、保護されていない映像が自動
的に削除(上書き)され、空いた容量で録画が継続されま
す。
スマートフォンを本製品に接続した際、データ通信が発生
しますか?
• いいえ。保存された映像をその他の共有用アプリケ
ーションを使って共有した場合のみ、データ通信が発
生します。

简体中文 3029 日本語
注意
リサイクル・再利用可能な、高品質の素材および
部品で設計・製造されています。
製品または梱包物にあるこのマークは、家庭ごみ
として廃棄できないことを示しています。その
ためリサイクルのため適切な回収施設に渡して廃
棄する必要があります。適切な処分とリサイクル
は、天然資源、人々の健康および環境を保護する
のに役立ちます。本製品の廃棄およびリサイクル
については、各自治体、処分場、または本製品を
購入した販売店にお問い合わせください。
本取扱説明書上に記載されている会社名および各製品名は、
一般に各社の商標または登録商標です。
安全须知
使用本产品之前请仔细阅读以下注意事项。如果因违反以下注
意事项而造成损害,本公司概不提供售后保障。
• 请妥善保管此手册。
• 请勿摔跌、损坏、拆装本产品。
• 避免将本产品至于漏水或溅水环境下。
• 避免长时间阳光曝晒,以免损害产品。
• 接触明火可能会引发爆炸。
• 仅限使用原装配件。
• 请勿将本产品安装在遮挡驾驶员视线或弹出安全气囊的
地方。
• 驾驶途中请勿操作此设备以免发生意外。
• 确保摄像头表面干净且无异物遮挡。
• 使用本产品之前请准确设置时间。
• 车充或电源线如有破损,请勿使用。
• 本产品长时间工作或曝晒后,请勿直接接触以免烫伤。
• 长时间不使用时请移除本产品。
• 避免小童接触。
• 使用干净的棉布擦拭镜头。切勿使用任何腐蚀性清洁剂或清
洁油。
• 本公司不对任何数据或内容的遗失负责。

31 简体中文 简体中文 32
概览
喇叭
麦克风
电源键(LED灯)
• 红色: 录像状态
• 绿色: 暂停录像状态
镜头
LCD屏幕
触摸按键
内存卡卡槽
通风口
Micro USB 充电口
重置孔
插入记忆卡
开机状态下请勿拔出或插入记忆卡,以免损坏记忆
卡。
为确保可靠运行,请使用 Class 10 以上的记忆卡。若使用 64G
/ 128GB 的记忆卡,请先将其格式化。建议定期格式化以保护
记忆卡。
记忆卡容量 32 GB 64 GB 128 GB
1440P 30FPS 220 分钟 440 分钟 880 分钟
1080P 60FPS 240 分钟 480 分钟 960 分钟
1080P 30FPS 320 分钟 640 分钟 1280 分钟
720P 60FPS 360 分钟 720 分钟 1440 分钟
720P 30FPS 480 分钟 960 分钟 1920 分钟
请将金触点的一面朝向 DashCam 屏
幕一侧,插入记忆卡(microSD 或
TF 卡),直至卡位固定。
若要取出记忆卡,请轻按记忆卡顶
部边缘,使其自动弹出。

33 简体中文 简体中文 34
DashCam安装指南
请勿在行驶途中安装本产品。
将本产品安装在后视镜附近,确保最佳视角。请勿安
装在影响视线的位置。
将本产品安装在挡风玻璃刮水器的擦拭范围内,确保
雨天也能清晰观察。
请勿用手指直接触摸镜头,防止脏污。
底座具备粘性,从挡风玻璃上移除底座可能导致损坏。
将DashCam 安装在底座上。
在后视镜背部的挡风玻璃上选择一个安装位置(A 或B),
用清水洗净并待其完全干燥。
揭掉底座上的 3M 胶保护层,将底座粘贴在挡风玻璃上。
使用小撬棍将充电线按压并隐藏在仪表板边缘的接缝和密封
条中。
调整镜头角度以获得最佳视角。
This manual suits for next models
1
Table of contents
Languages:
Other Roav Dashcam manuals