Roav DASHCAM A0 User manual
Owner’s Manual
Roav DASHCAM A0
Model: R2251
51005000920 V01
©Anker Innovations Limited. All rights
reserved. ROAV and the ROAV logo are
trademarks of Anker Innovations Limited,
registered in the United States and other
countries. All other trademarks are the
property of their respective owners.

Table of Content
Safety Instructions 01
At a Glance 02
Inserting Memory Card 03
Installing Your DashCam 04
Connecting to Power 06
Downloading Roav App 07
Using Your DashCam 08
System Setup 10
Specifications 12
FAQ 13
Notice 14
01
Safety Instructions
Please read and understand all instructions before using this product. If
damage is caused by failure to follow the instructions, the warranty does
not apply.
• Keep these instructions.
• Do not drop, puncture or disassemble this product.
• This product should not be exposed to dripping or splashing liquids.
• Avoid long exposure to direct sunlight, which may cause damage to
this product.
• Exposing this product to open flames may cause explosion.
• Use original accessories only.
• Do not install where it will block the driver’s view of the road or the
deployment of the airbag.
• Keep your attention on the road. Do not operate the controls of this
product while driving.
• Ensure the camera lens is kept clean and there is nothing blocking
the lens.
• Setup time and date accurately before using this product.
• Do not use the charger if the cord is damaged or broken.
• Do not directly touch the product when it is getting overheated after
long exposure to sunlight or continuous work.
• Remove this product from your vehicle when not in use for a long
period.
• Keep out of reach of children.
• Use a clean, soft cloth to clean. Do not use any corrosive cleaner or
oil to clean.
• The Company is NOT responsible for the loss of any data/content
during operation.
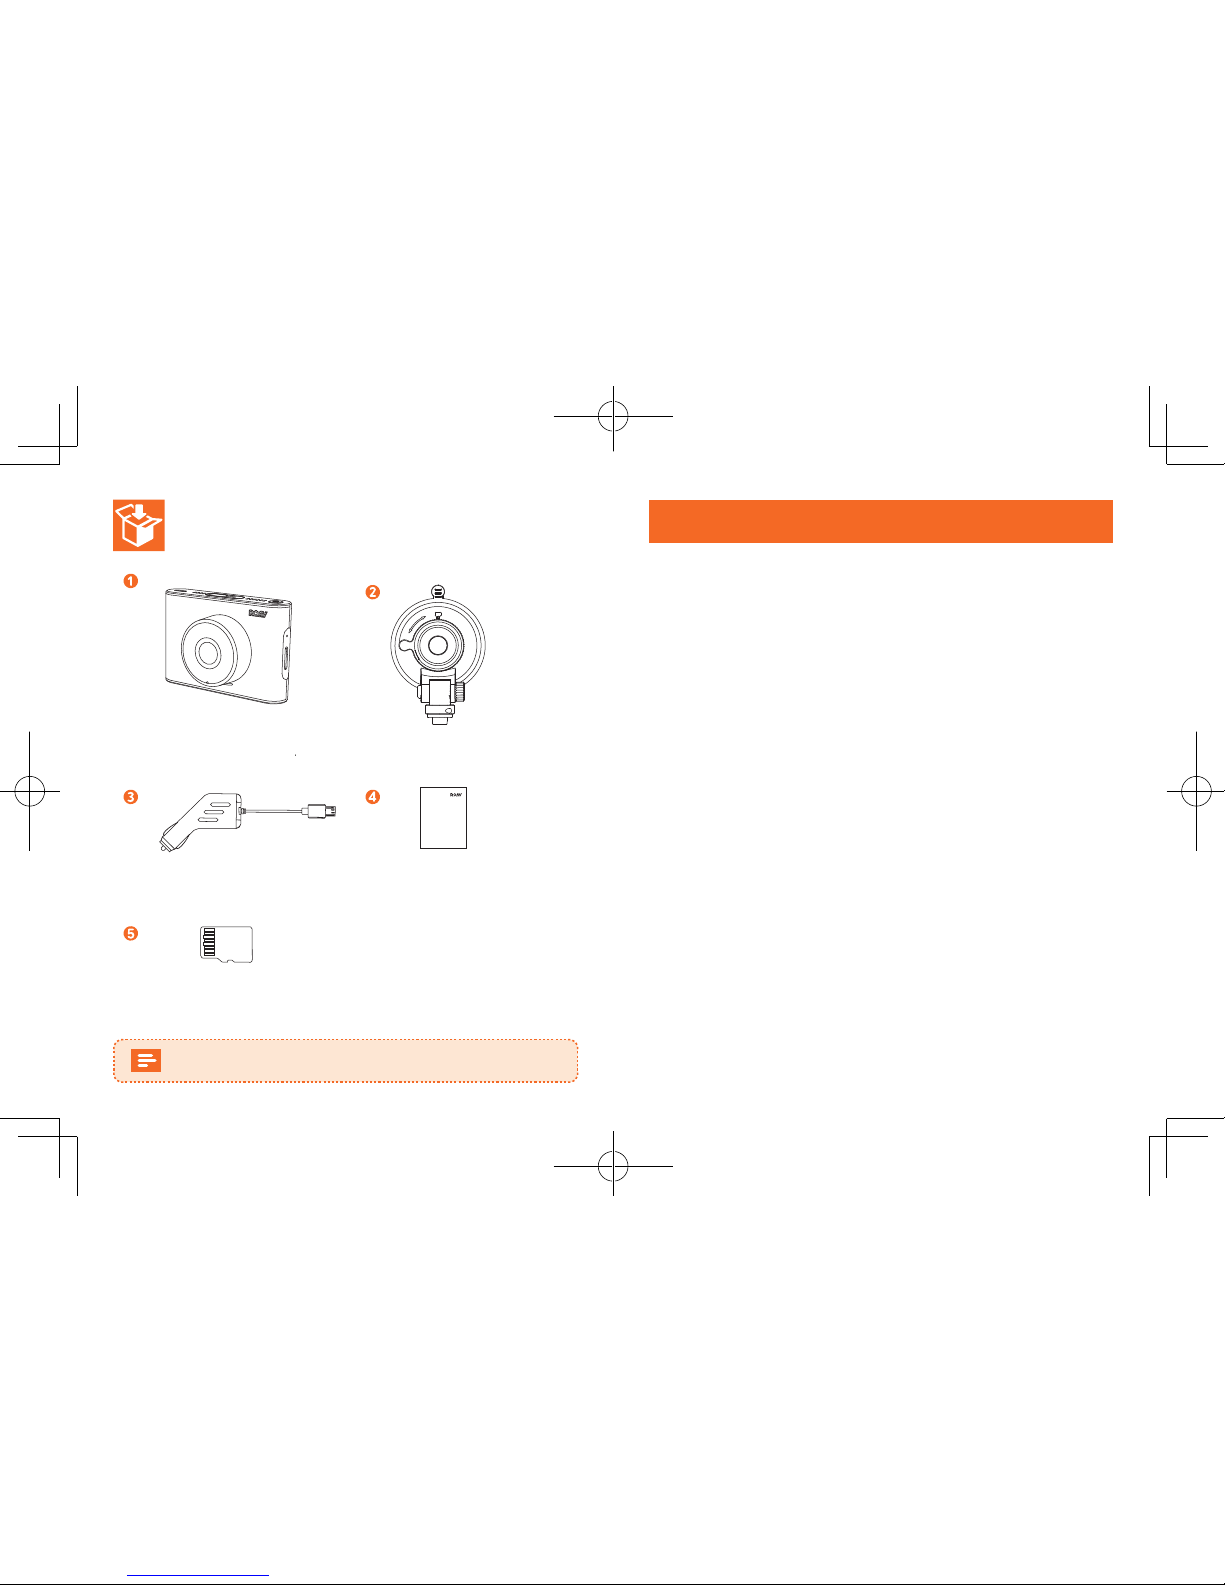
Owner’s Manual
DASHCAM C1
DashCam Suction mount
Car charger Manual
microSD card
Accessories are subject to change without notice.
02 03
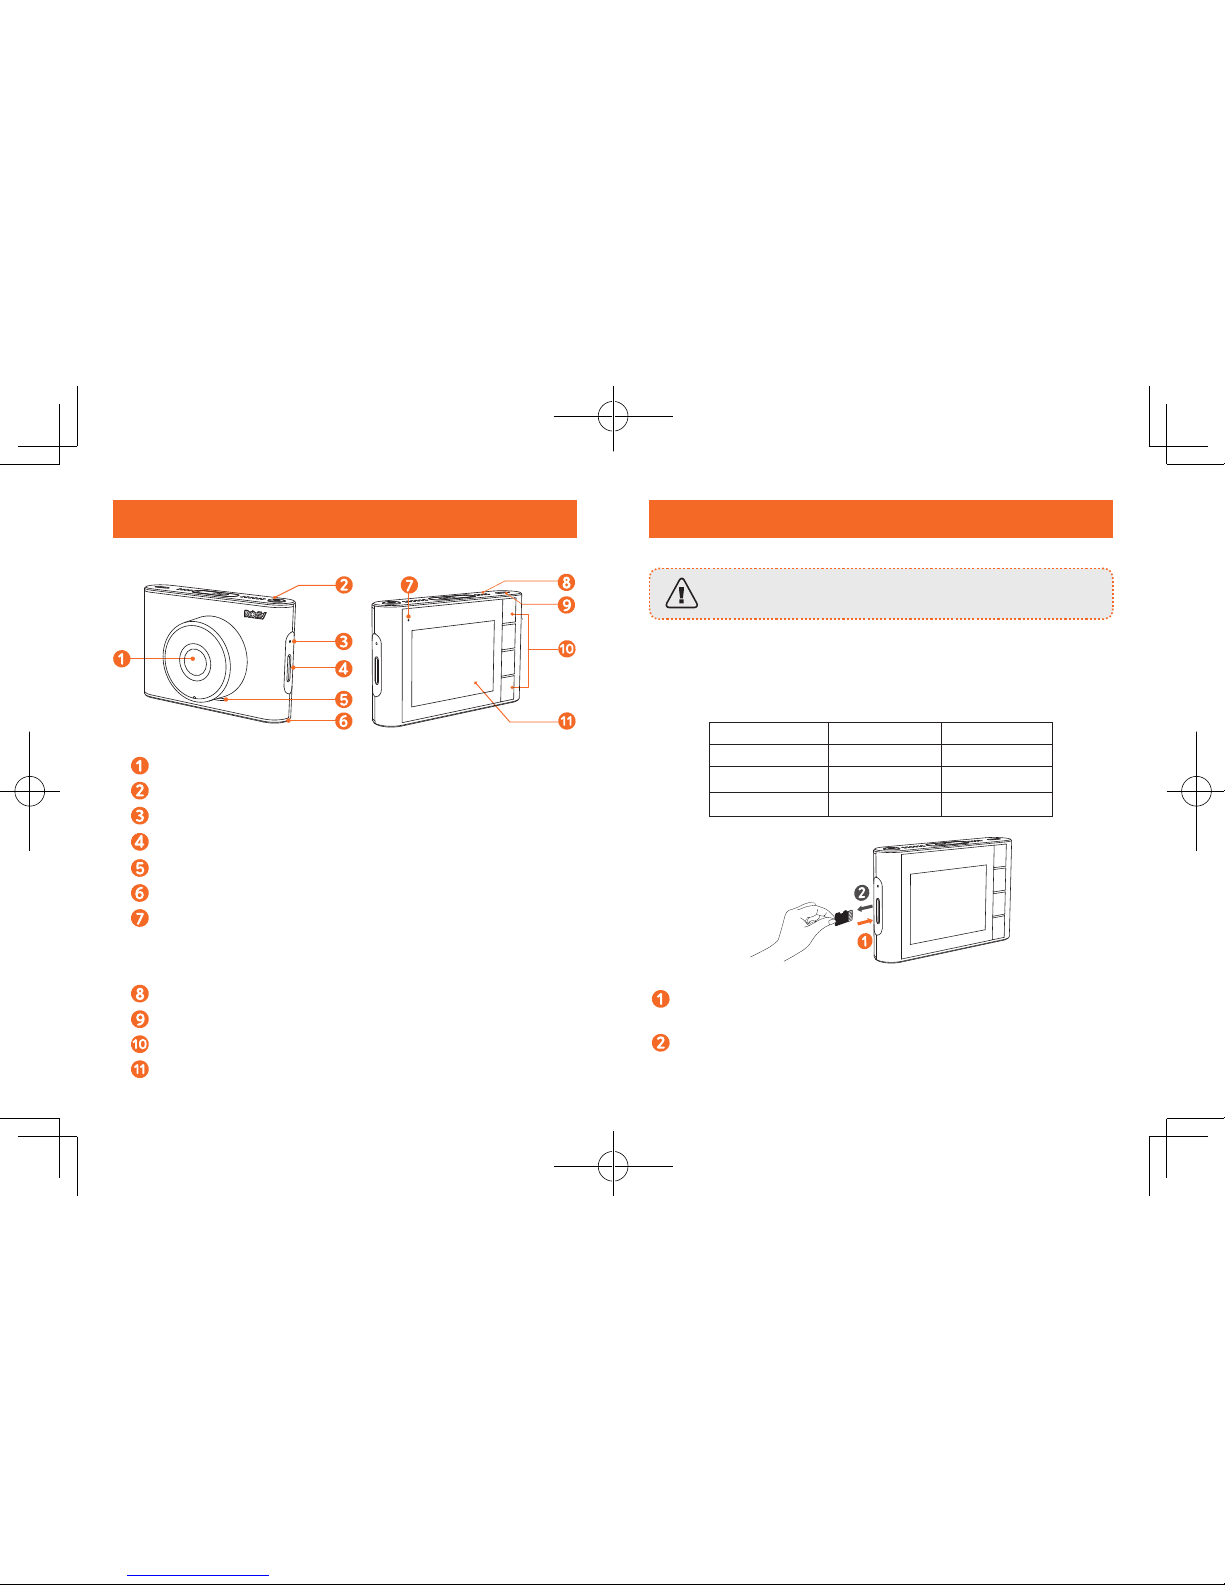
Inserting Memory Card
Do not remove or insert microSD / TF card when this
product is powered on, which may damage the card.
For better product experience, use microSD / TF card that is higher
than Class 10 32G. Do not use card lower than Class 10 as it may
damage the product. Card should be formatted in Dashcam before
using. It is recommended to format the card regularly.
Card Capacity 1080P 30FPS 720P 30FPS
32 GB 320 min 480 min
64 GB 640 min 960 min
128 GB 1280 min 1920 min
Insert a microSD / TF card with the gold contacts facing the screen
side of the DashCam. Push the card until it clicks into place.
To remove the card, gently push its top edge inward until it
clicks, and then pull it out of the slot.
At a Glance
Camera lens
Power button
Reset slot
Memory card slot
Speaker
Microphone
LED indicator
• Flashing blue: recording in progress
• Steady red: no recording status
Air vent
Micro USB charging port
Buttons
LCD screen
04 05
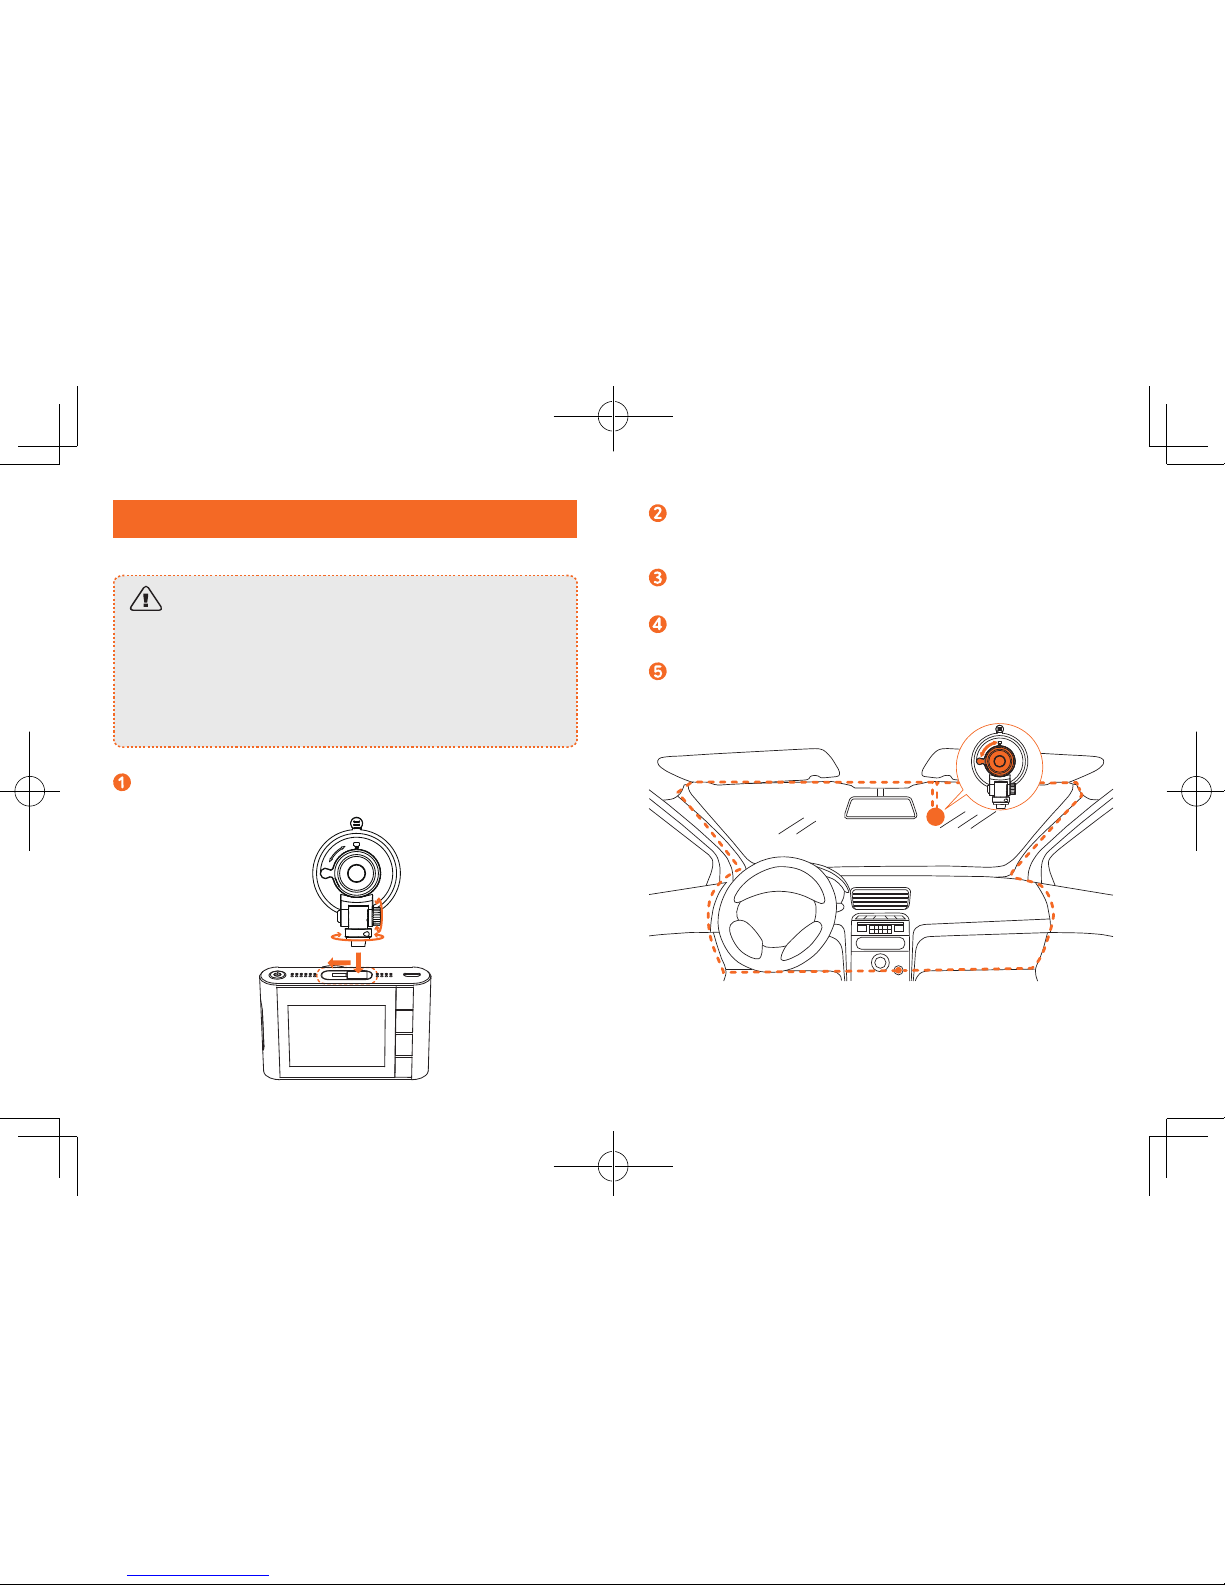
Installing Your DashCam
• Never install this product while driving.
• Install this product near the rear-view mirror to obtain the best
open-field view. Do not install in a location that will obstruct your
required driving view.
• Make sure that the lens is within the wiping range of the windscreen
wiper to ensure a clear view even when it rains.
• Do not touch the lens with your fingers. Finger grease may be left
on the lens and will result in unclear videos.
Attach the DashCam onto the mount.
Select a location on the windshield near the bottom right corner
of the rear-view mirror, clean with clear water and wait until
fully dry.
Attach the suction mount onto the windshield and press down
the suction clip.
Adjust the Dashcam viewing angle to ensure that it is aligned
with the road ahead, then rotate the fixing knob to fasten.
Hide the charging cable into the seams and weatherstrips
around the edge of the dashboard.
06 07
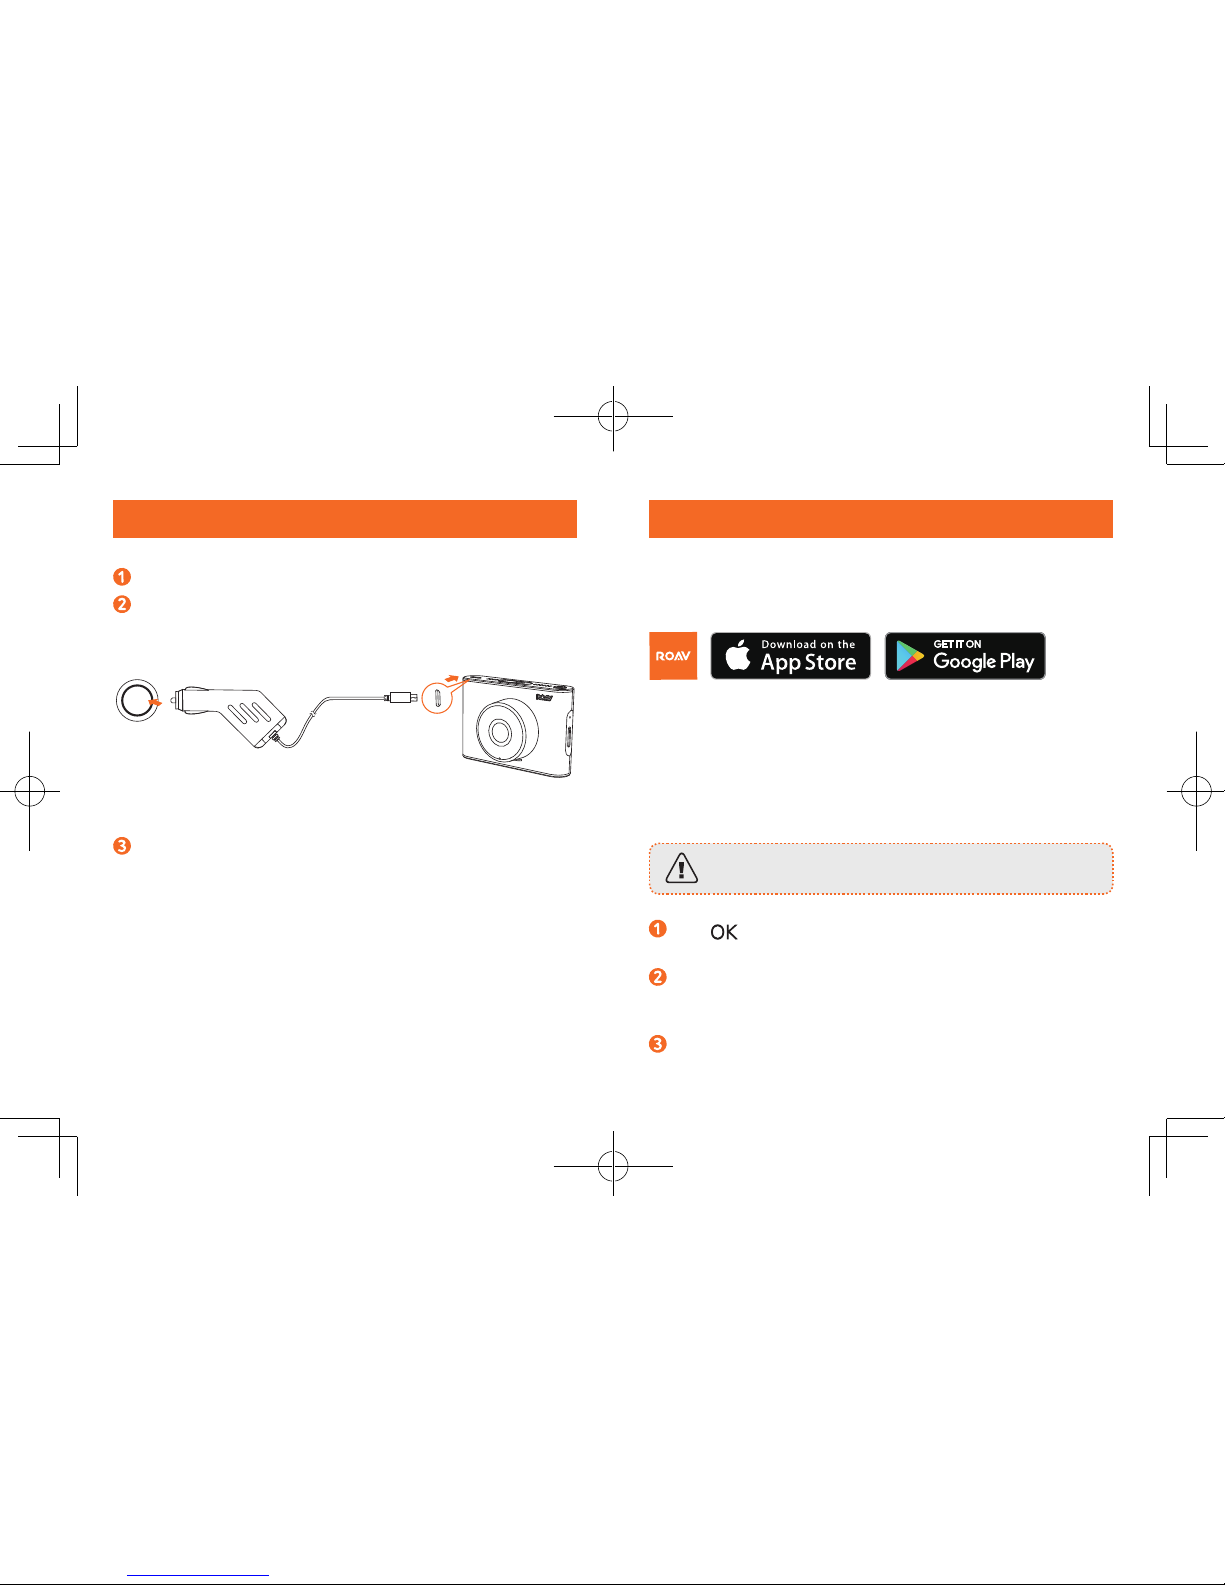
Connecting to Power
Connect the car charger to the DashCam.
Plug the other end of the car charger to your vehicle’s cigarette
lighter socket.
Once the car engine is started, DashCam will automatically
power on and start recording. Once the car engine is shut down,
DashCam will automatically save the recording and turn o.
Downloading Roav App
Search “Roav” in App Store or Google Play to Download.
Connect DashCam with Smartphone
With successful connection with your smartphone via built-in Wi-
Fi, you can save and playback the driving recording videos on your
smartphone. You can also change settings of your DashCam via the
Roav app.
When successfully connected, DashCam stops recording.
Press (Menu), select “WIFI” > “On” to enable WiFi on
DashCam.
Enable WiFi on your smartphone, find “Roav DashCam A0”
on the list and connect it, enter password (initial password:
goroavcam) if required.
Follow the on-screen instructions in the Roav app to complete the
connection.connection.

08 09
Using Your DashCam
As a driver, you have full responsibility to drive safely and adhere
to all applicable trac regulations.
Record Videos
When connected to a car charger, DashCam automatically
starts recording, REC is displayed and red dot flashes on the
screen, the current recording duration is displayed, and the
current date and time is displayed.
To enable / disable the audio recording, press (Mute/
Unmute).
Protect the Current Recording
By default, DashCam uses a sensor to automatically detect
accidental collisions and protect the video file with duration of 30
seconds. This indicates that those recordings have been locked and
will not be overwritten by new video clips.
To protect the current recording manually, press (Emer).
Playback Videos
The DashCam stops recording while viewing videos or settings.
Select “Normal” folder to check saved videos. Select “Event”
folder to check the videos of accidental collisions.
Select a video to playback.
Button Virtual Button Function
Play / Pause
Fast forward
Delete Current / Delete All
Back to previous menu
10 11
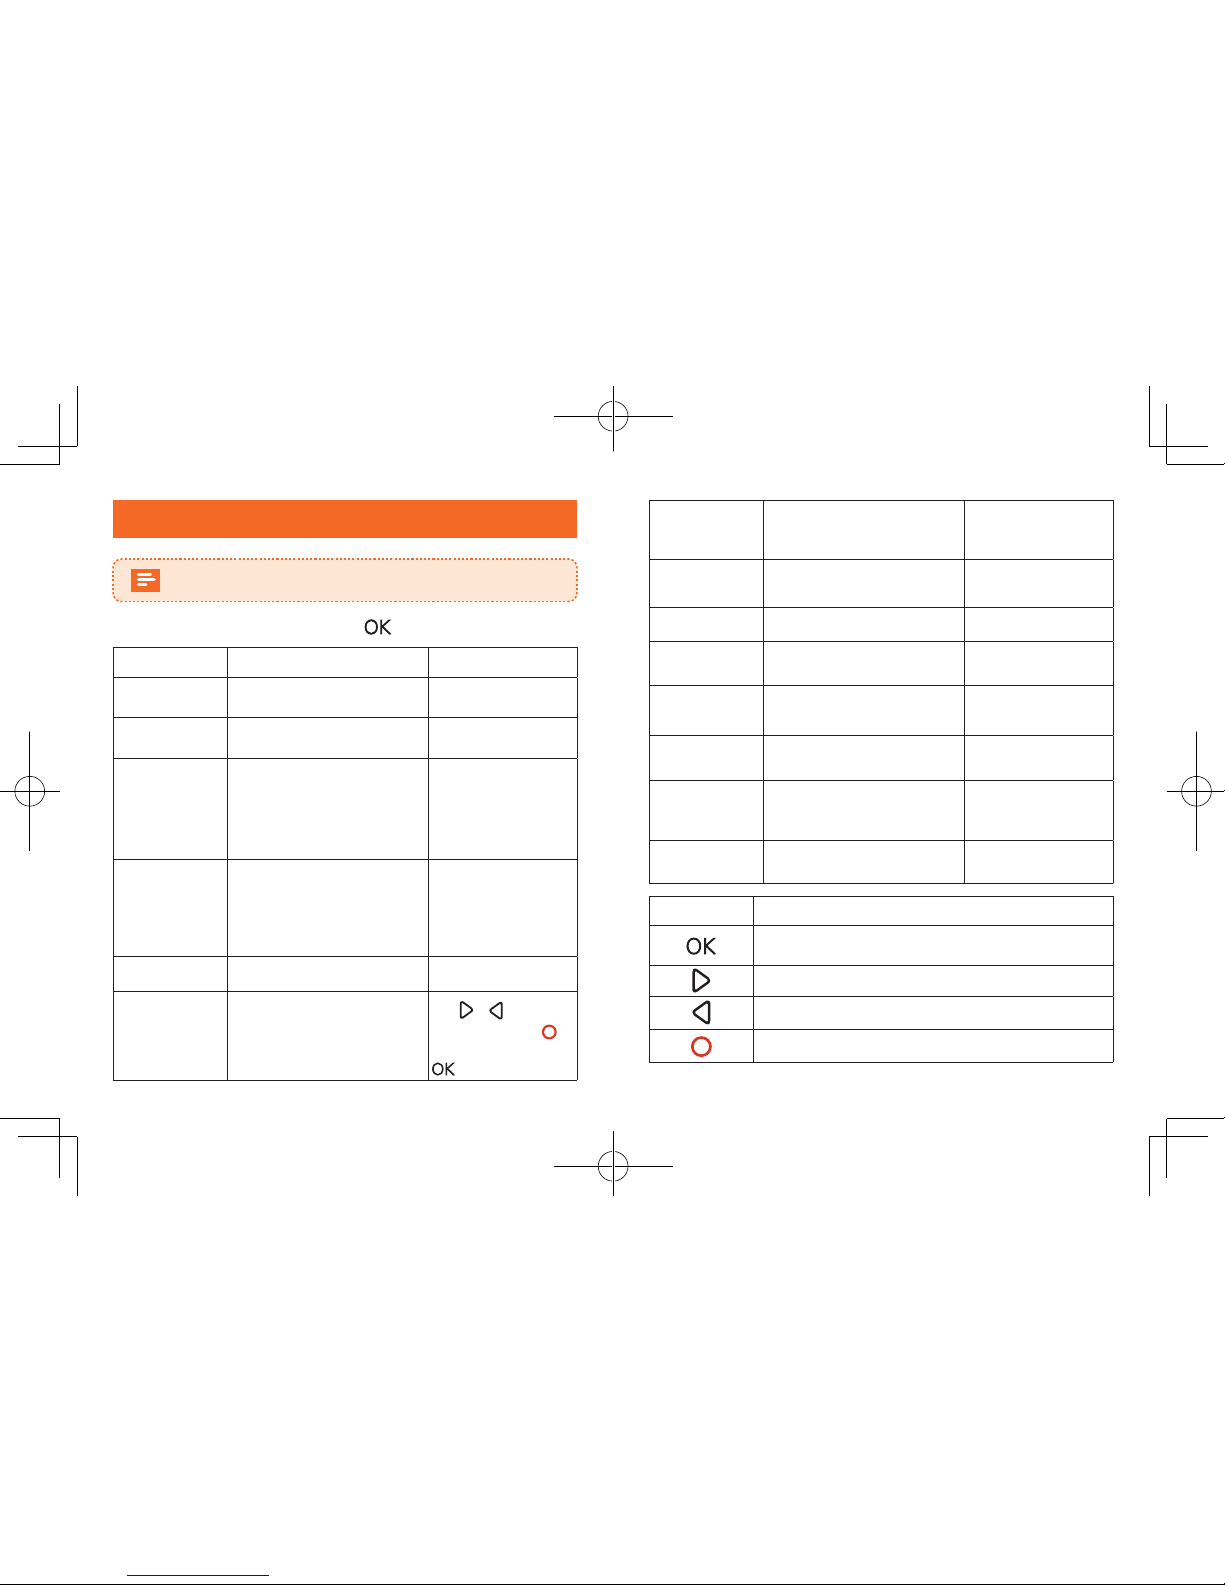
System Setup
The OSD functions are subject to change without notice
To adjust DashCam’s settings, tap .
Menu Options Description Available Options
Resolution Set a desired video
resolution.
720P 30FPS / 1080P
30FPS
Loop recording Set the duration of each
recording video clip.
1 Min / 3 Min / 5
Min
Sensitivity
Sensitivity for gravity helps
to detect vibration and
shock while driving and
makes DashCam to respond
appropriately.
Low / Medium /
High / O
Parking mode
Enable to keep DashCam in
standby mode. Motion will
be detected for 15 times and
DashCam starts recording a
30 second video each time.
Low / Medium /
High / O
WIFI Connect with smartphone. On / O
Time Setup Set date and time
Tap / to adjust
the value, press
to next option, press
to save
Date Format
Set the sequence for date.
None / YYYY MM
DD / MM DD YYYY
/ DD MM YYYY
LCD Auto O Turn o the screen backlight
after a period of inactivity.
30 Seconds / 60
Seconds / O
Machine Sound
Mute or unmute. On / O
Default Reset all options to the
default settings. Cancel / OK
Format
Format the memory card and
all the data will be deleted.
Cancel / OK
Water Mark Display / hide the date and
time on the recordings.
Date+Logo / Date /
Logo / O
Frequency
Match the video frequency of
DashCam with the electrical
frequency of your location.
50 Hz (EU / China) /
60 Hz (US)
About Check the current version
number.
Button Function
Click repeatedly to select a setting; Click to confirm
a selection.
Toggle the next setting
Toggle the previous setting
Back to recording mode

12 13
Specifications
Specifications are subject to change without notice.
Screen: 2.4” LCD color TFT
Camera lens: wide-angle lens 155°
Power input: 5V 1.5A
Max video resolution: 1080P 30FPS (1920x1080)
Video clip format: .MP4
Wi-Fi: 2.4GHz Band
Operating temperature range: -20°C to 70°C / -4°F to 158°F
Operating temperature range: 0°C~70°C/32°C~158°C (Parking
mode)
Weight: Approx. 87 g / 3 oz
Size: 83.4 * 56 * 35.4 mm / 3.3 * 2.2 * 1.4 in
FAQ
How come the memory capacity in my memory card is not
100% available?
• Some memory capacity is used for emergency recording.
Can not record?
• Check if the memory card is inserted properly and there is
enough free capacity.
• Check the battery level.
Blurred image?
• Use a clean, soft lens-cleaning cloth to gently clean the lens.
Malfunction or crash?
• Long press the Reset slot by using a sharp pin for at least 2
seconds.
Blank screen?
• The screen saver is activated. Change settings to “O” if
required.
Fail to view and playback videos on your smartphone?
• Check on your smartphone if Wi-Fi is successfully connected
to the DashCam.
How to enable parking mode?
• Press (Menu) , select “Parking mode” > “ON”.
Worry about the memory card is full?
• Continuous loop recording allows to overwrite the old
unlocked files.
Will my data be used when my smartphone is connected with
DashCam?
• No. Data will be used only if you share the saved videos via
social apps.

FCC Radiation Exposure Statement:
14 15
that to which the receiver is connected. (4) Consult the dealer or an
experienced radio / TV technician for help.
This device is acting as slave and operating in the 2.4 GHz (2412-
2462 MHz).
The device has been evaluated to meet general RF exposure
requirements. The device can be used in portable exposure
conditions without restriction.
Apple and the Apple logo are trademarks of Apple Inc., registered
in the U.S. and other countries. App Store is a service mark of Apple
Inc., registered in the U.S. and other countries.
Google Play and the Google Play logo are trademarks of Google Inc.
“Android” is a registered trademark of Google Inc. in the United
States and other countries.
“iOS” is a registered trademark of Apple Inc.
in the United States and
other countries.
IC NOTICE TO CANADIAN USERS
This device complies with Industry Canada license-exempt RSS
standard(s). Operation is subject to the following two conditions:
(1) This device may not cause interference, and (2) This device
must accept any interference, including interference that may cause
undesired operation of the device. This device complies
with RSS-247 of Industry Canada. Operation is subject to the
condition that this device does not cause harmful interference. This
Class B digital apparatus complies with Canadian ICES-003 (Cet
Notice
FCC Statement
This device complies with Part 15 of the FCC Rules. Operation
is subject to the following two conditions: (1) This device may
not cause harmful interference, and (2) This device must accept
any interference received, including interference that may cause
undesired operation.
Warning: Changes or modifications not expressly approved by the
party responsible for compliance could void the user's authority to
operate the equipment.
Note: This equipment has been tested and found to comply with
the limits for a Class B digital device, pursuant to Part 15 of the FCC
Rules. These limits are designed to provide reasonable protection
against harmful interference in a residential installation.
This equipment generates, uses and can radiate radio frequency
energy and, if not installed and used in accordance with
the instructions, may cause harmful interference to radio
communications. However, there is no guarantee that interference
will not occur in a particular installation. If this equipment does
cause harmful interference to radio or television reception, which
can be determined by turning the equipment off and on, the user is
encouraged to try to correct the interference by one or more of the
following measures: (1) Reorient or relocate the receiving antenna.
(2) Increase the separation between the equipment and receiver.
(3) Connect the equipment into an outlet on a circuit different from
This equipment complies with FCC radiation exposure limits set forth for an uncontrolled
environment. This equipment should be installed and operated with minimum distance
20cm between the radiator & your body.
appareil numérique de la Classe B conforme à la norme NMB-003
du Canada).
Le présent appareil est conforme aux CNR d'Industrie
Canada applicables aux appareils radio exempts de licence.
L'exploitation est autorisée aux deux conditions suivantes : (1)
l'appareil ne doit pas produire de brouillage, et (2) l'utilisateur
de l'appareil doit accepter tout brouillage radioélectrique subi,
même si le brouillage est susceptible d'en compromettre le
fonctionnement.
12-month limited warranty
Lifetime technical support
support@goroav.com
+1 (800) 988 7973 (US) Mon-Fri 9:00 - 17:00 (PT)
@GoRoav @GoRoav

Table of contents
Other Roav Dashcam manuals


