Roav DashCam Duo User manual

User Manual
ROAV DashCam Duo
Model: R2130
5100500xxxx V01

English 01
Table of Content
Safety Instructions 03
At a Glance 04
Getting Started 05
Using Your DashCam 09
System Setup 13
Specifications 16
FAQ 17
Notice 18
Customer Service 21
English 01
日本語 23

02 English English 03
DashCam Duo
3M Mount
Car charger
Charging cable
Crowbar
Manual
Safety Instructions
Please read and understand all instructions before using this product.
If damage is caused by failure to follow the instructions, the warranty
does not apply.
• Keep these instructions.
• Do not drop, puncture or disassemble this product.
• This product should not be exposed to dripping or splashing liquids.
• Avoid long exposure to direct sunlight, which may cause damage
to this product.
• Exposing this product to open flames may cause explosions.
• Use original accessories only.
• Do not install where it will block the driver’s view of the road or the
deployment of the airbag.
• Keep your attention on the road. Do not operate the controls of
this product while driving.
• Ensure the camera lens is kept clean and there is nothing blocking
the lens.
• Set the time and date accurately before using this product.
• Do not use the charger if the cord is damaged or broken.
• Do not directly touch the product when it is overheating due to
long exposure to sunlight or continuous use.
• Remove this product from your vehicle when not in use for an
extended period of time.
• Keep out of the reach of children.
• Use a clean, soft cloth to clean. Do not use any corrosive cleaner
or oil to clean.
• The Company is NOT responsible for the loss of any data/content
during operation.

04 English English 05
LED Indication
• Flashing red: recording in progress
• Steady blue: charging
Getting Started
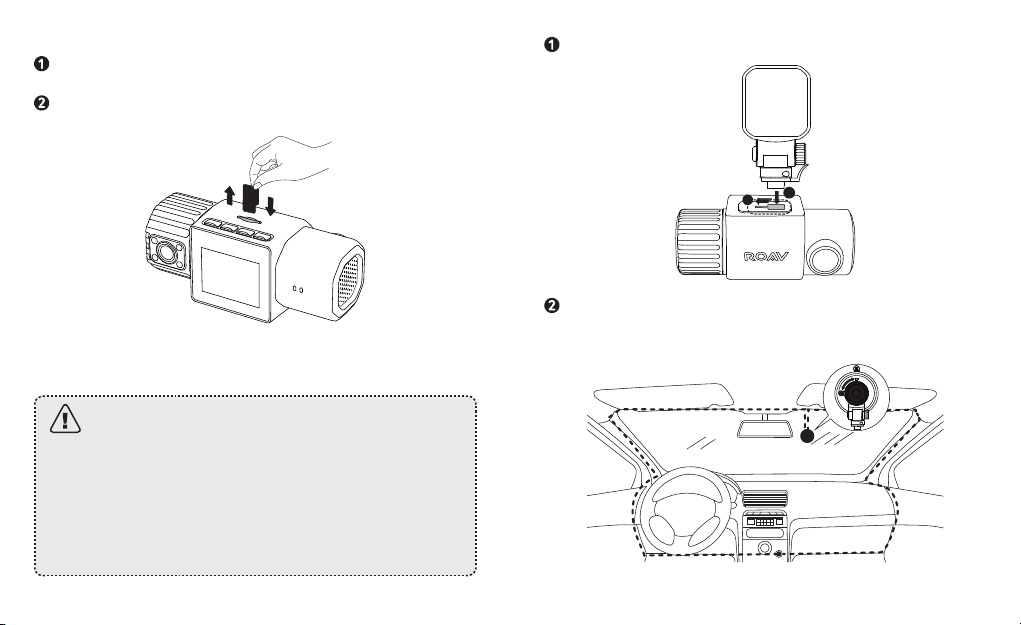
Insert a Memory Card
Do not remove or insert microSD / TF card when this
product is powered on, as it may damage the card.
A Class 10, 32GB microSD / TF card is required as lower-class cards
may damage the product. A 64GB or 128GB card should be formatted
in
DashCam before using. Regularly formatting the card is
recommended.
To format the microSD card correctly:
Press to access the Home menu.
Press to choose the “Format” option. The card is now
formatted for DashCam.
Card Capacity 1080p @30fps 720p @60fps 720p @30fps
32GB 320 min 360 min 480 min
64GB 640 min 720 min 960 min
128GB 1280 min 1440 min 1920 min
At a Glance
Knob Front camera lens
Speaker/Air vent
Indicator LCD screen Rear camera lens
IR LED lights
Buttons Micro USB
charging port
Memory
card slot Mount slot
06 English English 07
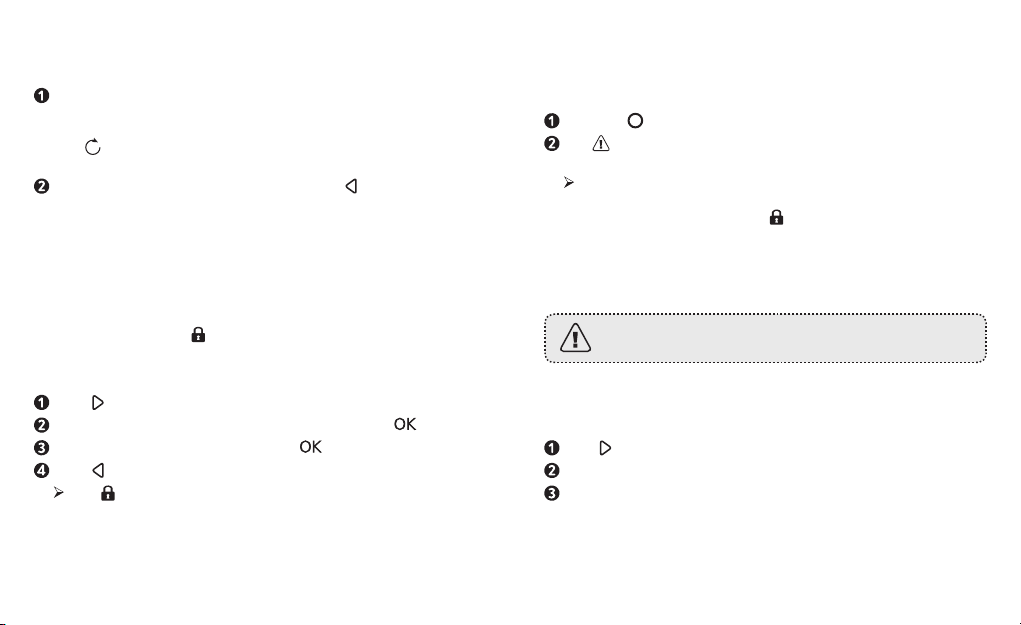
Attach DashCam Duo to the mount.
ba
Select a location on the windshield near the bottom-right corner
of the rear-view mirror. Clean with clear water and wait until
fully dry.
To insert a microSD card:
Insert a microSD / TF card with the gold contacts facing the side with the
LCD screen. Push the card until it clicks into place.
To remove the card, gently press the card, push its top edge inward until it
clicks, and then pull it out of the slot.
Install Your DashCam
• Never install this product while driving.
• Install this product near the rear-view mirror to obtain
the best field-of-view. Do not install in a location that will
obstruct your view when driving.
• Make sure that the lens is within the wiping range of the
windscreen wiper to ensure a clear view even when it
rains.
• Do not touch the lens with your fingers. Finger grease
may be left on the lens and will result in unclear videos.

08 English English 09
Adhere the 3M sticker onto the windshield and rotate the lock
as indicated.
Use the crowbar to press and hide the charging cable into the
seams and weatherstrips around the edge of the dashboard.
Adjust the lens viewing angle to ensure that it is aligned with the
road ahead, then rotate the fixing knob to fasten.
Do not install DashCam on an uneven surface as the
suction mount will be likely to detach.
Connect to Power
There are two ways to connect to power.
A) Use the provided charging cable
Connect the car charger to DashCam Duo using the charging
cable.
Plug the other end of the car charger into your vehicle’s cigarette
lighter socket.
B) Use the hardware kit (not provided)
Connect one end to the micro USB port by using the hardware kit.
Plug the other end of the hardware kit into your vehicle’s OBD
port.
Once the car engine has started, DashCam will automatically
power on and start recording. Once the car engine has shut
down, DashCam will automatically save the recording and turn
o.
Using Your DashCam
As a driver, you have full responsibility to drive safely and
adhere to all applicable trac regulations.
Record Videos
This DashCam features dual recording modes. The cameras
will capture the road in front as well as your car’s interior at the
10 English English 11
resolution set in your DashCam Duo’s settings menu.
To record videos:
When connected to a car charger, DashCam Duo automatically
starts recording, and the video captured by the front camera and
rear camera are displayed simultaneously. The loop-recording
icon is activated. The current recording duration, date, and
time are displayed on-screen.
To enable/disable the audio recording, press .
To get a better view of the interior, rotate the knob to adjust the
recording of the car interior.
Protect the Current Recording
By default, DashCam Duo uses a sensor to automatically detect
accidental collisions and to protect video files with a duration of 30
seconds or more. When is displayed, itindicates the recordings
that have been locked and will not be overwritten by new video clips.
To protect the current recording manually:
Press repeatedly to enter the Playlist file.
Select the “Normal Video” under Playlist files. Press .
Select the file you want to lock. Press .
Press .
The is displayed on screen to indicate the selected file is
locked.
Use Emergency Recording
The DashCam Duo allows users to manually record videos in cases
of emergency.
Press the to start emergency recording.
The is displayed on screen to indicate emergency recording is
active.
When emergency recording is activated, wait for a duration
of 30 seconds to exit emergency recording. The recorded
videos will be stamped with
and saved under Playlist >
Emergency Files.
View and Play Videos
DashCam Duo stops recording when you are viewing
videos or settings.
To view and play video on DashCam Duo
Click repeatedly to go to the Playlist.
Go to Normal Video / Emergency File to view all saved videos.
Select a video to play.

12 English English 13
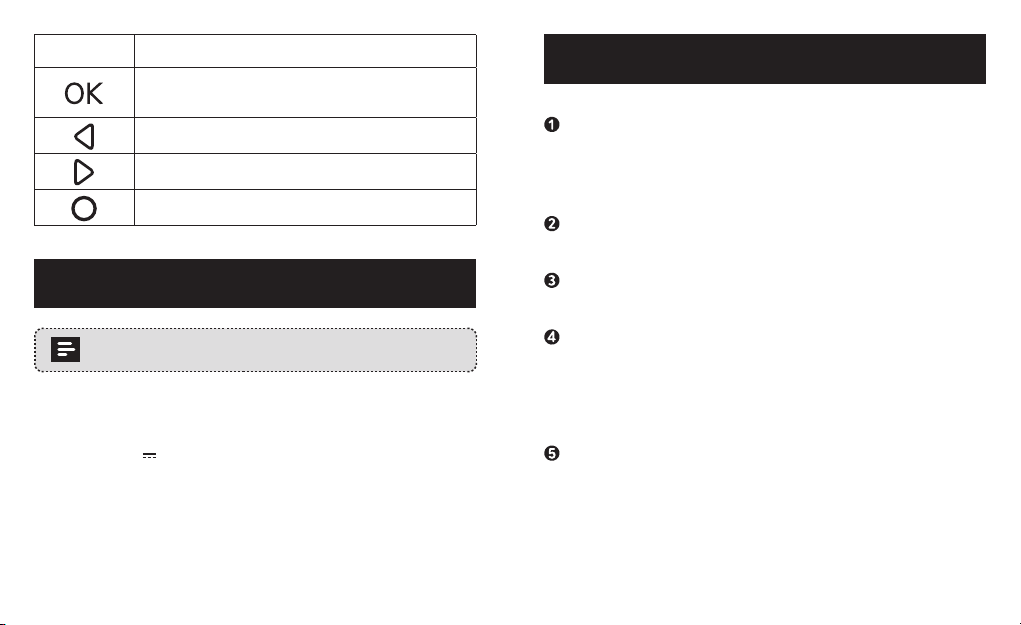
Button Virtual Button Function
Play / Pause
Lock Current / Unlock Current
Delete Current / Delete All
Return to previous menu
To view and play video with the DashCam Viewer
The saved videos can be viewed and played with the DashCam
Viewer (not provided).
Download the Anker Roav DashCam Viewer video player from
the website: https://www.dropbox.com/sh/4v5nmnl5hu5m4fi/
AABDuOxwkiIaohwOpQJ9DrFXa?dl=0
Remove the microSD card from DashCam Duo and insert it into
your device’s microSD card slot.
All the saved files will be displayed.
Follow the instructions on DashCam Viewer’s manual to play
videos.
DashCam Viewer runs on Windows and Mac-based
computers.
System Setup
To adjust DashCam Duo’s settings, press .
Menu
Options
Description Available Options
Resolution Set a desired video
resolution.
1080p + 1080p @30fps
/ 1080p + 720p @30fps
/ 720p + 1080p @30fps
/ 720p + 720p @30fps
Loop
recording
Set the duration of each
recording video clip.
1 minute / 3 minutes / 5
minutes / 10 minutes
LCD display
mode
Choose the LCD display
source.
Front Camera / Interior
Camera / PIP Front Full /
PIP Behind Full
LCD auto o Turn o the screen
backlight after a period
of inactivity. Recording
continues.
30 Seconds / 60
Seconds / O
Sound
recording
Enable or disable sound
recording.
On / O
Machine
sound
Mute or unmute. On / O
Voice prompt Enable or disable voice
prompt.
On / O

14 English English 15
Driving
collision
detection
If a collision is detected
while driving, DashCam
Duo will record a
30-second video clip.
Low / Medium / High
/ O
Record files Choose the recording
mode.
Loop recording /
Emergency recording
Infrared light The infrared light
automatically turns on
in low-light conditions. If
the light is on, the video
footage of the interior
will be in black and
white.
On / O
WDR By default, WDR is o.
Set WDR to On / O.
On / O
GPS Set GPS to On / O. On / O
Fatigue
driving alert
Set the duration to send
fatigue driving alert.
1 hour / 2 hours / 4
hours / O
Language Set the on-screen menu
language.
English / Japanese /
Chinese
Frequency Match the video
frequency of DashCam
Duo with the electrical
frequency of your
location.
50Hz (EU / China) /
60Hz (US)
Time zone Set the time zone. GMT -5 New York
GMT -6 Chicago
GMT -7 Denver
GMT -8 Los Angeles
GMT -9 Anchorage
GMT -10 Honolulu
GMT +9 Tokyo
GMT +8 Beijing
Constant
power supply
(Optional)
This option only shows
when the power supply
is always on.
Yes, I have constant
power supply / No,
power supply will turn o
when parking
Watermark Display / hide the date
and time on recordings.
On / O
Time setup Set date and time. Press / to adjust the
value, press to next
option, press to save
Default Reset all options to the
default settings.
Cancel / OK
Format Format the memory card
and all the data will be
deleted.
Cancel / OK
About Check the current
version number.
16 English English 17
Button Function
Click repeatedly to enter the menu setup; Click to
select a setting and confirm selection.
Toggle the next setting.
Toggle the previous setting.
Return to recording mode
Specifications
Specifications are subject to change without notice.
Screen: 1.5” LCD color TFT
Front camera lens: 155° wide-angle lens
Rear camera lens: 110° wide-angle lens
Power input: 5V 1A
Max video resolution: 1080p 30fps (1920x1080)
Video clip format: .MP4
Operating temperature range: -4°F to 158°F / -20°C to 70°C
Storage temperature range: 32°F to 158°F / 0°C to 70°C
Weight: Approx. 3 oz / 87 g
Size: 3.3 × 2.2 × 1.4 in / 83.4 × 56 × 35. 4 mm
FAQ
DashCam Duo is not recording.
•Check if the memory card is inserted properly and there is
enough free capacity.
•Check the battery level.
DashCam Duo’s image is blurred.
•Use a clean, soft lens-cleaning cloth to gently wipe the lens.
DashCam Duo has crashed.
•Hold the Reset slot by using a sharp pin for at least 2 seconds.
DashCam Duo’s screen in blank?
•The screensaver is activated. Change “LCD auto o” settings
to “O” if required.
•Check if the DashCam Duo is recording. If yes, press any key
to wake up the screen.
What if the memory card is full?
•Continuous loop recording automatically overwrites the old
unlocked files.

18 English English 19
Notice
This product complies with the radio interference
requirements of the European Community.
This product complies with the requirements of the European
Community
This product can be used across EU member states.
Hereby, Anker Innovations Limited declares that this device is in
compliance with the essential requirements and other relevant
provisions of EU Directive.For the declaration of conformity, visit
the Web site:www.goroav.com.
The following importer is the responsible party (contact for EU
matters only)
Importer: Anker Technology (UK) Ltd
Importer Address: Suite B, Fairgate House, 205 Kings Road,
Tyseley, Birmingham, B11 2AA, United Kingdom
This product is designed and manufactured with high quality
materials and components, which can be recycled and
reused.
This symbol means the product must not be discarded as
household waste, and should be delivered to an appropriate
collection facility for recycling. Proper disposal and recycling
helps protect natural resources, human health and the
environment. For more information on disposal and recycling
of this product, contact your local municipality, disposal
service, or the shop where you bought this product.
FCC Statement
This device complies with Part 15 of the FCC Rules. Operation
is subject to the following two conditions: (1) This device may
not cause harmful interference, and (2) This device must accept
any interference received, including interference that may cause
undesired operation.
Warning: Changes or modifications not expressly approved by the
party responsible for compliance could void the user's authority to
operate the equipment.
Note: This equipment has been tested and found to comply with
the limits for a Class B digital device, pursuant to Part 15 of the FCC
Rules. These limits are designed to provide reasonable protection
against harmful interference in a residential installation.
This equipment generates uses and can radiate radio frequency
energy and, if not installed and used in accordance with
the instructions, may cause harmful interference to radio
communications. However, there is no guarantee that interference
will not occur in a particular installation. If this equipment does
cause harmful interference to radio or television reception, which
can be determined by turning the equipment o and on, the user is
encouraged to try to correct the interference by one or more of the
following measures: (1) Reorient or relocate the receiving antenna.
(2) Increase the separation between the equipment and receiver.
(3) Connect the equipment into an outlet on a circuit dierent from
that to which the receiver is connected. (4) Consult the dealer or
an experienced radio/TV technician for help.

20 English English 21
FCC Radio Frequency Exposure Statement
The device has been evaluated to meet general RF exposure
requirements. The device can be used in portable exposure
conditions without restriction.
The following importer is the responsible party:
Company Name: Fantasia Trading LLC
Address: 9155 Archibald Ave., Suite 202, Rancho Cucamonga,
CA 91730, USA
Telephone:1-909-484-1530
Apple and the Apple logo are trademarks of Apple Inc., registered
in the U.S. and other countries. App Store is a service mark of
Apple Inc., registered in the U.S. and other countries.
Google Play and the Google Play logo are trademarks of Google Inc.
“Android” is a registered trademark of Google Inc. in the United
States and other countries.
“iOS” is a registered trademark of Apple Inc. in the United States
and other countries.
Customer Service
12-month limited warranty
Lifetime technical support
support@goroav.com
Live Chat on Roav app and website
(US) Mon-Fri 9:00-17:00(PT)
+1 (800) 988 7973 (US) Mon-Fri 9:00am - 5:00pm (PT)
@GoRoav @GoRoav
©Anker Innovations Limited. All rights reserved. ROAV and the
ROAV logo are trademarks of Anker Innovations Limited, registered
in the United States and other countries. All other trademarks are
the property of their respective owners.

日本語 23
目次
安全にご使用いただくために 25
外観 26
はじめに 27
DashCamの使用方法 31
システム設定 35
仕様 38
FAQ 39

24 日本語 日本語 25
DashCam Duo
3Mステッカー
カーチャージャー
充電ケーブル
クローバー
マニュアル
安全にご使用いただくために
本製品を使用する前に、すべての指示を読んで理解してください。指示に従わ
なかったために破損した場合は、保証の対象になりません。
• 以下の指示を守ってください。
•
本製品を落としたり、穴を開けたり、分解したりしないでください。
• 本製品に水滴や飛び散った液体がかからないように注意してください。
• 直射日光に長時間さらされないようにしてください。本製品が損傷するお
それがあります。
• 本製品を直火の近くに置くと、爆発するおそれがあります。
• 純正アクセサリーのみを使用してください。
• 運転者の道路の視界やエアバッグの展開を妨げるような場所には取り付け
ないでください。
• 道路に注意を向けてください。運転中に本製品を操作しないでください。
• カメラのレンズを清潔に保ち、レンズを塞いでいるものがないことを確認
します。
• 本製品を使用する前に、正確な日時を設定してください。
• コードが損傷していたり、破損している場合は、チャージャーを使用しな
いでください。
• 日光に長時間さらされていたり、連続使用により、過熱しているときは本
製品に直接触れないでください。
• 長期間使用しないときは、本製品を車両から取り外してください。
• お子様の手の届かない場所に保管してください。
• 清掃には清潔な、柔らかい布を使用してください。腐食防止剤や消毒用オ
イルは使用しないでください。
• 当社は、運転中のいかなるデータ/コンテンツの損失についても責任を負
いません。

26 日本語 日本語 27
外観
つまみ フロントカメラレンズ
スピーカー/換
気口
LEDインジケ
ーター LCD画面 リアカメラレンズ
赤外線LED
ランプ
ボタン
Micro USB充
電ポート
メモリカード
スロット 取り付け用ス
ロット
LED インジケーター
• 点滅(赤):録音中
• 点灯(青):充電中
はじめに
メモリカードを挿入する
本製品の電源が入っているときは、microSD/TFカードを取り外し
たり挿入したりしないでください。カードが損傷するおそれがあ
ります。
低いクラスのカードでは製品が損傷する可能性があるため、クラ
ス10、32GBのmicroSD/TFカードが必要です。64GBまたは128GBカ
ードは、使用する前にDashCamでフォーマットする必要がありま
す。定期的にカードをフォーマットすることをお勧めします。
microSDカードを正しくフォーマットするには、次の操作を実行し
ます。
ボタンを押してホームメニューにアクセスします。
下ボタンを押して 「フォーマット」オプションを選択します。
これでカードはDashCam用にフォーマットされます。
カード容量 1080p、30fps 720p、60fps 720p、30fps
32GB 320 分360 分480 分
64GB 640 分720 分960 分
128GB 1280 分1440 分1920 分

28 日本語 日本語 29
microSDカードを挿入するには、次の操作を実行します。
金色の接点がLCD画面の側面を向くようにmicroSD/TFカードを挿入しま
す。カチッと音がするまでカードを押し込みます。
カードを取り外すときは、カードを軽く押しながら、カチッと音がするま
でカードの上端を内側に押し、次にスロットから引き出します。
DashCam を取り付ける
•
運転中に本製品を取り付けるのは絶対にやめてく
ださい。
•
最良の視野を得るために、本製品をバックミラー
の近くに取り付けてください。運転中に視界を遮
るような場所には取り付けないでください。
•
雨天時にも良好な視界が得られるように、レンズ
がワイパーの拭き取り範囲内に位置していること
を確認してください。
•
レンズを指で触らないでください。レンズに指の
脂が付くと、映像が不明瞭になります。
DashCam Duoをマウントに取り付けます。
ba
フロントガラスのバックミラーの右下隅付近を選択します。清浄水で清掃
し、完全に乾くまで待ちます。

30 日本語 日本語 31
3Mステッカーをフロントガラスに貼り、指示に従ってロックを
回します。
クローバーを使用して充電ケーブルを縫い目に押し込んで隠し、
ダッシュボードの端を周回します。
レンズの角度を調整し、前方の道路に対して適切に取り付けられ
ていることを確認したら、固定ノブを回して固定します。
DashCamを平らでない面に取り付けないでください。マウ
ントの吸盤が外れるおそれがあります。
電源に接続する
電源に接続するには 2通りの方法があります。
A) 付属の充電ケーブルを使用する
充電ケーブルを使用してカーチャージャーをDashCam Duoに接続
します。
カーチャージャーのもう一方の端を車両のシガーライターソケッ
トに差し込みます。
B) ハードウェアキット(付属していない)を使用する
ハードウェアキットを使用して、一端をMicro USBポートに
接続します。
ハードウェアキットのもう一方の端を車両のOBDポートに差し込
みます。
自動車のエンジンが始動すると、DashCamには電源が自動的に入
り録画を開始します。自動車のエンジンが停止すると、DashCam
は自動的に録画を保存してオフになります。
DashCamの使用方法
運転手として安全運転を行い、適用されるすべての交通
規則を遵守する責任があります。
映像を録画する
このDashCamはデュアル録画モードを備えています。カメラ
は、DashCam Duoの設定メニューで設定された解像度で、正面の道
路と車内を撮影します。

32 日本語 日本語 33
映像を録画するには、次の操作を実行します。
カーチャージャーに接続すると、DashCam Duoは自動的に録画を開
始し、フロントカメラとリアカメラによってキャプチャされた映像
が同時に表示されます。ループ録音アイコン がアクティブにな
ります。現在の録画時間、日付、時刻が画面に表示されます。
音声録音を有効/無効にするには、 を押します。
車内の映りを良くするには、つまみを回して車内の録画を調整し
ます。
現在の録画を保護する
デフォルト設定の場合、DashCam Duoはセンサーで衝突事故を
自動的に検知し、30秒前からの映像をビデオファイルとして
保存し、保護します。 が表示されているときは、録画がロ
ックされており、新しいビデオクリップで上書きされないこと
を示します。
現在の録画を手動で保護するには、次の操作を実行します。
を繰り返し押して再生リストファイルに進みます。
再生リストファイルの「通常の映像」を選択します。 を押し
ます。
ロックするファイルを選択します。 を押します。
を押します。
が画面に表示されているときは、選択したファイルが
ロックされていることを示します。
緊急録画を使用する
DashCam Duoでは、緊急の場合にユーザーが手動で映像を録画する
ことができます。
を押して、緊急録画を開始します。
が画面に表示されているときは、緊急録画がアクティブであ
ることを示します。
緊急録画がアクティブの場合、30秒間待機すると緊急録画が
終了します。録画された映像は
でスタンプされ、再生リス
ト> 緊急ファイルで保存されます。
映像を表示 /再生する
映像または設定を表示している際、DashCam Duoは録画
を停止します。
DashCam Duo で映像を表示 /再生するには、次の操作を
実行します。
を繰り返しクリックして再生リストに移動します。
通常の映像/緊急ファイルに移動して、保存されているすべての
映像を表示します。
再生する映像を選択します。

34 日本語 日本語 35
ボタン 仮想ボタン 機能
再生/一時停止
現在の映像をロック/ロック解除
現在の映像を削除/すべての映像
を削除
前のメニューに戻る
保存した映像は DashCam Viewer(別売)を使用して表示
/再生ができます。
DashCam Viewerを使用して映像を表示/再生するには、次の操作を
実行します。
次のWebサイトから、Anker Roav DashCam Viewerビデオプ
レーヤーをダウンロードします。https://www.dropbox.com/
sh/4v5nmnl5hu5m4fi/AABDuOxwkiIaohwOpQJ9DrFXa?dl=0
DashCam DuoからmicroSDカードを取り外し、デバイスのmicroSD
カードスロットに挿入します。
保存したファイルがすべて表示されます。
DashCam Viewerのマニュアルの指示に従って映像を再生します。
DashCam Viewerは、WindowsおよびMacベースのコンピュ
ータで動作します。
システム設定
DashCam Duoの設定を調整するには、 を押します。
メニューオプ
ション
説明 利用可能なオプション
解像度 希望する映像解像度を設
定します。
1080p + 1080p @30fps /
1080p + 720p @30fps /
720p + 1080p @30fps /
720p + 720p @30fps
ループ録画 各録画のビデオクリップ
の長さを設定します。
1分/3分/5分/10分
LCD表示モ
ード
LCD表示ソースを選択し
ます。
フロントカメラ/車内カメ
ラ/PIPフロントフル/PIPビ
ハインドフル
LCD自動オフ 一定時間操作しないと、
画面のバックライトが消
えます。録画は継続し
ます。
30秒/60秒/オフ
音声録音 音声録音を有効/無効に
します。
オン/オフ
機械音 ミュートまたはミュート
解除します。
オン/オフ
音声プロン
プト
音声プロンプトを有効/無
効にします。
オン/オフ

36 日本語 日本語 37
運転時の衝突
検知
運転時に衝突を検知する
と、DashCam Duoは30秒
間のビデオクリップとし
て録画します。
低/中/高/オフ
録画ファイル 録画モードを選択しま
す。
ループ録画/緊急録画
赤外線ライト 微光の状況になると赤外
線ライトが自動的に点灯
します。ライトが点灯し
ている場合、車内のビ
デオ映像は白黒になり
ます。
オン/オフ
WDR デフォルトではWDRはオ
フです。WDRをオン/オ
フに設定します。
オン/オフ
GPS GPSをオン/オフに設定
します。
オン/オフ
疲労運転アラ
ート
疲労運転アラートを送信
する長さ(時間)を設定
します。
1時間/2時間/4 時間/オフ
言語 画面上のメニュー言語を
設定します。
英語/日本語/中国語
周波数 DashCam Duoの映像周波
数を現在地の電源周波数
に合わせます。
50Hz(EU/中
国)/60Hz(米国)
タイムゾーン タイムゾーンを設定し
ます。
GMT -5 ニューヨーク
GMT -6 シカゴ
GMT -7 デンバー
GMT -8 ロサンゼルス
GMT -9 アンカレッジ
GMT -10 ホノルル
GMT +9 東京
GMT +8 北京
安定化電源
(オプショ
ン)
このオプションは、
ハードウェアキットが
DashCam Duoに接続され
ている場合にのみ表示さ
れます。
はい。安定化電源があり
ます/いいえ。駐車時には
電源が切れます
ウォーターマ
ーク
録画の日時を表示/非表示
にします。
オン/オフ
タイマー設定 日時を設定します。 値を調整する場合は / を
押し、次のオプションに
進無効化場合は を押し、
保存する場合は を押し
ます。
デフォルト すべてのオプションをデ
フォルト設定にリセット
します。
キャンセル/OK
フォーマット メモリカードをフォーマ
ットすると、すべてのデ
ータが削除されます。
キャンセル/OK
バージョン
情報
現在のバージョン番号を
確認します。
This manual suits for next models
1
Table of contents
Other Roav Dashcam manuals


