manuals.online logo
Brands
  1. Home
  2. •
  3. Brands
  4. •
  5. Robert Juliat
  6. •
  7. Lighting Equipment
  8. •
  9. Robert Juliat ALICE 1469TC User manual

Robert Juliat ALICE 1469TC User manual

User'smanual: Manuelutilisateur:
Date: 19/01/24
DN41145301
Included Accessories / Accessoires inclus :
CAL03 OR CAL04
SGUP
x6
VDM100
DN41145301 PF1011
CCU1
OZ 1169TC / ALICE 1469TC TOP CONTROL OZ 1169 / ALICE 1469
Quick Start Guide
Angles Controls /
Commandes
Model / Modèle
Standard / CE North American /
Nord-Américain
7 – 14,5° On the side /
Sur le côté 1169 (v3) 1169C (v3)
13 – 24° On the side /
Sur le côté 1469 (v3) 1469C (v3)
Angles Controls /
Commandes
Model / Modèle
Standard / CE North American /
Nord-Américain
7 – 14,5° On top /
Sur le dessus 1169TC (v3) 1169CTC (v3)
13 – 24° On top /
Sur le dessus 1469TC (v3) 1469CTC (v3)
www.robertjuliat.com
Robert Juliat S.A.S. 32, rue de Beaumont, F 60530 Fresnoy-en-Thelle - phone : +33 (0)3 44 26 51 89 - [email protected]
Robert Juliat reserves the right to change or alter any of the items detailed in this document, to increase or improve manufacturing techniques without prior notice.
Robert Juliat se réserve le droit de modier sans préavis le contenu de ce document ou les caractéristiques de ses produits dans un soucipermanent d'amélioration.
600 W LED FOLLOWSPOTS /
POURSUITES À LED 600 W
User's manual: Manuel utilisateur :
For more information
and updates:
www.robertjuliat.com
Pour plus d'informations et
de mises à jour :
www.robertjuliat.fr
Quick Start Guide /
Notice de
démarrage rapide
OZ1169TC/ ALICE 1469TCTOP CONTROL OZ1169 / ALI CE 1469
www.robertjuliat.com
RobertJuliat S.A.S. 32,rue de Beaumont, F60530 Fresnoy-en-Thelle - phone : +33 (0)3 44 26 51 89 - [email protected]
RobertJuliatreserves the right to change or alter any of the items detailed in this document, to increaseor improve manufacturing techniques without prior notice.
RobertJuliatseréserve le droit de modier sans préavis le contenu de ce document ou les caractéristiques de ses produits dans un soucipermanent d'amélioration.
600W LED FOLLOWSPOTS /
POURSUITES À LED 600W
Product version /
Version du produit :
V3
Software :
FIRMWARE V4.00
2
1 User’s instructions / Instructions d’utilisation
GENERAL INSTRUCTIONS
1. Not for residential use.
2. These fixtures must only be serviced by a qualified technician.
3. In addition to the instructions indicated on this page, relevant health and safety requirements
of the appropriate EU Directives must be adhered to at all times.
4. This fixture is in compliance with section 17 - Lighting appliance for theatre stages, television,
cinema and photograph studios.
Standards NF EN 60598-1, NF EN 60598-2-17, Low Voltage Directive 2014/35/UE & EMC
Directive 2014/30/UE.
5. This fixture is rated as IP20, and is for indoor use only.
FIXTURE
6. Ensure fixture is correctly mounted on an appropriate support.
7. Protection screens and lenses must be replaced in the event of any damage, such as cracks or
deep scratches, since these might reduce performance.
8. When hung or flown the fixture must be secured by an additional hanging accessory
(such as a safety cable or bond) of suitable length.
9. Safety bonds or cables must be securely attached to the back of the fixture and be as short as
possible, or rolled up as necessary, to minimise travel distance should the fixture be dislodged.
10. Movable accessories (scroller, etc.) must also be secured with a suitable safety cable or bond at
the front of the fixture.
11. The combined weight of both the fixture and the accessories must be considered when
choosing the load-bearing capability of safety cable or bond.
12. Do not open lighting fixture when the source is on.
13. WARNING: LED source become hot during use. Allow fixture to cool before servicing.
14. Do not tamper with design of fixture nor any of its safety features.
15. Tighten electrical mains cable connections regularly and replace with one of identical
specification if damaged.
16. Use only with correct power supply.
VENTILATION
17. Keep well away from flammable material.
18. Not for outdoor use. Do not cover. Do not permit fixture to get wet.
19. To avoid overheating, do not obstruct air vents.
20. Ensure any cooling fans are in correct working order. If fans are not working, turn fixture of
immediately and service as necessary.
CLEANING
21. Do not touch the LED source with your fingers.
22. To clean the optical parts, use a soft cloth in combination with distilled water or isopropyl
alcohol recommended for coated optics.
Do not use any cleaning product that contains solvents or abrasives, as these can cause surface
damage. Dry with a soft lint-free cloth.
23. Regularly remove dust with a soft lint-free cloth.
24. If the fixture has filters, they must be cleaned frequently.
POWER SUPPLY
25. Disconnect from the mains before servicing.
26. Mains connection only. Do not connect to "electronic output" such as dimmer.
27. Ensure power supply circuit breakers, always remain accessible.
PLEASE NOTE
This product has been built to conform to European standards relating to professional lighting
equipment.
Any modification made to our products will void the manufacturers' warranty.
Risk group 2
CAUTION:
Possibly hazardous optical
radiation emitted from
this product. Do not stare
at operating lamp. Maybe
harmful to the eye.
AVERTISSEMENT :
Ce produit émet un
rayonnement optique
potentiellement
dangereux. Ne regardez
pas la lampe lorsqu'elle
est allumée. Des lésions
oculaires peuvent en
résulter.
CONSIGNES GÉNÉRALES
1. Impropre à l'usage domestique.
2. Matériel professionnel : intervention par technicien qualifié uniquement.
3. Outre les consignes d’utilisation figurant dans la présente notice, vous devrez respecter les
prescriptions générales de sécurité et de
prévention des accidents édictée par le législateur.
4. L’appareil auquel est attachée cette notice rentre dans la section 17 - Luminaires pour éclairage de
scènes de théâtre, des studios de télévision, de cinéma et de photographie de la norme:
Standards NF EN 60598-1, NF EN 60598-2-17, Low Voltage Directive 2014/35/UE & EMC Directive
2014/30/UE.
5. Ces appareils sont considérés IP20 et réservés à une utilisation intérieure.
PROJECTEUR
6. Veiller à ce que le projecteur soit monté avec un support approprié.
7. Les écrans de protection ou les lentilles doivent être remplacés s’ils sont visiblement endommagés
au point que leur efficacité en soit diminuée, par exemple par des fêlures ou des rayures profondes.
8. En position suspendue (crochet, boulon...), l’appareil doit obligatoirement être assuré par une
suspension auxiliaire (élingue, chaîne...) convenablement dimensionnée.
9. Les attaches ou câbles de sécurité doivent être solidement fixés à l'arrière de l'appareil et être aussi
courts que possible, ou enroulés si nécessaire, pour réduire au minimum la distance de
déplacement si l'appareil devait être délogé.
10. Les accessoires amovibles (changeur de couleurs...) doivent également être assurés par une
élingue de taille appropriée, ancrée à l’avant de l’appareil.
11. Le poids combiné de l'appareil et des accessoires doit être pris en compte lors du choix de la
capacité portante du câble ou de la liaison de sécurité.
12. Ne pas ouvrir l’appareil sous tension.
13. ATTENTION : Source LED et supports chauds. Attendre que l’appareil soit froid avant toute intervention.
14. Ne modifiez pas la conception de l'appareil ni aucun de ses dispositifs de sécurité.
15. Resserrer régulièrement les connexions et contrôler l’état des câbles. Si le câble est détérioré, le
remplacer par un câble identique.
16. Utiliser l’appareillage d’alimentation approprié.
VENTILATION
17. Ne pas placer le projecteur à proximité de matière inflammable.
18. Ne pas utiliser à l'extérieur. Ne pas couvrir. Ne pas laisser l'appareil exposé à l'eau.
19. Pour éviter toute surchauffe de l’appareil, ne jamais boucher les passages d’air.
20. Si l’appareil comporte un ou plusieurs ventilateurs, vérifier qu’ils fonctionnent bien.
Si un dysfonctionnement apparaît à ce niveau, éteindre immédiatement le projecteur et
effectuer les contrôles nécessaires.
NETTOYAGE
21. Ne pas toucher la source LED.
22. Pour nettoyer les parties optiques, utilisez un chiffon doux en combinaison avec de l'eau distillée
ou de l'alcool isopropylique recommandé pour les optiques revêtues. N'utilisez aucun produit de
nettoyage contenant des solvants ou des abrasifs, car ceux-ci peuvent endommager la surface.
Séchez avec un chiffon doux non pelucheux.
23. Enlevez régulièrement la poussière avec un chiffon doux non pelucheux.
24. Dépoussiérer régulièrement les filtres.
ALIMENTATION
25. Isoler électriquement avant toute intervention
26. Raccordement direct secteur.
Ne pas raccorder sur une sortie "électronique" (gradateur, relais statique...).
27. Contrôler la tension secteur.
REMARQUE
Appareils réalisés en conformité avec les directives européennes de normalisation appliquées au
matériel d’éclairage professionnel.
Toute modification du produit dégage la responsabilité du constructeur.
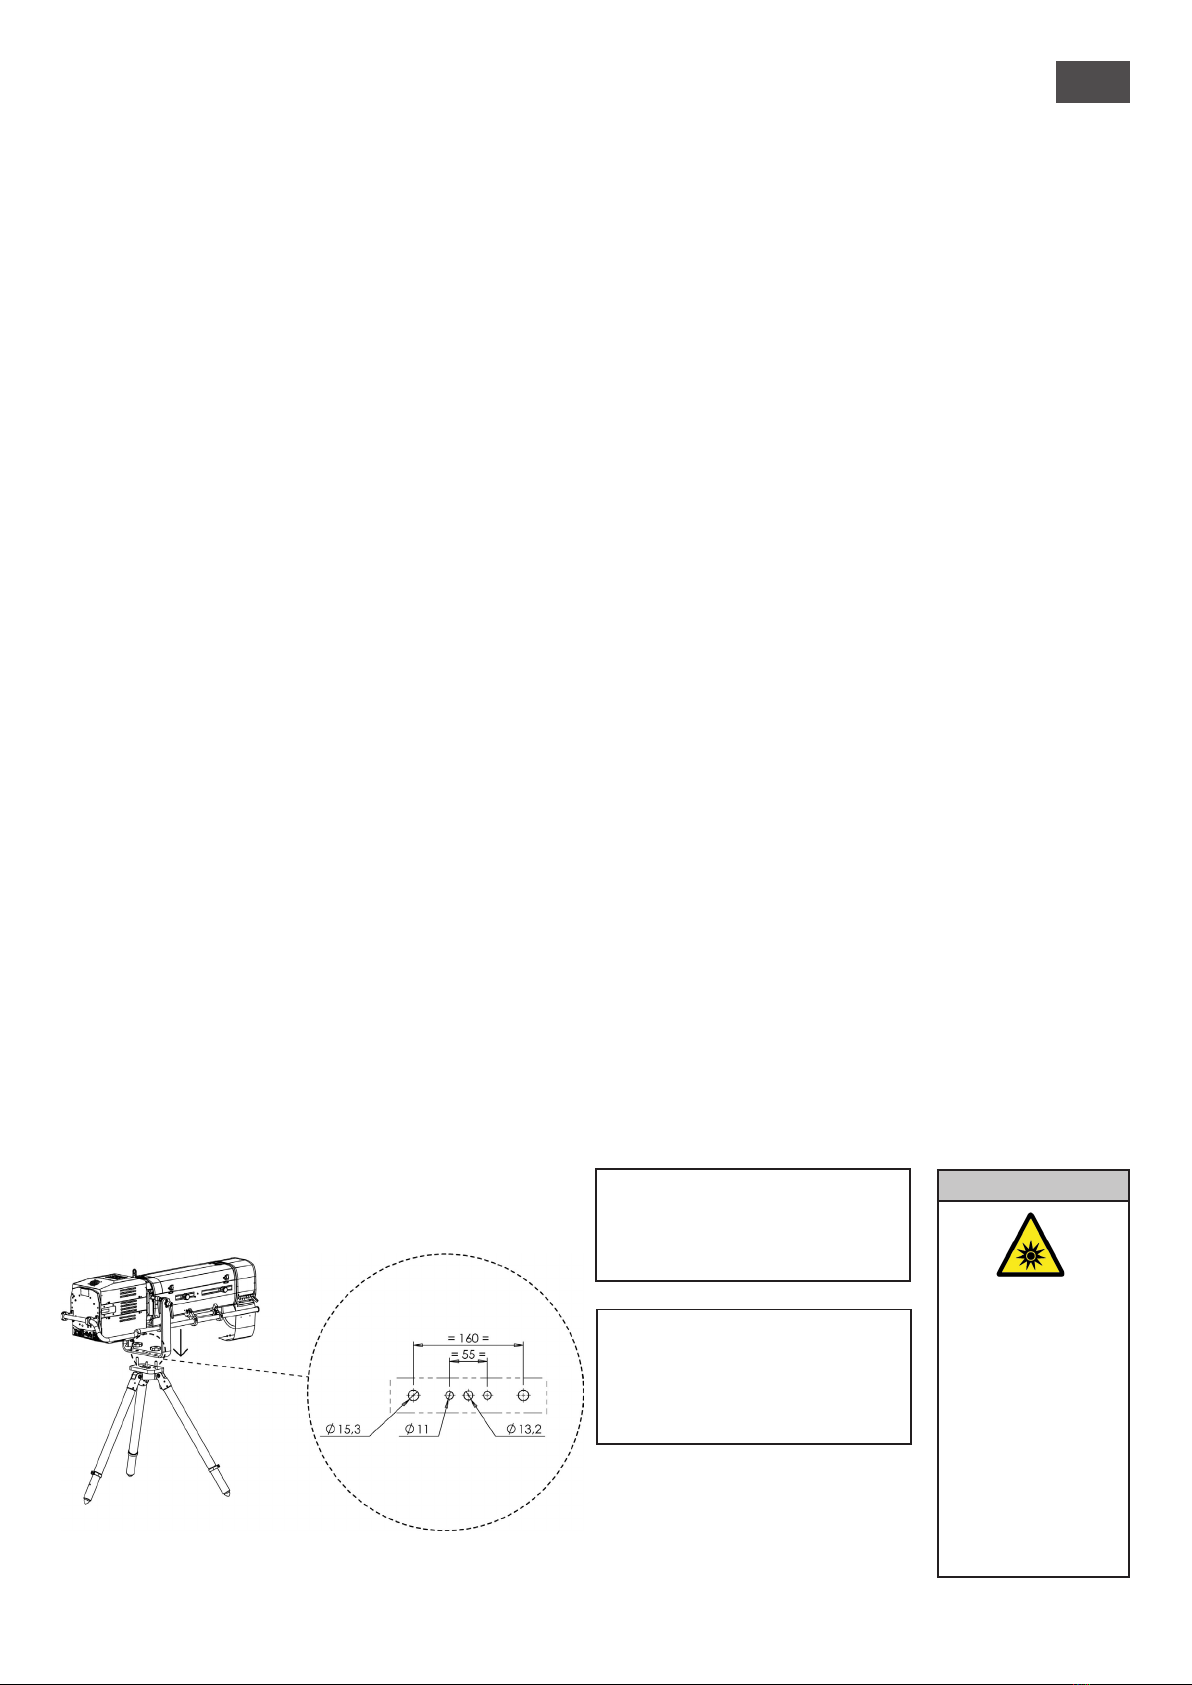
GT4000
Please refer to the relevant user manual for further details. /
Pour plus de détails, veuillez consulter le manuel de l'utilisateur correspondant.
Dimensions in / en : mm
Groupe de risque 2 - le projecteur doit être
positionné de manière à ce qu’il soit
improbable qu’une personne regarde ce
projecteur de manière prolongée à une
distance inférieure à
30m (Oz) &
19m (Alice).
Group risk 2. Luminaires should be
positioned so that prolonged staring
into luminaire at a distance closer than
30m (Oz) & 19m (Alice) is not expected.
2 Installation
3 12 18 4 2 1 10 95 6
4*
11 5* 8 7
17 15 16 14 20 19
13
21
3 12 18 4 2 1 10 95 6
4*
11 5* 8 7
17 15 16 14 20 19
13
21
3
1Switch / Interrupteur Power ON / OFF
2Power input / Puissance d’entrée
Connector / Connecteur : Neutrik®powerCON TRUE1 TOP Max. 16 A.
Power input / Puissance d’entrée : 100 => 264 V 50/60 Hz.
Must be connected directly to AC power.
Do not connect to dimmer power /
Doit être raccordé à une alimentation AC.
Ne pas raccorder à une source graduable.
@ 230 V 50 Hz = 3 A / 660 W
@ 120 V 60 Hz = 5.8 A / 680 W
@ 100 V 60 Hz = 7.1 A / 690 W
3Power output / Puissance de sortie
Connector / Connecteur : Neutrik®powerCON TRUE1 TOP Max. 8 A.
Power output available / Puissance de sortie disponible :
@ 230 V / 16 A = max 2900 VA (or / ou 4 units/ unités)
@ 120 V / 15 A = max 1100 VA (or / ou 1 units /unités)
4Fuse / Fusible Thermal breaker: 10 A automatic switch
5Data Out / Connecteur de sortie Connector / Connecteur : XLR 5-pin
6Data In / Connecteur d’entrée Connector / Connecteur : XLR 5-pin / Protocol: USITT DMX 512-A RDM
7Ethernet Connector / Connecteur : RJ45 / Protocol Art-Net, sACN + software updating / mise à jour du logiciel
8Auxiliary out / Sortie auxiliaire Connector / Connecteur : USB (Not for charging purpose / Ne pas utiliser pour la recharge)
1 2 3 4 5 6 7 8
Description
4 Electrical / Data connections / Électrique
3 Functions / Fonctions
1. Lyre
2. Poignée verrouillage de la lyre
3. Poignée ergonomique
4. Commande d'iris (1169/1469)
4*. Commande d'iris (1169TC/1469TC)
5. Commande de gradation (1169/1469)
5*. Commande de gradation (1169TC/1469TC)
6. Changeur 6 couleurs
7. Réglage zoom
8. Réglage focus
9. Filtre verre
10. Filtre de réserve
11. Support gobo
12. Afficheur local
13. Plaque d'identification
14. Connecteurs DATA (entrée et sortie)
15. Connecteurs d'alimentation (entrée et sortie)
1. Yoke
2. Yoke locking
3. Side operating
4. Iris control (1169/1469 only)
4*. Iris control (1169TC/1469TC only)
5. Dimming control (1169/1469 only)
5*. Dimming control (1169TC/1469TC only)
6. Colour changer
7. Zoom adjustment
8. Focus adjustment
9. Frost glass
10. Spare filter
11. Gobo holder
12. Local display
13. Identification plate
14. Data connectors (OUT and IN)
15. Power connectors (IN and OUT)
16. Thermal breaker
17. Power switch
18. Control board
19. USB connector
20. RJ45 connector
21. Cable lock
16. Disjoncteur thermique
17. Interrupteur de mise sous tension
18. Panneau de contrôle et paramétrages
19. Connecteur USB
20. Connecteur ethernet RJ45
21. Verrouillage du câble
A
B4
5
2
1
3
ZOOMFOCUS
AB
ZOOMFOCUS
AB
4 4
5
B
B
A
A
4
5 Operation / Opérations
1Switch on the followspot by pressing the ON / OFF power button /
Allumez la poursuite en appuyant sur le bouton d'alimentation ON / OFF
2 Open the colour changer unit to let the light beam out /
Ouvrez le changeur de couleurs pour faire sortir le faisceau lumineux
3 Use the manual dimming control to adjust the light intensity /
Utilisez la commande manuelle de gradation pour régler l'intensité lumineuse
4 The light beam zoom and focus can be set by using the control knobs A & B /
Le zoom et la mise au point du faisceau lumineux peuvent être réglés à l'aide des boutons de commande A & B
5 The beam size can be adjusted by using the iris cassette /
La taille du faisceau peut être réglée à l'aide de la cassette d'iris
0% 100% closed iris /
100% fermé

This manual suits for next models

7

Other Robert Juliat Lighting Equipment manuals

Robert Juliat 1459 FLO User manual

Robert Juliat

Robert Juliat 1459 FLO User manual

Robert Juliat ATHOS User manual

Robert Juliat

Robert Juliat ATHOS User manual

Robert Juliat 1015 B User manual

Robert Juliat

Robert Juliat 1015 B User manual

Robert Juliat SPOTME User manual

Robert Juliat

Robert Juliat SPOTME User manual

Robert Juliat 1015 B User manual

Robert Juliat

Robert Juliat 1015 B User manual

Robert Juliat ALEX User manual

Robert Juliat

Robert Juliat ALEX User manual

Robert Juliat 1011+ F User manual

Robert Juliat

Robert Juliat 1011+ F User manual

Robert Juliat SULLY 1156 User manual

Robert Juliat

Robert Juliat SULLY 1156 User manual

Robert Juliat ARTHUR User manual

Robert Juliat

Robert Juliat ARTHUR User manual

Robert Juliat ZEP 360CLF User manual

Robert Juliat

Robert Juliat ZEP 360CLF User manual

Robert Juliat 1011+ User manual

Robert Juliat

Robert Juliat 1011+ User manual

Robert Juliat ARTHUR 1014TC User manual

Robert Juliat

Robert Juliat ARTHUR 1014TC User manual

Robert Juliat CHARLES 964SX User manual

Robert Juliat

Robert Juliat CHARLES 964SX User manual

Robert Juliat SULLY 315L 4C User manual

Robert Juliat

Robert Juliat SULLY 315L 4C User manual

Robert Juliat ARAMIS+ 1013+ M User manual

Robert Juliat

Robert Juliat ARAMIS+ 1013+ M User manual

Robert Juliat Sully T/650SX Manual

Robert Juliat

Robert Juliat Sully T/650SX Manual

Robert Juliat ARAMIS 1013+ User manual

Robert Juliat

Robert Juliat ARAMIS 1013+ User manual

Robert Juliat SULLY 650SX Series User manual

Robert Juliat

Robert Juliat SULLY 650SX Series User manual

Robert Juliat CIN'K 326 LFV User manual

Robert Juliat

Robert Juliat CIN'K 326 LFV User manual

Robert Juliat TIBO 535 User manual

Robert Juliat

Robert Juliat TIBO 535 User manual

Robert Juliat ROXIE User manual

Robert Juliat

Robert Juliat ROXIE User manual

Robert Juliat ZEP 360 User manual

Robert Juliat

Robert Juliat ZEP 360 User manual

Robert Juliat SUPER KORRIGAN User manual

Robert Juliat

Robert Juliat SUPER KORRIGAN User manual

Popular Lighting Equipment manuals by other brands

GLEELITE GL G110A user manual

GLEELITE

GLEELITE GL G110A user manual

Mosaic BWL-0625 operating instructions

Mosaic

Mosaic BWL-0625 operating instructions

tibelec Vega quick start guide

tibelec

tibelec Vega quick start guide

Sensio Dart/Primo 2 quick start guide

Sensio

Sensio Dart/Primo 2 quick start guide

Pool Warehouse Prol-0850 Assembly

Pool Warehouse

Pool Warehouse Prol-0850 Assembly

Nora NSPEC Marquise II Series installation instructions

Nora

Nora NSPEC Marquise II Series installation instructions

Experia IRiS instruction manual

Experia

Experia IRiS instruction manual

COMPLED Solutions GmbH HashCropter user manual

COMPLED Solutions GmbH

COMPLED Solutions GmbH HashCropter user manual

Lightolier CD7-3 Specification sheet

Lightolier

Lightolier CD7-3 Specification sheet

Cembre CBL02-W Operation and maintenance manual

Cembre

Cembre CBL02-W Operation and maintenance manual

Paramount Fitness MDX-R3 Owner's manual and installation guide

Paramount Fitness

Paramount Fitness MDX-R3 Owner's manual and installation guide

Eliminator Lighting EX-6 quick start guide

Eliminator Lighting

Eliminator Lighting EX-6 quick start guide

EuroLite LED OPEN operating instructions

EuroLite

EuroLite LED OPEN operating instructions

Exo Terra PT2335 operating instructions

Exo Terra

Exo Terra PT2335 operating instructions

Mobiclinic GROWFLEX X2 instruction manual

Mobiclinic

Mobiclinic GROWFLEX X2 instruction manual

lighting PLUS IP-B906 user manual

lighting PLUS

lighting PLUS IP-B906 user manual

iGuzzini P411 manual

iGuzzini

iGuzzini P411 manual

Panlux LV15HP/CH instructions

Panlux

Panlux LV15HP/CH instructions

manuals.online logo
manuals.online logoBrands
  • About & Mission
  • Contact us
  • Privacy Policy
  • Terms and Conditions

Copyright 2025 Manuals.Online. All Rights Reserved.