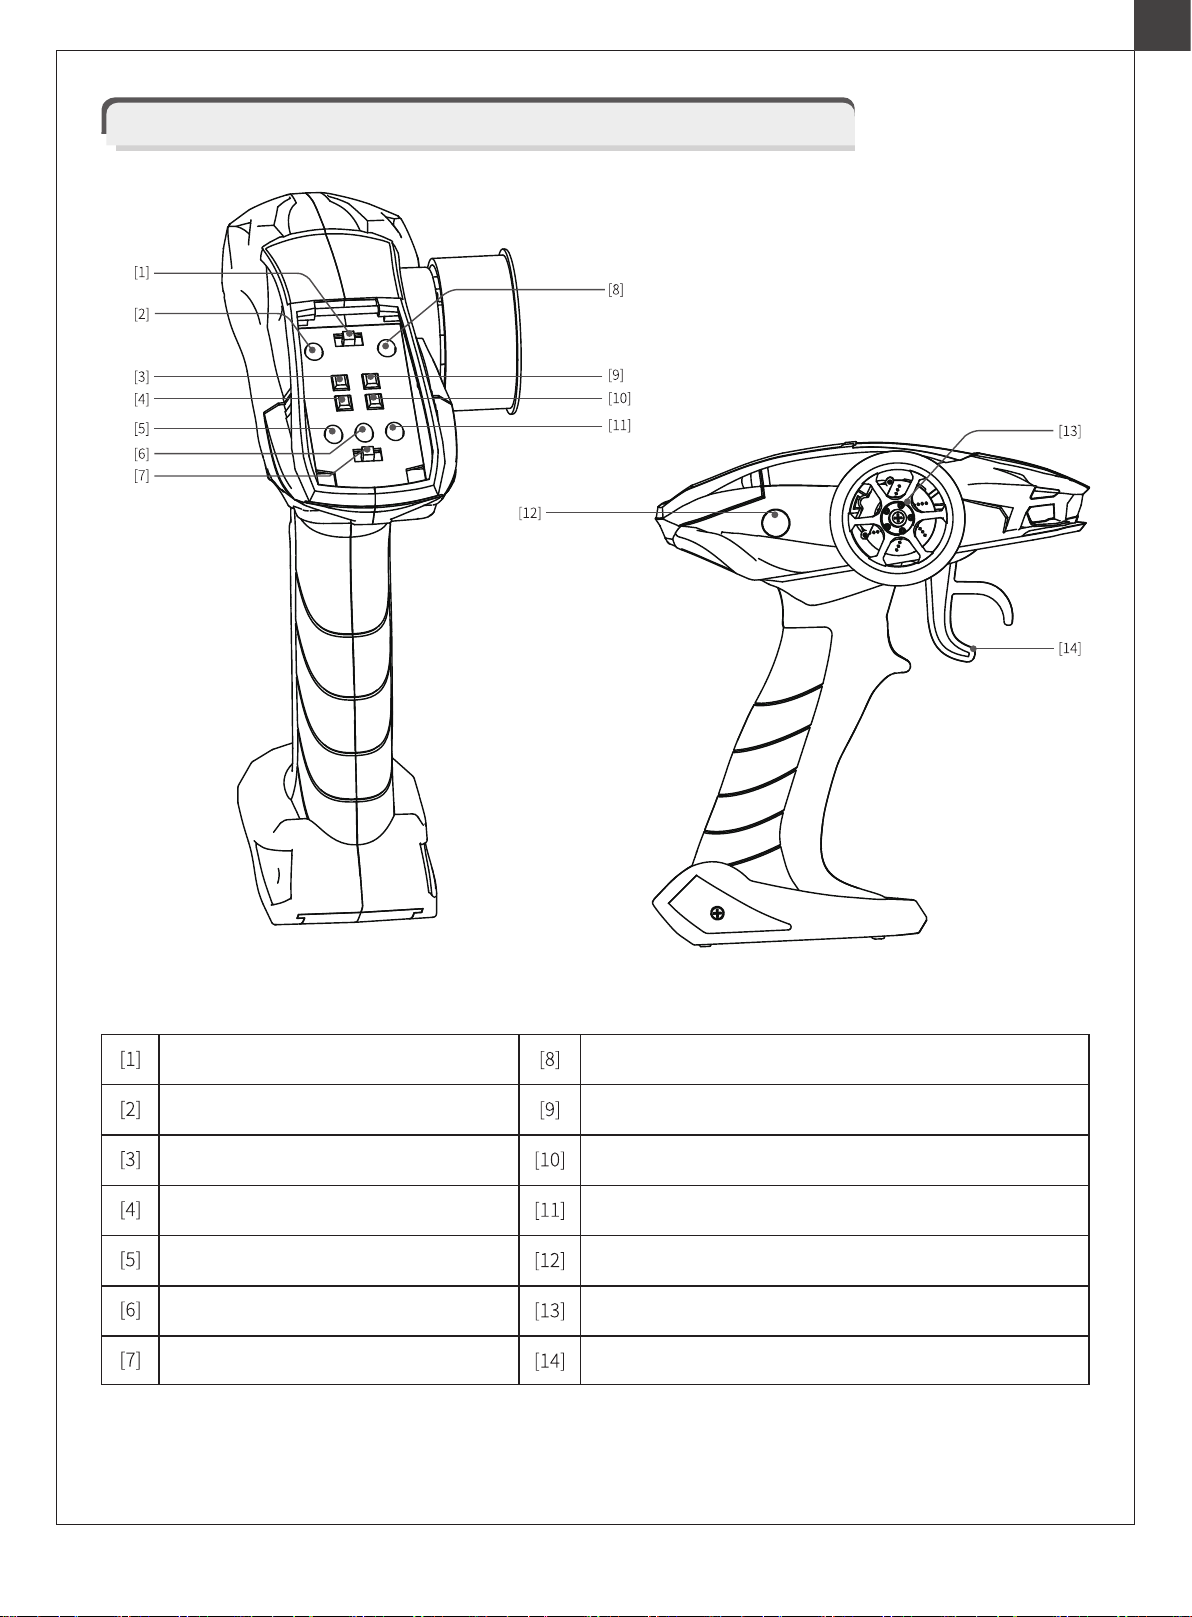
Roc Hobby SCALER MB 1941 User manual

Length:278mm
Width: 136mm
Height:140mm
Wheel base: 169mm
Ground clearance: 24mm
Approach angle: 41°
Departure angle: 40°
SPECIFICATION
1:12 1941
scaler mb
Manuel d’utilisation
Instruction Manual
Bedienungsanleitung
操作手册

03
04
12
13
13
14
14
56
61
TABLE OF CONTENTS
02
.......................................................................
..................................................................
............................................................................
..........................................................
.............................................
....................................................................
....................................................................................
.................................................................................
................................................................................
.............................................................................
............................................................
.......................................................................
62
.................................................................
63
.................................................................
.............................................................................
......................................................................
......................................................................
.............................................................................
................................................................................
....................................................................
.............................................................................
EN
56
57
57
58
59
59
60
60
61
61
68
.....................................................................
.....................................................................
.........................................................................
............................................................
............................................................
64
65
66
67
Safety precautions
Radio system
Throttle stick position
Vehicle setup
Set up wiper, retract the windshield frame
Unfold the canvas roof bracket
Operating the vehicle
Wheels
Transmission
Transfer case
Front axle assembly
Rear axle assembly
Driver seat
Front passenger seat
Back seat
Windshield
Steering gear
Steering wheel steering gear
Shift steering gear
Chassis exploded-view 1
Chassis exploded-view 2
Car body assembly 1
Car body assembly 2
Finished product
General list of accessories (I)
General list of accessories (II)

introduction
safety, precautions and warnings
SAFETY PRECAUTIONS
03
EN
This manual is written to assist you in properly operating, maintaining and repairing the vehicle. As many of the compo-
nents used are unique to this truck, please retain this manual as a future reference.
Composed of precision-made components, the ROCHOBBY 1/12 1941 SCALER MB is not a toy, thus it is not suited for
children under 14 years of age. Minors should be accompanied by an adult when operating. Failure to operate or main-
tain this vehicle in a safe manner can result in bodily harm.
It is the owner responsibility to operate this product in a safe manner. ROCHOBBY and its distributors are not responsible
in any way for any and all bodily harm and/ or property damage that may result from the use of this product.
Replace damaged components with original factory-parts. Pay special attention to the polarity of all vehicle wiring.
• Replace damaged components with original factory-parts. Pay special attention to the polarity of all vehicle wiring.
• Use common sense when selecting the environment to operate your vehicle. Do not operate near power cables, cellu-
lar/radio towers, deep water or unstable terrain. The operator is solely responsible for their actions.
• The product is composed of precision electrical components. It is critical to keep the product away from moisture and
other contaminants.
• Always check the radio range of the vehicle prior to operation in order to prevent radio loss or interference.
• Operate this product within your ability. If the vehicle is dangerous to retrieve, it never worth the risk.
• Always turn on the transmitter before connecting the battery on the model. When turning off the model, always discon-
nect the battery first, and then turn off the model, always disconnect the battery first, and then turn off the transmitter. If
this order is reversed, the model may become uncontrollable and cause serious damage.
• Never allow transmitter batteries to run low as it may cause loss of vehicle control.
• Plastics on the vehicle are susceptible to damage or deformation due to extreme heat and cold climate. Do not store the
model near any source of heat such as oven or heater. Store the model indoors, in a climate-controlled, room temperature
environment.
CE compliance information for the european union
The associated regulatory agencies of the following countries recognize the noted certifications for this product as
authorized for sale and use.
Declaration of Conformity
Products: 2.4GHz Controller
Equipment Class: 2
The objects of declaration described above are in
conformity with the requirements of the specifications
listed below.
Item Name : 2.4GHz Controller
The RED Directive 2014/53/EU
EN 60950-1:2006 + A11:2009 + A1:2010 + A12:2011 + A2:2013
EN 300 328 V2.1.1:2016
EN 301 489-1 V2.1.1:2017
EN 301 489-17 V3.1.1:2017
UK DE DK BG SE GZ ES NL SK HU RO FR PT
FI EE LV LT PL AT CY SI GR MT IT IE LU

04
EN
This product is not a toy! (14+) Recommended for ages 14 and up. Adult supervision
required for ages under 14 years old. Contains small parts, keep out of reach of children
3 years of age and younger.
Please read this manual carefully prior to using.We are not responsible for any intention-
al damage or improper use.lf you require any additional information or have any
quesions adout he product or its use,please contact us via(www.rochobby.com).
MADE IN CHINA
Statement - This device complies with Part 15 of the FCC Rules.
Operation is subject to the following two conditions:
FCC ID 2AUBX-HT-TX02
This equipment complies with FCC radiation exposure limits set forth for an uncontrolled environment. And should be operat-
ed with minimum distance of 20 cm between the antenna & your body.
RF Exposure Warning:
1. this device may not cause harmful interference, and.
2. this device may not cause harmful interference, and.including interference that may cause undesired operation.
Changes or modifications not expressly approved by the party responsible for compliance could void the user’s authority to
operate the equipment.
RADIO SYSTEM
safety symbols
Pay close attention to the following symbols and their meanings. Failure to follow these warnings could cause damage,
injury or death.
Danger Not following these instructions may lead to serious injuries or death.
Warning Not following these instructions may lead to major injuries.
Attention Not following these instructions may lead to minor injuries.

05
EN
Prohibited Mandatory
Do not use the product at night or in bad weather like rain or thunderstorm. It can cause
erratic operation or loss of control.
Do not use the product when visibility is limited.
Do not use the product on rain or snow days. Any exposure to moisture (water or snow)
may cause erratic operation or loss of control.
Interference may cause loss of control. To ensure the safety of you and others, do not
operate in the following places:
1、Near any site where other radio control activity may occur
2、Near power lines or communication broadcasting antennas
3、Near people or roads
4、On any body of water when passenger boats are present
Do not use this product when you are tired, uncomfortable, or under the influence of
alcohol or drugs. Doing so may cause serious injury to yourself or others.
The 2.4GHz radio band is limited to line of sight. Always keep your model in sight as a
large object can block the RF signal and lead to loss of control.
Do not touch any part of the model that may generate heat during operation, or imme-
diately after use. The engine, motor or speed control, may be very hot and can ause se-
rious burns.
Misuse of this product may lead to serious injury or death. To ensure the safety of you
and your equipment, read this manual and follow the instructions.
Make sure the product is properly installed in your model. Failure to do so may result
in serious injury.
Make sure to disconnect the receiver battery before turning off the transmitter. Failure
to do so may lead to unintended operation and cause an accident.
Ensure that all motors operate in the correct direction. If not, adjust the direction first.
Make sure the model stays within the systems maximum range to prevent loss of control.
●
●
●
●
●
●
●
●
●
●
●
●
safety guide

06
EN
introduction
“It did everything, went anywhere, was as faithful as a dog, as strong as a mule, and as agile as a goat. It
consistently carried twice what it was designed for, and still kept going. ”
— Ernie Pyle, Pulitzer Prize-winning War Correspondent
When the SCALER MB was first put into service during the 1940s it wasn’t the only light off-road vehicle on
the battlefield. It wasn’t the most ground-breaking design and didn’t feature state-of-the-art technology.
However it would start a revolution - designed to tackle the most extreme type of terrain, it became a reli-
able and versatile workhorse honored by soldiers around the World for year to come.
To recreate and capture that original love for the SCALER MB, ROCHOBBY has gone through a repeated
testing and upgrading process to present you with this one of ist kind 1:12 model.
Sometimes, Smaller really is Better. The Legend lives on ‒ 1941 SCALER MB!
Features:
• Authentic full-time 4WD includes a radio transmitter & receiver and a battery.
• Delicate army green body finished with fine pad-printing design.
• Realistic scale detailing including canvas seats, rear-view mirrors, dashboards, leaf springs & dampers,
tires and metal ladder frame rails.
• Additional movable scale features and accessories like rear seat, axe, shovel, two bins, windshield, rotat-
ing steering wheel and fuel tank.
• The perfect match for 1/12 figures.
• Up to seven LED lights are included for nighttime driving.
• Optional parts (canvas top, machine gun, and trailer) provide further scale finishing.
No less than its larger sibling: 1:6 1941 SCALER MB we created one year ago — it features a realistic mould-
ed hard body finished with a delicate pad printing technique including real rear-view mirrors, a detailed
dashboard, rubber tires and removable accessories such as a fuel tank, axe, shovel, hood, windshield and
a top bow assembly.
However the 1:12 1941 SCALER MB features even more. More Details — such as lifelike canvas seats, a
fold-down rear seat with openable bins and tires with stunning scale tread patterns. More Realistic — the
SCALER MB chassis features a solid ladder frame rail that mirrors its full-size counterpart, multi-leaf
springs with dampers as well as offset differentials, making this vehicle exquisitely equal to the legendary
historical SCALER. More Versatile — the SCALER MB features a fantastic LED system (four turn lights, two
headlights and a blackout lamp) that helps explore the dark of night. Besides the scale finishing and detail
its 2.4GHz ANT transmitter provides modelers from rookies to experts with the opportunity to enjoy excit-
ing trails with a Two-speed transmission option (Crawling Mode and Beginner Mode), as well as alerting
the user with a Low-Battery Warning, Forgotten Alarm, Motor Overload Protection, and more!

A/B Mode switch key
F.Reset
REV/ST
Angle
A/B Mode
CH5/Climbing
CH4/Train CH6
ON/OFF
ST TRIM
+
--
TH TRIM
+/LED
Re-set button(F.Reset)Mode A
Steering Trim+(ST TRIM+)Mode A
Steering Trim-(ST TRIM-) Mode A
Training mode B
Climbing Mode B
Power Switch
Reverse key mode a / steering angle limit mode B
Throttle trim + (TH TRIM +) mode A / light control switch 1 mode B
Throttle trim - (TH TRIM -) mode A / light control switch 2 mode B
Channel 6 (reserved)
Shift Key
Steering wheel
Throttle trigger
07
EN
transmitter intruction

F.Reset
REV
ST TRIM
TH TRIM
LED
Train
Climbing
In the use of the disorder
settings, not back to the normal
state, you can use Factory.Reset
function
A/B mode function toggle switch
After replacing the steering
gear, the steering gear is
reversed
After replacing the motor, there
is a reverse
Adjust 30 / 50 / 100% steering
radian
When the steering center is not
centered
When the throttle is not
centered
Light setting
Adjust the training mode for
beginners
Adjust climbing mode
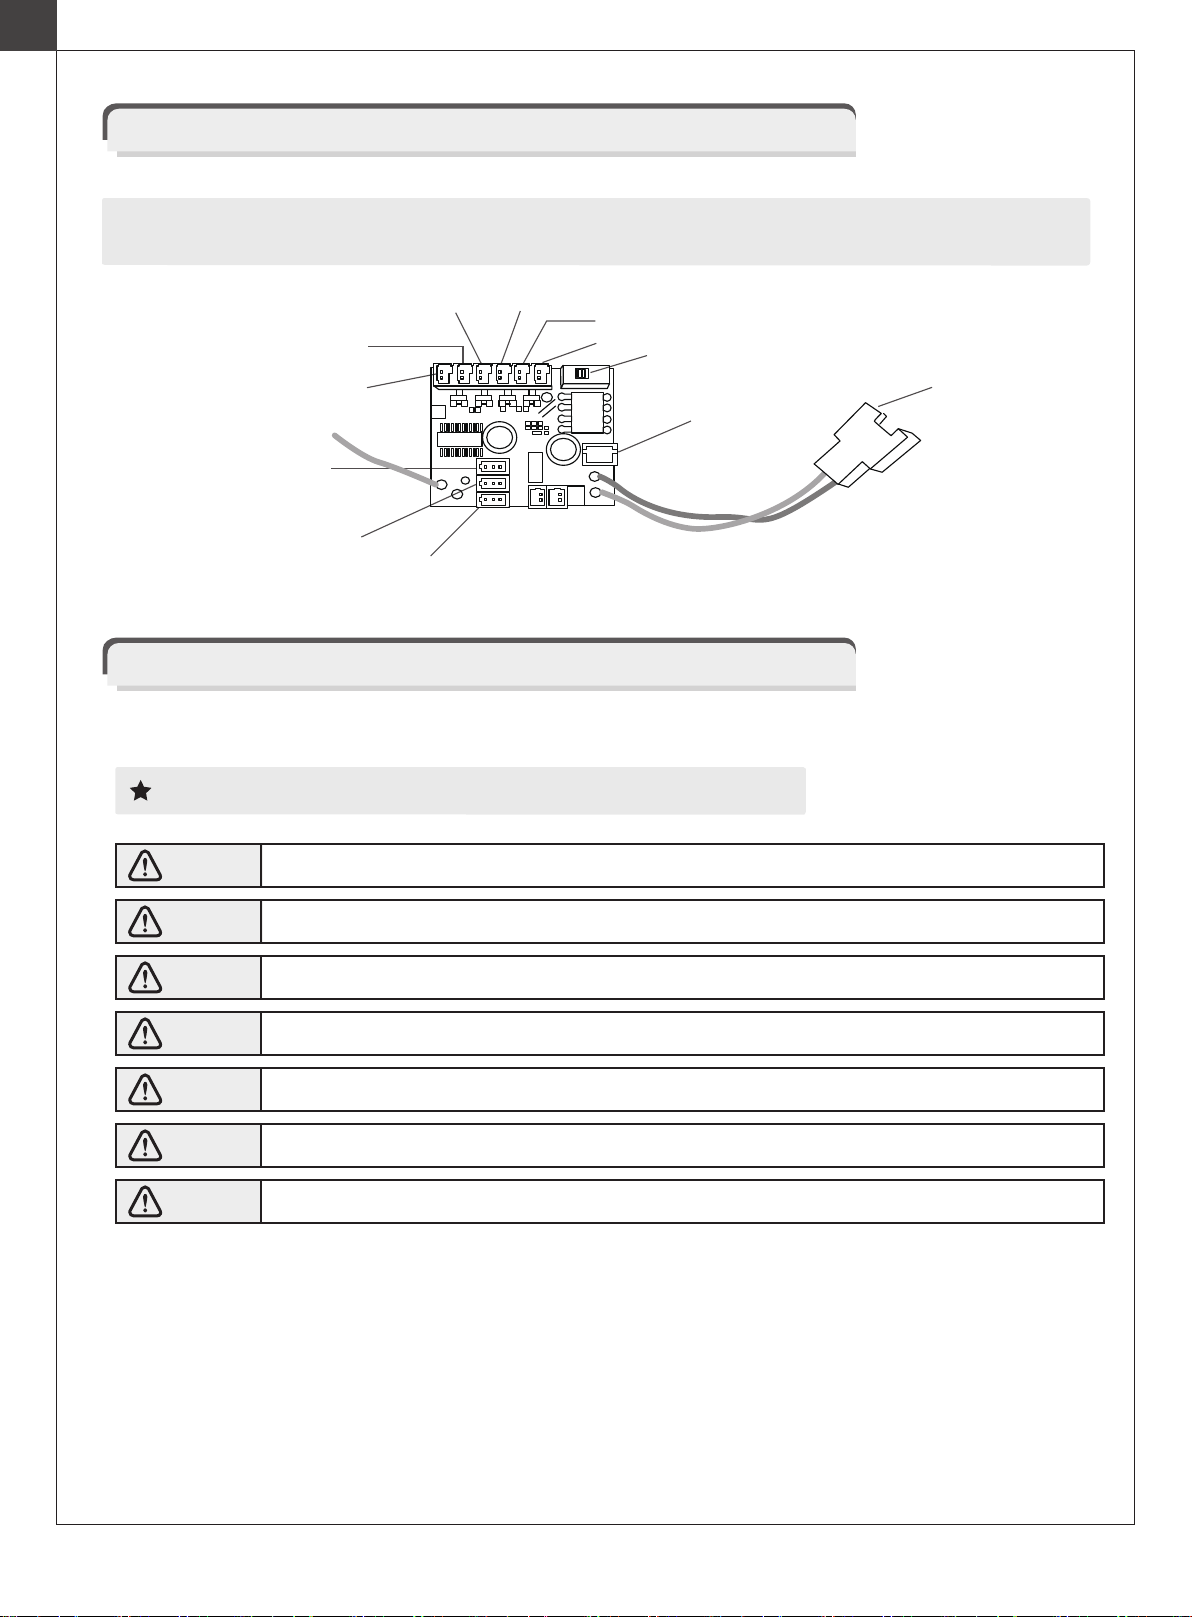
Emitter: forget reminder
Transmitter: frequency alert
If the transmitter does not receive any command, it will give an alarm after 10 minutes
and enter sleep mode after 2 minutes
When the transmitter does not match the receiver, the indicator light of the transmitter
keeps flashing
Transmitter: no frequency matching
+ low power reminder 4.5V
Transmitter: low power reminder 4.5V
The indicator light of the transmitter flashes slowly and makes a sound
The indicator light of the transmitter flashes slowly
Car: frequency alert
Car: low power alarm 6.3-6.4v
The headlights keep flashing
All lights keep flashing, steering and throttle are not controlled
Car: reminders to prevent
forgetting If the vehicle does not receive any signal, it will flash back and forth after 10 minutes
and enter sleep mode after 2 minutes
Make sure that the mode function toggle switch is in mode A, hold the steering wheel
left or right, and click the F. Reset button at the same time. After two clicks, it means
that the factory settings have been completed.
Make sure that the mode function toggle switch is in mode A, twist the left or right
steering wheel, and click Rev button at the same time. After ringing, it means that the
reverse setting of steering gear has been completed.
Make sure that the mode function toggle switch is in mode B, and click the ST Angle
key. After a click, it means that the 30% steering radian has been set. Click the ST
Angle button again, and you will hear two beeps, indicating that the setting of 50%
steering radian has been completed. Click the ST Angle button again, and you will
hear three beeps, indicating that the 100% steering radian has been set. Then click to
cycle to a click to indicate that the 30% steering radian has been set.
Make sure that the mode function toggle switch is in mode A, pull or push the throttle,
and click Rev button at the same time. After ringing, it means that the motor reverse
setting has been completed.
Make sure that the mode function toggle switch is in mode A, press ST TRIM+ or -
button to fine tune the steering center. Every click of the button will ring. When the
maximum and minimum values are reached, a long sound will appear. When the
median value is reached, it will ring twice.
Make sure that the mode function toggle switch is in mode A, press TH TRIM + / -
button to fine tune the throttle center. Every click of the button will ring. When reach-
ing the maximum and minimum value, the button will ring, when reaching the
median value, the button ring twice.
Make sure that the mode function toggle switch is in mode B, click the LED button,
and the headlamp will be on after a click. Then click the LED button, and the
headlight will be highlighted after two clicks. Continue to click the LED button, and
the air defense light will be on after three rings.
Make sure that the mode function toggle switch is in mode B, click the Train button,
and after a click, enter the beginner training mode. At present, the throttle speed is
limited to 50%. Press it again, and it will return to normal after hearing two rings.
Make sure that the mode function toggle switch is in mode B, click the Climbing
button, and enter the climbing mode after a click. When the accelerator is released,
the braking function starts. It's not easy to reverse when going up a steep slope. Press
it again, and it will return to the normal state after hearing two rings.
08
EN

09
Times for Pressing
Button
LED1#
LED2# Turn
Signal
Left turn
signal
Left turn
signal
Emergency
Flashers
Light
Position
Headlight
Always on OFF
OFF
OFF
OFF
Direction
linkage controL
Direction linkage
controL
OFF
OFF
OFF
OFF OFF
OFF OFF
OFF OFF
OFF Throttle linkage
control
When the throttle is released,
the light will be on for 0.5
seconds. If there is refueling
action within 0.5 seconds, it
will not be highlighted. The
tail light is highlighted during
braking operation to simulate
the effect of brake light
The light is on when reversing
Throttle linkage
control
OFF
OFF OFF
OFF OFF OFF
•
•
• •
•
•
•
•
•
Always Off
Always on
Tail lamp
highlight
constant
Reversing
light
Fog lamp Normally on
Taillights
Function Power on
is off by
default I II
I II
III IV V Control Mod Remarks
EN

receiver overview
getting started
Note:To ensure the best signal quality make sure that the antenna is mounted perpendicular to
the model body in an upright position.
Before operation, install the battery and connect the system as instructed below.
10
EN
Danger Do not expose to excessive heat or liquids.
Danger Do not open, disassemble, or attempt to repair the battery.
Danger Do not crush/puncture the battery, or short the external contacts.
Danger Do not use the battery if damaged.
Danger Do not drop the battery or expose to strong shocks or vibrations.
Danger Always store the battery in a cool, dry place.
Danger Only use specified battery (X4 AA batteries).
Transmitter Battery Installation
1.Open the battery compartment cover.
2.Insert 4 fully-charged AAA batteries into the compartment. Make sure that the battery makes good contact with the bat-
tery compartment's contacts.
3. Replace battery compartment cover.
Battery Type: AAA
Battery Installation:
Low battery alarm: When the battery is lower than 4.2V, the LED on the panel will flash slowly.
Head light Tail light
Tail light
Head light
Left Signal Light
Right Signal Light
Fast and slow
steering gear
Steering gear
Steering wheel steering gear
Motor Wire
Switch Power wire

instructions
After setting up, follow the instructions below to operate the system.
1. Automatic code matching (the transmitter and receiver have been successfully coded before
leaving the factory.)
1. When the transmitter power is on and the code matching mode is on, the light keeps flashing;
2. The power supply of the receiving board is turned on, and the front lights keep flashing to enter the code
matching mode;
3. When the code matching is successful, all the transmitter lights are on and all the lights on the car are off;
If you need to replace another transmitter or receiver, please follow the following steps to code:
Note: when code matching, please operate the transmitter to enter the code matching state first, and then
operate the receiver to enter the code matching state.
2、POWER OFF
instructions
2-3S 锂电或 5-9 芯镍氢电
1、Transmitter specification
Adaptive model
RF
Wireless protocol
Transmitting power
Product Model
Car
2.4GHz
ANT
<20dBm
HT-TX02
11
EN
1.Disconnect the receiver power.
2.Toggle the transmitter's power switch to the off position.
Follow the steps below to turn off the system:
Danger Make sure to disconnect the receiver power before turning off the transmitter. Failure
to do so may lead to damage or serious injury.

THROTTLE STICK POSITION
throttle stick position
Top point of backward directionTop point of forward directionNeutral point
2、Transmitter specification
2-3S 锂电或 5-9 芯镍氢电
阻抗
前进:0.0008 欧姆,后退:0.0016 欧姆
Battery
Charging Interface
Low Voltage Warning
Life time
Channel Resolution
Distance
6V DC 1.5AAA*4
NO
<4.45V
According to battery type
256 Grade
>100m(ground)
2-3S 锂电或 5-9 芯镍氢电
阻抗
前进:0.0008 欧姆,后退:0.0016 欧姆
Temperature Range
Humidity Range
Color
Online Update
Data interface
Antenna Type
-10°C ~ +60°C
20-95%
Black
NO
NO
Built-in single antenna
2-3S 锂电或 5-9 芯镍氢电
Certification
Weight
Size
CE, FCC ID: 2AUBX-HT-TX02
160g
152mm *75mm *167mm
12
EN

13
SET UP WIPER, RETRACT THE WINDSHIELD FRAME
Step 1: press the wiper into one hole.
Step 2: gently press and hold the center of the windshield,
bend and buckle the assembly to 2 holes on the hood.
connecting the battery
VEHICLE SETUP
Step 1: open the hood.
Step 2: place the battery in the battery box and connect the battery plug.
EN

UNFOLD THE CANVAS ROOF BRACKET
Step1: Pull out the canvas bracket.
Step 2: insert the canvas canopy bracket into the corresponding hole.
EN
14
OPERATING THE VEHICLE
Step 1: turn on the transmitter, the headlamp of the transmitter will flash and enter the frequency matching mode.
Step 2: turn on the receiver switch, the headlight will flash and enter the frequency matching mode.
Step 3: when the transmitter and receiver are successful in frequency up, the front lights of the transmitter will be on
for a long time, and the front lights of the vehicle will be off.
F.Reset
REV/ST
Angle
A/B Mode
CH5/Climbing
CH4/Train CH6
ON/OFF
ST TRIM
+
--
TH TRIM
+/LED

EN
15
Declaration of Conformity (DoC)
North America:
Horizon Hobby LLC
2904 Research Road
Champaign, IL 61822, USA
Tel.: 217-403-3584
The United Kingdom:
CML Distribution Ltd
Saxon House, Saxon Business Park, Hanbury Road
Bromsgrove, Worcestershire
B60 4AD, England
Tel.: +44 (0)1527 575349
Sweden:
Minicars Hobby Distribution AB
Annelundsgatan 17C
749 40 Enköping, Sweden
Tel.: +46-171-14 30 02
Australia:
Model Engines Pty Ltd
Unit 1/32 Bluett Drive
Smeaton Grange
NSW 2567 Australia
Tel.: +61(0)411128284
DISTRIBUTOR
We,
Dongguan Solid Model Technology Co.,Ltd
Add:Room 701, Block B, Luo Tian Community
Xiangshan Road 142, Songgang Street,
Tel: +86 0755-61811796
Web:www.rochobby.com
Shenzhen Baoan District, Shenzhen City of China 518101.
declare under our responsibility that the product:
Type of Equipment: 1/12 1941 SCALER MB Driving System & 2.4GHz Control System
Brand Name: ROCHOBBY
ETSI EN 301 489-1 V2.2.3(2019-11)
ETSI EN 301 489-17 V3.2.4(2020-09)
EN 55032:2015+A11:2020
EN 55035:2017+A11:2020
EN61000-3-2:2014
EN61000-3-3:2013
EN : 62479:2010
ETSI EN 300 328 V2.2.2 (2019-07)
Equipment Model: 11201(11201RTR)
to which this declaration relates is in conformity with the essential requirements and other relevant
requirements of the RED Directive 2014/53/EU, EMC Directive 2014/53/EU,FCC Indentifier 2AUBX-HT-TX-
02.The product is in conformity with following standards and/or other normative documents:

17
18
26
27
27
28
28
INHALT
.....................................................................
..................................................................
...................................................................
........................................................................
....................................
...............................................................
....................................................................................
.................................................................................
......................................................................
.............................................................................
.........................................................
...................................................................
.........................................................
.........................................................
.............................................................................
...........................................................................
...........................................................................
.............................................................................
................................................................................
.............................................................................
..................................................................
.........................................................................
.........................................................................
.....................................................................
............................................................
............................................................
Sicherheitshinweise
Fernsteuerungs-system
Position des gashebels
Fahrzeug- einstellung
Montage von Scheibenwischer Windschutzscheibe
Dach einklappen
Bedienung des fahrzeugs
Räder
Übersetzung
Übertragung
Vordere Achse
Hintere Achse
Fahrersitz
Beifahrersitz
Rücksitze
Windschutzscheibe
Lenkgetriebe
Lenkradgestänge Lenkgetriebe
Lenkgetriebe schalten
Chassis Explosionszeichnung 1
Chassis Explosionszeichnung 2
Body Montage 1
Body Montage 2
Montierte Produkte
Ersatz- und Zubehörteile (I)
Ersatz- und Zubehörteile (II)
16
DE
56
61
62
63
56
57
57
58
59
59
60
60
61
61
70
64
65
66
69

17
DE
einleitung
vorsichtsmassnahmen und warnhinweise
SICHERHEITSHINWEISE
Dieses Handbuch soll Sie bei der sachgerechten Bedienung, Wartung und Reparatur des Fahrzeugs unterstützen. Da
viele der verwendeten Komponenten einzigartig für diesen Truck sind, bewahren Sie bitte diese Anleitung als zukünftige
Referenz auf.
Der ROCHOBBY 1/12 1941 SCALER MB ist kein Spielzeug und daher nicht für Kinder unter 14 Jahren geeignet, da er aus
Präzisionsbauteilen besteht. Minderjährige sollten beim Betrieb von einem Erwachsenen begleitet werden. Wenn Sie
dieses Fahrzeug nicht in einer sicheren Art und Weise betreiben, kann dies zu körperlichen Schäden führen.
Es liegt in der Verantwortung des Besitzers, dieses Produkt auf sichere Weise zu betreiben. ROCHOBBY und seine
Vertriebspartner sind in keiner Weise verantwortlich für Personen- und/oder Sachschäden, die durch den Gebrauch
dieses Produkts entstehen können.
Ersetzen Sie beschädigte Komponenten durch Original-Werksteile. Achten Sie besonders auf die Polarität der gesamten
Fahrzeugverkabelung.
CE-konformitätsinformationen für die europäische union
Die zugehörigen Aufsichtsbehörden der folgenden Länder erkennen die angegebenen Zertifizierungen für dieses
Produkt als für den Verkauf und die Verwendung zugelassen an.
Konformitätserklärung
Produkt: 2.4GHz-Controller
Geräteklasse: 2
Die oben beschriebenen Erklärungsgegenstände sind
konform mit den Anforderungen der unten aufge-
führten Spezifikationen.
Artikelbezeichnung : 2.4GHz Controller
Die RED-Richtlinie 2014/53/EU
EN 60950-1:2006 + A11:2009 + A1:2010 + A12:2011 + A2:2013
EN 300 328 V2.1.1:2016
EN 301 489-1 V2.1.1:2017
EN 301 489-17 V3.1.1:2017
UK DE DK BG SE GZ ES NL SK HU RO FR PT
FI EE LV LT PL AT CY SI GR MT IT IE LU
• Ersetzen Sie beschädigte Bauteile durch Original-Werksteile. Achten Sie besonders auf die Polarität der gesamten Fahrze-
ugverkabelung.
• Nutzen Sie Ihren gesunden Menschenverstand, wenn Sie die Umgebung für den Betrieb Ihres Fahrzeugs auswählen.
Fahren Sie nicht in der Nähe von Stromkabeln, Funkmasten, tiefem Wasser oder instabilem Terrain. Der Bediener trägt die
alleinige Verantwortung für seine Handlungen.
• Das Produkt besteht aus elektrischen Präzisionsbauteilen. Es ist wichtig, das Produkt von Feuchtigkeit und anderen
Verunreinigungen fernzuhalten
• Prüfen Sie vor dem Betrieb immer die Funkreichweite des Fahrzeugs, um Funkverluste oder Störungen zu vermeiden.
• Betreiben Sie dieses Produkt im Rahmen Ihrer Möglichkeiten. Wenn das Fahrzeug gefährlich zu bergen ist, lohnt sich das
Risiko nicht.
• Schalten Sie immer den Sender ein, bevor Sie den Akku am Modell anschließen. Wenn Sie das Modell ausschalten,
trennen Sie immer zuerst den den Akku ab und schalten Sie dann das Modell aus, trennen Sie immer zuerst den Akku ab
und schalten Sie dann den Sender aus. Wenn diese Reihenfolge umgedreht wird, kann das Modell unkontrollierbar werden
und schwere Schäden verursachen.
• Lassen Sie niemals zu, dass die Senderbatterien leer werden, da dies zum Verlust der Fahrzeugkontrolle führen kann.
• Kunststoffe am Fahrzeug können durch extreme Hitze und Kälte beschädigt oder verformt werden. Lagern Sie das Modell
nicht in der Nähe von Wärmequellen wie Öfen oder Heizungen. Lagern Sie das Modell in einem klimatisierten Raum bei
Raumtemperatur.

18
DE
Dieses Produkt ist kein Spielzeug! Empfohlen für Personen ab 14 Jahren. Unter 14
Jahren ist die Aufsicht eines Erwachsenen erforderlich. Enthält Kleinteile, außerhalb der
Reichweite von Kindern unter 3 Jahren aufbewahren.
Wir haften nicht für vorsätzliche Beschädigung oder unsachgemäße Verwendung. Wenn
Sie zusätzliche Informationen benötigen oder Fragen zum Produkt oder dessen
Verwendung haben, kontaktieren Sie uns bitte über www.rochobby.com
MADE IN CHINA
Erklärung - Dieses Gerät entspricht Teil 15 der FCC-Bestimmungen.
Der Betrieb unterliegt den folgenden zwei Bedingungen:
FCC ID 2AUBX-HT-TX02
Dieses Gerät entspricht den FCC-Grenzwerten für die Strahlenbelastung, die für eine unkontrollierte Umgebung festgelegt
wurden. Es sollte mit einem Mindestabstand von 20 cm zwischen der Antenne und Ihrem Körper betrieben werden.
Warnung vor HF-Exposition:
1. dieses Gerät darf keine schädlichen Interferenzen verursachen, und.
2. dieses Gerät darf keine schädlichen Störungen verursachen, einschließlich Störungen, die einen unerwünschten
Betrieb verursachen können.
Änderungen oder Modifikationen, die nicht ausdrücklich von der für die Konformität verantwortlichen Partei genehmigt
wurden, können die Berechtigung des Benutzers zum Betrieb des Geräts aufheben.
FERNSTEUERUNGS-SYSTEM
sicherheitssymbole
Achten Sie genau auf die folgenden Symbole und ihre Bedeutungen. Die Nichtbeachtung dieser Warnhinweise kann zu
Schäden, Verletzungen oder Tod führen.
Danger Die Nichtbeachtung dieser Hinweise kann zu schweren Verletzungen oder zum Tod führen.
Warning Die Nichtbeachtung dieser Hinweise kann zu leichten Verletzungen führen.
Attention Die Nichtbeachtung dieser Hinweise kann zu leichten Verletzungen führen.

19
DE
Verboten Obligatorisch
●
●
●
●
●
●
●
sicherheitshinweise
Eine falsche Verwendung dieses Produkts kann zu schweren Verletzungen oder zum Tod
führen. Um Ihre Sicherheit und die Ihres Geräts zu gewährleisten, lesen Sie dieses Hand-
buch und befolgen Sie die Anweisungen.
Stellen Sie sicher, dass das Produkt ordnungsgemäß installiert ist. Bei Nichtbeachtung kann
es zu schweren Verletzungen kommen.
Stellen Sie sicher, dass der Empfängerakku abgeklemmt ist, bevor Sie den Sender auss-
chalten. Andernfalls kann es zu unbeabsichtigtem Betrieb kommen und ein Unfall verursacht
werden.
Achten Sie darauf, dass alle Motoren in der richtigen Richtung laufen. Falls nicht, stellen Sie
die Richtung zuerst ein.
Stellen Sie sicher, dass das Modell innerhalb des maximalen Bereichs des Systems bleibt,
um einen Kontrollverlust zu vermeiden.
Verwenden Sie das Produkt nicht in der Nacht oder bei schlechtem Wetter wie Regen oder
Gewitter. Es kann zu unregelmäßigen Betrieb oder Kontrollverlust führen.
Verwenden Sie das Produkt nicht, wenn die Sicht eingeschränkt ist.
Benutzen Sie das Produkt nicht bei Regen oder Schnee. Jeglicher Kontakt mit Feuchtigkeit
(Wasser oder Schnee) kann zu fehlerhaftem Betrieb oder zum Verlust der Kontrolle führen.
Interferenzen können zum Verlust der Kontrolle führen. Um Ihre Sicherheit und die anderer
Personen zu gewährleisten, dürfen Sie nicht nicht an den folgenden Orten betreiben:
1. In der Nähe eines Ortes, an dem andere Funksteuerungsaktivitäten auftreten können.
2. In der Nähe von Hochspannungsleitungen oder Kommunikationsfunkantennen
3. In der Nähe von Menschen oder Straßen
4. Auf einem Gewässer, auf dem sich Passagierboote befinden
Verwenden Sie dieses Produkt nicht, wenn Sie müde sind, sich unwohl fühlen oder unter dem
Einfluss von Alkohol oder Drogen stehen. Dies kann zu schweren Verletzungen bei Ihnen oder
anderen führen.
Das 2.4-GHz-Funkband ist auf die Sichtlinie beschränkt. Halten Sie Ihr Modell immer in Sicht-
weite, da ein großes Objekt HF-Signal blockieren und zum Verlust der Kontrolle führen kann.
Berühren Sie keine Teile des Modells, die während des Betriebs oder unmittelbar nach dem
Betrieb Wärme erzeugen können. Das Triebwerk, der Motor oder die Drehzahlregelung
können sehr heiß sein und schwere Verbrennungen verursachen.
●
●
●
●
●

20
introduction
“It did everything, went anywhere, was as faithful as a dog, as strong as a mule, and as agile as a goat. It
consistently carried twice what it was designed for, and still kept going. ”
— Ernie Pyle, Pulitzer Prize-winning War Correspondent
Als der SCALER MB in den 1940er Jahren zum ersten Mal in Dienst gestellt wurde, war er nicht der einzige
leichte Geländewagen auf dem Schlachtfeld. Er war nicht das bahnbrechendste Design und verfügte nicht
über die modernste Technologie. Dennoch sollte er eine Revolution auslösen - entwickelt, um die extrem-
sten Geländetypen zu bewältigen, wurde er zu einem zuverlässigen und vielseitigen Arbeitstier, das von
Soldaten auf der ganzen Welt über Jahre hinweg geschätzt wurde.
Um diese ursprüngliche Liebe zum SCALER MB wieder zu erwecken und einzufangen, hat ROCHOBBY einen
wiederholten Test- und Aufrüstungsprozess durchlaufen, um Ihnen dieses einzigartige Modell zu präsen-
tieren - als 1:12 Modell.
Der SCALER MB verfügt über eine realistisch geformte Hartkarosserie, die mit einer filigranen Tampon-
drucktechnik veredelt wurde, einschließlich echter Rückspiegel, einem detaillierten Armaturenbrett, Gum-
mireifen und abnehmbarem Zubehör wie einem Kraftstofftank, einer Axt, einer Schaufel, einer Motor-
haube, einer Windschutzscheibe und einer oberen Buggruppe.
Der 1:12 SCALER MB von 1941 bietet jedoch noch mehr. Mehr Details - wie z. B. naturgetreue Sitze aus
Segeltuch, eine umklappbare Rückbank mit aufklappbaren Ablagefächern und Reifen mit verblüffend
maßstabsgetreuen Profilen. Realistischer - das Fahrgestell des SCALER MB verfügt über eine solide Leiter-
rahmenschiene, die das Pendant in Originalgröße widerspiegelt, mehrblättrige Federn mit Dämpfern
sowie Offset-Differentiale, wodurch dieses Fahrzeug dem legendären historischen SCALER in nichts nach-
steht. Vielseitiger - der SCALER MB verfügt über ein fantastisches LED-System (vier Blinker, zwei Scheinw-
erfer und eine Verdunkelungslampe), das bei der Erkundung der nächtlichen Dunkelheit hilft. Neben der
maßstabsgetreuen Verarbeitung und Detailtreue bietet sein 2.4GHz ANT-Sender Modellbauern vom An-
fänger bis zum Experten die Möglichkeit, aufregende Strecken mit einer Zwei-Gang-Getriebeoption
(Kriechmodus und Beginner-Modus) zu genießen, sowie mit einer Warnung bei niedrigem Batteriestand,
einem "Vergessensalarm", einem Motorüberlastungsschutz und vielem mehr!
Manchmal ist kleiner wirklich besser. Die Legende lebt weiter - 1941 SCALER MB!
Merkmale:
• Authentischer 4WD, inklusive Funksender und -empfänger sowie Akku.
• armeegrüne Karosserie mit feinem Tampondruck-Design.
• Realistische, maßstabsgetreue Detaillierung mit Segeltuchsitzen, Rückspiegeln, Armaturenbrett, Blat-
tfedern und Dämpfern, Reifen und Metall-Leiterrahmenschienen.
• Zusätzliche bewegliche maßstabsgetreue Funktionen und Zubehörteile wie Rücksitz, Axt, Schaufel, zwei
Ablagen, Windschutzscheibe, drehbares Lenkrad und Kraftstofftank.
• Die perfekte Ergänzung zu den 1/12-Figuren.
• Bis zu sieben LED-Lichter sind für Nachtfahrten enthalten.
• Optionale Teile (Planenverdeck, Maschinengewehr und Anhänger) sorgen für eine weitere maßstäbliche
Veredelung.
DE
This manual suits for next models
1
Table of contents
Languages:
Other Roc Hobby Motorized Toy Car manuals

Roc Hobby
Roc Hobby 11241 User manual

Roc Hobby
Roc Hobby 1:18 Fire Horse User manual

Roc Hobby
Roc Hobby ROC11242RTRCE User manual

Roc Hobby
Roc Hobby 1:10 Atlas 4x4 User manual

Roc Hobby
Roc Hobby 1:18 Fire Horse User manual

Roc Hobby
Roc Hobby 1:12 TYPE82 KUBELWAGEN User manual

Roc Hobby
Roc Hobby DPROC001RS User manual