manuals.online logo
Brands
  1. Home
  2. •
  3. Brands
  4. •
  5. ROCK EXOTICA
  6. •
  7. Safety Equipment
  8. •
  9. ROCK EXOTICA Omni-AZTEK Elite Set-of-fours Manual

ROCK EXOTICA Omni-AZTEK Elite Set-of-fours Manual

AZTEK “Set-of-Fours” System End Assembly—Page 1 of 4
DIRECTIONS FOR ASSEMBLY OF THE OMNI–AZTEK ELITE® “SET-OF-FOURS”
(System End)
Congratulations on your purchase of the Rock Exotica Omni-AZTEK Elite® pulleys! The AZTEK system was developed in Arizona-based
Ropes That Rescue Ltd®. rigging programs around the world. These, configured as a “set-of-fours” (double-blocks) as shown in detail in
these instructions, will enable the rescue practitioner greater versatility in a personal mechanical advantage (PMA) for rescue and general
rigging. These swivel “omni” pulleys (blocks) are hewn from a solid “block” of high strength aluminum and are engineered with great pride
to withstand over 8,000# (36kN) of tensile force end to end. STERLING ROPE Company has also designed sewn products for these
pulleys including the 8mm restraint cord, rated at 4,270# (19kN) and both ratchets in two colors, and shock absorber/restraint cords. The
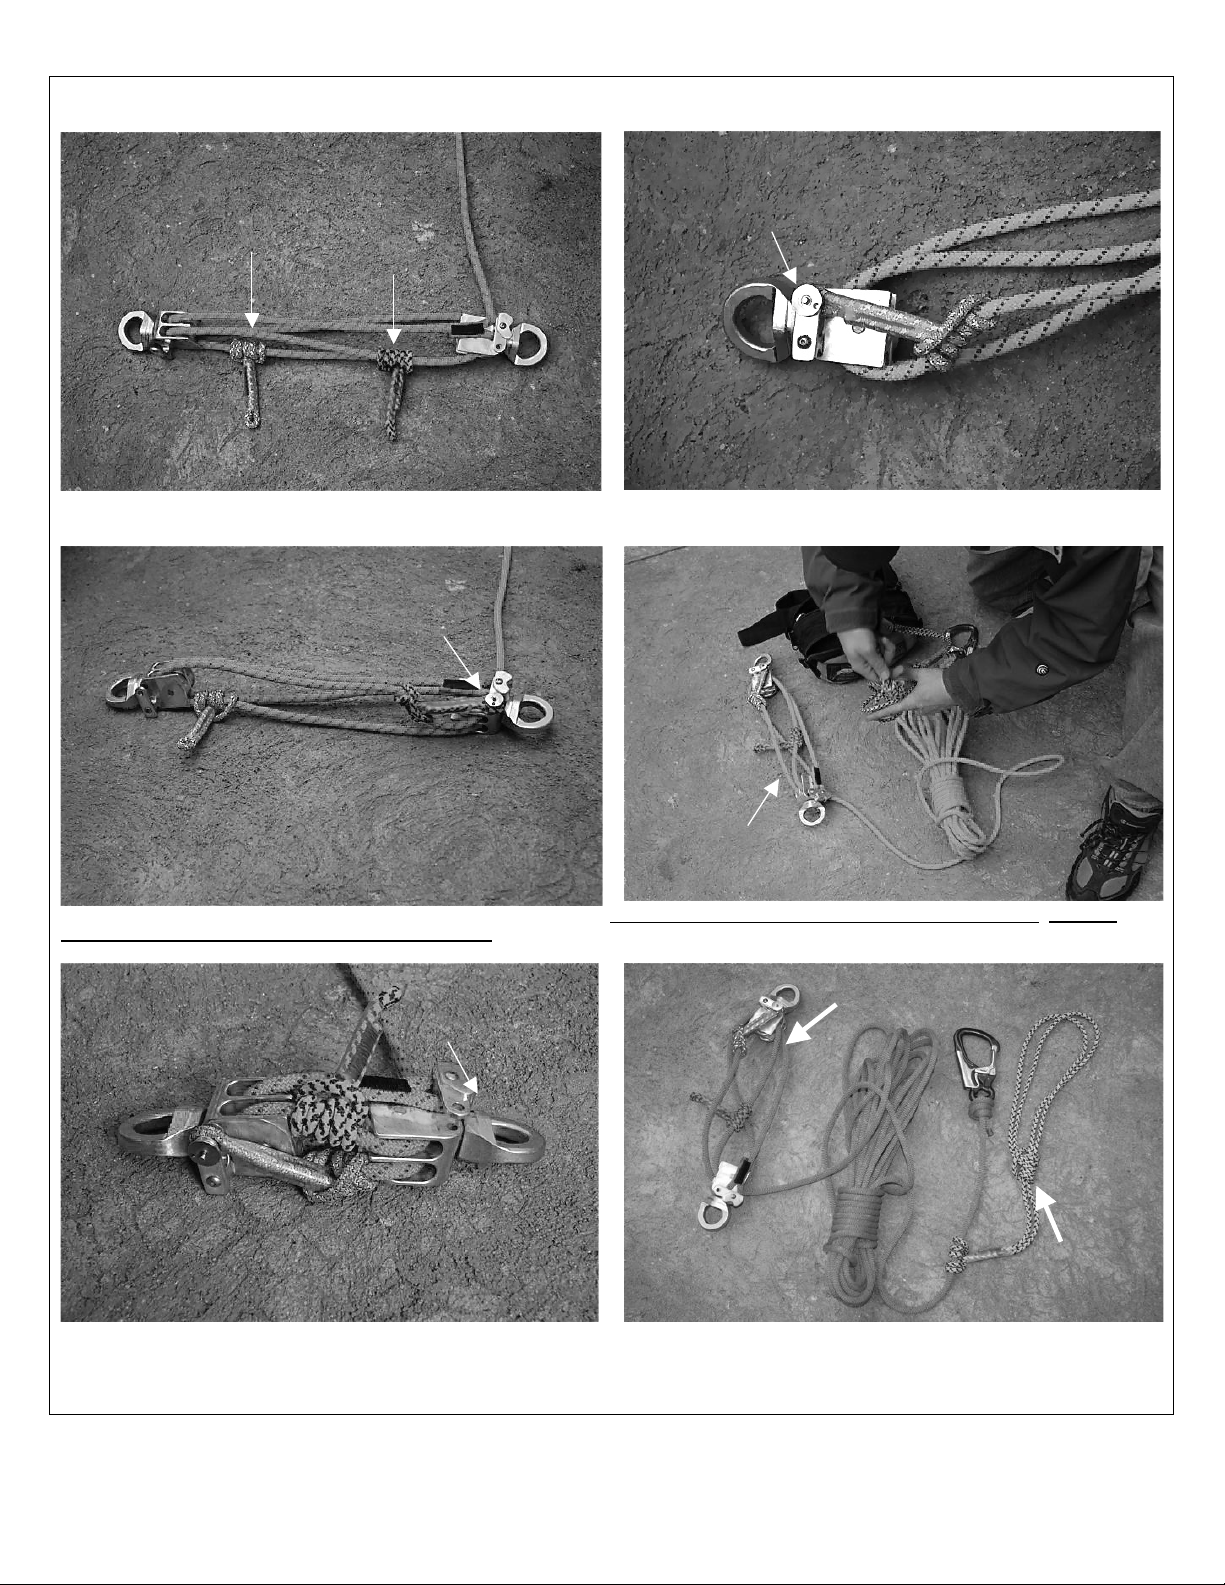
set of two blocks are different colors for ease of identification. Turn the set-of-fours one way and you have a 5:1 mechanical advantage.
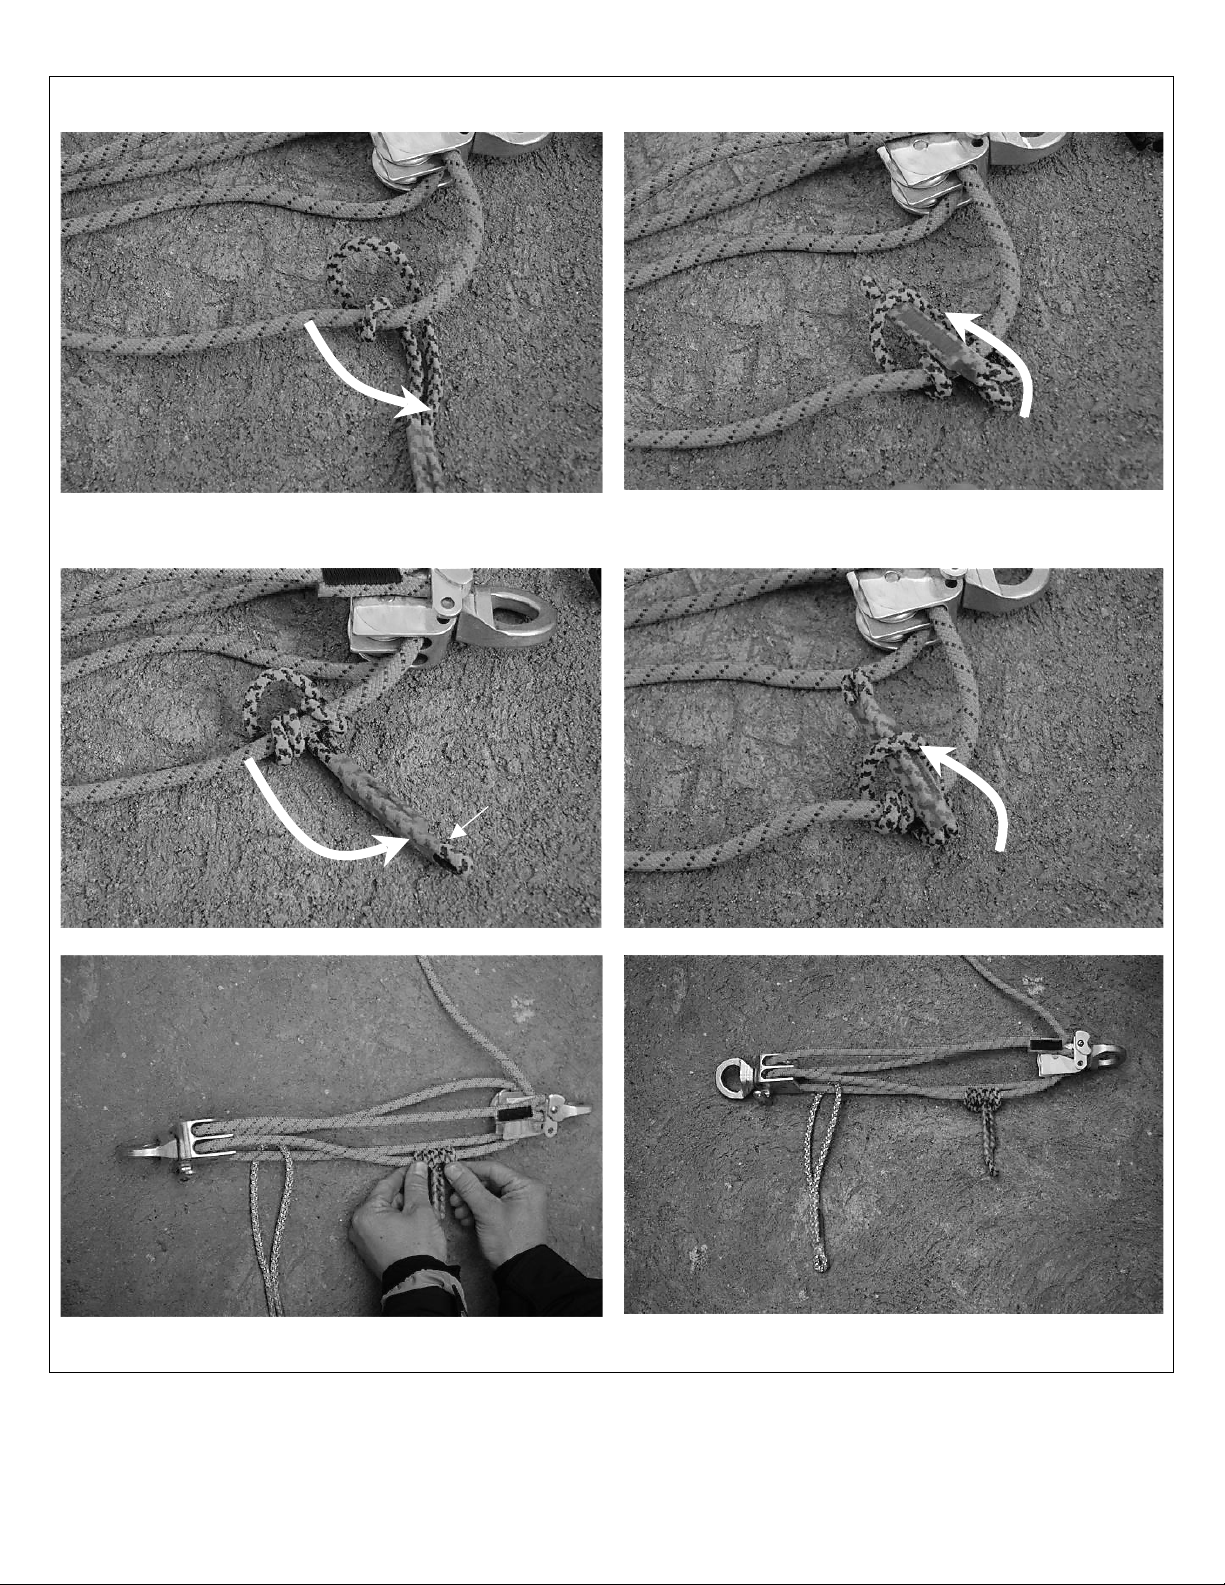
Turn it around and a 4:1 w/change of direction is the result, making this PMA extremely versatile. Also, the progress capture ratchet prusik
can be attached at either end (orange to orange or blue to blue). The progress capture prusiks are laced onto the restraint cord and then
formed into a directional prusik hitch (3 on 2) which prevents the inadvertent loss of the prusik once assembled. One quick pin is sold with
each set of blocks. Additional ones may be purchased if needed or if one wished to hold a spare in the opposite block. NOTE: These
directions are available IN COLOR in pdf form from www.ropesthatrescue.com/aztek.htm
INSPECTION: Blocks should be inspected before and after use to insure that connecting hardware is intact. All software should be
inspected for wear and glazing. These should be replaced as this occurs before use. Replacement software is available.
WARNING:
This equipment is for expert use only. The activities it was
designed for a inherently dangerous and carry a significant
risk of injury or death that cannot be eliminated. There are
many ways to misuse this equipment; any instructions that
come with this equipment do NOT tell you everything you
need to know. It is the user’s responsibility to obtain proper
instruction and to use the equipment safely. Do not use
unless you can will assume all risks and responsibilities for all
damage/injury/death that may result form use of this
equipment or the activities you undertake with it. Any
mechanical device is subject to failure; carefully check this
equipment before and after each use. You must always have
a parallel backup — Never trust a life to a single tool.
1. To begin the assembly of your Rock Exotica Omni AZTEK Elite® “Set-Of-Fours” find a large flat surface to lay the components out. You should have
components as follows:
•1 ea. Rock Exotica Omni AZTEK Elite® blue pulley
•1 ea. Rock Exotica Omni AZTEK Elite® orange pulley with
•Separate becket cover plate (shown attached to the orange pulley below)
•Quick pin (shown attached to the blue pulley below)
•1 ea. STERLING 8mm or 9mm AZTEK accessory cord with sewn eye on one end only (recommended length 15.25m or 50 ft.) 1
•1 ea. STERLING AZTEK orange ratchet
•1 ea. STERLING AZTEK blue ratchet
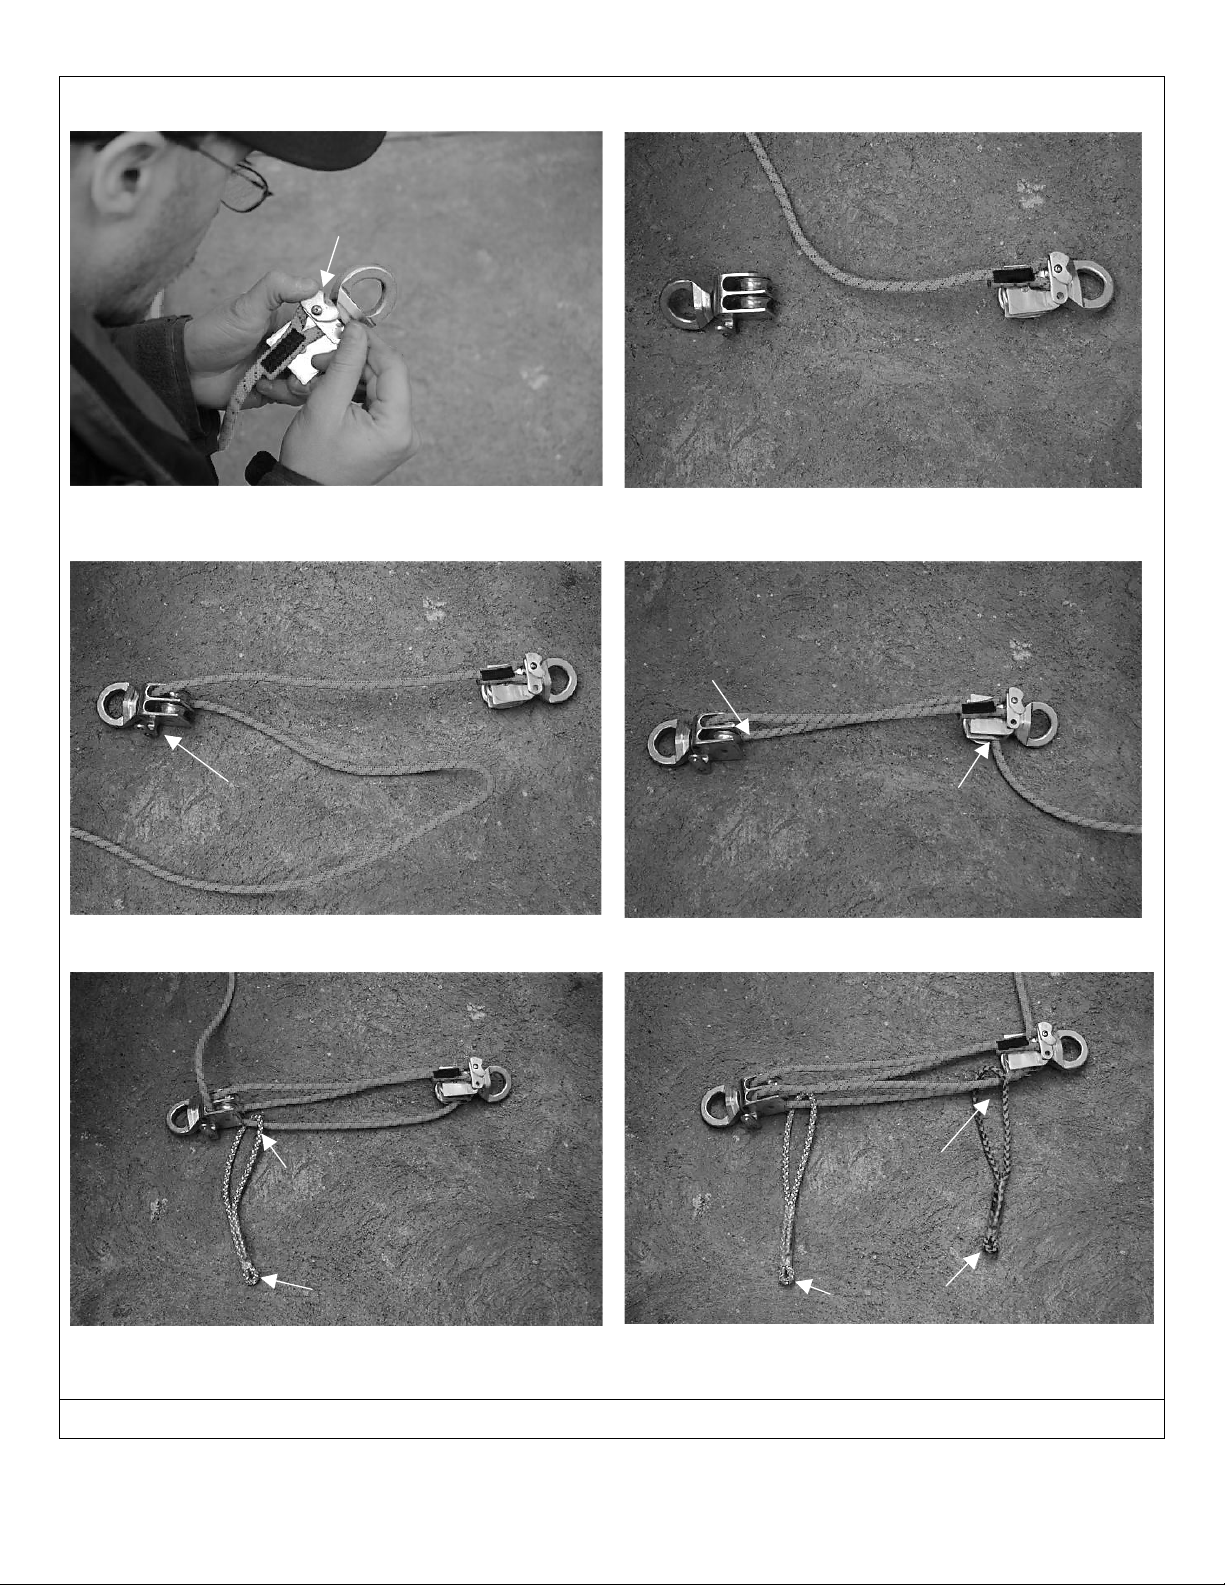
2. Remove pulley becket cover from orange pulley by removing small screw
and lock washer (if attached)
3. Slip end of sewn eye on accessory cord over becket (Note: this may
take some force)
Copyright © 2007 Ropes That Rescue Ltd. Copies in COLOR available at www.ropesthatrescue.com
1Personal AZTEK Elite® cords should be one color and the color changed to a different color for kits used in other locations (like at the foot end of the litter)
ORANGE
PULLEY
BLUE
PULLEY
ORANGE
PULLEY
±15.25m (50 ft.) of STERLING
accessory cord with sewn eye
on one end
BLUE and ORANGE
6mm STERLING
AZTEK sewn prusik
Pulley
becket cover
Screw with lock
washer
Orange pulley
becket cover
Sewn eye on end of
accessory cord
1
2
3
Quick
pin
3
AZTEK “Set-of-Fours” System End Assembly—Page 2 of 4
DIRECTIONS FOR ASSEMBLY OF THE OMNI–AZTEK ELITE® “SET-OF-FOURS”
(System End)
4. Reinstall becket cover plate with screw and lock washer then tighten
with screw driver. Inspect this screw often for tightness. Do not use if this
cover plate is loose.
5. Arrange your two Rock Exotica Omni AZTEK Elite® pulleys on the
ground as shown. The orange pulley should be laying with the sheaves
parallel to the ground and the blue sheaves should be perpendicular.
6. Pull balance of accessory cord through blue pulley sheave as shown
(top to bottom—blue pulley becket is on opposite side)
7. Reeve orange pulley with cord clockwise as shown. Be careful to reeve
exactly as shown in the photos.
8. After threading the bottom sheave on the orange pulley, put loop of blue
ratchet onto cord as shown before threading the next sheave on the blue
pulley from bottom to top
9. After threading the second sheave on the blue pulley, put loop of
orange ratchet onto cord as shown before threading the next sheave on
the orange pulley as shown (counterclockwise)
NOTE: Make certain that the loop formed at the top of each ratchet prusik next to the shrink tubing is just small enough to fit into the quick pin receptacle
on either pulley. This may be done by slipping the cord sewn into the loop through the shrink tubing installed at STERLING ROPE
Copyright © 2007 Ropes That Rescue Ltd. Copies in COLOR available at www.ropesthatrescue.com
BLUE
PULLEY
Laying with sheaves
perpendicular
lar
ORANGE
PULLEY
Laying with sheaves
parallel
ORANGE
PULLEY
4
5
ORANGE
PULLEY
BLUE
PULLEY
ORANGE
PULLEY
Loop here
with orange
ratchet
Thread cord through
bottom sheave closest
to ground (clockwise)
Cord leaves sheave of
blue pulley closest to
ground
8
6
Blue pulley becket
Loop here
with blue
ratchet
BLUE
PULLEY
BLUE
PULLEY
ORANGE
PULLEY
BLUE
PULLEY
ORANGE
PULLEY
9
7
Small loop typical at end
of each prusik
Small loop
Sewn eye on end of
accessory cord secured
under becket cover
AZTEK “Set-of-Fours” System End Assembly—Page 3 of 4
DIRECTIONS FOR ASSEMBLY OF THE OMNI–AZTEK ELITE® “SET-OF-FOURS”
(System End)
Wrap as shown in photos 10 though 13
Make certain that the loop formed at the top of the ratchet prusik next to the shrink tubing is just small enough to fit into the quick pin receptacle on either
pulley (See #12). This may be done by slipping the cord sewn into the loop through the shrink tubing installed at STERLING ROPE
14. Dress the prusik as shown
15. Repeat with blue prusik where 2 wrap is closest to blue pulley and 3
wrap is furthest away
Copyright © 2007 Ropes That Rescue Ltd. Copies in COLOR available at www.ropesthatrescue.com
BLUE
PULLEY
ORANGE
PULLEY
ORANGE
PULLEY
10
11
BLUE
PULLEY
12
14
15
0
1
2
1
1
2
2
3
3
2
0
13
Small loop
typical at end
of each
prusik
AZTEK “Set-of-Fours” System End Assembly—Page 4 of 4
DIRECTIONS FOR ASSEMBLY OF THE OMNI–AZTEK ELITE® “SET-OF-FOURS”
(System End)
16. Both ratchets are configured as shown with corresponding wraps
17. Decide which end of set-of-fours to attach ratchet and then remove
small quick pin which comes with AZTEK Elite® pulleys
14. Pin in place orange ratchet to orange pulley or blue ratchet to blue pulley. DO NOT attached orange ratchet to blue pulley or vice versa. Only one
ratchet should be attached at a time for proper operation.
The Rock Exotica Omni AZTEK Elite® SYSTEM END completely collapsed
with the customary lineman “reverse reeve”. Notice the prusik not used (in
this case the orange) floats on the rope during use and cannot be taken
from the rope by accident
The Rock Exotica Omni AZTEK Elite® PERSONAL END shown on the right
side with travel restrict/shock absorber and connecting auto locking
carabiner. For instructions on this end see
www.ropesthatrescue.com/aztek.htm
Copyright © 2007 Ropes That Rescue Ltd. Copies in COLOR available at www.ropesthatrescue.com
ORANGE
PULLEY
BLUE
PULLEY
Blue 6mm STERLING
AZTEK sewn prusik
attached to quick pin
Orange 6mm
STERLING AZTEK
sewn prusik attached to
quick pin
Blue ratchet
prusik
Finished
AZTEK set-of
fours
Orange
ratchet
prusik
17
18
16
2
3
2
3
BLUE
PULLEY
ORANGE
PULLEY
BLUE
PULLEY
Finished AZTEK set-of fours
“two blocked” for easier stowage
in completed AZTEK kit
SYSTEM END
PERSONAL
END

Other ROCK EXOTICA Safety Equipment manuals

ROCK EXOTICA Soloist User manual

ROCK EXOTICA

ROCK EXOTICA Soloist User manual

ROCK EXOTICA Akimbo User manual

ROCK EXOTICA

ROCK EXOTICA Akimbo User manual

ROCK EXOTICA SwivaBiner C81 S User manual

ROCK EXOTICA

ROCK EXOTICA SwivaBiner C81 S User manual

ROCK EXOTICA UNICENDER User manual

ROCK EXOTICA

ROCK EXOTICA UNICENDER User manual

Popular Safety Equipment manuals by other brands

IKAR HRA Series Instructions for the use and inspection records

IKAR

IKAR HRA Series Instructions for the use and inspection records

Guardian FABX instruction manual

Guardian

Guardian FABX instruction manual

Dräger PAS Micro Series Instructions for use

Dräger

Dräger PAS Micro Series Instructions for use

Honeywell Miller Falcon Edge User instruction manual

Honeywell

Honeywell Miller Falcon Edge User instruction manual

TEUFELBERGER NODUS REEPSCHNUR Instructions for use

TEUFELBERGER

TEUFELBERGER NODUS REEPSCHNUR Instructions for use

Petzl RAD LINE manual

Petzl

Petzl RAD LINE manual

S&S NavBoard FlipLite NB-FL02 Series User instructions

S&S

S&S NavBoard FlipLite NB-FL02 Series User instructions

DEZEGA CARBO CI-30 KS user manual

DEZEGA

DEZEGA CARBO CI-30 KS user manual

Bornack TQR02 user manual

Bornack

Bornack TQR02 user manual

Petzl SIMBA PARK manual

Petzl

Petzl SIMBA PARK manual

HACA LEITERN 0529.1904 Instructions for assembly and use

HACA LEITERN

HACA LEITERN 0529.1904 Instructions for assembly and use

Kentek 3+PRO KBS-C115C instructions

Kentek

Kentek 3+PRO KBS-C115C instructions

Kaya Safety E-3 B user guide

Kaya Safety

Kaya Safety E-3 B user guide

Charge Amps Amp Guard quick guide

Charge Amps

Charge Amps Amp Guard quick guide

CMC KOOTENAY ULTRA PULLEY manual

CMC

CMC KOOTENAY ULTRA PULLEY manual

Wieland SLX-COLM Series Mounting instructions

Wieland

Wieland SLX-COLM Series Mounting instructions

Petzl PITAGOR TECHNICAL NOTICE

Petzl

Petzl PITAGOR TECHNICAL NOTICE

ABS P.RIDE manual

ABS

ABS P.RIDE manual

manuals.online logo
manuals.online logoBrands
  • About & Mission
  • Contact us
  • Privacy Policy
  • Terms and Conditions

Copyright 2025 Manuals.Online. All Rights Reserved.