Rock-N-Roller Multi-Cart Series User manual
R2 (Micro)
R6 (Mini)
R8 (Mid)
R10 (Max)
R12 (All-Terrain)
RnR’s smallest model
expands from 26”-39” in
length with 25"/20"
(front/rear) foldable sides.
6”x1.50” rear wheels and
4"x1.0” front swivel casters
w/o brakes. Load capacity:
350 lbs./24 cu. ft. Weight: 17
lbs.
Frame telescopes from 28”-
42.5 in length with 24”
foldable sides. 8”x2.50”
pneumatic rear wheels and
4”x1.0" front swivel casters
w/o brakes. Load capacity:
500 lbs./27 cu. ft. Weight: 25
lbs.
Identical to R10 except with
8”x2.50” pneumatic rear
wheels resulting in 20%
smaller storage footprint than
R10. Load capacity: 500
lbs./32 cu. ft. Weight: 29 lbs.
Frame telescopes 34”-52” in
length with 32” foldable sides
to stack loads high. 10”x3.0”
pneumatic rear wheels.
5”x1.25” front swivel casters,
one w/brake. Load capacity:
500 lbs./32 cu. ft. Weight: 31
lbs.
Frame telescopes 34”-52” in
length with 32” foldable sides
to stack loads high. 10”x3.0”
pneumatic rear wheels and
8”x2.50” pneumatic swivel
casters w/o brakes. Load
capacity: 500 lbs./32 cu. ft.
Weight: 36 lbs.
Model R2 Models R6, R8, R10 Model R12
(2) 6”x1.50” (150mmx37mm) wheels
(2) 4.0”x1.0” (100mmx25mm) stem casters
(2) ½” flat washers
(2) ½”-13 nylon lock nut OR (nut + lock washer)
(4) 1” (25mm) square plastic endplugs
(12) 3/4” (20mm) square plastic endplugs
1/8” x 1” cotter pins
(2) 16mm flat washer
(1) Owner’s Manual
(2) 10”x3.0” (250mmx75mm) pneumatic wheels (R10 )
(2) 8”x2.5” (200mmx63mm) pneumatic wheels (R8/R6 )
(2) 5”x1.25” (125mmx32mm) stem casters (R10/R8)
(2) 4.0”x1.0” (100mmx25mm) stem casters (R6)
(2) ½”-13 lock nuts OR (nut + lock washer)
(2) ½” flat washers
(5) 1” (25mm) square plastic endplugs
(13) 3/4” (20mm) square plastic endplugs
(2) 1/8”x 1 1/4” cotter pins
(2) 20mm flat washers
(1) Owner’s Manual
(2) 10”x3.0” (250mmx75mm) pneumatic wheels
(2) 8”x2.5” (200mmx63mm) pneumatic casters
(5) 1” (25mm) square plastic endplugs
(13) 3/4” (20mm) square plastic endplugs
(4) 1/8”x 1 1/4” cotter pins
(2) 20mm flat washers
(1) Owner’s Manual
RocknRoller Multi-Cart: Owner’s Manual
Congratulations on your purchase of RocknRoller Multi-Cart, the most highly acclaimed and innovative carts or dollies ever. Although extremely easy to use,
Multi-Cart’s patented and ingenious design operates on a different principle than typical carts and dollies. To obtain maximum performance from your Multi-Cart,
we recommend reading the owner’s manual thoroughly. U.S. Patent # 5, 228,716; 5,476,282 & Pats. Pend.
LIMITED WARRANTY: Multi-Carts/RocknRollers carry a one year limited warranty against defective material or workmanship on basic frame and
components. Casters and wheels carry a 60 day warranty against defects. As with any equipment, normal maintenance is required. Caution should be used
when moving any load with Multi-Carts or any other dolly.
Each RocknRoller Multi-Cart shipping box should contain a frame and the following parts:
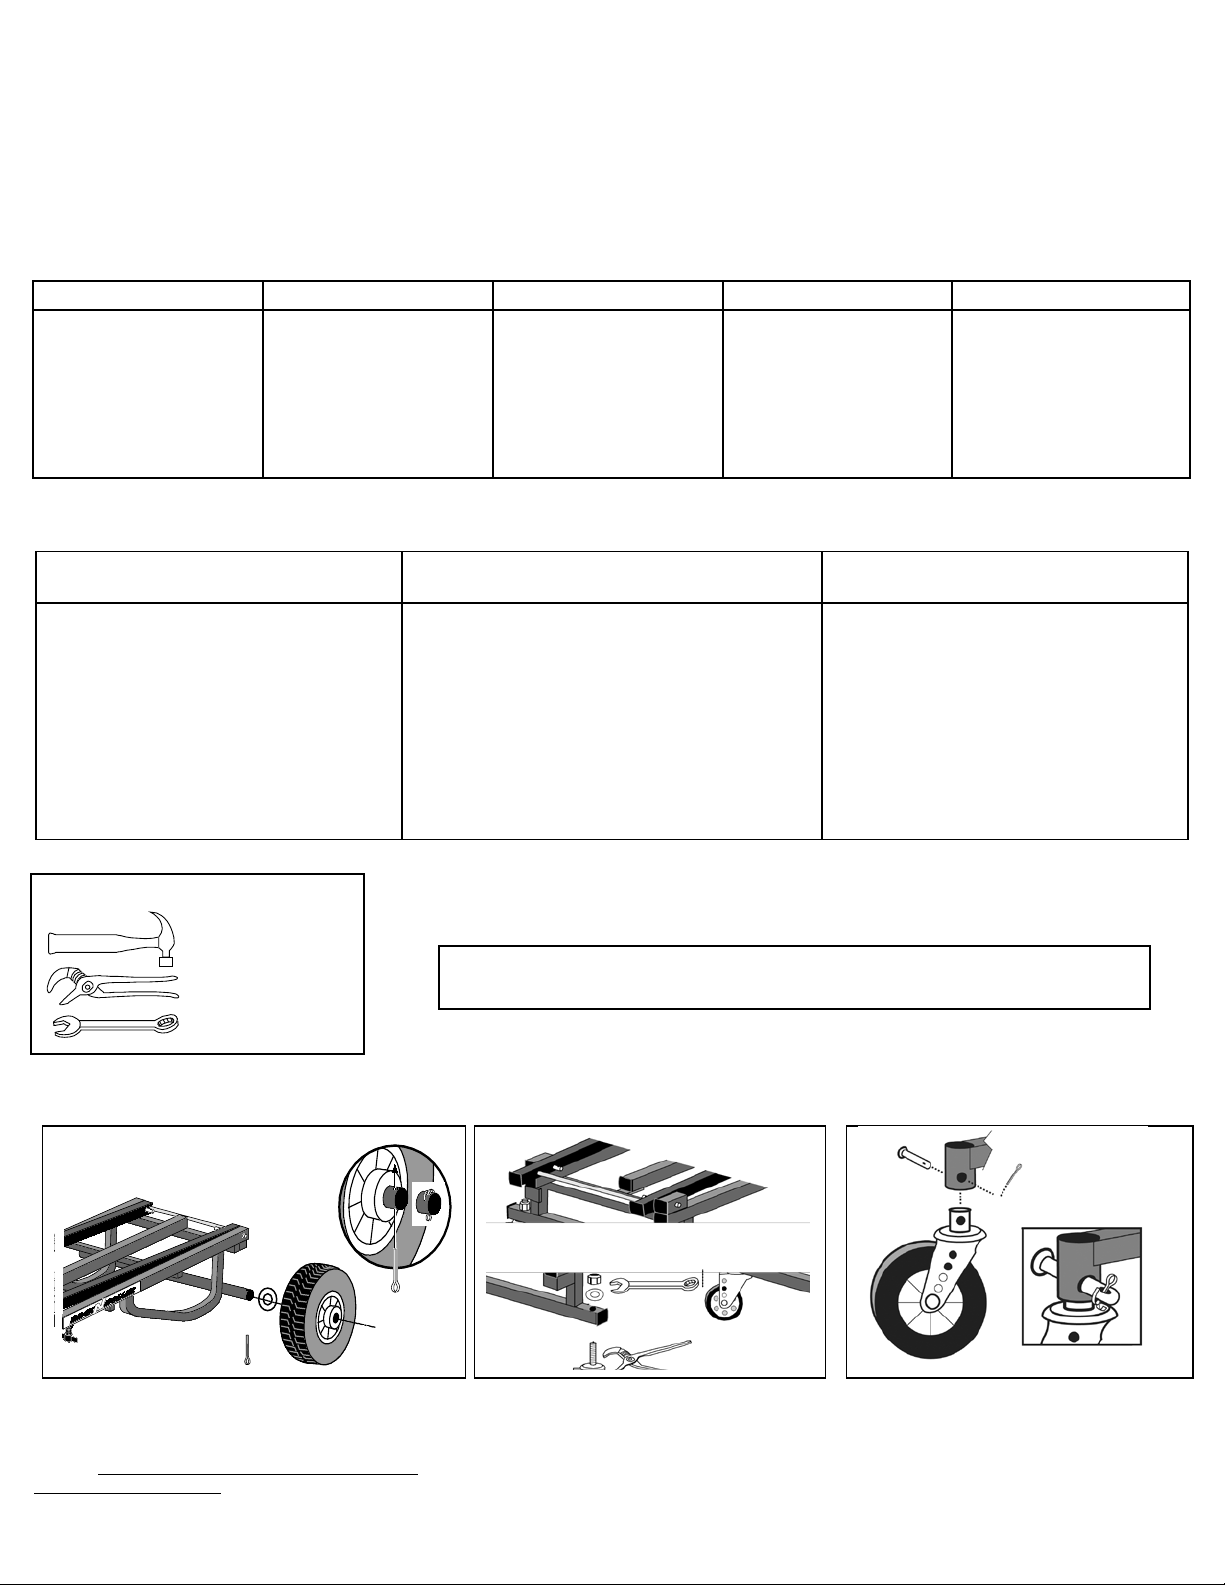
Gently slide wheel over axel as shown. Do not force wheels
onto axel. It is recommended to lubricate axels with light
grease before installing. Install cotter pins and bend ends
outward. Pneumatic wheels: maintain tire pressure at 25 –
30 p.s.i. Make sure valve stem core is tightened using
Schrader valve cap device. Check tire pressure periodically.
Models R2, R6, R8, R10, R12
1. Installing Rear Wheels
Hammer
Channel Lock pliers
1/2” box end wrench
or socket
Assembly Instructions
Recommended Tools For Assembly
CAUTION:
Be careful to not pinch or strike fingers during assembly. Be careful of metal burrs inside tubing.
2. Installing Front Swivel Casters
Attach front swivel casters as shown. While
tightening lock nuts, grip bearing cap with
channel lock pliers or pipe wrench to prevent
threaded stem from turning. Tighten locks nuts
firmly but not excessively tight.
Check lock nut tightness on casters stems
periodically.
Carefully insert caster stem into receptor tube
insuring that the caster stem holes line up with
the receptor pin holes. The stem should fit
very snugly in receptor tube. (If stem is
difficult to insert into tube: Occasionally, a
little excess paint or metal shavings get in the
receptor tube. If so, take a fine grain
sandpaper and ream it out a little. Then
reinsert the caster stem). Insert clevis pins.
Models R2, R6,
R8, R10
Cart Models
Page 1
Model R12
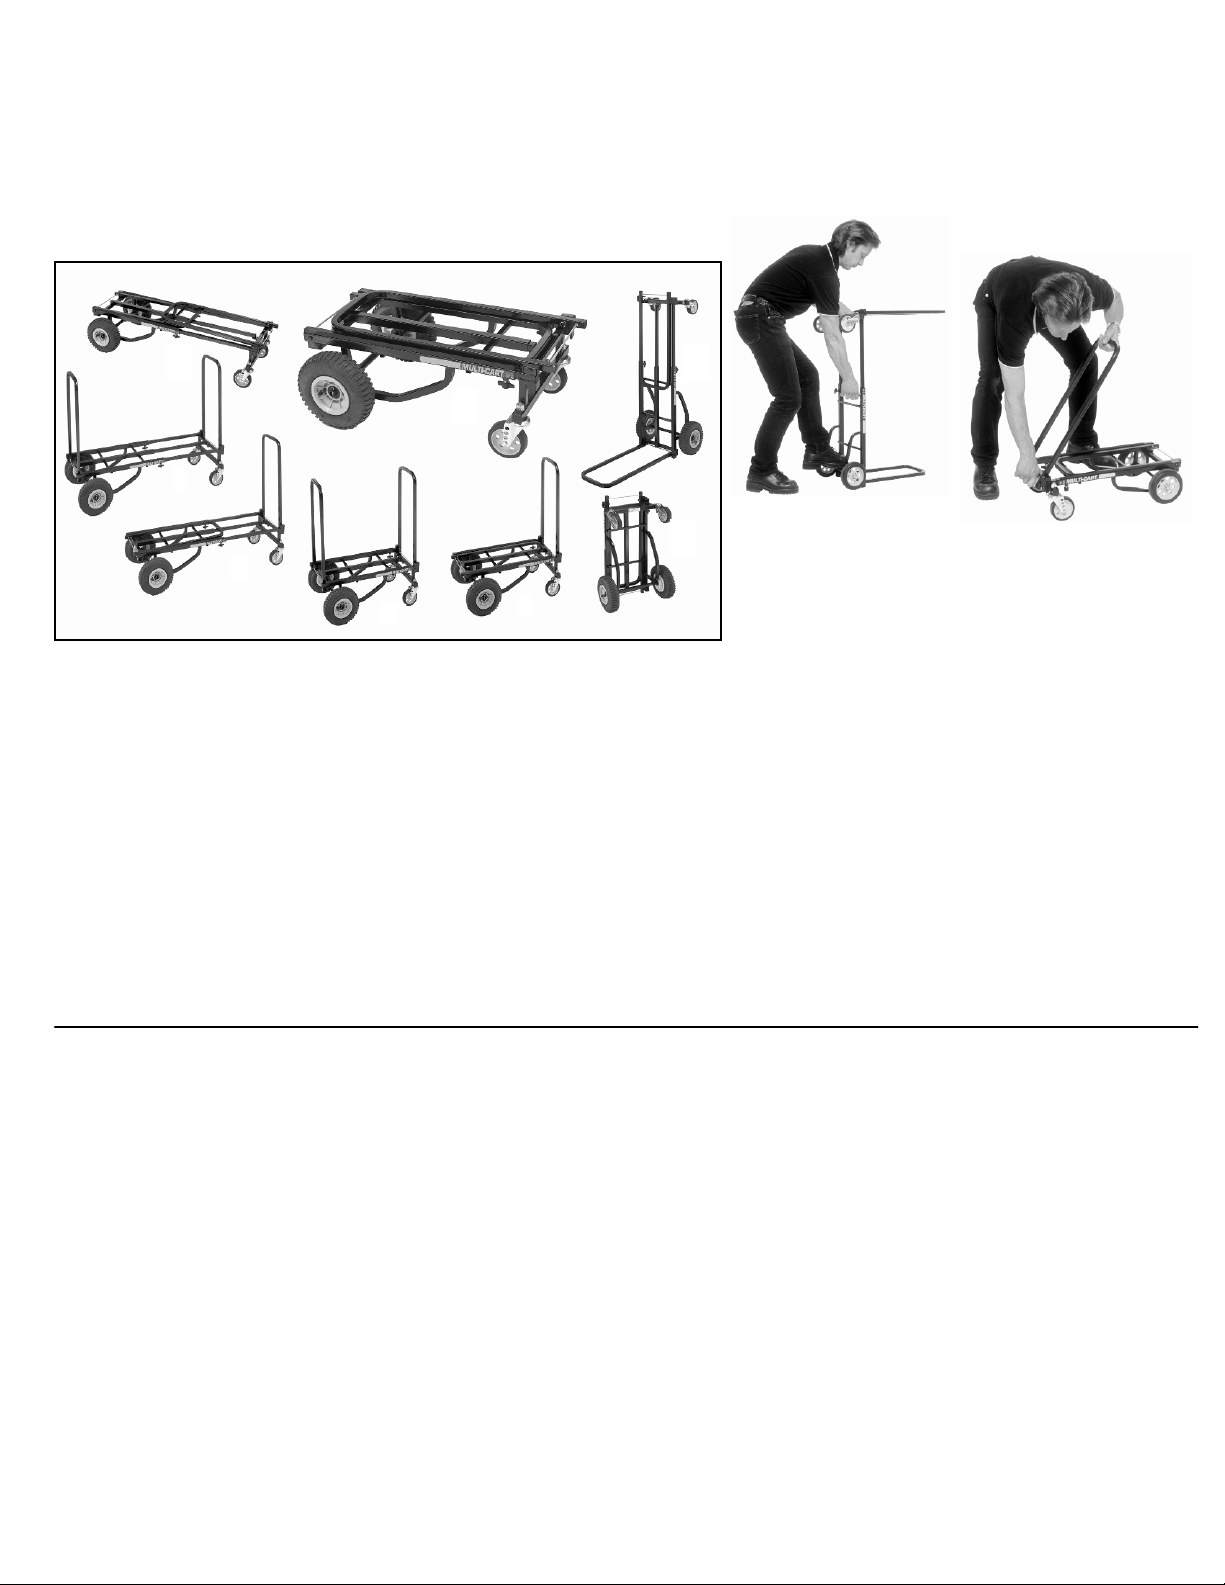
Operating Your RocknRoller Multi-Cart
Multi-Carts instantly transform into any of 8 different configurations: 1. short furniture dolly, 2. long-nose luggage cart 3. storage/transport, 4. short platform
cart, 5. short hi-stacker, 6. long furniture dolly, 7. long hi-stacker, 8. long platform cart. When using Multi-Cart in extended 4-wheel dolly configuration,
distribute load evenly over frame bed when possible, placing the heaviest items over the large rear wheels to make rolling easier. Over rough terrain it is
recommended to push cart with the large wheels forward. Caution: When loading equipment on a hill or incline, set brake. (Block wheels if load is
very heavy). Caution should be used when moving any load with Multi-Carts or any other dolly.
1. SHORT FURNITURE DOLLY: Place cart on all four wheels with sides folded down as shown.
2. LONG NOSE LUGGAGE CART: Extend cart into 4-wheel hi-stacker mode. Set on one end as shown, pull top release cable and lower top foldable side.
3. STORAGE/TRANSPORT: With sides upright, place cart on end, loosen wingbolts under frame 1/4 turn, push in extension stop button, and push down to
compact cart to minimum length. Retighten wingbolts. Place cart on all 4 wheels. FOLD HANDLES IN THIS ORDER: 1st, push down release cable over
large wheels with one hand and fold down side with the other hand. 2nd, fold side over front swivel casters in the same manner. Cart will not fold down
correctly unless done in this order. Stand cart on end to store or place upside down to ride in vehicles or on airport conveyor belts.
4. SHORT PLATFORM CART: Firmly push down on release cable located over swivel casters with one hand while raising the foldable side with the other
hand until side locks into place in upright position.
5. SHORT HI-STACKER: Raise both sides as previously described.
6. LONG PLATFORM CART: Take short hi-stacker configuration and set on 2 large wheels (upright). Loosen 2 wingbolts 1/4 turn and pull frame upward until
button engages. Retighten wingbolts and set cart back on all 4 wheels.
7. LONG HI-STACKER: Raise folded handle of long platform cart.
8. LONG PLATFORM CART: From long hi-stacker configuration, fold down side over large wheels first, then fold down side over swivel casters.
MULTI-CARTS TRANSFORM INTO 8 CONFIGURATIONS
Page 2
Raising Foldable Sides
Firmly press down on release
cable while raising other end
of foldable side as shown.
Repeat with other side.
Extending Frame
Loosen wingbolts 1/4 turn.
Step on rear axel and push in
extension stop button. Pull up
on frame as shown until stop
button engages. Retighten
wingbolts.
1
2
3
4
6
7
8
5

Page 3
RocknRoller Multi-Cart Maintenance Tips
RocknRoller Multi-Carts require very little maintenance but they do require some. This is especially important if you are
using your cart for professional purposes.
TIRES
1. Inflate your tires after unpacking the shipping box. The tires on carts with pneumatic wheels may not have been
inflated for months after being packed in the shipping box at the factory. Therefore, it is normal for tires to lose some air
after sitting in the shipping box for months.
2. Tip: Keep your tires inflated to proper pressure (30 p.s.i.). All pneumatic wheels (i.e. carts, trucks, bicycles,
wheelbarrows, etc.) need to have the tires inflated periodically. Also, carts roll with less effort with properly inflated tires.
Inflate to 30 p.s.i. approximately every 3 months.
3. Tip: Keep a spare tire just like on your car or bike. Running over a nail or something always happens at the most
inconvenient time. Spare wheels are not expensive, install quickly, and can save your gig.
4. Tip: Keep a small 12-Volt air compressor in your car (they plug into a car lighter). Small 12-volt air compressors
are inexpensive and extremely handy. People often forget simple tire maintenance until you are on your way to some
really important gig.
5. Tip: Keep the nuts on the caster stems firmly tightened.
6. Tip: Purchase an extra caster as a spare in case you damage one. Put a little Loctite or similar thread sealer on
caster stem threads to prevent nuts from vibrating loose. Casters eventually wear out and it happens at the most
inconvenient times.
7. Tip: Remember to retighten the wingbolts after changing the frame length
. You only need to loosen the
wingbolts ¼ turn to extend or retract the frame.
Troubleshooting
Problem
Cause
Solution
Tire leaking air
Loose Schrader Valve
Typical tires and tubes use a spring-loaded
device in the valve stem called a Schrader
valve to inflate the tire. The Schrader valve
screws into the valve stem and sometimes
can become loose causing air leakage.
Spray some water on the valve stem. If you
see bubbles then its leaking. Take a
Schrader valve cap and tighten the valve
core.
Tire leaking air
Hole in inner tube
Remove wheel assembly, inflate tire, and
place in bucket of water. If you see bubbles
then its probably caused by a hole in the
tube. Replace entire wheel assembly or
Replace/patch tube.
Tire difficult to inflate
because valve stem is not
centered (sticks out at an
angle) or does not stick out
far enough from wheel rim.
Sometimes the inner tubes
shift position a little inside
the wheel rim when the tire
is rolled around without
being sufficiently inflated.
Remove the wheel, press on the air valve,
and deflate the tire about 75%. Note the
direction that the tire valve is pointing.
Squeeze tire and tube together with one hand
and hold the wheel rim with the other hand.
Rotate the tire/tube together on the rim until
the valve stem is centered and sticks out
straight. Inflate the tire to about 30 p.s.i.
Caster stem bent
Nuts loose on threaded
stem while carrying loads
Replace caster
Non-skid tape comes off
High humidity. Heavy,
sharp-edged equipment.
Get some silicon sealer, smear a line of the
sealer on the top of the frame bed tube. Stick
the non-skid tape back on and scotch tape it
tightly to the frame. Allow to dry for several
hours. Remove the scotch tape.

Accessories
R2 Solid Deck
No-Flat Tires: Available For All Models
Flex-Straps
Piggyback
Spool Carrier
Headphone
Rack
Multi-Clamp
Solid Decks: Available For All Models
Shelf Kits: Available For All Models
R6 Solid Deck
R8/R10/R12 Solid Deck
Perforated
Handles
R6 Shelf Kit
R8/R10/R12 Shelf
Mini Shelf
Hang headphones &
cables
Attach to cart or stand
alone
8”x2.50” No-Flat
Offset &
Symmetrical hubs
10”x3.0” No-Flat
8”x2.50” No-Flat
caster assembly
6-Pocket
Hangbag
Strong, flexible tie-
down straps in RnR
colors.
Universal U-Clamp to
attach accessores to
20mm tube handles.
For bolt-on
accessories
12-Volt Air
Compressor
Air
Compressor
Page 4
This manual suits for next models
5
Other Rock-N-Roller Outdoor Cart manuals

Rock-N-Roller
Rock-N-Roller Multi-Cart R64C User manual

Rock-N-Roller
Rock-N-Roller Multi-Cart RSH10Q User manual

Rock-N-Roller
Rock-N-Roller Multi-Cart R6RT User manual

Rock-N-Roller
Rock-N-Roller R2RT-RD User manual

Rock-N-Roller
Rock-N-Roller MultiCart R18RT User manual

Rock-N-Roller
Rock-N-Roller Multi-Cart R12RT User manual

Rock-N-Roller
Rock-N-Roller Multi-Cart R14G User manual

Rock-N-Roller
Rock-N-Roller Multi-Cart R16RT User manual

Rock-N-Roller
Rock-N-Roller MULTI-CART R2RT User manual


