manuals.online logo
Brands
  1. Home
  2. •
  3. Brands
  4. •
  5. Rocky's
  6. •
  7. Lighting Equipment
  8. •
  9. Rocky's Eazy Roller 4A Permanent User manual

Rocky's Eazy Roller 4A Permanent User manual

SELF-DRILLING
SELF-TAPPING
SCREWS
#69 - 3” Hub
Please see instruction supplied in the Tube box before
going any further.
Very important:
You must use the bolts supplied or the tube may sag.
When you have assembled the tube according to the
instructions put the 3” hubs in each end of the tube.
Using the Self-Drilling Self-Tapping screws attatch the 3”
Hubs to the tubes.
NOTE: No pre drilling required
For regular shaped pools, align the outside edge of the
tube parallel with the end of the pool.
For irregular shaped pools, the outside edge of the tube
should be a minimum of 3' inside from the end of the
pool. Place the reel at the widest point if that is possible
for a better result
Positioning your Reel System
12
3
4
Assembling the tubes
#4A Portable Instructions
105
69
57 107
71 19 5
61
TM
Assemble the system
Put the Black Bushing #105 onto the end of the hub remembering to
put some Vasaline or waterproof grease inside the Bushing.
Grease once a year after that.
Push the tube into the Black Bushing then into the #4A Frame Part
#57.
Put the Black washer #107 over the end of the protruding end of the
Hub and slide the Handle #71 onto the end of the Hub.
Put the washer #19 on the Bolt #5 and secure the Handle.
VERY IMPORTANT: Do not overtighten this bolt as it will make it
hard to rotate the handle.
Repeat this on the other end of the unit and use the White Knob #61
in place of the Handle.
Your system is now complete.
Using the two holes of the #4 A-frame (item #57) as guides, make
two marks on deck for each #4 A-frame. With a 1/2" concrete drill
bit, drill a 1 1/2" deep verticle hole at each mark.
1/16"
15
Slug
Hit center slug
with hammer &
center punch,or
large nail.
Drive the concrete anchor #15 into the hole with a ham-
mer. Leave the anchor raised 1/16" above deck.
To set the concrete anchor:
Hit the slug in the center of the anchor (usually Red)
with a hammer and center punch, or heavy nail,
driving the slug down into the anchor forcing the legs
out into concrete. This will stop the anchor from
rotating.
6
7
21
Insert the 3/8" bolts (item #7) through the
3/8" washers (item #21), through the #4 A-frames (item #57)
and into the concrete anchors (item #15).
Tighten the 3/8" bolts.
7
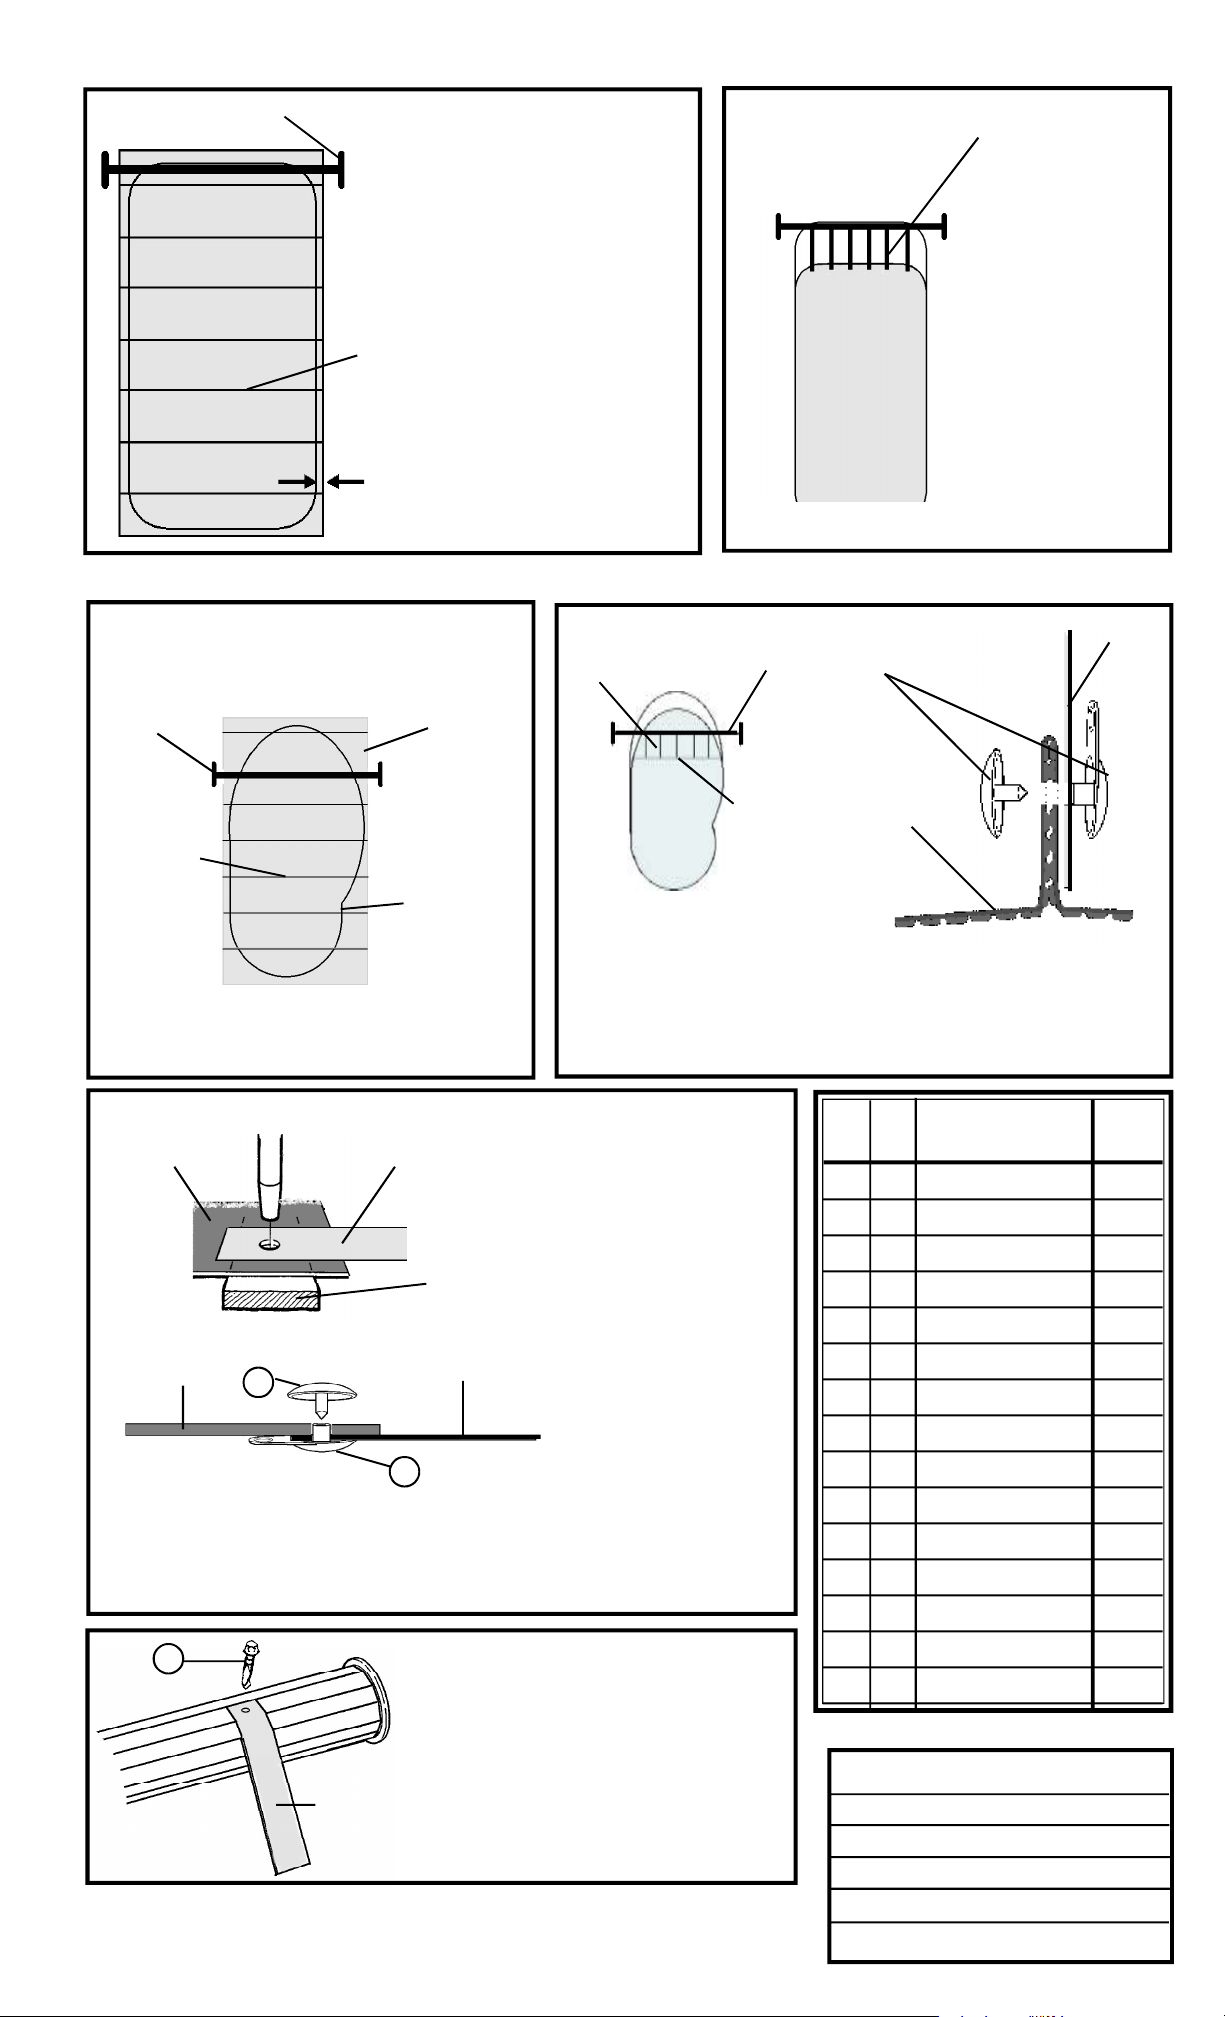
GROMMET DETAIL Position the blue strap on the
cover. Place a piece of wood
underneath to protect the
blade. Make a hole, or cross
cut through the strapping and
the cover. Ensure that the hole
in strapping is at least 2" from
the end of the strap and that
the hole in the cover is at least
2" from the end of the cover.
COVER STRAP
WOOD
Insert female grommet (item #103) through hole in strapping and cover.
Ensure that material is completely pushed down shaft. Insert male
grommet (item #101) into female grommet. Once in place, hit with
hammer until secure. (Caution - excess force will break grommet).
COVER 101 STRAP
103
1
STRAP
Using self-tapping/drill screws
(item #1), secure strap to tube.
For odd shaped pools, pinch the cover and attach the strap as
shown. Attach the cut cover to the roller with the blue straps (see
grommet detail) by folding the cover in a straight line as shown in
the diagrams. Ensure that the fold in the cover is straight.
Attach the cut cover
to the roller with the
blue straps (See
grommet detail). En-
sure length of strap
allows cover to lay flat
on pool, to prevent
wind from getting un-
der cover.
STRAPS EVERY 3'
Open cover over the pool and set into position.
Ensure that the seams on the cover are
parallel to the roller. (This may not be possible
with some types of covers).
COVER
POOL
SEAMS
ROLLER
When cutting the cover, allow a 1"
wide border around the pool edge to
compensate for shrinkage.
Open cover over the pool and set
into position. Ensure that the end
of the cover (where it attaches to
the roller) is square to the roller.
If the cover has seams, then the
seams should be parallel to the
roller. (This may not be possible
with some types of covers.)
When cutting the cover, allow
a 1” wide border around the
pool edge to compensate for
shrinkage.
ROLLER
SEAMS
1" BORDER
COVER
FOR IRREGULAR, KIDNEY, OR ROUND SHAPED INGROUND POOLS
FOR REGULAR SHAPED INGROUND POOLS
Cover
Grommets
STRAPS EVERY 3'
Roller
Fold in
cover
Strap
Tools Required
Reversible Electric Drill
1/2" Concrete (masonary) Drill Bit
Hammer & Center Punch or Nail
5/16" Hex Head Socket Bit
1/2" Wrench
5/8" Wrench
Rocky’s Reel Systems Inc.
Tel: 1-800-663-8705 E-Mail: info@rockys.ca
ITEM
#
1
5
7
15
19
21
57
61
69
71
101
103
105
107
201
DESCRIPTION
Self-tapping Screw
5/16"x1" Bolt
3/8"x1" Bolt
Concrete Anchor
5/16" Washer
3/8" Washer
#4 A-Frame
White Knob
3" Regular Hub
Small Handle
Male Grommet
Female Grommet
Plastic Bushing
Plastic Washer
22' Strapping
QTY.
12
2
4
4
2
4
2
1
2
1
10
10
2
2
1
RE-
ORDER
#
501
505
507
515
505
21
531
533
543
545
549
549
555
555
587

Other Rocky's Lighting Equipment manuals

Rocky's Eazy Roller Senior Commercial User manual

Rocky's

Rocky's Eazy Roller Senior Commercial User manual

Rocky's Eazy Roller 3A User manual

Rocky's

Rocky's Eazy Roller 3A User manual

Rocky's Junior User manual

Rocky's

Rocky's Junior User manual

Rocky's Eazy Roller 5A Portable User manual

Rocky's

Rocky's Eazy Roller 5A Portable User manual

Rocky's EAZY ROLLERS 305/336 User manual

Rocky's

Rocky's EAZY ROLLERS 305/336 User manual

Popular Lighting Equipment manuals by other brands

M-system PATLABOR IT40SRE instruction manual

M-system

M-system PATLABOR IT40SRE instruction manual

Rollei Soluna 300 manual

Rollei

Rollei Soluna 300 manual

Eaton Metalux installation instructions

Eaton

Eaton Metalux installation instructions

Welch Allyn Exam Light III Service manual

Welch Allyn

Welch Allyn Exam Light III Service manual

Vision & Control DL30x30-B470/UDC/-a Instructions for use

Vision & Control

Vision & Control DL30x30-B470/UDC/-a Instructions for use

ARRI Orbiter Short manual

ARRI

ARRI Orbiter Short manual

amaran SM5c product manual

amaran

amaran SM5c product manual

SECO-LARM SL-126-A24Q installation manual

SECO-LARM

SECO-LARM SL-126-A24Q installation manual

screwfix 7237F Instruction leaflet

screwfix

screwfix 7237F Instruction leaflet

thomann StairVille LED Matrix Blinder 5x5 DMX user manual

thomann

thomann StairVille LED Matrix Blinder 5x5 DMX user manual

Viessmann 6623 quick start guide

Viessmann

Viessmann 6623 quick start guide

Image Engineering CAL1 user manual

Image Engineering

Image Engineering CAL1 user manual

Conrad Electronic 361475 operating instructions

Conrad Electronic

Conrad Electronic 361475 operating instructions

Varytec BAT.PAR 8 RGBW user manual

Varytec

Varytec BAT.PAR 8 RGBW user manual

HUBBELL LIGHTING Dual-Lite EVE Series Installation, operation and maintenance instructions

HUBBELL LIGHTING

HUBBELL LIGHTING Dual-Lite EVE Series Installation, operation and maintenance instructions

RSA Lighting COMBOLIGHT LV570 datasheet

RSA Lighting

RSA Lighting COMBOLIGHT LV570 datasheet

Pelican 2720 LED instructions

Pelican

Pelican 2720 LED instructions

Stahl 6018/11 Series operating instructions

Stahl

Stahl 6018/11 Series operating instructions

manuals.online logo
manuals.online logoBrands
  • About & Mission
  • Contact us
  • Privacy Policy
  • Terms and Conditions

Copyright 2025 Manuals.Online. All Rights Reserved.