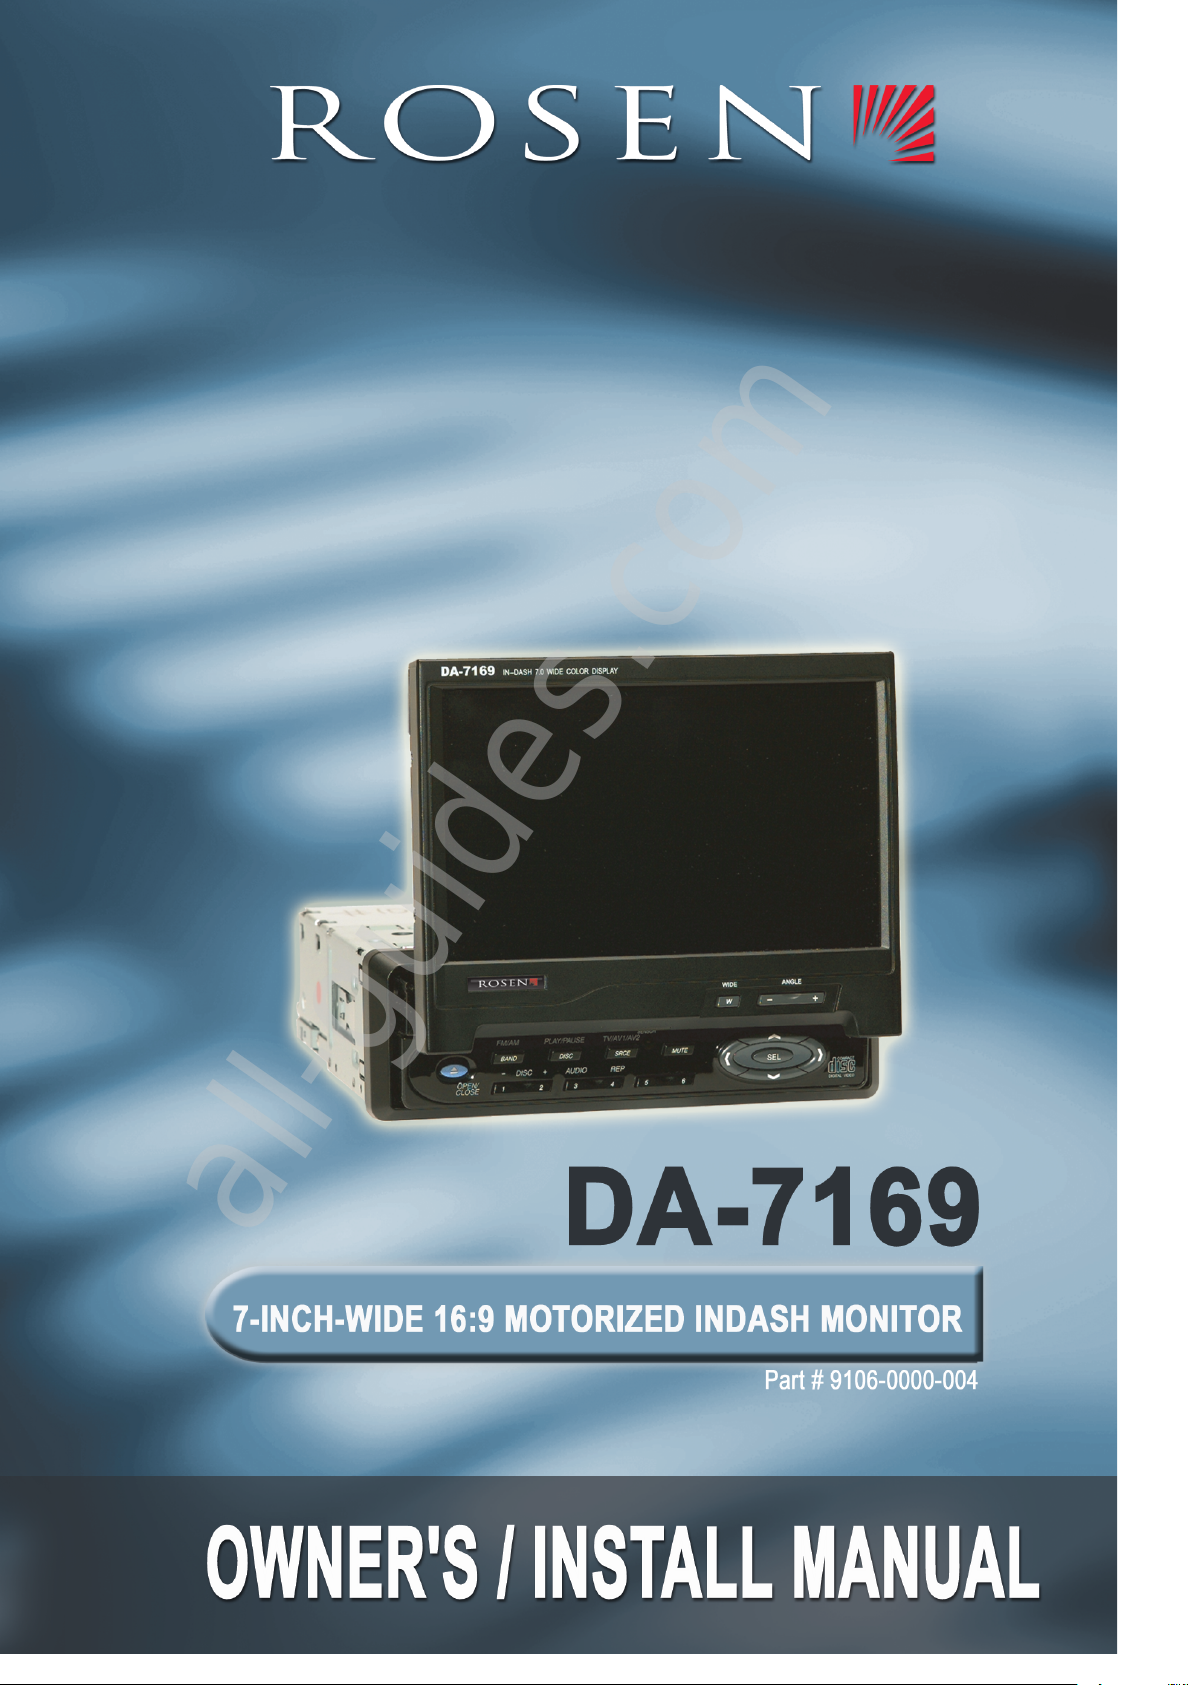
Rosen DA-7169 Quick start guide

All manuals and user guides at all-guides.com
all-guides.com

Table of Contents
1 Before You Begin ............................................ 2
2 Installing the DA-7169 Monitor ....................... 4
Parts Overview................................................. 8
4 Operating the DA-7169 Monitor ................... 11
5 Specifications ................................................ 16
6 Appendix ........................................................ 17
All manuals and user guides at all-guides.com

Page 2
Welcome to the In-Dash DA-7169 Operating Guide. Before
ou begin, read the following warnings and notes carefull .
Warning!
To avoid serious harm or injur to ou, others, the vehicle,
or the remote control unit, follow the instructions below.
To avoid short-circuiting the electrical s stem:
•When replacing a blown fuse, disconnect all power
supplies and power off the unit. Be sure to use the correct
replacement fuse.
•If the unit shows signs of overheating or malfunction,
power off the unit and consult our dealer immediatel .
Do not open the unit; there are no serviceable parts
inside.
To avoid damaging the LCD panel:
•Do not drop the LCD displa panel or subject it to direct
impact.
•If the LCD panel breaks, avoid contact with an broken
glass or leaking fluids. If ou come into contact with these
materials, flush and clean the affected areas with water.
Seek medical attention immediatel .
This unit uses high-qualit electronic components and is
manufactured under a stringent qualit -control s stem.
Properl maintain the remote control unit to ensure optimal
performance:
•Replace the batteries regularl . To avoid damage to new
batteries, do not use new and used batteries at the same
time. Batter life is six months.
•Use a soft, damp cloth (a lens cloth) to wipe dirt and
fingerprints off the screen. Chemical solvents, cleaning
agents, or corrosive detergents can cause irreparable
damage.
1 Before You Begin
All manuals and user guides at all-guides.com

Page 3
•Do not drop metal or foreign objects between the displa
screen and enclosure. Doing so ma impede the motor-
ized tra and cause an electrical short.
Important Notes
•When using the unit with a radio/TV tuner (model DA-2301),
reception qualit will var with geographical location and
climatic conditions.
•For safet , this unit can onl be activated when the
vehicles hand break is engaged. See our dealer for
details.
•Do not install the screen where it ma distract the driver.
•Avoid installing the displa screen in direct sunlight or
near hot air vents. Operating temperature for the displa
screen is 0oC to 60oC. If the internal temperature of the
vehicle is extremel high, cool down the inside of the
vehicle before operating the unit.
•Install the unit in a dr location, awa from condensation.
•To avoid a fire hazard, use the correct fasteners and
connecting cables during installation.
•The unit contains high voltages. To avoid electrical shock,
do not open the unit; there are no user serviceable parts
inside.
•See our authorized dealer if unsure how to proceed.
Before installing this display system,
ensure you are in compliance with
local traffic rules and regulations.
1 Before You Begin
All manuals and user guides at all-guides.com

Page 4
Precautions
1 This unit should be installed b a qualified service techni-
cian.
2 This product is designed to operate with a 12-Volt,
negative ground batter .
3 Disconnect the ground wire from the batter terminal
before connecting this unit to the electrical s stem.
4 Other products or accessories ma have wires that are
color-coded similarl to those for this unit. Refer to the
electrical diagrams of an other products before installa-
tion of the unit to avoid making wrong connections.
5 To avoid short-circuiting the electrical s stem, use proper
insulation and fastening materials.
6 Do not connect the units ellow wire directl to the
batter terminal. Connect the units red wire to the ACC of
the ignition switch. Failure to connect the red and ellow
wires properl ma drain the vehicles batter .
7 To avoid damaging the unit, use onl the accessories
supplied with the unit.
8 Do not install this product at an angle exceeding ±30°.
9 Do not install this product in a position that ma cause
injur to passenger(s) during an accident.
2 Installing the DA-7169 Monitor
All manuals and user guides at all-guides.com

Page 5
Electrical Connections
Color Code Function
Black Ground
Red ACC
Yellow +12 V
Blue +12 V Out (Max 1 Amp)
2 Installing the DA-7169 Monitor
All manuals and user guides at all-guides.com
all-guides.com

Page 6
Signal Connections
Color Code Function
Gre /Yellow Video 1 In
Black /Yellow Video 2 In
Black/Black Video Out
Orange/Brown Rear View Camera/Night Switch
Signal
Signal & Control Signal & Control
2 Installing the DA-7169 Monitor
All manuals and user guides at all-guides.com

Page 7
Typical Wiring Diagram
The following is a t pical wiring diagram for an In-Dash DA-
7169 connected to model DVA-310x and a radio receiver with
a 40-Watt, 4-channel power amplifier.
2 Installing the DA-7169 Monitor
All manuals and user guides at all-guides.com

Page 8
Parts Overview
Front Panel
1 Mute (MUTE)
2 Remote sensor
3 Signal Source select (SRCE and CH / AV1 / AV2)
4 Pla er select and Pla /Pause (DISC & PLAY /
PAUSE)
5 AM/FM Radio select (BAND & AM/FM; when
interfaced with DA-2301)
6 OPEN / CLOSE
7 Disc select +/- (DISC)
8 Audio select (AUDIO)
9 Repeat function (REP)
7/8/9 Memor location (1 / 2 / 3 / 4 / 5 / 6)
10 Forward (>)
11 Up volume control
12 Backward (<)
13 Function mode (SEL)
14 Down volume control
15 Degree of tilt (ANGLE)
16 Displa mode (WIDE)
All manuals and user guides at all-guides.com

Page 9
Remote Control Unit
Frequently Used Buttons
CHANNEL SELECT: Selects TV channels, disc title, or
desired settings on the MENU screen.
MODE: Selects the input video source. i.e. TV / AV1 / AV2.
MENU: Displa s menu screen of functions available.
POWER: Open (ON) or close (OFF) the monitor enclosure.
VIEWING ANGLE & DISPLAY MODE:
Press once to activate angle adjustment function. While in
this mode, press por q to set the tilt angle of the screen.
Press and hold to activate displa mode functions: ZOOM /
CINEMA / NORMAL / FULL.
Parts Overview
All manuals and user guides at all-guides.com

Page 10
Replacing the Battery
1 Use a small coin to remove batter container from the unit.
2 Remove old batter and insert new one. The positive sign
(+) should face upward.
3 Insert batter container into unit until it is securel in place.
Precautions
1 Properl dispose of used batter .
2 Overheating the batter ma cause an explosion or create
a fire hazard.
3 Remove used batteries from the batter container to prevent
leakage.
4 Prevent children from pla ing with the batter .
Parts Overview
All manuals and user guides at all-guides.com
all-guides.com

Page 11
perating the In-Dash DA-7169 Color
Display Monitor
To take full advantage of the In-Dash DA-7169s features,
read these operating instructions before using the monitor.
Note: The color and brightness of the LCD displa screen is
factor preset. To adjust picture qualit , follow the instruc-
tions in this guide.
Ejecting and Opening the Display Monitor
•To eject/open the displa monitor, press the OPEN /
CLOSE button (#6 on the Front Panel Overview on page
7) once. The displa monitor will automaticall eject from
its DIN enclosure.
Caution: To pre ent damage to the dri er motor and
gear train, do not obstruct the mo ement of the
monitor tray.
•If the ejection of the displa monitor is stopped halfwa ,
press the OPEN / CLOSE button once to return the
monitor to the closed position. Press OPEN / CLOSE to
activate the ejection process again until the monitor is
full extended.
•The displa monitor returns to the closed position when
the ignition is turned OFF or when pressing the OPEN /
CLOSE button when the monitor is in the open position.
Adjusting the Position of the Monitor
•Press the ANGLE + / - button (#15) to adjust the viewing
angle of the monitor.
4 Operating the DA-7169 Monitor
All manuals and user guides at all-guides.com

Page 12
Note: To prevent damage to the gear train, do not use force to
adjust the displa screen.
•The displa monitor returns to the preset position whenever
the s stem is turned ON.
Selecting the Screen Size
•Press the WIDE button (#16) to change the screen size.
There are four options:
ZOOM: Picture is stretched verticall and horizontall .
CINEMA: Picture is displa ed with uniform enlargement
horizontall .
NORMAL: When 4:3 picture is pla ed on a wide screen,
black bands appear on both side of the picture.
FULL: 16:9 picture is full displa ed on screen.
Adjusting Features of the Display Monitor
•Press the SEL button (#13) to scroll through the following
screen options:
COLOR: Color adjustment
CONTRAST: Contrast setting
BRIGHT: Brightness setting
TINT: Color saturation
DIMMER: When set to ON, the brightness of the screen
adjusts automaticall when vehicle headlights are turned
ON.
REV VID: (Reverse Video) ON or NORMAL. When set to
ON, reverse video automaticall runs when monitor is
connected to a rear view camera.
RESET: Resets COLOR, CONTRAST, BRIGHT and TINT
4 Operating the DA-7169 Monitor
All manuals and user guides at all-guides.com

Page 13
to factor defaults.
Note: The SEL button will have different functions when the
monitor is connected to model DA-2301. Refer to the user
manual for details.
•Once the correct option is visible, press the forward/
backward ke s (< and >) to confirm our selection. If no
ke is pressed, then the SEL mode will turn off in about
five seconds.
Choosing NTSC or PAL Display System
•Once input video source (TV / AV1 / AV2) is selected b
pressing SRCE (#3), use the forward/backward ke s (<
and >) to toggle between NTSC or PAL displa s stem.
Note: The function of the forward/backward ke s (< and >)
changes when this monitor is connected to model DA-2301 or
DVD pla er DVA-310x. Refer to the respective manuals for
details.
Adjusting the Volume
•When the monitor is connected to DA-2301, use the UP /
DOWN ke s (#11 & 14) to adjust the volume.
Note: Refer to the DA-2301 user manual for details.
Muting the Volume
•Press the MUTE button (#1).
Note: This button is onl activated when the monitor is
connected to model DA-2301. Refer to the DA-2301 user
manual for details.
4 Operating the DA-7169 Monitor
All manuals and user guides at all-guides.com

Page 14
Selecting the Video Source
•Press the SRCE button (#3) to choose between AV1 and
AV2.
Note: Refer to Choosing NTSC or PAL Display System on
previous page.
Note: The SRCE button activates TV (CH) mode when the
monitor is connected to model DA-2301.
Selecting the Audio Channel
•Use the AUDIO button (#8) to select the desired channel
when the monitor is connected to a DVD pla er or VCD/
CD changer (model DA-2301).
•The AUDIO button is also used to select the audio lan-
guage as recorded in the DVD.
•When pla ing back VCD, use the AUDIO button to toggle
between AUDIO LL, AUDIO RR, or AUDIO STEREO.
Note: Refer to the respective user manuals for details.
Playing and Pausing the Disc Player
•When the monitor is connected to a DVD pla er or VCD/
CD changer via model DA-2301, press the PLAY/PAUSE/
DISC ke (#4) to turn on the disc pla er, pla the disc,
and pause the disc pla er.
Turning On and Changing the Radio Station
•When the monitor is connected to the DA-2301, press the
BAND button (#5) to turn ON the radio and pla the last
selected channel.
•When the radio is ON, press the BAND button to toggle
between radio bands (AM, FM1, FM2, FM3).
4 Operating the DA-7169 Monitor
All manuals and user guides at all-guides.com

Page 15
Selecting Preprogrammed Radio Stations
•When the monitor is connected to model DA-2301, Use
buttons 1 / 2 / 3 / 4 / 5 / 6 (buttons #7-9 on the Front
Panel Overview on page 7) to select preprogrammed
radio stations.
Note: Refer to the DA-2301 user manual for details.
Selecting a Disc to Play
•When the monitor is connected to a DVD or VCD/CD multi-
disc pla er via model DA-2301, press the disc selection
ke (#4) to select the disk ou wish to pla .
Using the Play Back Feature
•Press the REPEAT button (#9) to activate the pla back
feature and selection from the following options: OFF,
CHAPTER, and TITLE.
4 Operating the DA-7169 Monitor
All manuals and user guides at all-guides.com
all-guides.com

Page 16
Specifications
•Monitor Displa S stem: 7 in. (18 cm) Active Matrix Color
LCD Displa ; NTSC/PAL selectable
•Displa Format: 112,320 pixels
•Resolution: 336,960 dots / 1,440 (W) x 234 (H) dots
•Aspect Ratio: 16:9
•Active Area: 155.5 mm (W) x 87.8 (H) mm
•Front Panel: Anti-glare glass
•Back Light: 10,000 hours normal operation
•Mechanism: Full Motorized Open/Close
•Viewing Angle: Adjustable Up/Down; Off-axis Viewing Angle
(<) 120°
•Master Control: TV/AM/FM (DA-2301) and CD/VCD/DVD
(DVA-310x) interfaces
•Source: Composite video input x 2; Composite video
output x 1
•Operating Voltage: 12-Volt DC
•Operating Current: 1.5 Amp (Nominal)
•Mounting: Single DIN/In-Dash mount
•Weight: 1.8 kg
•Dimensions: 17.8 cm (W) x 18.5 cm (D) x 5.0 cm (H)
All specifications are sub ect to change without prior notice.
5 Specifications
All manuals and user guides at all-guides.com

All manuals and user guides at all-guides.com
Other manuals for DA-7169
1
Table of contents
Other Rosen Car Video System manuals

Rosen
Rosen DS-UN0810 User manual

Rosen
Rosen PR-UN1670 User manual

Rosen
Rosen M10 User manual

Rosen
Rosen T10 User manual

Rosen
Rosen A10 User manual

Rosen
Rosen GM SERIES DS-GM0710 User manual

Rosen
Rosen T8 Reference guide

Rosen
Rosen 10.2 User manual

Rosen
Rosen GM1CAMHD User manual

Rosen
Rosen AV7700 User manual

Rosen
Rosen A7 User manual

Rosen
Rosen CAR SHOW 7 User manual

Rosen
Rosen Z-Series User manual

Rosen
Rosen AV7700 User manual

Rosen
Rosen EM-1 User manual

Rosen
Rosen AV7500 User manual

Rosen
Rosen DS-UN1010 Universal Series User manual

Rosen
Rosen AV7700 User manual

Rosen
Rosen CV1005 User manual

Rosen
Rosen AV-CY0801-G42 Owner's manual