manuals.online logo
Brands
  1. Home
  2. •
  3. Brands
  4. •
  5. Rosle
  6. •
  7. Kitchen Appliance
  8. •
  9. Rosle 16280 User manual

Rosle 16280 User manual

Other Rosle Kitchen Appliance manuals

Rosle Multi-Cutter User manual

Rosle

Rosle Multi-Cutter User manual

Rosle 16281 User manual

Rosle

Rosle 16281 User manual

Rosle 12755 User manual

Rosle

Rosle 12755 User manual

Rosle Gourmet Ring F60 Guide

Rosle

Rosle Gourmet Ring F60 Guide

Rosle Silence User manual

Rosle

Rosle Silence User manual

Rosle Style User manual

Rosle

Rosle Style User manual

Popular Kitchen Appliance manuals by other brands

Saturn ST-EK8037 manual

Saturn

Saturn ST-EK8037 manual

BOSKA Pro 853560 instruction manual

BOSKA

BOSKA Pro 853560 instruction manual

Enders 7909 instruction manual

Enders

Enders 7909 instruction manual

Kalorik USK PPG 37241 operating instructions

Kalorik

Kalorik USK PPG 37241 operating instructions

Scarlett SC-FD421001 instruction manual

Scarlett

Scarlett SC-FD421001 instruction manual

FoodSaver V4925 owner's manual

FoodSaver

FoodSaver V4925 owner's manual

Course	Housewares B416144 quick start guide

Course Housewares

Course Housewares B416144 quick start guide

AEG SANTO Series operating instructions

AEG

AEG SANTO Series operating instructions

Melissa 643-036 instruction manual

Melissa

Melissa 643-036 instruction manual

cecotec ROCK'NTOAST 3IN1 instruction manual

cecotec

cecotec ROCK'NTOAST 3IN1 instruction manual

Gourmia GMF225 instructions

Gourmia

Gourmia GMF225 instructions

Electrolux EKM7 Series Instruction book

Electrolux

Electrolux EKM7 Series Instruction book

Magio MG-965 instruction manual

Magio

Magio MG-965 instruction manual

Keimling Naturkost Excalibur 56301WH Operation manual

Keimling Naturkost

Keimling Naturkost Excalibur 56301WH Operation manual

Beper 90.071 use instructions

Beper

Beper 90.071 use instructions

Geryon E2900-M user manual

Geryon

Geryon E2900-M user manual

Morphy Richards 46718 owner's manual

Morphy Richards

Morphy Richards 46718 owner's manual

Kenwood A995 manual

Kenwood

Kenwood A995 manual

manuals.online logo
manuals.online logoBrands
  • About & Mission
  • Contact us
  • Privacy Policy
  • Terms and Conditions

Copyright 2025 Manuals.Online. All Rights Reserved.

ROE-Anleitung-Entkerner.indd 1ROE-Anleitung-Entkerner.indd 1 25.01.2011 16:01:08 Uhr25.01.2011 16:01:08 Uhr
Cherry/Plum Pitter
16280
Cherry Pitter
16281
Dear RÖSLE Customer,
Thank you for choosing the high quality Cherry Pitter
by RÖSLE. It’s a wise choice and one that will prove
the test of time as a durable top quality product.
To make sure you get optimum results and long-lasting
service from your new kitchen utensil, we’ve compiled
some important information plus tips for optimal use
and aftercare, as well as safety guidelines.
ROE-Anleitung-Entkerner.indd 14ROE-Anleitung-Entkerner.indd 14 25.01.2011 16:01:17 Uhr25.01.2011 16:01:17 Uhr
First time use
Before first time use clean all parts. Take care to observe the instructions
provided under paragraph “Cleaning“.
Outstanding product features at a glance:
For effortless pitting of large quantities of cherries or plums. The stones are
neatly separated from the fruit flesh and collected in a receptacle. The spe-
cial cutting blade for plums cuts open the fruit and removes the stone in one
operation. A neat method that avoids messy splattering of fruit juice. An ideal
tool for baking or when making fruit preserves.
3 For pitting cherries and plums
3 Quick processing even of large quantities
3 Automatic separation of fruit flesh from stone
3 The receptacle for stones is integrated in the utensil
3 Comes with a special blade for removing stone and cutting open plums
3 No splattering of fruit juice around utensil
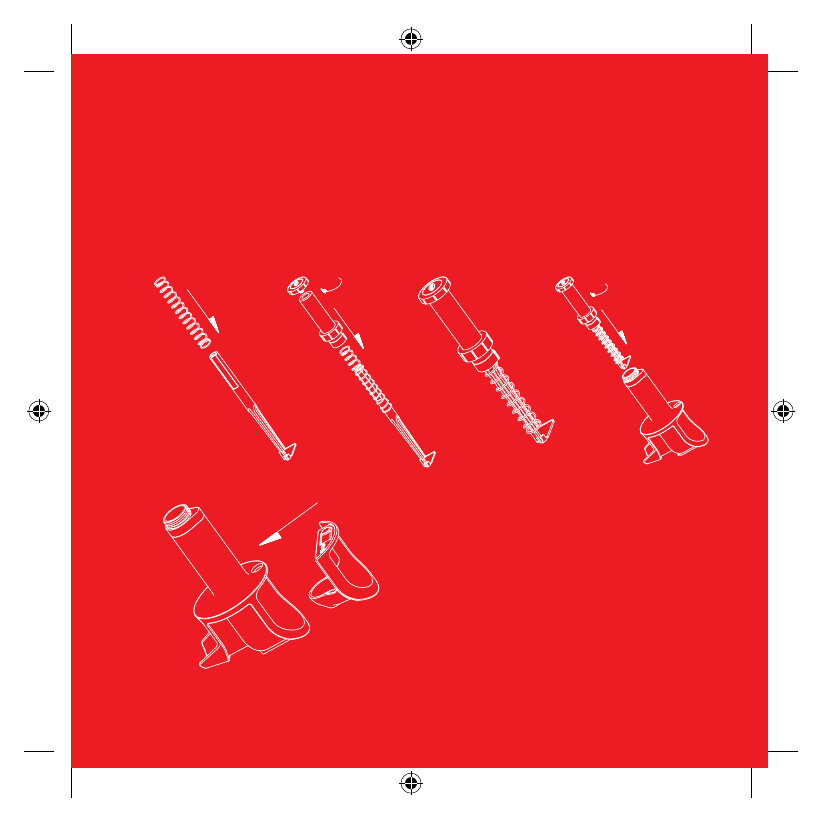
3 Can be completely disassembled for cleaning
3 Dishwasher safe (except for spring)
ROE-Anleitung-Entkerner.indd 15ROE-Anleitung-Entkerner.indd 15 25.01.2011 16:01:17 Uhr25.01.2011 16:01:17 Uhr
1. Close up on the Cherry/Plum Pitter
1. Push rod for operation
5. Detachable stainless steel cover
figure 1
7. Receptacle for collecting
stones (inside)
8. Removable container for fruit
9. Clip securing container
6. Stand with integrated rubber
ring for topple free positioning
2. Retention nut of punch
4. Fruit outlet
3. Guide tube of punch
containing spring
ROE-Anleitung-Entkerner.indd 16ROE-Anleitung-Entkerner.indd 16 25.01.2011 16:01:17 Uhr25.01.2011 16:01:17 Uhr
2. Before first time use
The spring must be fitted. The spring is provided as a separate component.
To position the spring remove the retention nut (No. 2 Illustration 1) from the
punch and pull out the cutting unit. Position the spring in the tube and refit
the punch. Tighten the nut.
(Figure shows fitting of the cherry punch)
The pitter is now ready for use.
ROE-Anleitung-Entkerner.indd 17ROE-Anleitung-Entkerner.indd 17 25.01.2011 16:01:17 Uhr25.01.2011 16:01:17 Uhr
3. Close up on the punch
The appliance comes with two different cutting units for the punch. One from
synthetic material for cherries plus one with stainless steel blade for plums.
The appliance must be fitted with the correct cutting unit appropriate for the
task.
for cherries for plums
(only 16280)
ROE-Anleitung-Entkerner.indd 18ROE-Anleitung-Entkerner.indd 18 25.01.2011 16:01:17 Uhr25.01.2011 16:01:17 Uhr
4. Fitting the cutting unit for plums
Plum attachment, plum knife (1) and plum insert (2) are not included
in article no. 16281 .
When pitting plums the punch must be fitted with the cutting unit for plums
(1) and a plum holder (2). The following steps give instructions for fitting.
(1)
(2)
The pitter is now ready for use.
ROE-Anleitung-Entkerner.indd 19ROE-Anleitung-Entkerner.indd 19 25.01.2011 16:01:18 Uhr25.01.2011 16:01:18 Uhr
5. Pitting cherries
Place a flat dish or bowl below the outlet to collect the fruit.
Remove the cherry stems and place the fruit in the transparent container.
Make sure that the fruits roll into the aperture in the appliance. The fruit will
be automatically centered in the correct position in the appliance. Press the
punch downwards with the flat of your hand until it is fully down. The fruit
will be automatically pitted and ejected all in one go. The shape of cherries
may sometimes prevent them from rolling smoothly into the aperture of the
appliance. In such cases they can be given a little push with a finger.
6. Pitting plums
Fit cutting unit for plums and plum holder (See instructions above).
Place a flat dish or bowl below the outlet to collect the fruit.
Place each plum by hand into the holder. The plums must be exactly
and correctly positioned in the holder. Please observe the illustration.
ROE-Anleitung-Entkerner.indd 20ROE-Anleitung-Entkerner.indd 20 25.01.2011 16:01:18 Uhr25.01.2011 16:01:18 Uhr
Remove hands from the cutting zone. Then press the punch downwards
with the flat of your hand until it is fully down.The fruit will be automatically
pitted, cut open along one side and ejected all in one go. When positioning
plums they must be placed so that the punch with the blade meets the fruit
centrally.
Tip: The riper the plums the easier the stone loosens from the fruit flesh. Un-
ripe fruit should not be processed as the stones can only be dislodged with
great force which could lead to damage of the appliance itself. The punch
may also suffer damage if stones get jammed in the holder.
ROE-Anleitung-Entkerner.indd 21ROE-Anleitung-Entkerner.indd 21 25.01.2011 16:01:18 Uhr25.01.2011 16:01:18 Uhr
7. Emptying the cherry pit container
The container for the cherry pits is located inside the unit. Disassemble
the unit as described in the following figure to emptying the pits.
ROE-Anleitung-Entkerner.indd 22ROE-Anleitung-Entkerner.indd 22 25.01.2011 16:01:18 Uhr25.01.2011 16:01:18 Uhr