Ross XPression User manual
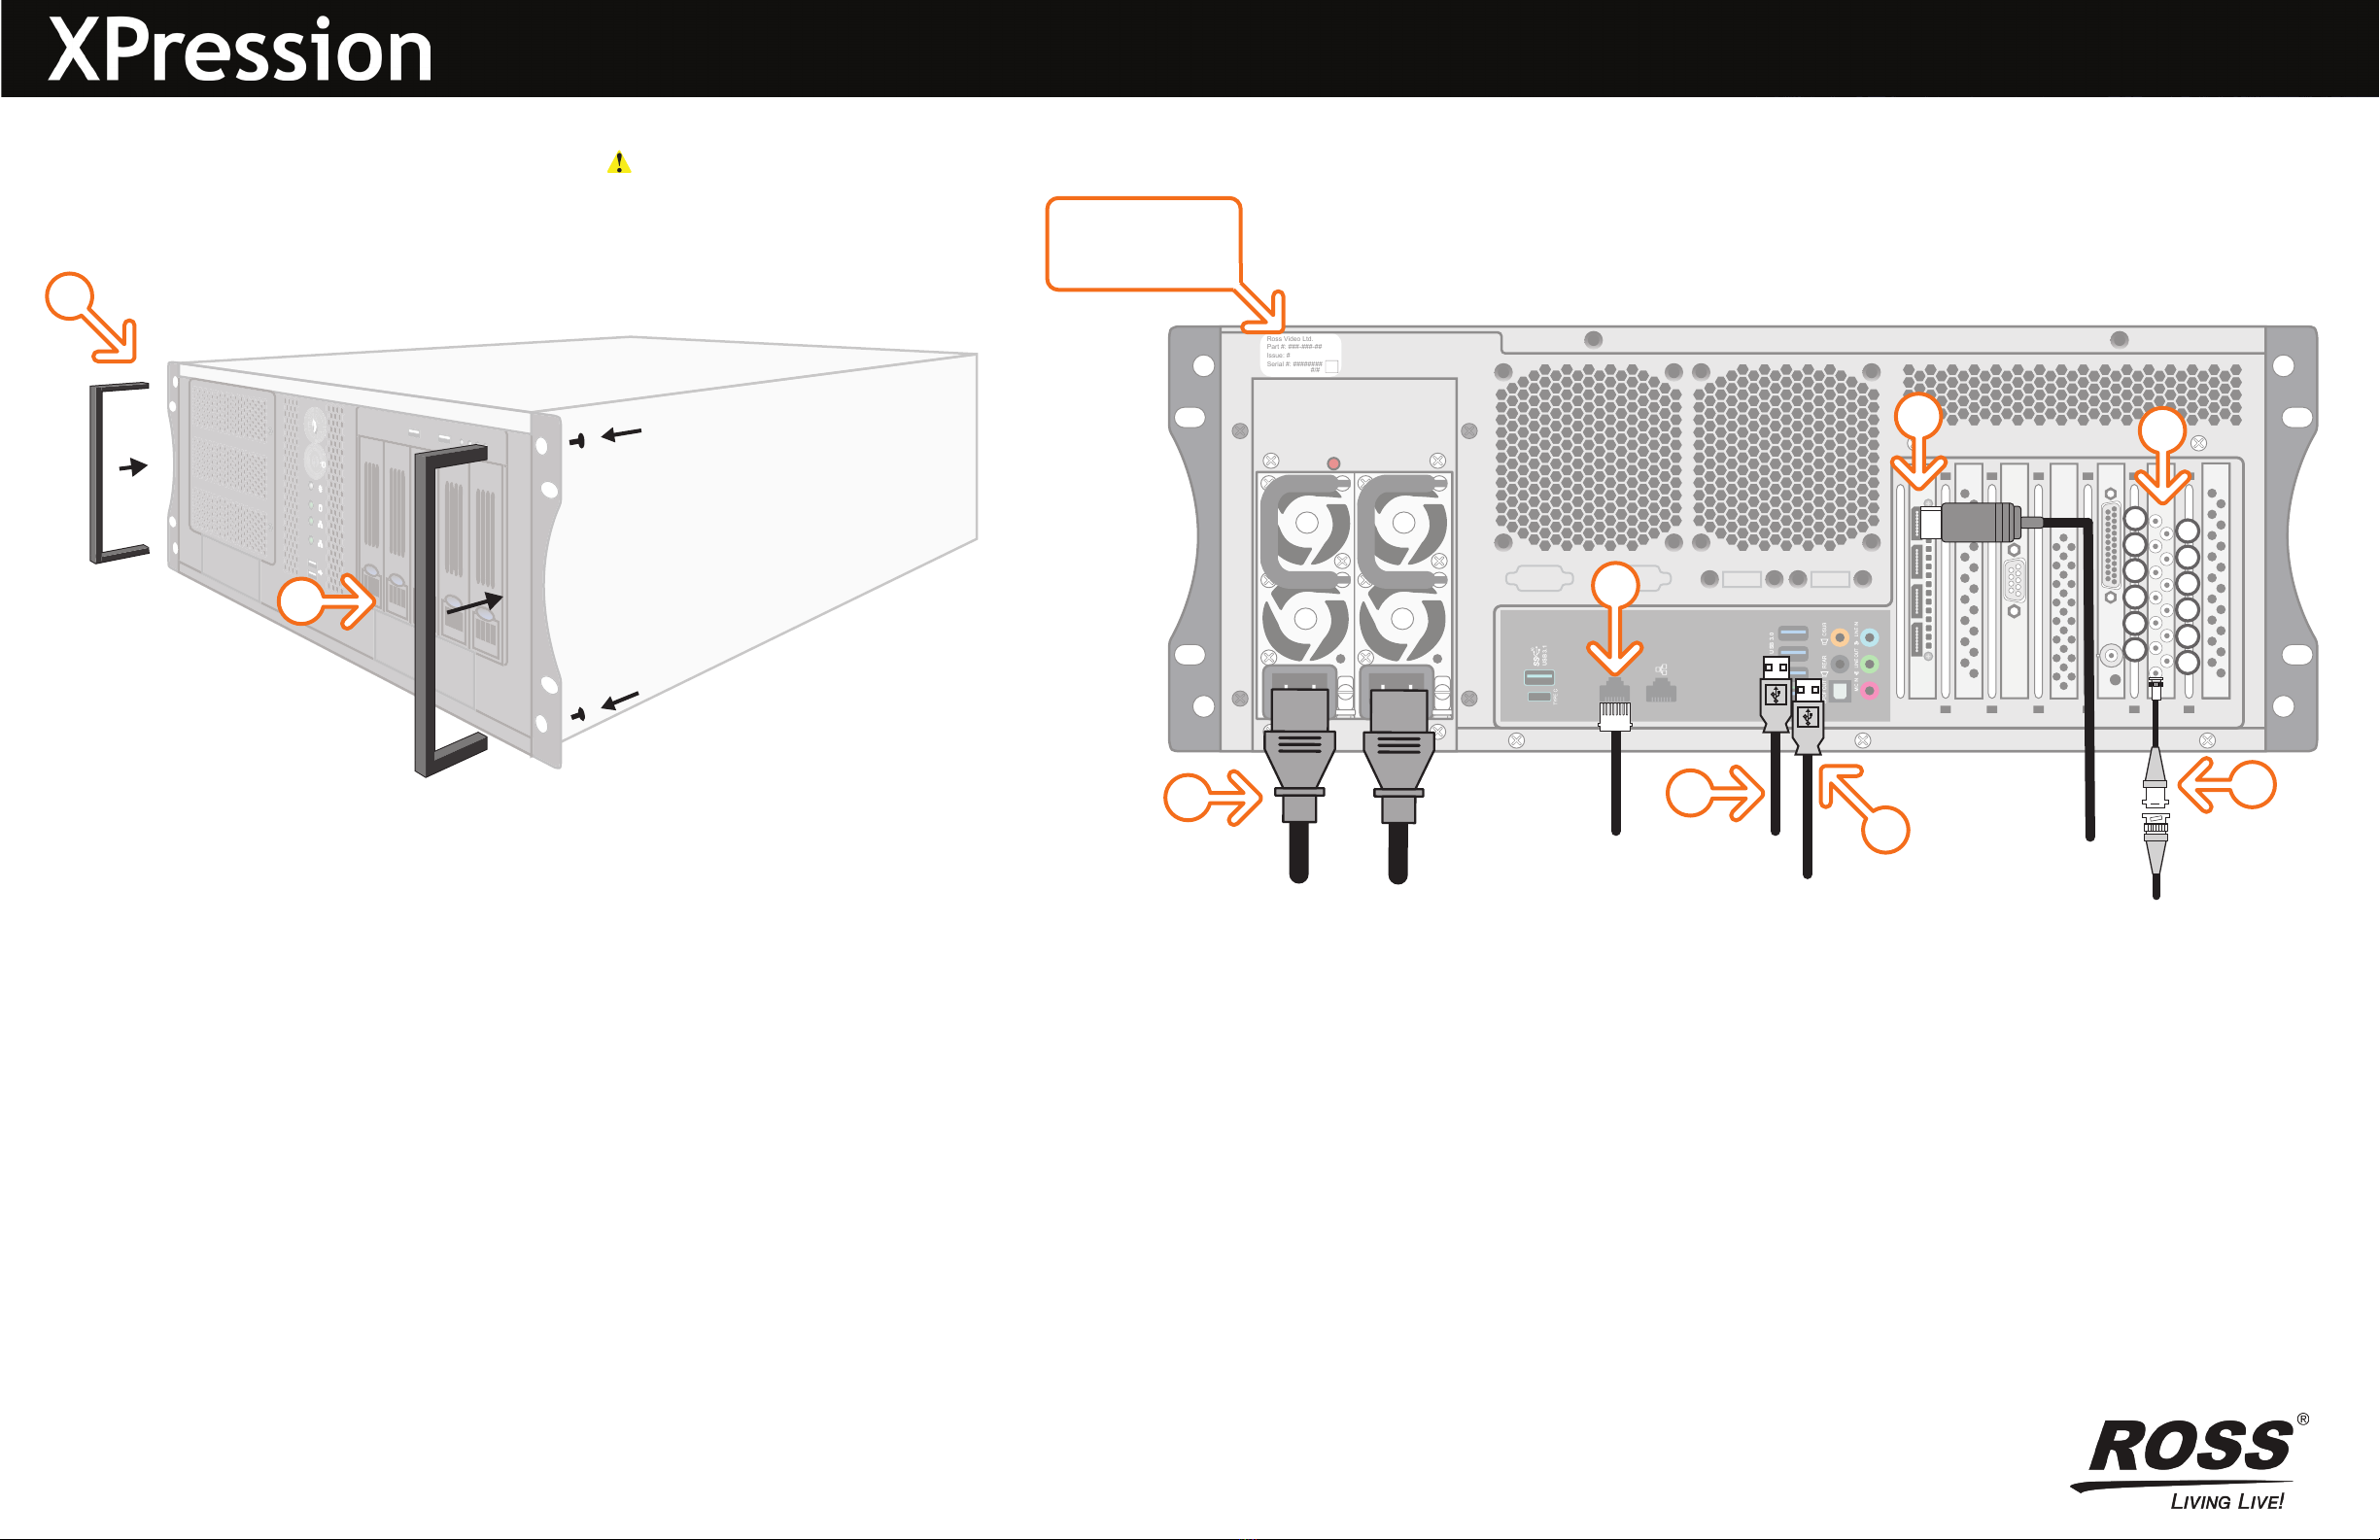
Ross Video Ltd.
Part #: ###-###-##
Issue: #
Serial #: ########
#/#
USB 3.0
USB 3.1
3508DR-517-01 ©2023 Ross Video Limited, Ross®, and any related marks are trademarks or registered trademarks of Ross Video Limited. All other trademarks are the property of their respective companies.
PATENTS ISSUED and PENDING. All rights reserved. No part of this publication may be reproduced, stored in a retrieval system, or transmitted in any form or by any means,mechanical, photocopying, recording or
otherwise, without the prior written permission of Ross Video. While every precaution has been taken in the preparation of this document, Ross Video assumes no responsibility for errors or omissions. Neither is any liability
assumed for damages resulting from the use of the information contained herein.
1Attach the handles to the front rack-mount tabs by aligning the handle with the round holes and
fastening from the rear with the supplied screws.
2Use the supplied Rack Mount Kit to mount the XPression system in a 19’’ EIA equipment rack.
For information on installing the XPression chassis in a rack, see the provided document “Installing the
Chassis in a Rack”.
3Plug the supplied Keyboard into a USB port.
4Plug the supplied Mouse into a USB port.
5Connect a Monitor (customer supplied) to any of the four display ports.
KVM extenders (customer supplied) are required when the XPression system monitor, keyboard, and
mouse are located remotely from the rack room.
6Plug an Ethernet cable from your Local Area Network into one of the Ethernet ports.
XPression systems can run standalone or accept a connection to a production network. The network
connection is also used for the RossTalk / Smart GPI Feature.
7 Connect your house reference Genlock signal to the REF HD-BNC connector.
XPression systems accept analog blackburst or tri-level sync as reference inputs. Tri-level sync is
recommended for HD installations.
8 Connect the HD-BNC end of the pigtail cables to the HD-BNC
connectors and attach the SDI cables to the BNC end of the pigtails according to their required
destination (see the XPression User Guide or Help file for information about configuring the key and fill
for the HD-BNC connectors).
See page 2 for configuration instructions.
Not all HD-BNC connectors will be active depending on the XPression software edition. Keep any
unused pigtail and SDI cables in a safe place for future use.
If your facility requires analog outputs, additional outboard digital to analog conversion equipment is
available from Ross Video.
Inputs/outputs can be configured in the Hardware Setup in the
XPression User Guide or Help file.
9 Connect power cords from the AC Ports on the XPression system to the mains power.
XPression system power supplies are auto-sensing and can use either 110 VAC or
220 VAC.
Continued on other side...
1
1
4
3
6
5
7
12 11
10 9
8
7
65
4
3
2
1
8
9
CAUTION: Before you set up and operate this product, see the “Important Safety Instructions” in your Manual.
Getting Started
When contacting
technical support, please
provide the information
listed on this label.

operating XPression, see the “XPression User Guide” available in the C:\Archive folder
maintenance of the XPression system, see the “XPression Maintenance Guide” in the C:\Archive folder
other XPression features and functions, see the documents available in the C:\Archive folder
For information on...
To configure the XMIO5:
1 Stop all applications using the Matrox card and ensure that the card is installed.
2 Run the machine as administrator:
3Click the Windows Start button.
4Type Command Prompt.
5Right-click on Command Prompt and select Run as administrator.
6In the Command Prompt, type the following to get to the directory:
cd C:\Program Files\Matrox DSX-TopologyUtils\drivers
7 Then type:
mvConnectorConfig.exe load-f=Xmio5Le5ConnectorMapping\Xmio5\Pinout_XiYo.pin -sn=XXXXXXX
a. Replace Pinout_XiYo.pin with .pin file you want to use. For example xmio5_x2_06i06o.pin provides 6 inputs
and 6 outputs.
b. Replace the XXXXXXX with the serial number of the Matrox card.
To find the serial number, open the Matrox X.info app from the Windows system tray, select Hardware from the
drop-down and look at the hardware information.
The final mvConnectorConfig should look something like this:
C:\Program Files\Matrox DSX-TopologyUtils\drivers>mvConnectorConfig.exe load-f=Xmio5Le5ConnectorMapping\
Xmio5\Pinout_06i06o.pin -sn=A572788
8Reboot the machine.
9In XPression, click Edit > Hardware Setup and select the Inputs/Outputs tab to confirm the video I/O settings.
To launch XPression:
1 Press the Power button ( ) on the front of the XPression system.
Ross Video recommends shutting down XPression systems from the Windows
operating system.
2 Click the XPression user account icon on the desktop.
3 Log onto the system.
4 Launch XPression from the Start menu.
Getting Started continued
3508DR-517-01 © 2023 Ross Video Limited. All rights reserved.
Technical Support:
1-844-652-0645 (North America)
+800 1005 0100 (International)
Email: [email protected]
Need Help?
*Up to 12G
^Up to 3G
Out 3*
Out 2*
Out 4*
Out 1*
In 8^
In 7^
In 6^
In 5^
In 4*
In 3*
In 2*
In 1*
8 In, 4 Out
Out 8*
Out 7*
Out 6*
Out 5*
Out 4^
Out 3^
Out 2^
Out 1^
In 4*
In 3*
In 2*
In 1*
4 In, 8 Out
Out 2*
Out 1*
In 10*
In 9*
In 8^
In 7^
In 6^
In 5^
In 4*
In 3*
In 2*
In 1*
10 In, 2 Out
Out 6*
Out 5*
Out 4*
Out 3*
Out 2^
Out 1^
In 6^
In 5^
In 4*
In 3*
In 2*
In 1*
Default
(6 in, 6 out)
12
11
10
9
8
7
66
5
4
3
2
1
HD-BNC
1
ab
Other manuals for XPression
10
Other Ross Media Converter manuals

Ross
Ross openGear GPI-100 User manual

Ross
Ross ADC-8032A User manual

Ross
Ross GearLite SMC-9901 User manual

Ross
Ross GearLite ADC-9032 User manual

Ross
Ross YOYAGER X1 Operating manual

Ross
Ross DAC-9213-PVM User manual

Ross
Ross NWE-TS User manual

Ross
Ross MC1-MK Manual

Ross
Ross openGear UDC-8225A User manual

Ross
Ross ADC-8733A User manual

Ross
Ross GearLite ADR-9039 User manual

Ross
Ross UltraChrome HR User manual

Ross
Ross MB-652 User manual

Ross
Ross ADC-8733AS User manual

Ross
Ross MB-652-DUO User manual

Ross
Ross nielsen openGear NWE-3GA User manual

Ross
Ross ADC-8432 User manual

Ross
Ross MB-652-DUO User manual

Ross
Ross GearLite FDR-9647-LC User manual

Ross
Ross Opengear UDC-8625A Series User manual


