Rotolight AEOS User manual

USER MANUAL
Version 1.4

BOX CONTENTS
Functions & Operations Flowchart
Basic Operation
Advanced Operation and Flash Mode
F-Stop table
Designer Fade™
CineSFX™
Strobe, Lightning
Throb, Cycle, Fire
Police
TV
True Aperture Dimming™
Control Menu
Technical Utilities Menu
Filter Information
Technical Specification
TLCI Test Result
Mounting and Batteries
Manufacturer’s Limited Warranty
Limitation of Liability
Additional Accessories
Thank you for purchasing Rotolight AEOS! We hope you enjoy
using it as much as we enjoyed making it!
Please register to activate your warranty at
www.rotolight.com/register
1 x Rotolight AEOS
1 x Professional Aluminium Ball Head (Supports 5kg load)
1 x Rotolight Universal power adapter with regional mains cable
1 x Filter Holder
1 x AEOS Filter pack:
1 x 216 Full Diffuser (1.5 Stops)
1 x 250 Medium, Half White Diffuser (3/4 Stops)
1 x 184 “Cosmetic Peach” Diffusion
1 x 279 1/8th Minus Green (Magenta)
02
3
6
8
11
12
14
16
17
18
19
22
23
25
28
30
31
32
33
34
35
PAGE CONTENTS

KNOBS
LEFT KNOB = BRI
RIGHT KNOB = COL (KELVIN)
CLICK BOTH KNOBS TO ENTER
/ EXIT MENU MODE
LEFT KNOB = BRILEFT KNOB = BRI
RIGHT KNOB = COL (KELVIN)RIGHT KNOB = COL (KELVIN)
CLICK BOTH KNOBS TO ENTERCLICK BOTH KNOBS TO ENTER
/ EXIT MENU MODE/ EXIT MENU MODE
MENU
BRI COL
OPERATION FLOWCHART
POWER
SWITCH ON/OFF
FLASH SYNC
3.5MM MONO JACK
SOCKET TO CONNECT
THIRD PARTY FLASH
TRIGGER. USE HSS
TRIGGER FOR BEST
RESULTS (I.E PHOTTIX ODIN II)
MOST CINESFX + FADE CAN
ALSO BE TRIGGERED.
DISPLAY
DISPLAYS MENU ITEM OR
SELECTED ITEM
V-LOCK BATTERY PLATE
CONNECT ROTOLIGHT V-LOCK
BATTERY OR GOLD MOUNT MODEL USING
QR-A200 ADAPTER PLATE
* BATTERY NOT INCLUDED IN SINGLE UNIT
USB PORT
FOR FUTURE
FIRMWARE
UPDATES
DC INPUT SOCKET
15V 60W DC - ONLY USE
PROVIDED PSU OR
ROTOLIGHT ADAPTERS
DMX IN/THRU
CONNECT TO THIRD
PARTY DMX
DEVICES OR
LIGHTING CONSOLES
PRO BALL HEAD
PROFESSIONAL ALUMINIUM BALL HEAD WITH
360º SWIVEL WITH 1/4 - 20 & 3/8th MOUNTS
ALUMINIUM HANDLES
INTEGRATED HANDLES FOR HANDHELD
SHOOTING AND PORTABILITY
FLSH FADE SFX FDIM
ISO
EXP
FEET
CTRL DEMOTECH
STRB
LTNG
THRB
CYCL
FIRE
PLCE
To Exit Menu Click
Both Red knobs TV
ADDR
LOCK
VOLT
CAL
TEMP
SRNO
03
DN
UP
MODE
FREQ
SKYP
GRP
VERS
DISP
SCRL
To Enter Menu Click
Both Red knobs
FINE

“The ultimate light for portrait / location photographers. Powerful
yet portable, AEOS enables you to get shots no-one else can”
Jason Lanier - Rotolight Master of light
04 Photo by Jason Lanier www.jasonlanier.com

Photo by Jason Lanier www.jasonlanier.com

AEOS BASIC OPERATION
To operate AEOS you will find two red knobs
controls, which also act as switches, and a DC on/off
switch, these are all located on the rear of AEOS.
POWER
AEOS can be powered by 1 x V-Lock battery, DC
from the supplied AC mains adapter or from a
DC source in the range of 7v -15v (i.e. optional car
12v Socket, or D-Tap from a broadcast battery).
When connecting a power source to the DC input
socket, for instance mains adapter or an optional
D-Tap to DC connection, the V-Lock battery is
automatically disconnected, thus saving battery
power. Note if you are connecting an external DC
source make sure the power is the correct polarity
to avoid damaging your AEOS. We recommend
using Rotolight RL-Batt-95, 95mWh V-Lock
batteries (available from Rotolight.com) which will
run your AEOS for up to 3 hours at full power.
To power up AEOS click the power switch (located
above the ‘FLASH’ input Jack)
On power up, you will see ‘ROTOLIGHT AEOS’
scroll across the screen, you can interrupt this
anytime by operating one of the control knobs.
To power AEOS down , click the power switch
again. AEOS stores all the user settings in non-
volatile RAM so it will remember your last used
settings.
RESET
You can reset all the user parameters in AEOS
non-volatile memory by holding down the left
red control knob whilst simultaneously powering
AEOS on.
The word ‘ZERO’ will be displayed, select Y for yes
(reset all data), or N for NO.
ZERO
06

BASIC OPERATION MODE (BRI / COL)
(‘BRI’) Brightness
You can adjust the brightness output of AEOS by
rotating the left control knob.
If you rotate the knob quickly it will speed up the
data input. You can press and rotate to adjust the
brightness in steps of 10% (Fast Mode).
AEOS has a dimming range of 0% -100% and is
completely flicker free at any brightness level,
shutter speed or frame rate.
Note: there is a special mode called ‘True Aperture
Dimming’ (F-DIM) , available in the MENU section,
which will display the brightness as an F-Stop, based
on your camera exposure settings – see ‘True Aperture
Dimming’.
(‘COL’) Colour
You can adjust and accurately display the colour
temperature (CCT) of AEOS by rotating the right
control knob.
If you rotate the knob quickly it will speed up the
data input. You can press and rotate to deliberately
adjust the colour in steps of 100 kelvin (Fast Mode).
Simply rotating the knob will adjust the brightness
in steps of 10 kelvin.
AEOS has a colour temperature Range of 3150
kelvin (Tungsten) up to 6300 kelvin (reflected
daylight sky).
Note: as a bi-colour light, AEOS will be brightest
at the ‘mid point’ colour : 4200 kelvin, where both
sets of LEDs are at full power. This also applies in
flash mode.
AEOS has a special technology called ‘Dynamic
Drift Stabilisation’ which maintains the colour
temperature through the entire dimming range.
COL
BRI
07

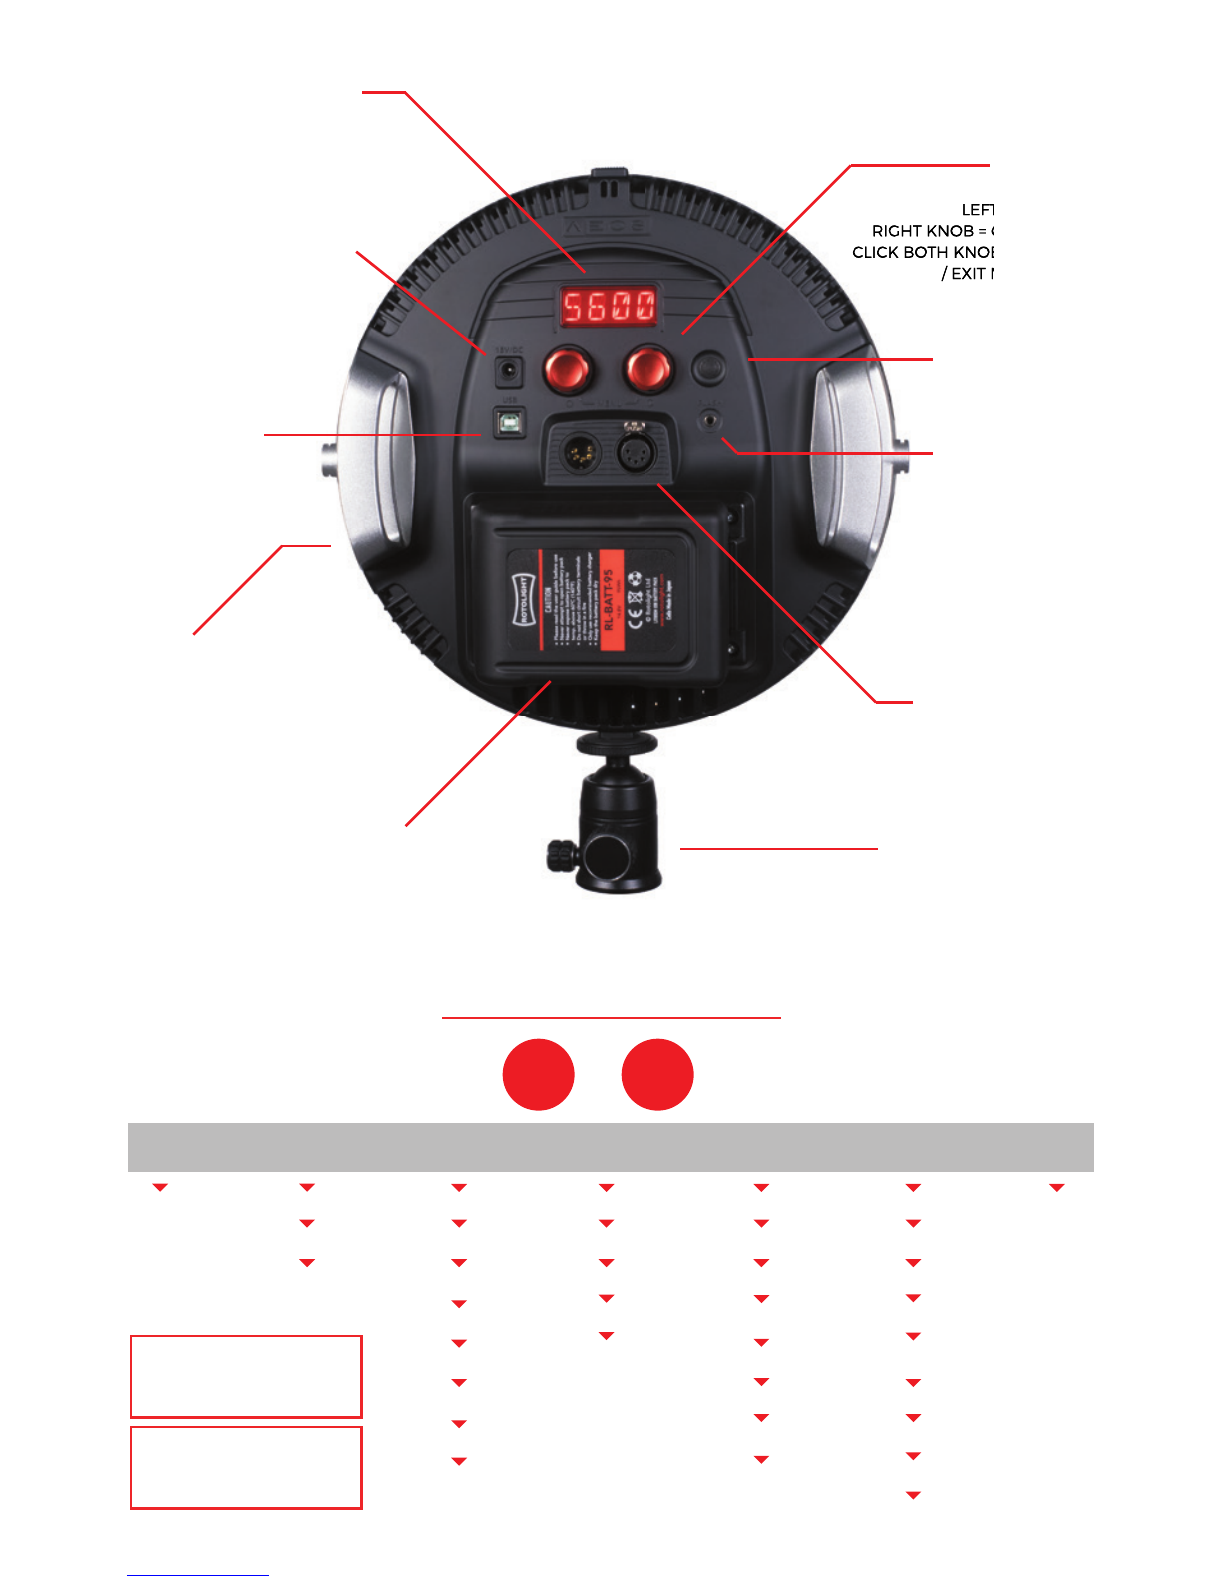
(‘MENU’) Advanced Operation
You can enter the MENU by pressing both red
control knobs simultaneously (or clicking and
holding down the left knob followed by the right
control knob). If you wish to leave MENU at any
time, you can return to the basic operation (BRI
/ COL) by pressing both red control switches
together again.
In ‘MENU’ Mode rotating the left knob navigates
through the menus, whilst pressing it takes you
back one level. Rotating the right knob adjusts
a setting, and pressing it acts as enter / trigger /
activate depending on the menu position.
In the MENU there are eight optional submenus
through which you navigate by rotating the left
knob: ‘FLSH’, ‘DISP’ , ‘FADE’ , ‘SFX ‘, ‘F-DIM’ , “CTRL”,
‘TECH’ , ‘DEMO’
You can enter your desired sub menu function by
clicking the right knob
You can leave the selected function by clicking the
left knob, alternatively you can return to the basic
operation mode (BRI /COL) at any time by pressing
both switches together at the same time.
(‘FLSH’) Flash Mode
Scroll to ‘FLSH’ Click the right knob to enter ‘FLSH’
mode.
Note: in order to use the flash, you must be in flash
mode (indicated by shutter speed on the display. If
you see word ‘FLSH’, you are not in flash mode and
must right click to ENTER flash mode).
Set your camera to manual flash mode
AEOS is not a TTL flash, it is a manual flash with
adjustable flash power, modelling light, colour
temperature and duration settings. Simple
operation: set your camera into manual flash
mode, refer to the F stop table (p.11) for exposure
guide, take a test shot and either adjust flash
power, or distance to the subject to achieve
optimal exposure.
Rotate the left knob to adjust the brightness of the
MENU
FLSH
08

modelling light in order to preview your shadow
and highlights on your subject (in %, 0-100%) .
You can use the modelling light to compose your
photograph, or set different levels for multiple
AEOS lights, and have them flash together
retaining the relative set levels in ‘X8’ or ‘X16’ mode
Note: AEOS is intentionally less bright whilst in
modelling light mode than regular continuous
light mode, in order to make the light more
comfortable for the subject.
Press, hold and rotate the left knob to set the
desired colour temperature for your flash (in kelvin,
from 3150-6300k.
Note: as a bi-colour light, the flash will be at its
brightest at 4200K.
Rotate the right knob to set the desired duration
for the flash, in shutter intervals, i.e. 1/50s, 1/60s,
1/80s, 1/100s…up to 1/2500s (‘1/2K5s’).
Press, hold and rotate the right hand knob to
set the flash output power, ‘MAX’ (=250% of MAX
continuous output), ‘1/2’ (=125%), ‘1/4’ (=62%), ‘X8’
(=modelling light level x 8), and ‘X16’ (= modelling
light level x 16).
Finally connect a flash receiver or transceiver which
has a PC sync output, with a PC sync cable to the
3.5mm mono jack flash trigger input jack located
on the rear of AEOS below the DC Switch. Place
the trigger on top of your camera shoe.
Alternatively for wired operation, connect a long
PC sync cable from your cameras PC sync port to
the 3.5mm mono jack on the AEOS.
Recommended settings for simple one-light
operation:
1. Set flash power to MAX
2. Set flash duration to 1/50th (any faster
shutter speed ie 1/100th will be automatically
captured).
3. Set colour temp (kelvin) to 4200K.
09

Shooting in High Speed Sync
AEOS is capable of High Speed Sync flash(HSS).
HSS allows you to utilize the flash of AEOS, at
speeds faster than your cameras native internal
sync speed (typically 1/125 or 1/250th).
AEOS will happily work with any camera and any
trigger/receiver with a PC sync input, however
to shoot in High Speed Sync your camera must
itself be capable of HSS (many are not), and you
must use a HSS capable trigger and receiver (most
trigger/receivers are not natively HSS compatible
unless explicity stated).
PLEASE CHECK THAT YOUR CAMERA AND TRIGGER
EQUIPMENT IS CAPABLE OF HIGH SPEED SYNC.
Recommended triggers :
Phottix ODIN II (HSS) – Canon, Nikon, Sony
PocketWizard (HSS) : FlexTT5, and FlexTT6 support
High Speed Sync (HSS) for Canon and FP Sync for
Nikon.
Cactus VI II (HSS) : Canon, Nikon, Pentax, Olympus,
Panasonic.
Cactus VI IIS(HSS) : Sony
Phottix ARES (not HSS) – Canon, Nikon, Sony.
Pocketwizard (not HSS) : Other models.
NOTE: AEOS will flash once for the duration set
shutter interval when syncing in HSS, ensuring
that the complete frame is illuminated.
If AEOS detects a flash re-trigger event during a set
interval , it will automatically adjust the duration
of the flash to a shorter interval , to avoid damage
occurring to the LEDs.
AEOS supports flash at ANY frame rate, flash
output can be up to 250% of the nominal
maximum continuous light output (>14,750 Lux at
3 feet or Guide Number 27).
10

11
Distance
(ft) 3ft 6ft 9ft 12ft
ISO F-stop
Continuous
mode
F-stop
Flash
mode
Guide
Number
(GN)
F-stop
Continuous
mode
F-stop
Flash
mode
Guide
Number
(GN)
F-stop
Continuous
mode
F-stop
Flash
mode
Guide
Number
(GN)
F-stop
Continuous
mode
F-stop
Flash
mode
Guide
Number
(GN)
100 5.6 8 24 2.8 4.0 24 2 2.8 25.2 1.4 2 24
200 8 11 33 4 5.6 33.6 2.8 4 36 2 2.8 33.6
400 11 15 45 5.6 8.0 48 4 5.6 50.4 2.8 4 48
800 15 22 66 8 11.0 66 5.6 8 72 4 5.6 67.2
1600 5.6 30 90 11 16.0 96 8 11 99 5.6 8 96
2500 5.6 38 114 14 20.0 120 10 14 126 8 10 120
Shutter speed = 1/60th
Measured at midpoint colour temperature 4300Kelvin with Sekonic flash meter, no modifiers or intensifiers
AEOS F-Stop table in FLASH MODE (measured at midpoint colour 4300K)

To Exit Flash Mode
Click the left knob to return to MENU, alternatively
you can return to the basic operation (BRI / COL) by
pressing both control switches together.
(‘FADE’) Designer Fade™
(Programmable fade up / fade down for practical
‘in-camera’ production fade effects)
Scroll to ‘FADE’ Click the right knob to enter fade
mode.
Rotate the right knob to adjust the fade duration
(range is up to 12 seconds up or down)
(It will display DN (=fade down) followed by a
numerical value ‘X’s where X = seconds of fade
duration).
Lit with 1 x Rotolight
AEOS, Sony A6300,
Sony 10-18mm,
ISO 100, F4.0,
1/15th(tripod)
12
FADE

13

SFX
The fade can be from 1 to 12 seconds long.
Please note, the FADE will be a fade to zero from
the current brightness level the AEOS is set to (i.e.
if brightness is currently 80%, then fade will be
80%-0% over custom time duration).
Note: both the last used brightness setting and
fade duration parameter are stored in non volatile
memory.
Once you have selected the length of the fade,
click the right knob to perform the fade (you can
also trigger the fade using an external flash trigger
via the FLASH sync port).You will notice the display
now shows UP X s (i.e. it will now fade up to your
previous brightness setting over ‘X’ seconds.
To fade up click the right knob again
If you only want to fade down use the left knob to
click out of FADE and click back in – use the right
knob to perform the fade.
Click the left knob to return to MENU, alternatively
you can return to the basic operation menu
(BRI / COL) by pressing both control knobs
simultaneously.
(‘SFX’) CineSFX™
In collaboration with Stefan Lange, DOP and
visual FX veteran, we have created an arsenal of
special FX (CineSFX™), these production tools
are designed to complement your feature/ music
video/short film.
Please note, the current ‘BRI’ brightness level and
‘COL’ colour temperature setting of AEOS is used
by SFX mode to represent the ‘peak output’ level
of each effect, enabling accurate metering (i.e. if
AEOS is set to 75% brightness and 5600 kelvin,
then the lightning effect peak brightness level
shall be 75% brightness at 5600 kelvin).
Therefore set AEOS to 100% brightness and 4300
14

kelvin for maximum brightness in SFX mode.
To adjust the colour temperature of the light to
better match your desired effect once you have
selected your desired SFX (i.e Fire), press hold and
rotate the right knob to set the desired colour
temperature (in kelvin, from 3150-6300K).
To similarly adjust the peak (maximum) brightness
level of your desired effect, once you have selected
your desired effect press, hold and rotate the left
knob.
WARNING - HEALTH HAZARD – USE STROBE WITH
CAUTION: CineSFX™ mode uses strobe lighting
effects that may pose a risk to those at risk of
photosensitive seizures/ epilepsy. Manufacturer
accepts no liability or responsibility for misuse of
this product. You should take all precautions to
pre-warn and ensure the safety of those who may
come into contact with the product. If you or
any of your relatives have a history of seizures or
epilepsy, consult a doctor before using.
If you feel unwell from using these effects,
immediately discontinue use and consult a doctor.
If strobe lighting is to be used in a production,
warnings should be posted at the front of house
or entrance doors to the set/theater as well as
in a video or program, if distributed. Example:
“WARNING: Strobe lights are used during this
performance”.
This product is not suitable for use by children of
any age and is designed for professional use only.
Click the Right knob to enter ‘SFX’ rotating the
left knob cycles through the available ‘SFX’:-‘Strb’ -
‘Ltng’-‘Thrb’-‘Cycl’-‘Fire’-‘Plce’-‘TV’.
You can activate your selected SFX function by
pressing the right knob.
You can leave the selected function by clicking the
left knob, alternatively you can return to the basic
operation mode (BRI /COL) at any time by pressing
both knobs together at the same time.
15

(‘STRB’) Strobe
The strobe effect produces a regular flashing light.
Pressing the right knob will activate the strobe
effect, and rotating it will adjust the speed of
the strobe. (It will display XX hz , where= ‘XX’ =
number of strobe cycles per second). The strobe
range is from 0.3hz up to 7hz.
Note: the last used strobe parameters are stored in
non-volatile memory.
Rotate the left knob to adjust the ‘duty cycle’
(flash duration) to eliminate any issues with rolling
shutter cameras (This is known as ‘Rolling Shutter
Compensation’) where you can match the light
flashes to match the shutter speed and/or Frame
Rate of your camera, to avoid unlit portions of the
image/frame. Click the left knob to exit the strobe
menu and return to SFX menu.
(‘LTNG’) Lightning
The lightning effect simulates real lightning. It is
a random effect but you can control the speed at
which the lightning bursts re-occur, and because
this is a stroboscopic effect you can also adjust the
‘Rolling Shutter Compensation’, and this effect is
triggerable. Ideally you would set the brightness
(BRI) to 100% and the colour (COL) temperature to
6000k.
Click the right knob to activate the lightning effect,
and rotate the right knob to adjust the lightning
cluster re-occurance speed.
(It will display XX hz which is an indication of the
effect frequency) The lightning range is from 1hz
up to 50hz.
Click the right knob to arm the effect and fade
to black, ‘Trig’ will be displayed - re-click the right
knob to trigger the effect (you can also use a flash
trigger connected to the ‘FLASH’ port jack to
trigger and stop the effect).
Rotate the left knob to adjust the ‘duty cycle’
STRB
LTNG
16

(flash duration) to eliminate any issues with rolling
shutter cameras.
Note: the last used lightning parameters are stored
in non volatile memory.
Click the left control knob to exit the lightning
effect and return to SFX Menu.
Note: the duration of the lightning flashes is
20ms which is the recommended duration for
cinematography. The lightning strikes come in
bursts of between 2 and 8 random length pulse).
(‘THRB’) Throb
Throb is a regular smoothly pulsing light.
Click the right knob to activate the ‘Throb’ effect.
Rotate either the left or right knob to adjust the
throb effect frequency
(It will display XX hz which is an indication of the
effect frequency). The throb range is from 1hz up to
50hz.
Note: the throb parameters are stored in non-
volatile memory. Click the left knob to exit the
throb effect and return to SFX menu.
(‘CYCL’) Colour Cycle
Cycle is a regular smoothly pulsing light which
fades between the tungsten and blue LEDs.
Click the right knob to activate the effect.
Rotate either the left or right knob to adjust the
cycle effect frequency (It will display XX hz which is
an indication of the effect frequency).
The cycle range is from 1hz up to 50hz.
Note: the cycle parameters are stored in non-
volatile memory). Click the left knob to exit the
cycle effect and return to SFX Menu.
(‘FIRE’) Fire
Fire is a complex emulation of a burning fire
and it can be tuned to your requirements.
Some VFX artists like to use multiple lights
with slightly different settings/gels to achieve
a fire with ‘dancing shadows’ and stereoscopic
Thrb
Cycl
FIRE
17

characteristics.
Note: Before activating the fire effect it is a good
idea to adjust the ‘COL’ colour to 3150 kelvin.
Click the right knob to activate the fire effect.
Rotate either the right knob to adjust the fire
effect frequency (It will display XX hz which is an
indication of the effect frequency – around 45hz is
nice for a campfire).
Rotate either the left knob to adjust the fire effect
depth threshold (residual glow) (about 35% is nice
for a campfire).
(It will display XX % which is an indication of the
effect depth).
Inside the fire effect there is a switchable
parameter called ‘ColourSwing BLUE’ which
emulates the colour transition of flames going up
the chimney (i.e. from yellow to blue), to activate
this parameter click the right button (‘BLUE’ is
displayed).
To deactivate ‘Colour Swing BLUE’ click the right
knob again and ‘MONO’ (Monochrome) will be
displayed.
Note: the fire parameters are stored in non-volatile
memory.
The fire effect can be enhanced with a warm
colour filter included within the optional add on
Colour FX Pack (RL-AEOS-CFP) available from your
dealer or www.rotolight.com (‘205’ LED CTO is
recommended for best impact, ‘182’ Light Red also
works well, or an Amber, CT Straw or other CTO
filter).
(‘PLCE’) Police
This effect is an emulation of an emergency
services light – it works best by adding the 712
Bedford Blue, or ‘182’ Light Red Filter Gel included
within the optional Add On Colour FX Pack.
Click the right knob to activate the Police effect
PLCE
18

Rotate either the left or right knob to adjust the
Police beacon speed
(It will display XX hz , which will give you an
indication of the effect speed)
Note: the Police parameters are stored in non
-volatile memory). Click the left knob to exit the
Police effect and return to SFX Menu.
(‘TV’) Television
This effect is an emulation of someone watching
a TV show – it works best by setting the colour
temperature to around 6000 kelvin to emulate the
light from a cathode ray tube.
Click the right knob to activate the TV effect.
Rotate either the left or right knob to adjust the TV
effect speed (It will display XX hz , which will give
you an indication of the effect speed).
Click the right knob to pause the effect / fade to
black - ‘Trig’ will be displayed - re-click the right
knob again to Trigger the effect. (you can also use
an external flash trigger to trigger the TV effect,
just connect this to the ‘FLASH’ sync port on the
rear of AEOS)
Note: the TV parameters are stored in non-volatile
memory. Click the left knob to exit the TV effect
and return to SFX Menu.
Click the left knob to return to MENU, alternatively
you can return to the basic operation (BRI / COL)
by pressing both control switches together.
‐TV‐
TV SIMULATION LIGHTNING FIRE
19

Lit by Rotolight AEOS, Photo by Mark Mann for DEADLINE
MICHAEL KELLY, STAR OF HIT SHOW ‘HOUSE OF CARDS’
20
Other manuals for AEOS
2
Table of contents
Other Rotolight Lighting Equipment manuals
Popular Lighting Equipment manuals by other brands

nissen
nissen 141060-1 operating instructions

XAL
XAL MOVE IT 1.2 Mounting instructions

Chauvet
Chauvet Cyborg CH-258 user manual

Multikomplex
Multikomplex SLT973 Installation, Use and Maintenance Instruction

Somogyi
Somogyi home KD 90 T quick start guide

ORGA
ORGA L240 Installation, operation and maintenance manual