manuals.online logo
Brands
  1. Home
  2. •
  3. Brands
  4. •
  5. Rousseau
  6. •
  7. Lock
  8. •
  9. Rousseau W14-AL01S User manual

Rousseau W14-AL01S User manual

Other Rousseau Lock manuals

Rousseau L13-OC20S User manual

Rousseau

Rousseau L13-OC20S User manual

Rousseau L3 User manual

Rousseau

Rousseau L3 User manual

Rousseau R4G-MR20B User manual

Rousseau

Rousseau R4G-MR20B User manual

Rousseau L3 User manual

Rousseau

Rousseau L3 User manual

Rousseau L50 User manual

Rousseau

Rousseau L50 User manual

Rousseau L50 User manual

Rousseau

Rousseau L50 User manual

Rousseau L12-JL12S User manual

Rousseau

Rousseau L12-JL12S User manual

Popular Lock manuals by other brands

Magic 105 manual

Magic

Magic 105 manual

Gantner GAT NET.Lock 7020 System Installation, configuration & operation

Gantner

Gantner GAT NET.Lock 7020 System Installation, configuration & operation

Dorma Studio Classic Installation instruction

Dorma

Dorma Studio Classic Installation instruction

Securam ECSL-601 quick start guide

Securam

Securam ECSL-601 quick start guide

Sudhaus 3003 operating manual

Sudhaus

Sudhaus 3003 operating manual

Safety 1st 48517 user guide

Safety 1st

Safety 1st 48517 user guide

Pado FDS-10 user manual

Pado

Pado FDS-10 user manual

Esco systeQ Series installation instructions

Esco

Esco systeQ Series installation instructions

COMPX National D8951 instruction sheet

COMPX

COMPX National D8951 instruction sheet

secureo Key Box instruction manual

secureo

secureo Key Box instruction manual

Stock Loks C8713 instruction sheet

Stock Loks

Stock Loks C8713 instruction sheet

COMPX 1T-058 Information

COMPX

COMPX 1T-058 Information

Auslock T11 user manual

Auslock

Auslock T11 user manual

Stealth SAFES ShadowVault Instructions & Troubleshooting

Stealth SAFES

Stealth SAFES ShadowVault Instructions & Troubleshooting

Knox KeySecure 5 Admin & user guide

Knox

Knox KeySecure 5 Admin & user guide

Kwikset 48334/01 Quick installation guide

Kwikset

Kwikset 48334/01 Quick installation guide

Metra Electronics Door Access Terminal Combo Technical manual

Metra Electronics

Metra Electronics Door Access Terminal Combo Technical manual

Kilitronik miniK10m operating manual

Kilitronik

Kilitronik miniK10m operating manual

manuals.online logo
manuals.online logoBrands
  • About & Mission
  • Contact us
  • Privacy Policy
  • Terms and Conditions

Copyright 2025 Manuals.Online. All Rights Reserved.

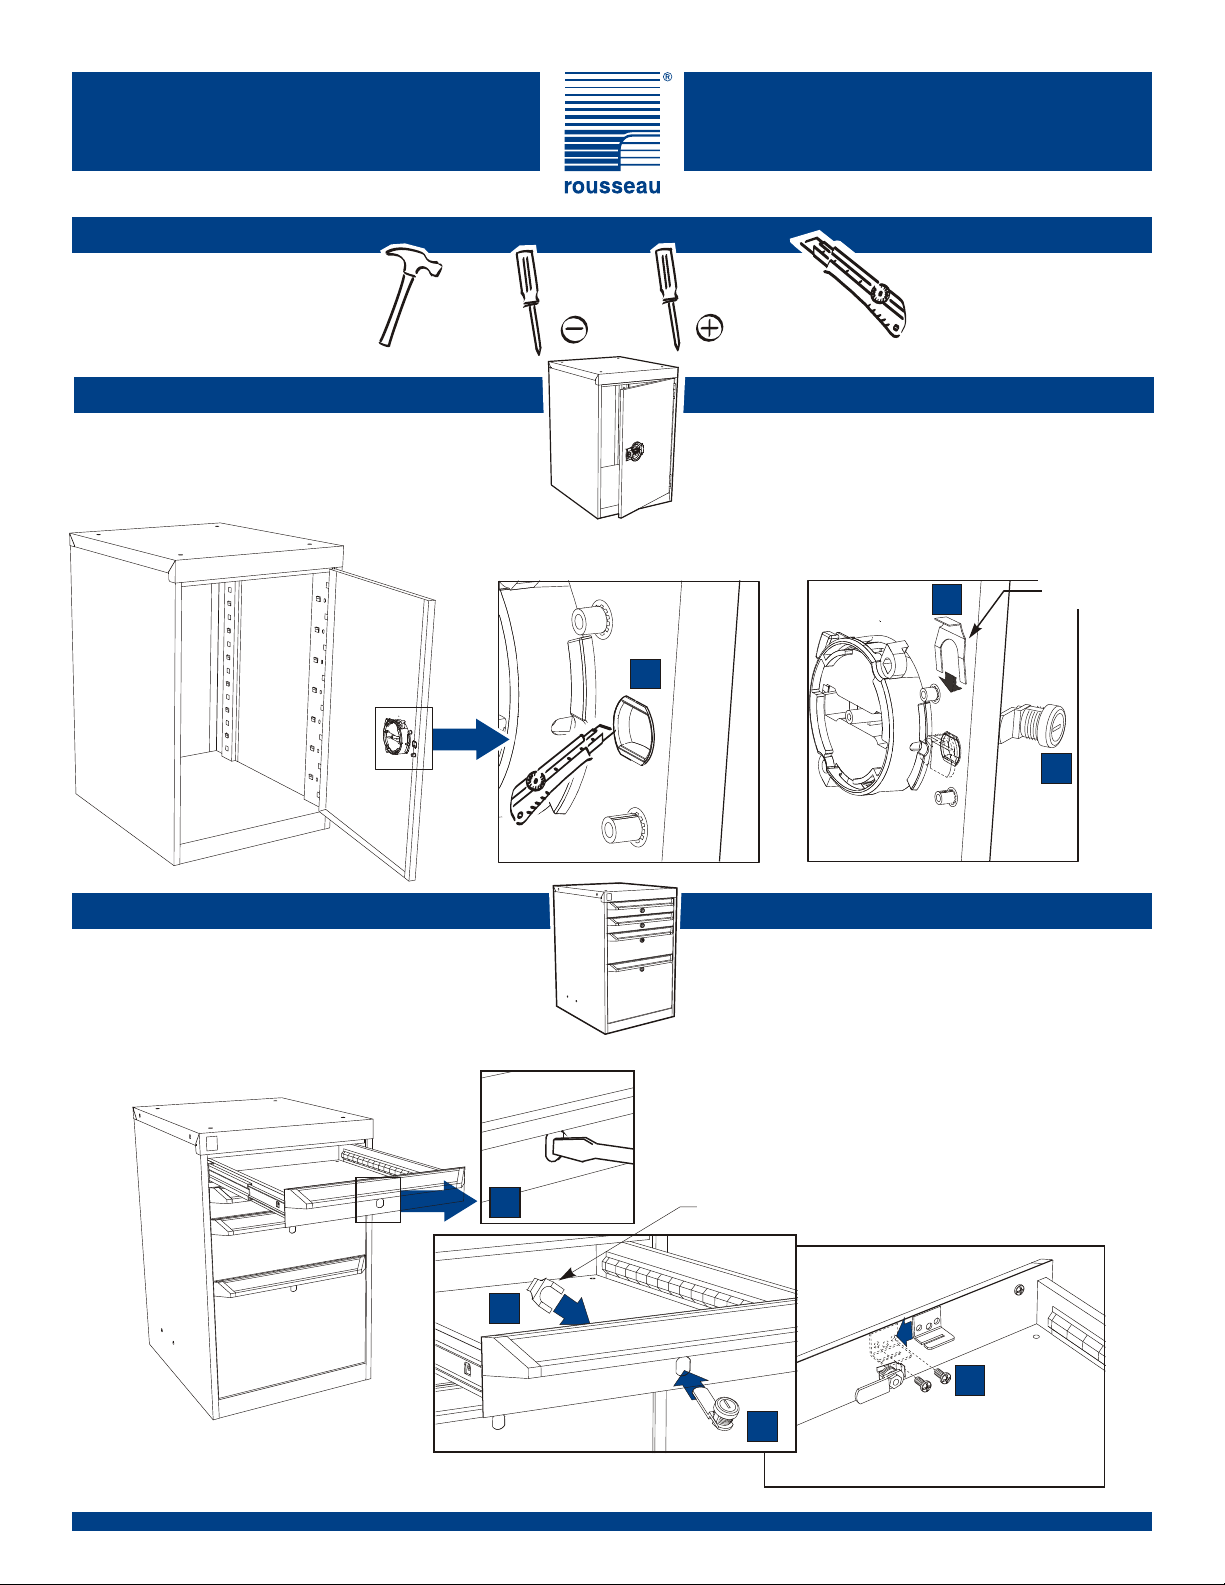
Tools Required Herramientas necesarias
Drawer Lock Assembly Cerradura de cajón - Montaje
Phillips #3
Hundir el círculo que está en la cara
delantera del cajón.
Montar la cerradura.
Utlizar el resorte en U para bloquear
la cerradura en su lugar.
Instalar el refuerzo de la cerradura.
AUSpring
Resorte en U
A.
C.
B.
Remove the knock-out from the drawer front.
Assemble the lock onto the drawer.
Use the U spring to secure the lock in place.
Install the reinforcing bracket.
A.
C.
B.
D.
D.
D
B
C
B
C
Door Lock Assembly Cerradura de puerta - Montaje
A.
C.C.
Retirar la circunferencia premarcada de la
manija de plástico con cuchillo o cortador.
Montar la cerradura en la puerta.
Utilizar el resorte en U para mantener la
cerradura en su lugar.
A.
C.
B.
B.
Remove the knock-out from the plastic handle with
a knife.
Assemble the lock onto the door.
Use the U spring to secure the lock in place.
U Spring
Resorte en U
A
Locking Mechanisms
WS Line Assembly Guide
Mecanismos de cierre
Ligne WSGuía de montaje
W14-AL01S
Page/Página 1/2
7D000904S
rousseaumetal.com
1-800-463-4271
Shelves Assembly
Locking Bar Assembly
Anaqueles - Montaje
Barra de cierre - Montaje
Ubicar los anaqueles
según el uso:
-Posición frontal, entre
dos cajones.
-Posición trasera,
entre un cajón y una
puerta.
ATENCIÓN
Shelves to be
position according
to need:
-Front position
between two
drawers.
-Rear position
between a drawer
and a door.
Attention
If shelves are required between two
drawers or between a drawer and a
door, read the following instructions.
If not required, go to locking bar
assembly.
If locking bars are required between two drawers, read
the following instructions.
Remove the
drawers from the
cabinet.
If necessary,
remove the glides.
Insert the shelves
into the cabinet
and secure them
with 2 tapping
screws 12x1/2" at
the front.
B.
C.
A.
Si se desea instalar anaqueles entre dos
cajones o entre un cajón y una puerta,
seguir las instrucciones que se encuentran
a continuación.
Si se desea instalar barras de cierre entre dos cajones,
seguir las instrucciones siguientes:
Retirar los cajones
del gabinete.
Si fuera necesario,
retirar los rieles.
Colocar los
anaqueles y fijarlos
en su lugar con dos
tornillos
autorroscantes
12x12” en el frente.
B.
C.
A.
2
1
C
3
Drawer
Cajón
Drawer
Cajón
Side view
Vista de lado
Door
Puerta
Drawer
Cajón
Drawer
Cajón
Front position
Posición trasera
Rear position
Posición trasera
Side view
Vue de côté
Tapping screw 12x1/2"
Tornillos autorroscantes
12x1/2"
Cerradura sin anaquel
para el cajón superior
Cerradura sin barra para
el cajón superior.
Cerradura con barra
para los otros cajones
Tapping screw 12x1/2"
Tornillos autorroscantes
12x1/2"
Lock without shelf
for top drawer.
Lock without bar
for top drawer.
Lock with bar for
the other drawers.
3
2
1
A
B
3
2
1
4
Page/Página 2/2
rousseaumetal.com
1-800-463-4271
2