manuals.online logo
Brands
  1. Home
  2. •
  3. Brands
  4. •
  5. RS4
  6. •
  7. Cleaning Equipment
  8. •
  9. RS4 407H-16 Installation and operating instructions

RS4 407H-16 Installation and operating instructions

407H-16 / 407H-16-O3
GERMICIDAL UV Y TEM FOR U E WITH
R 4 WHOLE HOU E IAQ Y TEM
Installation & Maintenance Instructions
UNPACKING THE UNIT
Each unit is shipped with the germicidal lamps placed in a box with protective
packaging. When handling lamps take care to not touch the glass portion of the
lamp with bare hands. Oils from
the hands can cause “hot spots” which reduce lamp
life. Handle by the porcelain caps or use a soft cloth. If you accidentally
touch a
lamp, clean it using a soft cloth dampened with rubbing alcohol. The lamp is
fragile and proper care must be taken when removing from packaging.
The following parts are included:
•
407H
UVC Germicidal Unit
• Germicidal Twin H Lamp (packed in lamp box)
• Lamp reflector
• Four #8-32 x 3/8” mounting screws
• One #8-32 x 3/4” screw to activate safety switch
• Four nuts for reflector
• Installation & maintenance instructions
• 120 VAC Power Cord
When installing and using this elect ical equipment, basic safety p ecautions should always be followed including the following:
1. READ AND FOLLOW ALL INSTRUCTIONS.
2. SAVE THESE INSTRUCTIONS.
3.
Always be su e the unit is unplugged du ing installation o se vice p ocedu es.
4.
The ult aviolet light p oduced by the UV lamp is ha mful to you eyes. Do not look di ectly at
the lamp. Should it become necessa y to view the lamp, use UV-p otected sunglasses.
Lo s de l’installation et de l’utilisation de cet équipement, des p écautions dev ont êt e suivies.
1- L re et su vre les étapes attent vement.
2- Conserver ces nstruct ons.
3- Assu ez vous de toujou s déb anche avant l installation ou le se vice.
4- Ne pas ega de la lampe di ectement avec les yeux. Si nécessai e de le fai e,
veuillez po te les lunettes de soleil cont e les ayons U.V.
IMPORTANT: SAFETY INSTRUCTIONS
IMPORTANT: Instructions de securité
TROUBLESHOOTING
• The LED should light when the unit is operating.
If the LED does not light:
1. Check to be sure there is power to the unit.
2. Be sure lamp connector is fastened securely.
3. If the LED still does not light, replace lamp.
4. If still not operating, replace ballast.
5. To ensure Safety Switch has not cut power, first check to make sure RS4 access panel
latches are fully engaged. You should be able to hear the safety switch click on and off.
Back out the safety switch screw until it engages properly.
WARRANTY
All electronic
components carry a lifetime
warranty to the original homeowner. In addition there is a
four-year warranty
from the date of installation for any subsequent owner. The manufacturer reserves the
right to send replacement parts or to replace the unit at its discretion. This warranty does not cover any
labor or damage resulting from improper installation or abuse. Use of any lamp other than the
manufacturer’s lamp designed for this device will void the warranty.
The original lamps are warranted for a period of two years. This warranty does not cover lamps
broken during shipping, installation or as a result of improper handling.
All returns are routed through your contractor/wholesaler and must be approved and accompanied by
an RGA#. Please call 800-578-7873 and we will guide you through the return procedure.
This warranty gives you specific legal rights and you may also have other rights which vary
from state to state.
For Technical upport Call (800) 578-7873
© 2016 Form GEN-213 (09/16)
16” Germicidal
UV-C Lam
18”
Box size is
6 high x 2 wide.
MAINTENANCE
This maintenance schedule is only a guideline, determined by average conditions. Actual conditions will dictate
the frequency of cleaning and/or replacement of lamps. Do not touch the glass portion of the lamp with bare
hands because oils from the hands can cause “hot spots” which reduce lamp life. Handle either by the plastic
end cap or use a soft cloth. Clean the lamp using a soft cloth dampened with rubbing alcohol.
CLEANING THE LAMP - Recommended interval: 12 months
1. Unplug the power cord from the outlet, or disconnect power to the unit.
2.
Remove the cover from the unit by removing the top and bottom retaining screws using a screwdriver.
3. Unplug the lamp connector from the end of the lamp.
4. Remove lamp holder using a 11/32 size nut driver. (Figure B)
5. Remove the lamp by grasping the plastic end cap and extract carefully.
6.
Using a soft cloth moistened with rubbing alcohol, wipe down the lamp. If there is a large build-up of
dust particles, you may wish to use a can of air first. Always handle lamp by the end caps.
7. Slide the lamp back into lamp opening by grasping the plastic end cap and reinstall lamp holder.
8. Plug the lamp into the lamp connector.
9. Replace and secure the cover using the two retaining nuts.
10. Plug power cord back into outlet, or restore power to unit.
REPLACING THE LAMP - Recommended interval: 24 months
Replacement lamps are available through your HVAC contractor.
Follow above procedure excluding #6.
(Please note standard off-the-shelf lamps are not compatible with this unit. Use of improper lamps will void warranty.)
(Figure 3)
Germicidal Lamp Holder
INSTALLATION
• Best results are achieved when the unit is installed where the HVAC system air temperature is most
constant. Therefore, the preferred installation is on the return side of the furnace. If return side
installation is not possible, install the unit on the supply side, keeping it as far from the heat/cooling
source as possible, and in the main airstream.
• Do not locate the unit within 20” of any plastic material that will be directly exposed to the UV light,
such as wiring, a return side humidifier or certain types of air filters. Check with the filter manufacturer to
see if their material is UV resistant. Over time, UV light may degrade plastic materials.
• Do not touch the glass portion of the lamp with bare hands because oils from the hands can cause “hot
spots” which reduce lamp life. Handle either by the porcelain caps or use a soft cloth. If you accidentally
touch a lamp, wipe it off, using a soft cloth dampened with rubbing alcohol.
1. The model 407H-16 or the 407H-16-O3 Series2 Germicidal UV Lamp is standard on some models
or available separately.
2. Remove the cover from the unit by removing the top and bottom retaining screws using a screwdriver.
3. Remove the knock-outs on the RS4 cabinet door for UV lamp and safety switch. (fig 1 on back page)
4. Attach back of the UV unit to the cabinet door using the four #8-32 x 3/8” screws provided.
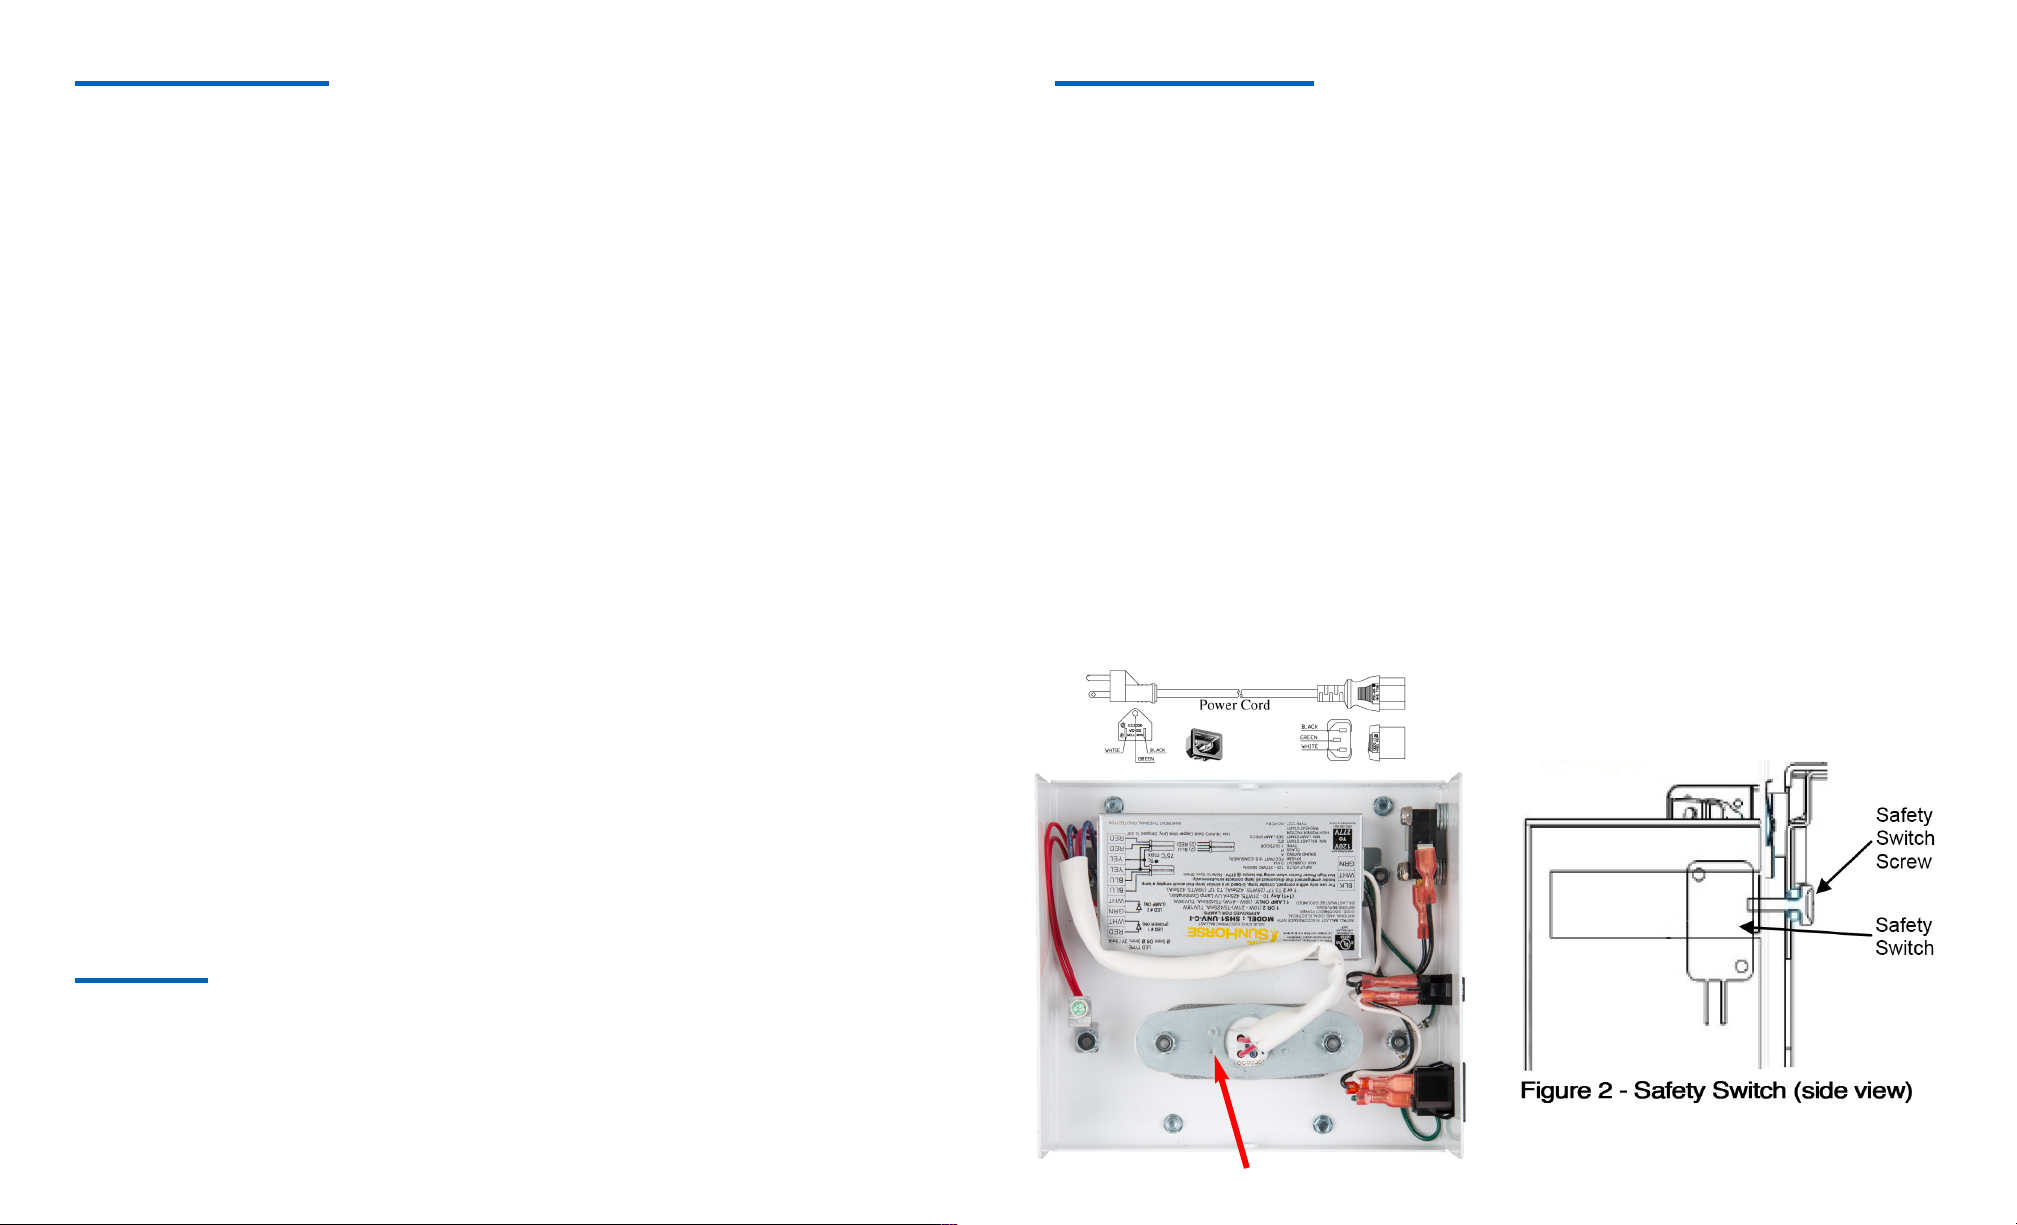
5. Attach #8-32 x 3/4” safety switch screw to cabinet frame (fig 2) to activate safety switch.
6. Attach lamp reflector to back of 407 unit using the four nuts provided.
7. Remove germicidal lamp holder using a 11/32 size nut driver (fig 3).
8. Slide germicidal lamp into lamp opening and reinstall lamp holder.
9. Plug lamp into lamp connector.
10. Connect power in accordance with local wiring codes. The multivoltage ballast is self-adjusting and
operates with voltages from 120 - 240 VAC. Use the provided 120 VAC power cord. For 240 VAC,
install 5 amp inline fuses and use the optional 240 VAC power cord, Part #PC-240.
IMPORTA T: WHE USI G THE 407H-16-O3 LAMP WITH ACTIVATED OXYGE ,
POWER TO THE LAMP MUST BE I TERLOCKED WITH THE FUR ACE BLOWER.
11. For 407H-16-O3 O LY – Plug the 120 VAC power cord into an outlet which is interlocked
with the furnace blower. If an EAC terminal is available, supply power to the outlet from the
EAC terminal. If there is no EAC terminal, interlock the UV unit with the furnace blower
using an appropriate alternate. Verify voltage is operating between 120 - 240 VAC when the
air handler is operating.
12. Replace and secure cover using the two retaining nuts. Affix caution labels if necessary.
WIRING
The multivoltage ballast is self-adjusting and operates with voltages from 120 - 240 VAC.
Install provided
120 VAC power cord and plug the unit into a 120 VAC outlet which is interlocked with the furnace blower.
If an EAC terminal is available, supply power to the outlet from the EAC terminal. Connect in accordance
with local wiring codes. If there is no EAC terminal, interlock the UV unit with the furnace blower using an
appropriate alternate. After installing verify voltage is operating between 120 - 240 VAC with air handler
operating. For 240VAC wiring install 5 amp inline fuses and use optional 240 VAC power cord,
Part #PC-240.

This manual suits for next models

1

Popular Cleaning Equipment manuals by other brands

Kaivac 1700 Series Operator's & parts manual

Kaivac

Kaivac 1700 Series Operator's & parts manual

WEG SSW900 Series Applications manual

WEG

WEG SSW900 Series Applications manual

Strava 100.600 user manual

Strava

Strava 100.600 user manual

DS Produkte 06812 instructions

DS Produkte

DS Produkte 06812 instructions

Meec tools 721-382 operating instructions

Meec tools

Meec tools 721-382 operating instructions

Kärcher CW 3 manual

Kärcher

Kärcher CW 3 manual

Umuzi Cleaning D5009 manual

Umuzi Cleaning

Umuzi Cleaning D5009 manual

Kärcher WV Series manual

Kärcher

Kärcher WV Series manual

Griots Garage Tornador 90562 Instructions for use

Griots Garage

Griots Garage Tornador 90562 Instructions for use

Reer 36120 instruction manual

Reer

Reer 36120 instruction manual

Boma Multiwash Original instructions

Boma

Boma Multiwash Original instructions

Kärcher CV 30/2 Bp manual

Kärcher

Kärcher CV 30/2 Bp manual

Kärcher FR Basic manual

Kärcher

Kärcher FR Basic manual

PowerCare AP31025 manual

PowerCare

PowerCare AP31025 manual

Meiko TopLine M2 Instructions for use

Meiko

Meiko TopLine M2 Instructions for use

Alfalaval Gunclean Toftejorg TZ-75 instruction manual

Alfalaval

Alfalaval Gunclean Toftejorg TZ-75 instruction manual

Qleen Q-Station quick guide

Qleen

Qleen Q-Station quick guide

Raptor M 40l manual

Raptor

Raptor M 40l manual

manuals.online logo
manuals.online logoBrands
  • About & Mission
  • Contact us
  • Privacy Policy
  • Terms and Conditions

Copyright 2025 Manuals.Online. All Rights Reserved.