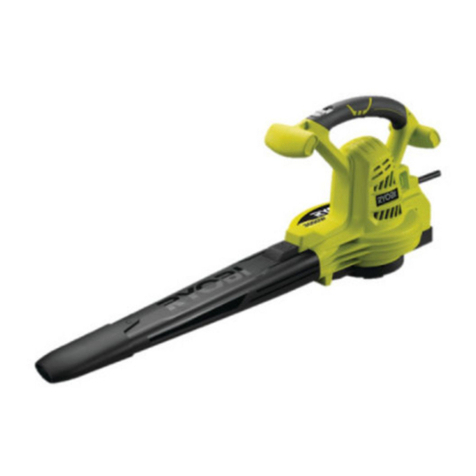
Ryobi RBV-2200 User manual

ELECTRIC MULCHING BLOWER / VAC
OPERATOR’S MANUAL
RBV-2200 / RBV-2400VP
RBV-2400VP
RBV-2200

1
3
13
12
14
4
5
6
7
8
9
10
11
2
Fig. 1
Fig. 2

Fig. 3
Fig. 6
Fig. 5
Fig. 7
Fig. 4

Fig. 11
Fig. 8
Fig. 9
Fig. 12
Fig. 10

1
English
GENERAL SAFETY RULES
WARNING
When using electric gardening appliances,
basic safety precautions should always be
followed to reduce the risk of fire, electric shock
and personal injury, including the following:
READ ALL INSTRUCTIONS.
■Be familiar with the controls and proper use of
the product.
■Clear the work area before each use. Remove all
objects, such as rocks, broken glass, nails, wire or
string that can be thrown or damage the impeller.
■Wear heavy, long trousers, boots and gloves. Do not
wear loose fitting clothing, shorts or go bare foot. Do
not wear jewelry of any kind.
■Secure hair above shoulder level to prevent
entanglement in moving parts.
■Do not allow children or untrained individuals to use
this product.
■Keep all bystanders, especially children and pets,
at least 15 m from the operating area.
■Do not operate this product when you are tired, ill or
under the influence of alcohol, drugs or medication.
■Do not operate in poor lighting. Use the unit only in
daylight or good artificial light.
■Keep firm footing and balance. Do not overreach.
Overreaching can result in loss of balance or
exposure to hazards.
■Keep all parts of your body away from moving parts.
■Inspect the product before use. Replace any damaged
parts before use.
■Do not operate the product in damp or wet locations.
Do not use the product in the rain.
■Wear safety glasses or goggles when operating
this product.
■Use the right product. Use the product for the intended
purpose only.
■Do not handle the product with wet hands.
■Do not use the product if the switch does not turn the
product on or off. A product that cannot be controlled
with the switch is dangerous and must be repaired.
■Avoid accidental starting.
■Use common sense when using this product.
Stay alert and pay attention to what you are doing.
■Do not force the product. It will do a better job with
less likelihood of a risk of injury when you operate it
at the rate for which it was designed.
■Pull the plug out immediately if the mains or extension
lead is damaged or severed.
■Disconnect the product from the power supply when
it is not in use, before servicing and when changing
accessories.
■The appliance is not intended for use by young
children or infirm persons without supervision.
■Young children should be supervised to ensure that
they do not play with the appliance.
SPECIFIC SAFETY RULES
■To prevent damage to your hearing, wear earplugs,
helmet with a visor.
■Do not use the machine to pick up, water, liquids,
pieces of glass, iron, stones or tin cans; this could
damage your machine and chance to be injured.
■Do not use the machine to pick up hot embers or
material, which is burning, smoking or smoldering.
Donot use the machine to pick up material that has
been contaminated by inflammable or explosive
substance.
■Do not use the machine to pick up lighten cigarettes.
■Do not vacuum highly inflammable fumes. Always
make sure that the material picked up by your
machine is not inflammable, toxic, or explosive.
■Do not use without the dust bag in place.
■Do not manually insert objects into the suction nozzle.
■Do not put part of your body such as hands and
fingers into the nozzle or exhaust opening.
■Do not switch the machine ON in enclosed or poorly
ventilated space or in the presence of inflammable
and / or explosive substance such as liquids, gas and
powders.
ELECTRICAL SAFETY RULES
■Make sure the cord is located so that it will not be
stepped on, tripped over or otherwise subjected to
damage or stress.
■Do not abuse the power cord. Never carry the product
by the cord. Never pull the plug out of the power point
by the cord. Keep the cord away from heat, oil and
sharp edges.
■For outdoors work use only suitably approved
extension cables with a min. conductor cross section
of 1.5 mm2The plug connectors must have earthing
contacts and be rain-water-proof.
1
English
1
English

SPECIFIC SAFETY RULES
■Inspect extension cords for deterioration, cuts or
cracks in the insulation. Repair or replace the cords if
any defects appear.
■A nameplate on the product indicates the unit’s
voltage. Never connect the product to an AC voltage
that differs from this voltage.
■If the power cord or extension cable becomes
damaged during use, disconnect the cord from the
supply immediately. DO NOT TOUCH THE CORD
BEFORE DISCONNECTING THE SUPPLY.
■Electrical power should be supplied via a Residual
Current Device (RCD) with a tripping current of not
more than 30 mA.
■To prevent electric shock, avoid contact with earthed
parts.
■Only plug in when the machine is switched off.
■Hold the machine firmly in both hands when working
with it.
MAINTENANCE RULES
■Maintain the product with care. Follow instructions
for changing accessories. Keep the product dry,
clean and free from oil and grease.
■Unplug the product before making adjustments
or repairs.
■Do not use the product if parts have been damaged.
■Check the product regularly to make sure that it
will operate properly and perform the intended
function. Check for alignment of moving parts, binding
of moving parts, breakage of parts and any other
condition that may affect the unit operation. Inspect
the unit’s power connection. Any part that is damaged
should be properly repaired or replaced by a Ryobi
authorised service centre.
■Keep the product clean of grass clippings and other
materials that may become lodged in the air vents.
■Never douse or squirt the product with water or
any other liquid. Do not use detergents or solvents.
Keep handles dry, clean and free from debris.
■After each use, clean with a soft, dry cloth.
WARNING
Before carrying out any maintenance operations,
cut off the electric power supply by disconnecting
the plug from the mains.
SERVICE RULES
■Service on this product must be performed
by qualified repair personnel only. Service or
maintenance performed by unqualified personnel
could result in injury to the user and/or damage to the
product. Such service may also void your warranty.
■Use only identical replacement parts when servicing
the product. Follow the instructions in the Maintenance
section of this manual. Use of unauthorised parts or
failure to follow maintenance instructions may create
a risk of shock, serious injury to the user and/or
damage to the product. Such use may also void your
warranty.
STORAGE AND TRANSPORTATION RULES
■Store the product inside in a dry place.
■Store the product up high or lock it up to prevent
unauthorised use or damage. Keep the product out of
the reach of children.
■Secure the product when transporting it.
■Save these instructions. Refer to them frequently
and use them to instruct others who may use this
product. If you loan someone this product, loan these
instructions also.
2
English

SYMBOLS
Some of the following symbols may be used on your tool. Please study them and learn their meaning.
Proper interpretation of these symbols will allow you to operate the tool more safely and effectively.
SYMBOL NAME EXPLANATION
Safety Alert Precautions that involve your safety.
Long Hair Risk of long hair being drawn into air intake.
Vacuum Door Do not run unit while vacuum door is unsecured.
Loose Clothing Risk of loose clothing being drawn into air intake.
Class II Construction Double-insulated construction.
Wet Conditions Alert Do not expose to rain or use in damp locations.
Read Operator's Manual To reduce the risk of injury, user must read and understand
operator's manual before using this product.
Switch Off Remove plug from mains before cleaning or maintenance.
Eye and Hearing Protection Wear eye and hearing protection when operating this equipment.
Keep bystanders away Keep all bystanders at least 15 m away.
The following signal words and meanings are intended to explain the levels of risk associated with this product.
SYMBOL SIGNAL MEANING
DANGER Indicates an imminently hazardous situation, which, if not avoided, will result
in death or serious injury.
WARNING Indicates a potentially hazardous situation, which, if not avoided, could result
in serious injury.
CAUTION Indicates a potentially hazardous situation, which, if not avoided, may result
in minor or moderate injury.
CAUTION (Without Safety Alert Symbol) Indicates a situation that may result in property
damage.
3
English

SERVICE
Servicing requires extreme care and knowledge and
should be performed only by a qualified service technician.
For service we suggest you return the product to your
nearest AUTHORISED SERVICE CENTRE for repair.
When servicing, use only identical replacement parts.
WARNING
Observe all normal safety precautions related to
avoiding electrical shock.
WARNING
To avoid serious personal injury, do not attempt
to use this product until you read thoroughly
and understand completely the operator's
manual. Save this operator's manual and review
frequently for continuing safe operation and
instructing others who may use this product.
WARNING
The operation of any power tool can result in
foreign objects being thrown into your eyes, which
can result in severe eye damage. Before beginning
power tool operation, always wear safety goggles
or safety glasses with side shields and a full face
shield when needed. We recommend Wide Vision
Safety Mask for use over eyeglasses or standard
safety glasses with side shields. Always use eye
protection.
SAVE THESE INSTRUCTIONS.
SPECIFICATIONS
SPECIFICATIONS RBV-2200
Voltage 220-240V~ 50 Hz
Power 2,200 W
Air velocity 237 Km/h
Air volume 16 m3/min
Mulching ratio 10:1
Dust bag capacity 45 L
Vibration level < 2.5 m/s2
SPECIFICATIONS RBV-2400VP
Voltage 220-240V~ 50 Hz
Power 2,400 W
Air velocity 185~237 Km/h
Air volume 10~16 m3/min
Mulching ratio 10:1
Dust bag capacity 45 L
Vibration level < 2.5 m/s2
DESCRIPTION
1. Shoulder Strap
2. Rear Handle
3. On/Off Switch
4. Speed Control Dial (Model RBV-2400VP only)
5. Front Handle
6. Motor Housing
7. Nozzle
8. Guide Wheels
9. Patio Head (Model RBV-2400VP only)
10. Dust Bag
A
11. Blower / Vac Mode Selection Lever
12. Power Cable & Plug
13. Live Tool Indicator
14. Dust Bag Holder
ASSEMBLY
ATTACHING THE NOZZLE (Fig.2)
■The nozzle(7) comes in two sections. Assemble the
sections by slotting them together as shown in Fig.2
Ensure the sections have clicked into place and are
aligned properly.
Fasten the sections together at the top and at the
bottom, with screws provided.
■Slide the assembled nozzle into the motor housing(6).
With the latches at the top and at the bottom, lock the
nozzle in place.
ATTACHING AND REMOVING THE DUST
BAG(10) (Fig.3 & 4)
CAUTION
Do not use the Blower/Vac in the vacuum mode
without the dust bag(10) in place.
■Latch the front of the dust bag holder(14) to the front
of the dust exhaust and then lift the dust bag handle
side until the dust bag holder secures to the housing.
see Fig.3
■Hang the strap at the front of the dust bag to the
bottom of the nozzle. See Fig.4
■When removing the dust bag, detach the strap from
nozzle first, then press the release on the dust bag
holder and gently dislodge the dust bag off the motor
housing.
SHOULDER STRAP(1) (Fig.3)
■Attach the metal fixture of the shoulder strap to the
hole just in front of the ON/OFF switch.
■Adjust the shoulder strap to a length comfortable for
your use.
4
English

OPERATION
■Plug the Blower/Vac into the mains supply. The
LiveTool indicator(13) will light up.
Note: To reduce the risk of injury, safety switches are
installed for the nozzle and dust bag. The Blower/
Vac cannot be turned on unless the nozzle and
dust bag are attached.
OPERATING AS A BLOWER
■Set the mode selection lever(11) to the position
showing the arrow pointing forward. Ensure the lever
has clicked to place and is rotated to the furthest point.
See Fig.5
■Push the switch(3) to turn power on. See Fig.6
■Hold the Blower/Vac as shown in Fig.7, and sweep
from side to side with the nozzle a few inches above
the ground or floor. Move the Blower/Vac slowly, while
accumulating a pile of debris.
■Use the blower on walls as shown in Fig.8.
OPERATING AS A VACUUM
■Set the mode selection lever(11) to the position
showing the arrow pointing backward. Ensure the lever
has clicked to place and is rotated to the furthest point.
See Fig.9
■Make sure the dust bag is fitted properly.
■Push the switch(3) to turn power on. See Fig.6
■Position the suction mouth on the area to be cleared.
■Hold the Blower/Vac with the nozzle close to ground
as shown in Fig.10, tilting the nozzle slightly, and use
a sweeping action to collect light debris. The debris
will flow in to the dust bag. Things such as leaves
and small twigs will be mulched as they pass through
the fan housing, allowing the dust bag to hold a lot of
debris.
■When the dust bag gets full, suction will noticeably
decrease. Turn off and unplug the Blower/Vac before
emptying the dust bag.
WARNING
When the impeller in the motor housing is clogged
with twigs, nylon bags, etc. turn off and unplug
the Blower/Vac, remove the nozzle and then the
obstruction carefully.
SPEED CONTROL (RBV-2400VP ONLY)
The speed of the unit can be varied using the dial(4) in
front of the handle.
■Rotate the dial anticlockwise to set higher speed and
clockwise for lower speed. See Fig.11
PATIO HEAD(9) (RBV-2400VP ONLY)
The patio head(9) increases the area of suction when the
unit is being used in vacuum mode.
■Slot the patio head into the nozzle until it is fully in.
See Fig.12
■Use the patio head wheels to roll the Blower/Vac over
the area being cleaned, in similar posture as for a
vacuum cleaner.
EMPTYING THE DUSTBAG
WARNING
Wear eye protection and face shield to limit your
exposure to dust and debris.
■Turn off and unplug the Blower/Vac from the mains.
■Empty the contents via the zip at the bottom of the
bag.
■Alternatively, detach the dust bag from the motor
housing and empty through the top.
MAINTENANCE
MAINTENANCE AND STORAGE
■Take care of your machine and clean it regularly to
Obtain long-lasting efficiency and performance.
■When you have finished work, remove the dust bag,
turn it upside down and clean it thoroughly.
■Use only a warm damp cloth and soft brush to clean
your machine. Do not use petrol, turpentine, lacquer or
paint thinner, dry cleaning fluids or similar products.
■If vacuum power decreases and the dust bag is empty,
clean the shredding chamber carefully.
■Prior to storing your Blower / Vacuum after use, check
to ensure the product is not clogged with dirt or debris
and that the blow / vacuum mode selection lever is
operating smoothly. Keep all nuts, bolts and screws
tight to be sure your machine is in a safe working
condition. Use only Ryobi replacement parts and
accessories.
CLEANING THE DUST BAG
■Empty the dust bag after each use to avoid
deterioration and obstruction of the air flow which will
reduce the performance of the unit.
■Clean the dust bag as needed. With eye protection
on, turn the dust bag inside out after initial emptying
and vigorously shake out the dust and debris.
5
English

DISPOSAL
Waste electrical products should not be disposed of
together with household waste. Please recycle where
facilities exist. Check with your local authority or retailer
for recycling advice.
6
English


Other manuals for RBV-2200
2
This manual suits for next models
1
Table of contents
Other Ryobi Blower manuals

Ryobi
Ryobi RY09460 Application guide

Ryobi
Ryobi RGBV3100 User manual

Ryobi
Ryobi RY09973 User manual

Ryobi
Ryobi RY09440 Quick setup guide

Ryobi
Ryobi RBL42BPN User manual

Ryobi
Ryobi RY08510 User manual

Ryobi
Ryobi RY09800 User manual

Ryobi
Ryobi EMB1800ET Operation manual

Ryobi
Ryobi RY09053 Application guide

Ryobi
Ryobi P3260 User manual