Ryobi RLT36X26BL User manual

ORIGINAL INSTRUCTIONS
Cordless Line
Trimmer
RLT36X26BL
RLT36BL
HERO SHOT

Important!
It is essential that you read the instructions in this manual before assembling,
operating, and maintaining the product.
Subject to technical modification.

1
Safety, performance, and dependability have been given
top priority in the design of your cordless line trimmer.
INTENDED USE
The cordless line trimmer is intended to be used only by
adults who have read and understood the instructions and
warnings in this manual and can be considered responsible
for their actions.
The product is only intended for use outdoors in a well-
ventilated area. For safety reasons, the product must be
adequately controlled by a two-handed operation.
When tted with the line trimmer head (and appropriate
guard), the product is intended for cutting long grass, pulpy
weed, and similar vegetation at or about ground level.
The cutting plane should be approximately parallel to the
ground surface when trimming.
The product should not be used to cut or trim hedges,
bushes, or other vegetation where the cutting plane is not
parallel to the ground surface.
Do not use the product for any other purpose.
GENERAL SAFETY WARNINGS
WARNING
Read all safety warnings and all instructions. Failure
to follow the warnings and instructions may result in
electric shock, re and/or serious injury.
WARNING
When using the product, the safety rules must be
followed. For your own safety and that of bystanders,
please read these instructions before operating the
product. Please keep the instruction safe for later use.
WARNING
The product is not intended to be used by children or
persons with reduced physical, mental, or sensory
capabilities. Children should be adequately supervised
to ensure they do not play with the product.
WARNING
Some regions have regulations that restrict the use of
the product. Check with your local authority for advice.
TRAINING
■Read the instructions carefully. Be familiar with all
controls and the proper use of the product.
■Never allow children or people unfamiliar with these
instructions to use the product. Local regulations may
restrict the age of the operator.
■Keep bystanders, children, and pets 15 m away from
the area of operation. Stop the product if anyone enters
the area.
■Do not use the product while tired, ill, or under the
influence of drugs, alcohol, or medication.
■Keep in mind that the operator or user is responsible
for accidents or hazards occurring to other people or
their property.
PREPARATION
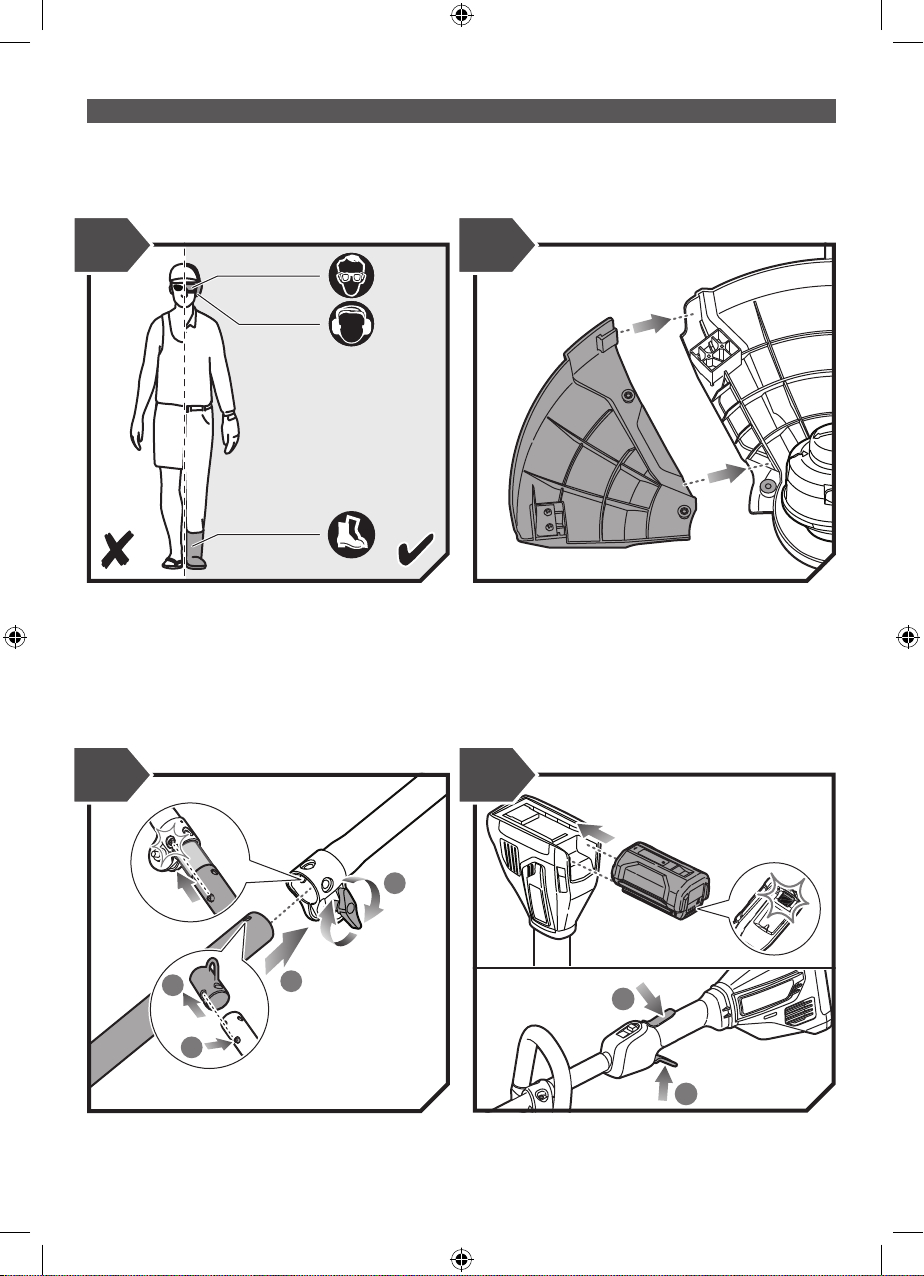
■Wear full eye and hearing protection while operating the
product. If working in an area where there is a risk of
falling objects, head protection must be worn.
■Hearing protection may restrict the operator’s ability
to hear warning sounds. Pay particular attention to
potential hazards around and inside the working area.
■Wear heavy, long trousers, boots, and gloves. Do not
wear loose fitting clothing, short trousers, jewellery of
any kind, or use with bare feet.
■Secure long hair so it is above shoulder level to prevent
entanglement in moving parts.
■Before use and after any impact, check that there are
no damaged parts. A defective switch or any part that
is damaged or worn should be properly repaired or
replaced by an authorised service centre.
■Make sure the cutting attachment is properly installed
and securely fastened.
■Never operate the product unless all guards, deflectors,
and handles are properly and securely attached.
■Consider the environment in which you are working.
Keep the working area free from wires, sticks, stones,
and debris which if struck by the cutter can become
thrown objects.
BATTERY TOOL USE AND CARE
■Recharge only with the charger specified by the
manufacturer. A charger that is suitable for one type of
battery pack may create a risk of fire when used with
another battery pack.
■Use power tools only with specifically designated
battery packs. Use of any other battery packs may
create a risk of injury and fire.
■When battery pack is not in use, keep it away from
other metal objects, like paper clips, coins, keys, nails,
screws, or other small metal objects that can make a
connection from one terminal to another. Shorting the
battery terminals together may cause burns or a fire.
■Under abusive conditions, liquid may be ejected from
the battery; avoid contact. If contact accidentally occurs,
flush with water. If liquid contacts eyes, additionally
seek medical help. Liquid ejected from the battery may
cause irritation or burns.
LINE TRIMMER SAFETY WARNINGS
■Never allow children, persons with reduced physical,
sensory, or mental capabilities, or lack of experience
and knowledge or people unfamiliar with these
instructions to use the product.
■Use the product in daylight or with good artificial light.
■Avoid using on wet grass.
■Keep proper footing and balance at all times and be
sure of proper footing on slopes.
■Do not walk backwards when using the product.
■Walk, do not run.
■Keep the head attachment below waist level.

2
■Never use the product with damaged guards or without
guards in place.
■Never fit a metal replacement line.
■Keep hands and feet away from the cutting means at all
times especially when switching on the motor.
■Beware, the cutting elements continue to rotate after
the motor is switched off.
■Beware of objects thrown by the cutting means. Clear
debris like small stones, gravel, and other foreign
objects from the work area before starting operation.
Wires or string may become entangled with the cutting
means.
■Turn off the product and remove the battery pack. Make
sure all moving parts have come to a complete stop:
●before servicing
●before clearing a blockage
●before checking, cleaning, and working on the
product
●before changing accessories
●before leaving the product unattended
●after striking a foreign object
●whenever performing maintenance
●whenever the product starts to vibrate abnormally
■Wear full eye and hearing protection while using the
product. If working in an area where there is a risk of
falling objects, head protection must be worn.
■Hearing protection may restrict the operator’s ability
to hear warning sounds. Pay particular attention to
potential hazards around and inside the working area.
■Wear heavy, long trousers, boots, and gloves. Do not
wear loose fitting clothing, short trousers, jewellery of
any kind, or use with bare feet.
■Secure long hair so it is above shoulder level to prevent
entanglement in moving parts.
■The small blade fitted to the safety guard is designed to
trim the new extended line to the correct length for safe
and optimum performance. It is very sharp, do not touch
it particularly when cleaning the product.
■Always ensure that ventilation openings are kept clear
of debris.
■Before use and after any impact, check that there are
no damaged parts. A defective switch or any part that is
damaged should be properly repaired or replaced by an
authorised service centre.
■Make sure the cutting head attachment is properly
installed and securely fastened.
■Make sure all guards, deflectors, and handles are
properly and securely attached.
■Do not modify the product in any way, this may increase
the risk of injury to yourself or others.
■Use only the manufacturer’s replacement cutting line.
Do not use any other cutting attachment.
■Immediately switch off and remove the battery pack
in the event of accident or breakdown. Do not operate
the product again until it has been fully checked by an
authorised service centre.
WARNING
Ensure that the line cut-off blade in guard is properly
positioned and secured before each use.
ADDITIONAL BATTERY SAFETY WARNINGS
WARNING
To reduce the risk of re, personal injury, and product
damage due to a short circuit, never immerse your
tool, battery pack, or charger in uid or allow a uid to
ow inside them. Corrosive or conductive uids, such
as seawater, certain industrial chemicals, and bleach
or bleach-containing product, etc., can cause a short
circuit.
TRANSPORTATION AND STORAGE
■Stop the product, remove the battery pack, and allow it
to cool down before storing or transporting.
■Clean all foreign material from the product.
■Do not store or transport the product with batteries
fitted, remove and secure separately. Store the
product in a cool, dry, and well-ventilated place that
is inaccessible to children. Keep away from corrosive
agents, such as garden chemicals and de-icing salts.
Do not store outdoors.
■For transportation in vehicles, secure the product
against movement or falling to prevent injury to persons
or damage to the product.
TRANSPORTING LITHIUM BATTERIES
Transport the battery in accordance with local and national
provisions and regulations. Follow all special requirements
on packaging and labelling when transporting batteries by
a third party.
Ensure that no batteries can come in contact with other
batteries or conductive materials while in transport by
protecting exposed connectors with insulating, non-
conductive caps or tape. Do not transport batteries that are
cracked or leaking. Check with the forwarding company for
further advice.
MAINTENANCE
WARNING
Use only original manufacturer’s replacement parts,
accessories, and attachments. Failure to do so can cause
possible injury, can contribute to poor performance, and
may void your warranty.
WARNING
Servicing requires extreme care and knowledge
and should be performed only by a qualied service
technician. Have the product serviced by an authorised
service center only. When servicing, use only original
replacement parts.

3
■Turn off the product and remove the battery pack before
conducting any maintenance or cleaning work.
■You may make adjustments and repairs described in
this manual. For other repairs, contact the authorised
service agent.
■For replacement line, use only nylon filament line of
the diameter described in the specification table of this
manual.
■After extending new cutter line, always return the
product to its normal operating position before starting.
■After each use, clean the product with a soft, dry cloth.
Any part that is damaged should be properly repaired or
replaced by an authorised service centre.
■Check all nuts, bolts, and screws at frequent intervals
for proper tightness to ensure the product is in safe
working condition. Any part that is damaged should be
properly repaired or replaced by an authorised service
centre.
■Bring the product to an authorised service centre to
replace damaged or unreadable labels.
RESIDUAL RISKS
Even when the product is used as prescribed, it is still
impossible to completely eliminate certain residual risk
factors. The following hazards may arise during use, and
the operator should pay special attention to avoid the
following:
■injury caused by vibration
–Hold the product by designated handles and restrict
working time and exposure.
■injury caused by exposure to noise
–Wear hearing protection and limit exposure.
■injury caused by flying debris
–Wear eye protection at all times.
RISK REDUCTION
It has been reported that vibrations from handheld tools
may contribute to a condition called Raynaud’s Syndrome.
Symptoms may include tingling, numbness, and blanching
of the ngers, usually apparent upon exposure to cold.
Hereditary factors, exposure to cold and dampness, diet,
smoking, and work practices are all thought to contribute to
the development of these symptoms. There are measures
that can be taken by the operator to possibly reduce the
effects of vibration:
■Keep your body warm in cold weather. When operating
the product, wear gloves to keep the hands and wrists
warm. It is reported that cold weather is a major factor
contributing to Raynaud’s Syndrome.
■After each period of operation, exercise to increase
blood circulation.
■Take frequent work breaks. Limit the amount of
exposure per day.
If you experience any of the symptoms of this condition,
immediately discontinue use and see your physician.
WARNING
Injuries may be caused, or aggravated, by prolonged
use of a tool. When using any tool for prolonged periods,
ensure you take regular breaks.
WHAT’S IN THE BOX
■Lower boom with string head assembly x 1
■Power head with upper boom assembly x 1
■Front handle x 1
■Grass deflector x 1
■Charger (RLT36X26BL only) x 1
■Battery (RLT36X26BL only) x 1
■Manual x 1
NOTE: For RLT36BL, the battery and charger are sold
separately.
SYMBOLS ON THE PRODUCT
Read and understand all instructions
before operating the product. Follow all
warnings and safety instructions.
Wear eye protection
Wear ear protection
Wear non-slip safety footwear when
using the product.
Do not use metal blade(s) on the
product.
Do not expose to rain or damp condition.
Remove the battery pack before starting
any work on the product.
Beware of thrown or ying objects.
Keep all bystanders, especially children
and pets, at least 15 m away from the
operating area.
Keep hands away from the cut-off blade
Regulatory Compliance Mark (RCM).
Product meets applicable regulatory
requirements.
PLACEHOLDER

4
Waste electrical products should not
be disposed of with household waste.
Please recycle where facilities exist.
Check with your local authority or
retailer for recycling advice.
The following signal words and meanings are intended to
explain the levels of risk associated with the product:
DANGER
Indicates an imminently hazardous
situation, which, if not avoided, will
result in death or serious injury.
WARNING
Indicates a potentially hazardous
situation, which, if not avoided, could
result in death or serious injury.
CAUTION
Indicates a potentially hazardous
situation, which, if not avoided, may
result in minor or moderate injury.
CAUTION
(Without Safety Alert Symbol)
Indicates a situation that may result
in property damage.
SYMBOLS IN THIS MANUAL
Parts or accessories sold separately
Note
Warning

5
WHAT’S IN THE BOX
x 1 x 1 x 1
x 1
x 1
x 1x 1
x 1
RLT36X26BL
* Kit includes battery and charger.
Two-piece guard must be fully assembled

6
WHAT’S IN THE BOX
x 1
x 1
RLT36BL
* Battery and charger are sold separately.
x 1
x 1 x 1 x 1
Two-piece guard must be fully assembled

7
Know your product
KNOW YOUR PRODUCT
13
14
15
2
3
1
7
456
9
8
10
11
12
1. Rear handle
2. Lock-out trigger
3. Variable speed trigger
4. Battery latch button
5. Battery pack
6. Charger
7. Lower shaft
8. Grass deflector (2 pieces)
9. Line cut-off blade
10. Lower housing
11. Bump knob
12. Inner spool
13. Cutting line
14. Front handle
15. Speed selector

8
GETTING STARTED
1 2
1
23
4
1
2
65
Install the small guard to the main guard.Always wear safety goggles or safety glasses with side shields
when operating the product. Wear non-slip, heavy-duty protective
gloves. Wear non-skid, protective footwear that will protect your
feet and improve your footing on slippery surfaces.
Attach the lower shaft to the upper shaft. Ensure that the lower
shaft is fully seated into the upper shaft to connect the inner drive
shaft.
Insert the battery until the battery clicks into place. To start
operating the product, hold the lock-out trigger (1) and then
squeeze the variable speed trigger (2).

9
GETTING STARTED
3
1
2
3
4
Secure the screws with a phillps head screwdriver. Install the front handle on the upper shaft.

10
OVERVIEW
406 mm
355 mm
Correct usage techniques Cutting width adjustment Reloading the line
Trimmer head replacement Cleaning the product Storing the product
p.11 p.14 p.15
p.19p.17 p.18

11
OPERATION
Correct usage techiques
OPERATING THE TRIMMER
NOTE: Hold the product with the right hand on
the rear handle and the left hand on the front
handle.
WARNING: Do not cut without attaching the small
guard to avoid injury.
WARNING: Do not cut in a dangerous cutting
area. Avoid trees and shrubs. Tree bark, wood
mouldings, cladding, and fence posts can easily
be damaged by the line.
WARNING: Exercise extreme caution when
using the product.

12
OPERATION
1
2
HIGHLOW
2
3
1
1. Insert the battery pack until it clicks into
place.
NOTE: Use the speed selector to adjust the
speed from high to low.
2. To start operating the product, hold the lock-
out trigger (1) and then squeeze the variable
speed trigger (2).
3. To advance the line, tap the knob on the
ground until it reaches its full speed. The line
advances each time the head is tapped. Do
not hold the bump knob on the ground.
NOTE: Tap the bump knob only on the grass
to prevent damage to the bump knob.

13
OPERATION
1
2
3
NOTE: The line trimming cut-off blade on the
grass deflector will cut the line to the correct
length.
NOTE: The small blade fitted to the cutting
attachment guard is designed to trim the new
extended line to the correct length for safe
and optimum performance. It is very sharp;
do not touch it, particularly when cleaning the
product.
NOTE: Cut tall grass from the top down. This
will prevent grass from wrapping around the
shaft housing and bump head, which may
cause damage from overheating.
NOTE: For cutting ease and safety, cut the
grass from the right side to the left side.

14
OPERATION
406 mm
355 mm
Cutting width adjustment
2
1
1
x2
x2
1
4
5
6
2
3
1
3
x2
x2
2
4
406 mm
355 mm
355 mm
406 mm
2
3
ADJUSTING THE CUTTING WIDTH
1. Remove the battery pack.
2. Remove the two line cut-off blades. (1)
Loosen the screws on the line cut off blade.
(2) Detach the line cut off blade. (3) Rotate
the line cut off blade 180º. Do the same
procedure for steps 4 to 6.
NOTE: Runtime is increased on 33 cm
setting.
3. Install the two line cut-off blades into the new
position. (1) Turn the two screws clockwise
to secure the cut-off blades to the guard. (2)
Do the same procedure for steps 3 and 4.

15
OPERATION
2
1
1
2
2.6m
12
Reloading the line
1
2
3
4
REPLACING THE LINE
1. Remove the battery pack.
2. Rotate the bump knob on the trimmer head
until the line on the centre of the bump knob
aligns with arrows on outer spool.
3. Use 2.4 mm diameter line. Cut one piece
of the line, approximately 5.2 m in length.
Insert one end of the line, through the eyelet
located on the side of the trimmer head and
push until the line comes out through the
eyelet on the other side. Continue to push
the line through the trimmer head until the
line is even in length on both sides.
4. Ensure there is equal lengths of line on
either side of the trimmer head (max. 2.6
m per side). Rotate the bump knob with the
speed winder handle on the trimmer head to
wind the line.
NOTE: Bump knob can also be rotated by
hand.

16
OPERATION
12cm12cm 12cm12cm
2
3
11
5
15
6
NOTE: Wind the line until approximately
12 cm remains protruding from the trimmer
head.
5. Insert the battery pack (1) until it clicks into
place (2). To start operating the product,
hold the lock-out trigger (3) and then
squeeze the variable speed trigger (4).
6. To advance the line, tap the knob on the
ground until it reaches its full speed. The line
advances each time the head is tapped. Do
not hold the knob on the ground.
NOTE: The line trimming cut-off blade on
the grass deflector will cut the line to the
correct length.

17
OPERATION
2
1
3
2
1
2
1
3
Trimmer head replacement
1
2
3
REPLACING THE TRIMMER HEAD
1. Remove the battery pack.
2. Insert the locking rod into the slot underneath
the head, then turn the trimmer head
clockwise to remove.
3. Install the new trimmer head and turn
conterclockwise until it is fully tightened.
Remove the locking rod from the slot.

18
MAINTENANCE
2
1
Cleaning the product
1
2
CLEANING THE PRODUCT
1. Remove the battery pack.
2. Clean all foreign material from the product.
WARNING: Keep away from corrosive
agents such as garden chemicals and de-
icing salts.
WARNING: The small blade fitted to the
cutting attachment guard is designed to trim
the new extended line to the correct length
for safe and optimum performance. It is very
sharp; do not touch it, particularly when
cleaning the product.
This manual suits for next models
1
Table of contents
Other Ryobi Trimmer manuals

Ryobi
Ryobi OPP1820 User manual

Ryobi
Ryobi RBC-254FC User manual

Ryobi
Ryobi RY402013 User manual

Ryobi
Ryobi rlt4025 User manual

Ryobi
Ryobi RPT4545E User manual

Ryobi
Ryobi RY39500 Application guide

Ryobi
Ryobi RBC430SBSC User manual

Ryobi
Ryobi PBC3046E User manual

Ryobi
Ryobi RHT1850XLi User manual

Ryobi
Ryobi RHT36C60R15 User manual

Ryobi
Ryobi RFT254 User manual

Ryobi
Ryobi RY36LT33A User manual

Ryobi
Ryobi RLT4125 User manual

Ryobi
Ryobi RLT36 User manual

Ryobi
Ryobi OHT1855R User manual

Ryobi
Ryobi RHT5555RS User manual

Ryobi
Ryobi RLT26CDS User manual

Ryobi
Ryobi RBC-52SB User manual

Ryobi
Ryobi RY34426 How to use

Ryobi
Ryobi RY40600 User manual