Read the instructions before installation & use. The appliance must be installed
and the gas cylinder stored in accordance with the regulations which are
currently in force. The patio heater should be positioned on a level surface.
For use outdoors or in amply ventilated areas. An amply ventilated area
must have a minimum of 25% of surface area open. The surface area is
dened as the the sum of the walls surface (see Fig. 1).
To t a Propane Gas Cylinder:
Change the gas cylinder in an amply ventilated area away from any ignition
source (candles, cigarettes or any other ame producing applainces). Ensure
that the area is free from any unprotected combustible material or substance.
1. Lift “Gas Cylinder Chamber” to access hose and regulator.
2. Attach the regulator to the new cylinder and check regulator seal is correctly tted
(see instructions with regulator.)
3. Sit cylinder into the cylinder housing, ensuring that the hose is not twisted or damaged in any
way.
4. Use gas cylinders with a gas capacity of 10 - 13kgs.
Lighting instructions:
1. Turn on gas supply at cylinder.
2. Push dial in and turn to position .
3. While dial is held pressed in at position , press spark button repeatedly to ignite the burner.
4. Hold dial in for at least 10 seconds to ensure burner stays lit. If the burner is not lighting, repeat
steps as above, and hold dial in for 20 seconds. Do not continuously hold dial in as you may
cause a build up of gas.
(IF FITTING A NEW GAS CYLINDER,YOU MAY NEED TO HOLD THE DIAL IN FOR AS LONG AS
A MINUTE TO ALLOW ALL THE AIR TO BE EXPELLED FROM THE GAS LINE.)
5. In windy conditions, shield from wind to ensure easy lighting.
6. Turn dial to one of the higher ame positions as required.
To Turn O:
1. Turn dial to postition .
2. Push in and turn to position .
3. Turn o gas supply at gas cylinder.
In the event of a gas leak turn o the gas supply at the gas cylinder, and contact a competent gas
technician immediately.
Cleaning: Abrasive cleaners are NOT to be used. Clean unit with a damp cloth when fully cooled.
Winter Storage: Remove cylinder from unit. For ease of storage we advise that the parasol be
removed. This can easily be done by removing the 3 bolts, and lifting the parasol o. Be sure that
the heater is fully cooled before proceeding with this operation.
Do Not Bring Goods Back To Place Of Purchase.
For help, contact the factory helpline. Helpline hours: 9am - 5pm Monday to Friday.
DO NOT: Attempt to use the heater indoors. This product is only for use in outdoor and well
ventilated areas and is only to be used for space heating. Do not use below ground level.
DO NOT: Move the appliance when in operation.
DO NOT: Use any other gas except Propane (G31). This unit was designed for propane use only.
DO NOT: Attempt to clean the heater until it is turned o and fully cooled.
DO NOT: Use naked ame to detect suspected gas leaks.
DO NOT: Allow children or pets to play near the heater.
DO NOT: Use conventional awnings, tents or gazebos over Patio Heaters. Use only purpose made
gazebos, designed for such a purpose.
DO NOT: Leave this product unattended when in use.
DO NOT: Use an adjustable regulator with this appliance.
WARNING!
Never attempt to light unit if the hose is loose or damaged in any way. Also never attempt to light
the unit if you have reason to believe that the unit may be leaking gas. Have the unit fully checked
by a competent person, in accordance with the instructions enclosed. We recommend a frequency
of servicing every 100 hours of use.
DO: Place heater on a at, level and solid surface at all times.
DO: Wait for 3 minutes before relighting, if the burner ame becomes extinguished during use.
DO: Ensure that all naked ames are extinguished before tting a new cylinder.
DO: Store gas cylinders outdoor, above ground level and in a safe and secure environment.
DO: Make sure that the gas supply at the gas cylinder is turned o after use.
DO: Ensure that servicing of the unit is carried out by a competent person in accordance with the
instructions enclosed.
DO: Use only the type of gas and the type of cylinder speciced by the manufacturer.
DO: Shut o the valve at the cylinder or the regulator before moving the appliance.
NOTE: It is normal for the Patio Heater to produce smoke during its rst three minutes of use.
This is caused because it burns o the protective oil lm on the metal surface.
ALWAYS: Follow any safety instructions supplied with gas cylinders.
ALWAYS: Keep unit well away from glass doors and windows to ensure no possibility of heat build
up and damage.
ALWAYS: Avoid leaving the heater exposed to extreme wind conditions as it might blow over and
damage the unit and other items.
ALWAYS: Ensure a minimum clearance above and beside of 0.6M from non protected combustable
materials both vertically and horizontally. See g 2.
•The use of this appliance in an enclosed area can be dangerous and is prohibited.
•Gas category I3P
•The appliance must be installed and the gas cylinder stored in accordance with instructions
and local regulations.
•Do not obstruct the ventilation holes of the cylinder housing.
•The exible hose must be changed within the prescribed intervals.
•In case of violent wind particular attention must be taken against the
tilting of the appliance.
•Keep the instructions for future reference.
•In the event of gas leakage turn o the appliance at the gas supply
and contact our helpline for assistance: 00 353 1 2873797
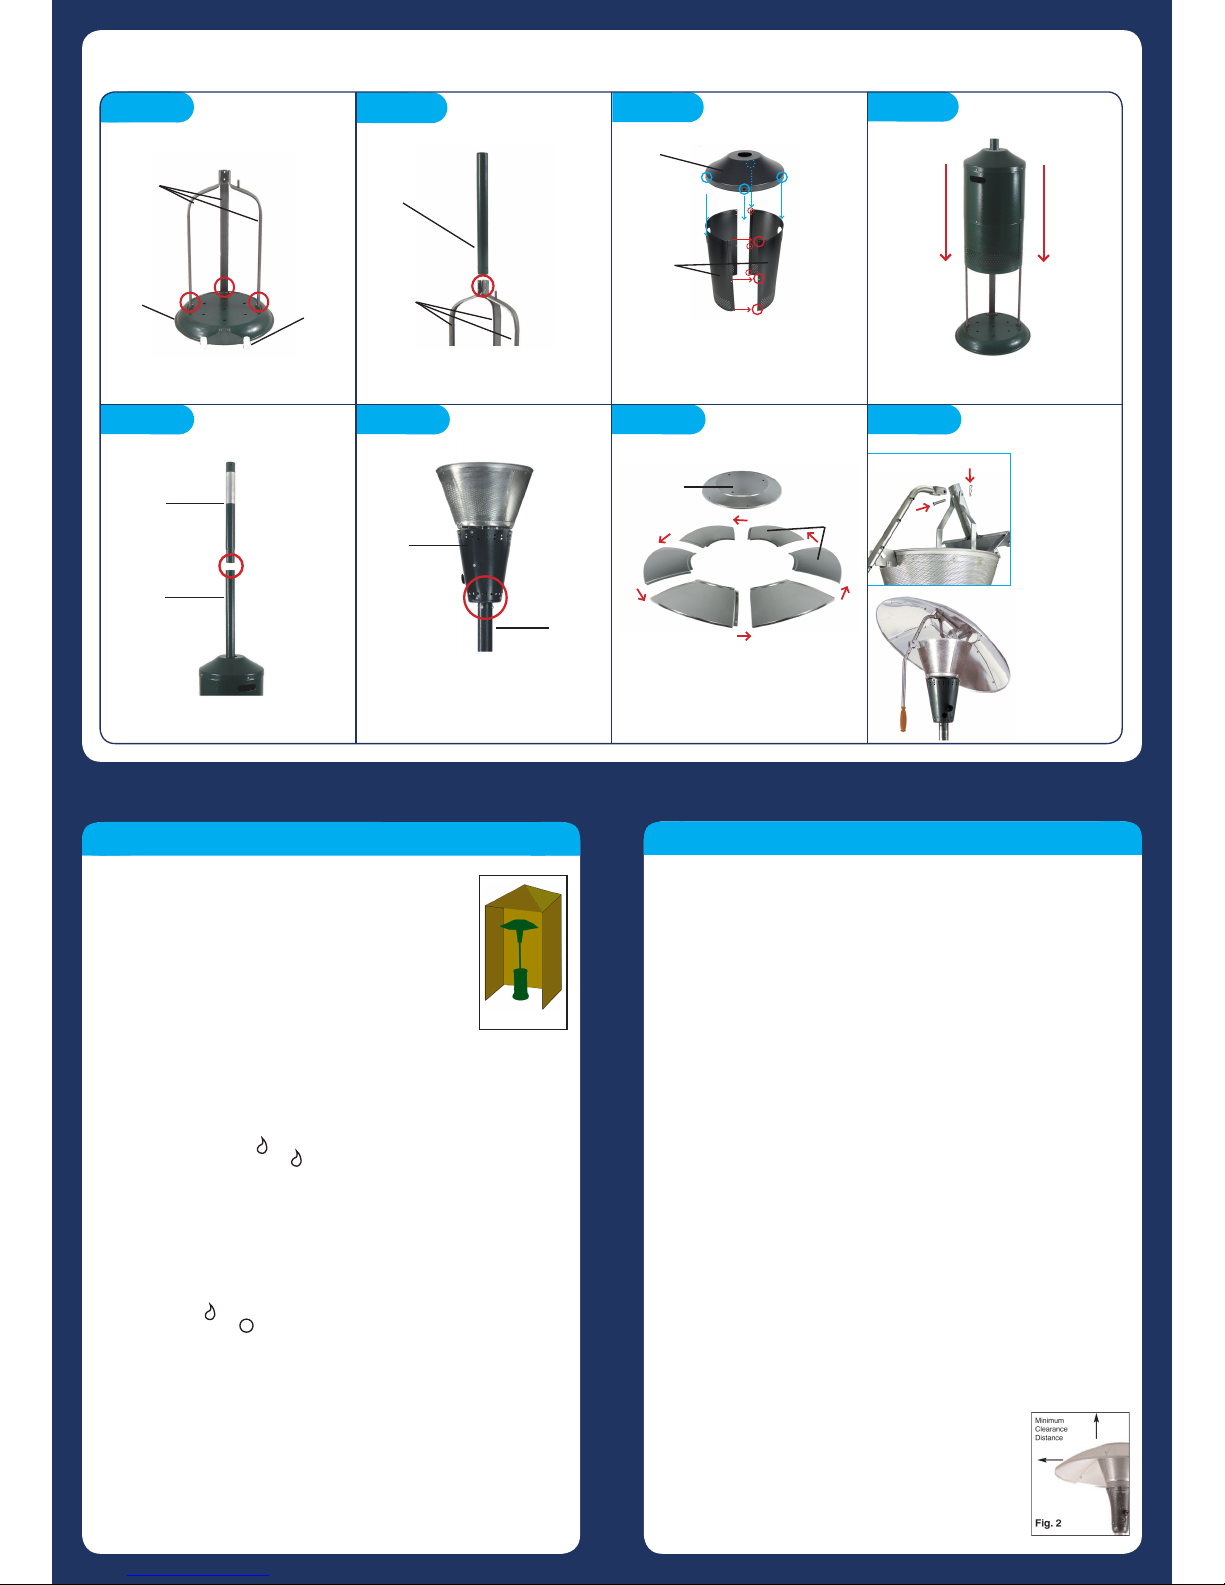
Fix cylinder chamber supports A, B, C to
corresponding sections on base. Finger tighten
only at this stage.
Fix lower support pole to cylinder chamber
supports. Now tighten all xings fully.
Note: Before tightening all xings, ensure that the
support pole is aligned in a fully vertical position.
1. Attach the cylinder chamber panels at the 6
points indicated (red). Finger tighten at this stage.
2. Attach chamber panels to cylinder cover at the
4 circled areas (blue) above. Once all bolts are in
place tighten all bolts securely.
Slide assembled cylinder chamber over
cylinder chamber supports.
Fix upper support pole to lower support pole.
Step 1 Step 2
Step 5
Step 3 Step 4
Step 6 Step 7 Step 8
USER INSTRUCTIONS SAFETY INSTRUCTIONS
Reector
handle
Pin
R-Clip
ASSEMBLY MUST BE CARRIED OUT BY A COMPETENT PERSON.
Important - while every precaution has been made in the manufacture of this product, care must be taken during assembly in case sharp edges are present.
For Step 1 use:
6 x Bolts Ref F
Cylinder
chamber
supports
Base
Wheels
For Step 2 use:
6 x Bolts Ref F
Lower
Support
Pole
Cylinder
chamber
supports
For Step 3 use:
10 x Bolts Ref A
10 x Nuts Ref E
Cylinder
cover
Cylinder
chamber
panels
For Step 5 use:
3 x Bolts Ref B
Upper
support
pole
Lower
support
pole Upper
support
pole
Lantern
For Step 7 use:
18 x Bolts Ref A
18 x Nuts Ref E
Top panel
Side panels
For Step 8 use:
3 x Bolts Ref C
3 x Washer Ref D
A B C
For Step 6 use:
4 x Bolts Ref F
4 x Washer Ref G
Feed gas hose down through pole. Secure the
lantern to the top of the support pole. Attach
regulator to other end of hose and secure with
hose clip. Note: for ease of tting hose, lubricate
nozzles with a soap solution.
Loosely screw parasol side panels together
overlapping as shown below. Fix the top panel
to the top of assembled side panels.
Using the pre-tted
R-clip and pin,
secure the reector
handle to the
bracket as shown
Fit reector to
lantern.
Test for leaks with
proprietary leak
detection uid
or soapy water
applied with a small
paintbrush.
Fig. 1
0.6M
0.6M