manuals.online logo
Brands
  1. Home
  2. •
  3. Brands
  4. •
  5. Saito
  6. •
  7. Engine
  8. •
  9. Saito FG-90R3 User manual

Saito FG-90R3 User manual

5.Break-inMOSTIMPORTANT!!
●Prop-recommendation:Mejzlik-24”x12”.
●Use15:1fuel:oilratioforbreak-in.
●Nevermakethefuelmixtureleanduringbreak-in.Itcouldcauseseizureevenduring
idlingorlow-speedrunning.
●Beforestartingtheengine,openthemainneedleApprox.3turnsandtheslowneedle
Approx.5turnsCCWeachfromfullyclosed.
●Starttheengine(usingastarterisrecommendedforsafety).
●Runforabout5secondsatlowspeedtowarmup.
●Openthrottlegraduallyuptooverhalfopen.Inthemeantimeturnthemainneedle
CCW.ContinuetoturnthemainneedleCCWuntiltheRPMdeclines,keepingthe
throttleopenedoverhalf.
●ThenturntheslowneedleCCWtomakemixturemuchricher.
●Runinthisveryrichconditionfor1literoffuel..
●Now“initial”break-inisdone.
●Graspthepropbyhandandturnitseveraltimesinthedirectionofnormaloperation(CCW)untilthecarburetorgenerateshissing-like
sound.Afterhearingthissoundforabout5times,quicklyflipthepropapproximately10times.
●Removethechokebar.Thenpowerontheignitionsystemandflipthepropquicklytostarttheengine.Iftheenginedoesnʼtstart,repeat
thechokingprocedure.
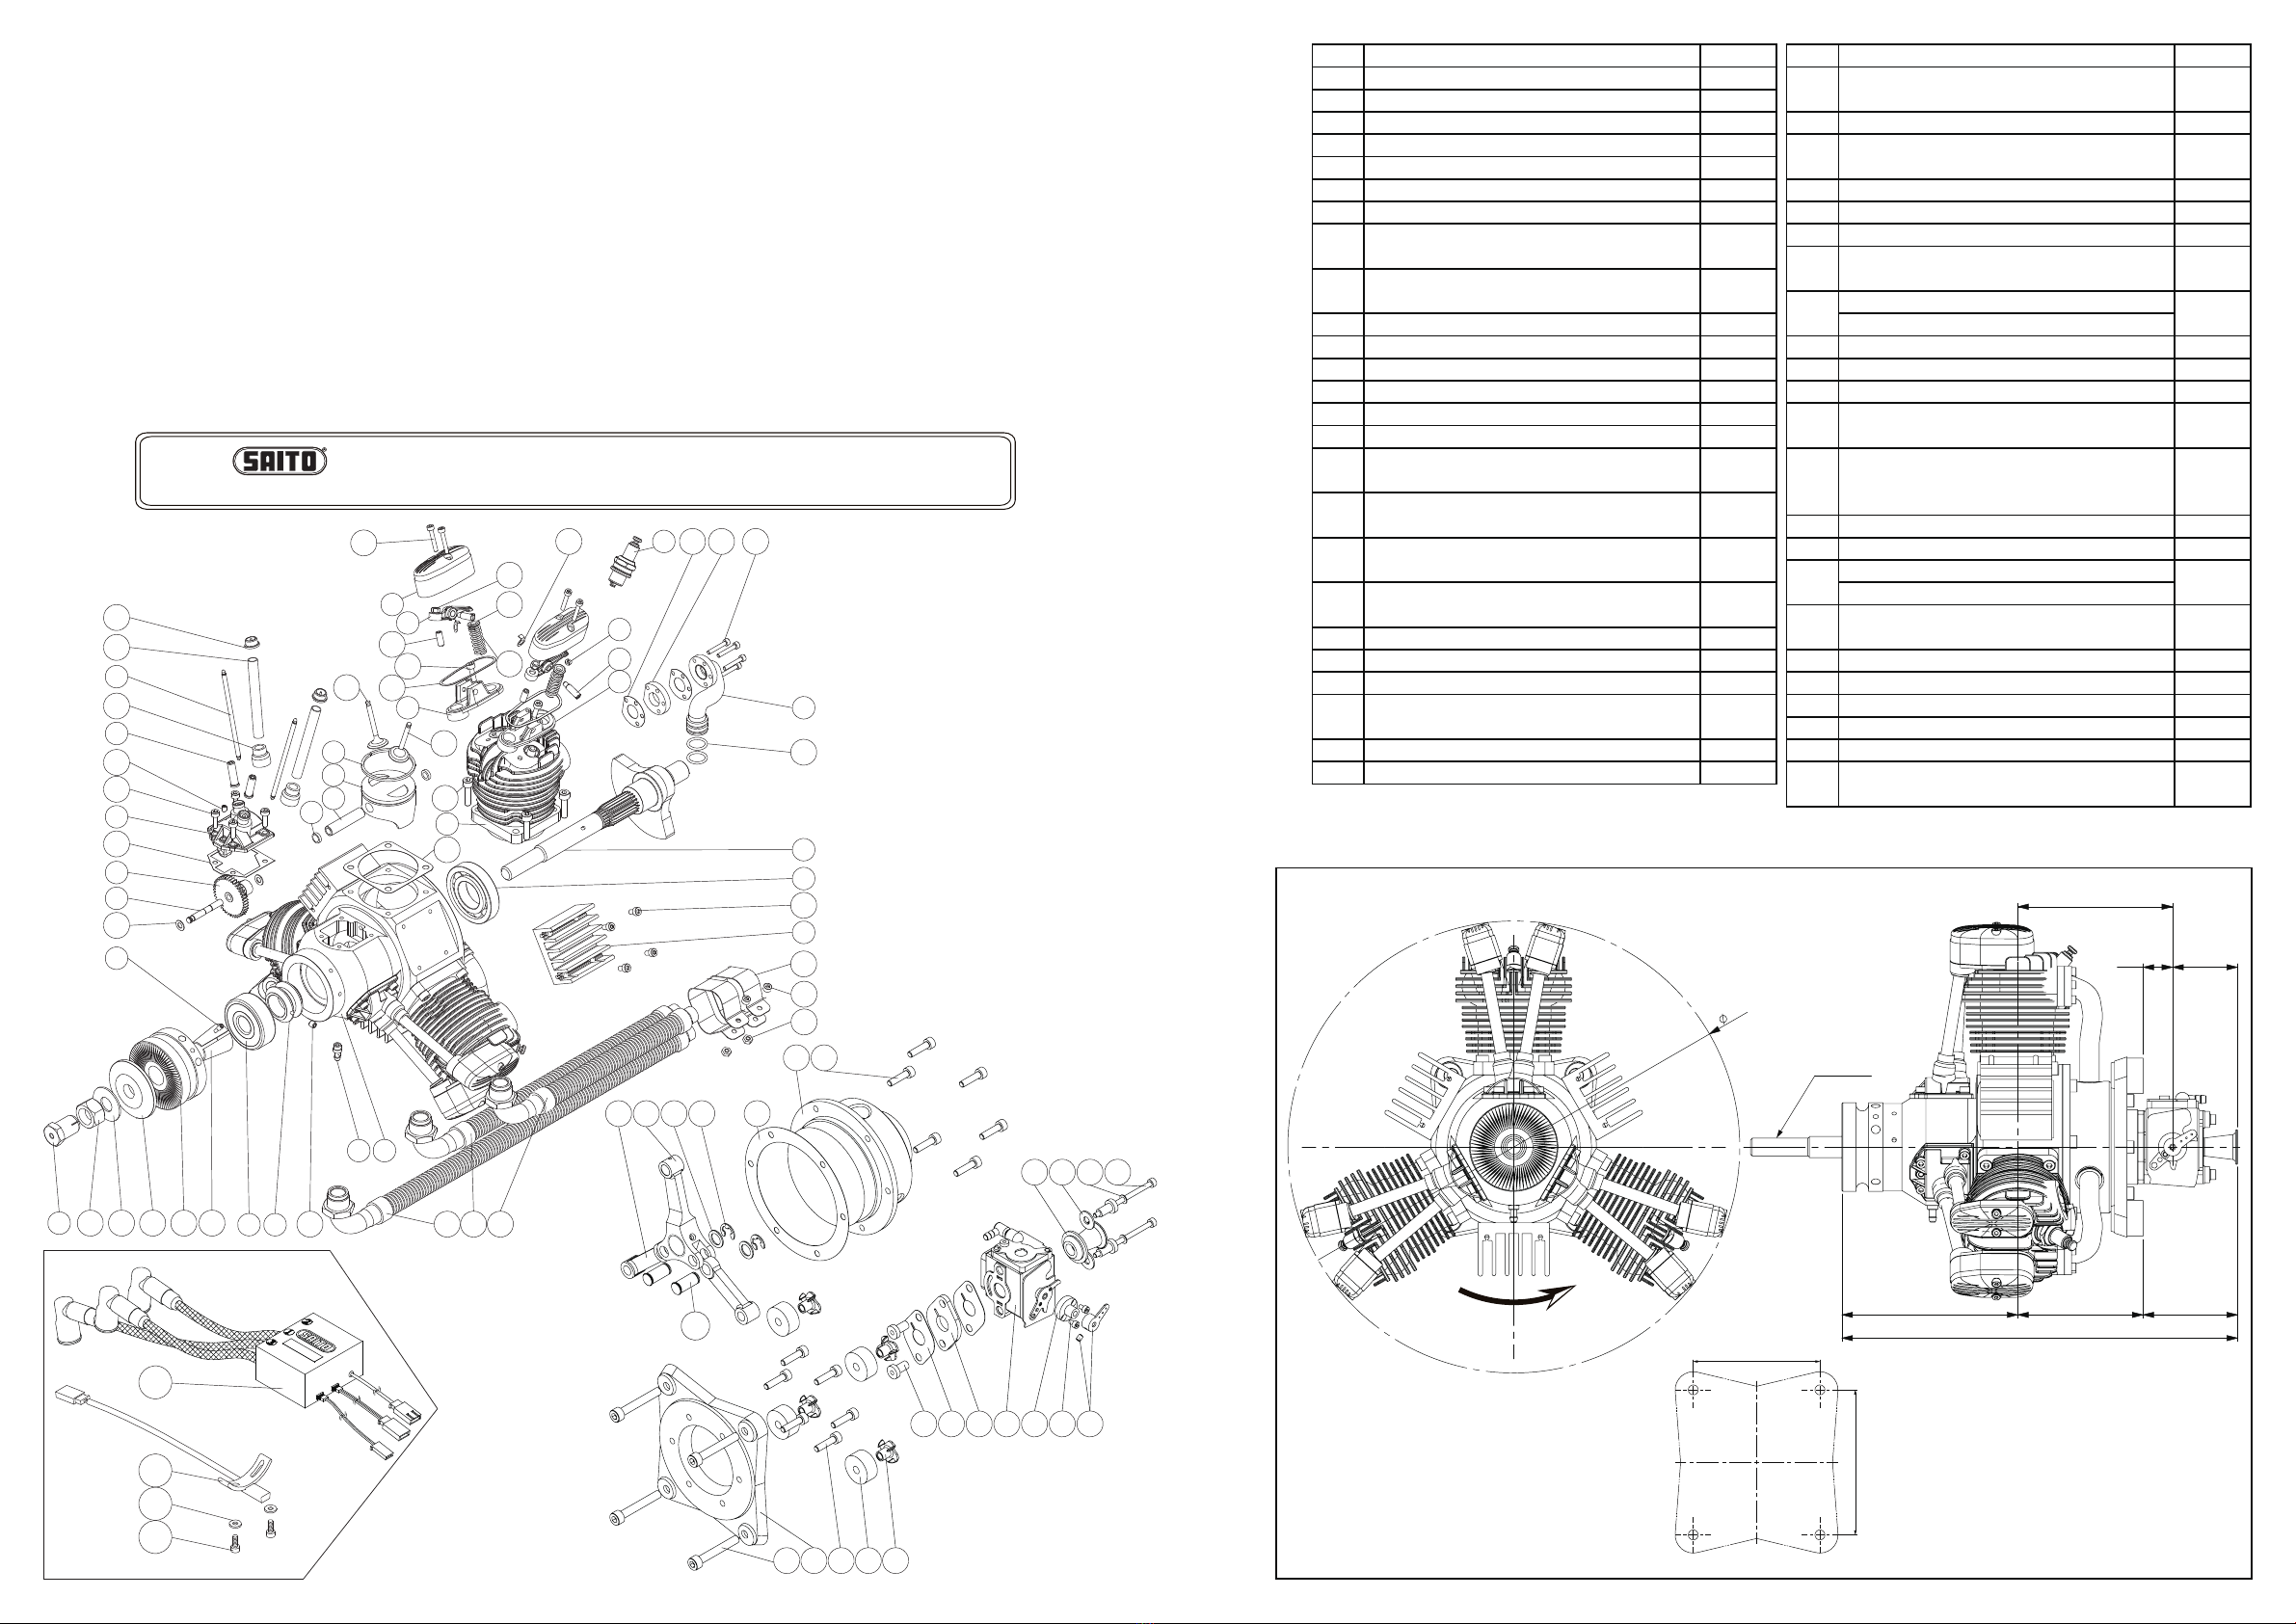
Φ37.2mm 27.6mm 89.99cc
D24”~25”xP10”xP12”
Bore
Mainbody:3,161g/Muffler:157g/Ignition:250g
Stroke Disp.
Weight(Approx.) RPMRange Approx.1,300-7,000rpm Maxonground Approx.6,000-6,500rpm
Propeller CM-6Plug
Optionalparts
Gasoline60-70㏄classApplications
Batteryforignitionsystem Voltage:6-8.4V,greaterthan1,000mA
・Limitgauge(0.1t)fortappetadjustment 1pc ・Spannerfortappetadjustinglocknut 1pc ・Carburetoradjustmentbar 1pc
・Sparkplug[CM-6](Attachedtotheengine) 3pcs ・Mufflerset   1set ・Chokebar  1pc
・Ignitionsystem(w/sensor)  1set ・Mufflerbracket   1set ・Plugwrench  1pc
・Standoffmount   1set ・Anti-looseningnut   1pc ・Hexagonalwrench  1set
Specifications
FG-90R3InstructionManual
2.Ignition
●Ignitionarrangement-Placethemainunitasfarfromotherelectrical
devicesaspossible.
(1)Plugcord(meshedhightensioncord)
Inserttheplugcapof(1)Plugcorddeeplyintotheplugof#1cylinder
tomakesureitwillnotcomeoff.Theothercapsandplugsshouldbe
installedbythesameway.(Refertocylinder#onthereverseside)
(2)Sensorcord
Connectwiththecordfromthesensorattachedtotheengine.
(3)Batterycord(black/redcord)
Useafullychargedbatterythathasadequatespec.(6-8.4V,morethan
1000mAisrecommended.).Betweenthebatteryandmainunit,make
suretosetaheavydutyswitchwhosecapacityishigherthan3A.
(4)Tachometercord
Connectthedigitaltachometer(Option).Otherwisetheconnectorisnormallyvacant.
ForCCW
Makerich Main
needle
ForCW
Open
Throttle
lever
Standard
accessories
FuelTank FuelLevel
ToOutsideoftheplane
Ventline
fuelsupplytocarburetor
Fuelfillerline
Ventline
Gasoline-compatible
tankstopper
Gasoline-compatibletubing
Filterwithweight
Setthecenterofthecarb
slightlyabovethefuellevel
Closeaspossible
Firewall
Standoffasrequired
Hollowoutreferringto
thecuttingsheet
PlugCap
SwitchCapacity:3A〜
Sensor
(2)Sensorcord
Battery
Voltage:6-8.4V
Capacity:1,000mA〜:
(
1)PlugCord MainUnit
(3)BatteryCord
(4)TachometerCord
7.Tappetadjustment
Thevalveclearanceshouldbecheckedandadjustedafterbreak-inandeverytimeaftertwohourswhiletheengineiscold.Beforeadjusting
tappetgaps,tightenthescrewsaroundcylindersetc.
1.Removethesparkplugand
rockerarmcoversof#1
cylinder.Thenturntheprop
CCWbyhandtoplacethe
pistonatTDCofcompres-
sionstroke.
2.Loosenthelocknutand
adjustthegapbyhexago-
nalwrenchuntilyouget
thecorrectgap(belowpic)
forbothofintake&
exhaust.
3.Oncethegapisset,tighten
thelocknutandattachthe
plugandcovers.Dothesame
adjustmentforthe#3-#2
cylindersinorder.
4.Turnthepropbyhandtocheckif
thecompressionisenough.Ifthe
gapislessthan0,thevalveis
alwaysopenedsightlyandlose
compression.Thenadjustagain.
CorrectGap
Mustnotbeinserted
Closeto“0”withnolimit
Limitgauge
(0.1mm)
Loosenthelocknut
Adjustthegapturning
thesetscrew
TopDeadCenter
(Thestatebothvalvesareclosed) Tightenthelocknut
tofixthesetscrew
Slowneedle
CCW
Rich
CW
Lean
Mainneedle
Throttle
lever
1.Fuel
●Thefuelismixtureofregulargasolineandhigh-quality2-strokeengineoil.
●[Exampleofoilrecommendation]
 ・KlotzKL-200OriginalTechniplate・DeluxeMaterialsPowerModel2T-Setc.
●Besuretousethemixture“gasoline:oil=15~20:1”byvolumeratio.(Ex.1000mlofgasolineshouldbemixedwithmorethan50mlofoil).
●Duringthebreak-inprocess,use15:1mixedfueltoensurethebestlubricationforinitialrunning.
●Anydamagecausedbythefuelused,inwhichtheoilratioislowerthan20:1willnotbecoveredbywarranty.
●Donotusegasolinecontainingethanol.Itmaycausenotonlypowerlossbutalsocorrosioninsidetheengine.
ver.Aug,2018
6.Adjustmentofcarburetorafterinitialbreak-in.
◇Needlereferenceposition(Setafterinitialbreak-in)
●Starttheengineafteradjustingtheneedletothefollowingreferencevalue.
●Mainneedle:Approx.2.5~3turnsCCWfromfullyclosed
●Slowneedle:Approx.4+1/2~5turnsCCWfromfullyclosed(Thenthrottleshouldbefullyclosed)
●Actually,thebestpositionoftheneedlesvarydependingontheprop,temperature,humidityand
soon.Pleaseadjustasnecessaryafterobservingtheengineperformanceduringflight.
◇Peakadjustment
●Afterstartingtheengine,warmupforapprox.30secondsatlowspeed.
●Achievethepeakatfullthrottle.
→TurnthemainneedleCWgraduallytothepositionwheretheRPMisgreatest(thepeak).ContinuingtoturntheneedleCWpastthepeak
couldleadtoseizuresoturnitslowlyandcarefully.IftheRPMsuddenlydecreasesafterpassingthepeak,instantlyturnthemainneedle
CCWtoagainincreasetheRPM.Otherwiseitcoulddamagetheengineseriously.
●OnceachievingpeakRPM,returnthethrottletolowspeed.Makeanoteofthepositionofmainneedleatthepeakatthattime.(How
manyturnsyoudidCWbasedonthereferencevalue.)
◇SlowneedleAdjustment
●AfterachievingpeakRPM,nextisslowneedleadjustment.OpenthethrottlefromlowRPMtofullthrottlequickly.
●TurntheslowneedleCCWslightlyiftheenginehesitatesforamomentorstallsbeforetheenginereachesmaxRPMbecausethemixture
istoolean.
●TurntheslowneedleCWslightlyiftheengineisslowtoreachpeakRPM(fullthrottleset)becausethemixtureistoorich.
●AdjusttheslowneedleasaboveuntiltheRPMfollowsthethrottlemovementsmoothly.Theimportantpointistoadjusttheslowneedle
AFTERthemainneedlehasbeenadjustedtoitspeak.
●Nowbreak-inatgroundlevelisdone.Adjusttappetsbythemethoddescribedlater.
◇Pre-flight/Flightadjustment
●Whentheslowneedleadjustmentisdone,checktheresponsebyrevvingupfromlowspeedtofullthrottlequicklyseveraltimes.
●OpenthethrottlefullyandturnthemainneedleCCWapprox.60〜90degreesfromthepeakposition.Thisistomakethefuelmixture
richerintheairwheretheRPMgethigherthanontheground.
●Afteralladjustmentsaremade,flyyouraircraftandfinetunetheengineaccordingtothesituation.Basicallytuningshouldbedonewith
themainneedle.Readjustmentoftheslowneedleisrarelyneededifthefirstadjustmentoftheslowneedlehasbeendonesuccessfully.
・Filterwithweight[G36-154] ・DurabletubeforGasoline(1m)[G36-155]
・Aluminumspinnernut[57T-30] ・Tappetadjustingkit[120S-161]・Digitaltachometer[G17-167]
3.Propeller
●RecommendedpropellerisMejzlik24x12.
●Useawell-balancedone.Neverusethepropellerthathasbeenscratchedordamagedevenifslightly.
●Asthepropelleriscompressedslightly,tightenthe6boltseveryhourofoperation.
4.Methodofchoke(Noneedwhenyouusestarter)
※Chokingisthemeansbywhichfuelisfedtotheenginewhenyoustartitby
handflipping.Thusitisunnecessarywhenusingstarter.Startingwithaelectric
starterisrecommendedforsafety.
●Inadvance,makeathinholeinthecowlingtoinsertthechokebar/slowneedle
adjustmentbar.
●Duringchoking,besuretoturnofftheignitionswitch.
●Asshowninthefig,passthechokebar(withM3.5threadonitstip)throughthe
holeinthecowling.ThenturnthebartoinsertintotheM3.5internalthreadat
thecenterofthethrottlelever.
●Fullyclosethethrottleandpullthechokebarandfixitwithacliporclampas
showninthefigsothatitmaynotgobacktothepreviousposition.
Cowling
Chokebarforinsert
M3.5screw
Throttlelever
Throttlevalve
(Movetotheleft)
Slowneedle
Chokebar
Temporaryfixed
byaclip
No. Item Qty No. Item Qty
01 Cylinder 3 Pushrodcover&Rubberseal
06 Piston 3 40-1,-2,-3
07 Pistonpin 3 41 Rockerarm 6
08 Pistonpinretainer 6 Rockerarmscrew&Nut
09 Pistonring 3 42-1,-2
10 Masterrod 1 43 Rockerarmpin 6
11 Linkedconrod 2 44 RockerarmbracketL 3
Conrodlinkpin&E-ring 45 RockerarmbracketR 3
12-1L,-2,-3 Valve(In&Ex)
Cylinderscrewset 46-1,-2
14-1,-2,-3,-4 Valvespring&Keeper&Retainer
15 Crankcase 1 47-1,-2,48
17 RearcoverA(Intakemanifold) 1 48 Valveretainer(Cotter) 6
19 Breathernipple 1 49 Rockerarmcover 6
20 Frontballbearing 1 69 Intakepipe 3
22 Rearballbearing 1 Flexibleexhaustpipe
23 Crankshaft 1 78-1,-2,-3
Tapercollet&Driveflange Carburetorcomplete
27-1,-2 82-1-1,-1-2,-1-3,-1-4,-1-5,-1-6
Propwasher&Nut -1-7,-1-8,-1-9
28-1,-2,-3 88 Throttlelever 1
Crankcasescrewset 93 Airfunnel 1
31-1,-2,-3,-5,-6,-7 Enginemountset
Enginegasketset 95-1,-2,-3,-4
32-1,-2,-3,-4,-5,-8,-9 Mufflerbracketset
33 Camgearhousing 3 99-1,-5,-7
35 Camgear 3 110 Antilooseningnut 1
36 Camgearshaft 3 120 Sparkplug(NGKCM-6) 3
Steelwasherset 128 Heatsink 3
37-1,-2 129 Lubricationadopter 1
38 Tappet 6 152 Screw-pin 1
39 Pushrod 6 Electronicignitionsystem
153-1,-2,-3,-4
37 1set
153 1set
31 1set
95 1set
32 1set
99 2set
78 3
27 1set 82-1 1set
28 1set
42 1set
12 2ea.
46 3ea.
14 1set
47 1set
40 1set
250
100 70 52
222
86
16 36
70
80
M10x1.25
Rotationdirection
回転方向
#1
#3
#2
CylinderIDNumber(Viewfromfront)
シリンダ番号(前方向より見て)
Dimensions
外形寸法図
38
39
14-4
31-5
32-8
48
152
44
40-2
36
78-1 78-3
07
40-1
06
09
08
32-2
14-3
42-1
43
47-1
14-2
47-2
45
14-1
37-2 32-9
41
42-2
32-5
110
23
31-6
22
32-4
69
120
01
40-3
19
31-7
129
15
27-2 20
33
28-2 28-3 28-1 27-1
49
99-1
99-5
99-7
35
37-1 128
32-1
31-3
78-2
46-2
46-1
153
-2
153
-4
153
-3
153
-1
1011 12-3 12-2 32-3
17 31-1
12-1L
82-1
-6
82-1
-4
82-1
-5
82-1
-1
82-1
-2
82-1
-3
88
93
82-1
-8
82-1
-7
82-1
-9
95-3 95-1 31-2 95-2 95-4
SAITOSEISAKUSHO,CO.,LTD.www.saito-mfg.com
22-7,3-chome,Tokagi,Ichikawa-shi,Chibaprefecture272-0024,JapanPhone:047-378-4156FAX:047-378-4155
Allspecificationsandmodelsaresubjecttochangewithoutnotice.
Note:
●Asitusesoil-mixedfuel,theplanemaysometimesgetdirtyfromtheexhaust.
●Useareliableandwell-balancedprop.Otherwiseitmaycauseanabnormalvibrationandcouldresultinaseriousaccident.
●Duringoperation,allenginescrewscanloosenduetometalheatexpansion.Checkandtightenoccasionally.
●Whentheexhaustvalvegetsdullbycarbonorsludgeespeciallyincoldatmosphere,removetherockercoverandapplysomeanti-rust
spraytotheexhaustvalvetohelpthevalvetomovesmoothly.
●Payattentiontothesurroundingssoasnottodisturbothersbynoiseandexhaust.
●Alwayskeepspectatorsstandbehindtheenginewhenoperatingtheengine.
●Asexhaustsmokeisharmful,becarefulnottobreatheinorotherwiseexposeyourselftoitsharmfuleffects.
●Payattentionnottotouchtherotatingpropellerwhenstartingengine,andmovetorearsideoftheaircraftoncetheengineisstarted.
●Allresponsibilitiesfortheuseoftheengine,andotherobligationsandresponsibilitiesbasedonlaws,regulations,etc.arebornebythe
purchaserandtheuser,andSAITOSEISAKUSHOCO.,LTD.isexemptfromanyresponsibilities.
Warranty:
●Ifthereisanydeficiencyfromthefactoryconcerningmanufacture,pleaseconsultwiththeshopordistributoryouboughtfrom.Our
companywillberesponsibleforrepair.However,anyfailureortroublecausedbyunnecessarydisassembly,modification,orotheruses
thanthoseprovidedintheinstructionmanualisnotsubjecttowarranty.
●Ignitionsystemissubjecttothewarrantyonlyforinitialfailure.Oncethesystemhasbeenactivatedsuccessfully,itwillnolongerbesubject
towarranty.

Other Saito Engine manuals

Saito FA-30S(H) User manual

Saito

Saito FA-30S(H) User manual

Saito FG-57T User manual

Saito

Saito FG-57T User manual

Saito FA-120 Special User manual

Saito

Saito FA-120 Special User manual

Saito FG-61TS User manual

Saito

Saito FG-61TS User manual

Saito FG-11 User manual

Saito

Saito FG-11 User manual

Saito FA-30S(H) User manual

Saito

Saito FA-30S(H) User manual

Saito FG-14C User manual

Saito

Saito FG-14C User manual

Saito FG-11 User manual

Saito

Saito FG-11 User manual

Saito FG-19R3 User manual

Saito

Saito FG-19R3 User manual

Saito FA-90R3 User manual

Saito

Saito FA-90R3 User manual

Saito FG-40 User manual

Saito

Saito FG-40 User manual

Saito FA-30S Golden Knight User manual

Saito

Saito FA-30S Golden Knight User manual

Saito FA-90R3 User manual

Saito

Saito FA-90R3 User manual

Saito FG-40 User manual

Saito

Saito FG-40 User manual

Saito FA-170R3-D User manual

Saito

Saito FA-170R3-D User manual

Saito FG-60R3 User manual

Saito

Saito FG-60R3 User manual

Saito FA-30S (H) User manual

Saito

Saito FA-30S (H) User manual

Saito FA-60T User manual

Saito

Saito FA-60T User manual

Saito FA-170R3 User manual

Saito

Saito FA-170R3 User manual

Saito FA-120R3 Firmware update

Saito

Saito FA-120R3 Firmware update

Saito FG-60R3 User manual

Saito

Saito FG-60R3 User manual

Saito FA-60T User manual

Saito

Saito FA-60T User manual

Saito FG-73R5 User manual

Saito

Saito FG-73R5 User manual

Saito FG-57TS User manual

Saito

Saito FG-57TS User manual

Popular Engine manuals by other brands

Iveco N60 ENT M37 Installation directive

Iveco

Iveco N60 ENT M37 Installation directive

Wren Turbines 75 manual

Wren Turbines

Wren Turbines 75 manual

Solo 2350 D manual

Solo

Solo 2350 D manual

Detroit Diesel 60 EGR Series Technician manual

Detroit Diesel

Detroit Diesel 60 EGR Series Technician manual

Kohler K361 owner's manual

Kohler

Kohler K361 owner's manual

Leroy-Somer X2 Installation and Maintenance

Leroy-Somer

Leroy-Somer X2 Installation and Maintenance

Doosan G643E Service manual

Doosan

Doosan G643E Service manual

Goodwe GW60K-MT introduction

Goodwe

Goodwe GW60K-MT introduction

Kohler Lombardini LDW 1003 user manual

Kohler

Kohler Lombardini LDW 1003 user manual

Stiga K 1250 ADV Operator's manual

Stiga

Stiga K 1250 ADV Operator's manual

Booma-RC DLE222 user manual

Booma-RC

Booma-RC DLE222 user manual

Briggs & Stratton VANGUARD 810 EFI Repair manual

Briggs & Stratton

Briggs & Stratton VANGUARD 810 EFI Repair manual

brel-motors BR35 installation manual

brel-motors

brel-motors BR35 installation manual

Briggs & Stratton 20E200 Series Illustrated parts list

Briggs & Stratton

Briggs & Stratton 20E200 Series Illustrated parts list

Seeed Grove - Servo Series quick guide

Seeed

Seeed Grove - Servo Series quick guide

Ventus BOW7512D Operation manual and installation instructions

Ventus

Ventus BOW7512D Operation manual and installation instructions

Briggs & Stratton 21A900 Series Illustrated parts list

Briggs & Stratton

Briggs & Stratton 21A900 Series Illustrated parts list

Rotax 912 ULS 3 Operator's manual

Rotax

Rotax 912 ULS 3 Operator's manual

manuals.online logo
manuals.online logoBrands
  • About & Mission
  • Contact us
  • Privacy Policy
  • Terms and Conditions

Copyright 2025 Manuals.Online. All Rights Reserved.