manuals.online logo
Brands
  1. Home
  2. •
  3. Brands
  4. •
  5. Salus
  6. •
  7. Thermostat
  8. •
  9. Salus Optima S User manual

Salus Optima S User manual

Other manuals for Optima S

3

Other Salus Thermostat manuals

Salus RT510RF Service manual

Salus

Salus RT510RF Service manual

Salus FC600 User manual

Salus

Salus FC600 User manual

Salus RT520 User manual

Salus

Salus RT520 User manual

Salus FT100 Owner's manual

Salus

Salus FT100 Owner's manual

Salus AHTR5024 User guide

Salus

Salus AHTR5024 User guide

Salus TH-3 User manual

Salus

Salus TH-3 User manual

Salus Quantum SQ610 User manual

Salus

Salus Quantum SQ610 User manual

Salus VS35W User manual

Salus

Salus VS35W User manual

Salus WBRT520TX User manual

Salus

Salus WBRT520TX User manual

Salus RT500ROF User manual

Salus

Salus RT500ROF User manual

Salus RT200 User manual

Salus

Salus RT200 User manual

Salus ST621TX User manual

Salus

Salus ST621TX User manual

Salus QUANTUM SQ610RF User manual

Salus

Salus QUANTUM SQ610RF User manual

Salus Quantum SQ610 User manual

Salus

Salus Quantum SQ610 User manual

Salus FC600 User manual

Salus

Salus FC600 User manual

Salus VS10WRF User manual

Salus

Salus VS10WRF User manual

Salus RT200 User manual

Salus

Salus RT200 User manual

Salus RT310SR User manual

Salus

Salus RT310SR User manual

Salus 091FLRF User manual

Salus

Salus 091FLRF User manual

Salus iT500 User manual

Salus

Salus iT500 User manual

Salus AWRT10RF User manual

Salus

Salus AWRT10RF User manual

Salus ERT20RF User manual

Salus

Salus ERT20RF User manual

Salus ERT30 User manual

Salus

Salus ERT30 User manual

Salus 091FLRF User manual

Salus

Salus 091FLRF User manual

Popular Thermostat manuals by other brands

Full Gauge TIC-17C product manual

Full Gauge

Full Gauge TIC-17C product manual

Imit Chronomix S manual

Imit

Imit Chronomix S manual

ChiliTec ST-35 ana instruction manual

ChiliTec

ChiliTec ST-35 ana instruction manual

Azel D-500 user guide

Azel

Azel D-500 user guide

Honeywell Chronotherm III owner's manual

Honeywell

Honeywell Chronotherm III owner's manual

Charmeg MP-R user manual

Charmeg

Charmeg MP-R user manual

dixell WING XW40LS Installing and operating instructions

dixell

dixell WING XW40LS Installing and operating instructions

Network Thermostat NetX X7C-WIFI Installation and programming manual

Network Thermostat

Network Thermostat NetX X7C-WIFI Installation and programming manual

Radio Thermostat CT80 Operation guide

Radio Thermostat

Radio Thermostat CT80 Operation guide

HAI Omnistat RC-120 installation manual

HAI

HAI Omnistat RC-120 installation manual

Lennox iComfort E30 Installation and setup guide

Lennox

Lennox iComfort E30 Installation and setup guide

Lux Products PSD011Ba Installation and operating instructions

Lux Products

Lux Products PSD011Ba Installation and operating instructions

Computherm Q20 operating instructions

Computherm

Computherm Q20 operating instructions

Heatmiser neoStat user manual

Heatmiser

Heatmiser neoStat user manual

Mars HEAT CONTROLLER IR Wireless Thermostat user manual

Mars

Mars HEAT CONTROLLER IR Wireless Thermostat user manual

LUX LP0511D user manual

LUX

LUX LP0511D user manual

Saswell SAS920XWHB-7-S-RF User manual and warranty card

Saswell

Saswell SAS920XWHB-7-S-RF User manual and warranty card

Aircalo TFP1-ET85P2 operating manual

Aircalo

Aircalo TFP1-ET85P2 operating manual

manuals.online logo
manuals.online logoBrands
  • About & Mission
  • Contact us
  • Privacy Policy
  • Terms and Conditions

Copyright 2025 Manuals.Online. All Rights Reserved.

OPTIMA'S'THERMOSTAT'
SETUP'GUIDE
SALUS%North%America,%Inc.%
850%Main%Street%
Redwood%City,%CA%94063%
www.salusinc.com%
!
STEP%1%
TURN%OFF%POWER%TO%THE%HVAC%SYSTEM%
%
STEP%2%
DETERMINE%WIRING%CONFIGURATION%
%%%%or%
%
!
Use%the%Wire%Labels%and%the%following%table%to%keep%track%of%wire%colors%
on%the%old%thermostat%or%on%the%heat%pump%/%furnace%/%air%conditioner.%
HP!
NON-HP!
Wire!Color!
R%
R%or%RH%
%
---%
RC%
%
C%
%
Y%or%Y1%
%
Y2%
%
AUX%
W%or%W1%
%
O/B%
W2%
%
G%
%
L%
---%
%
For% new% installations,% refer% to% Appendix% A% and% the% “Install% Mounting%
Plate”%sections%of%the%Optima'S'User'Manual.%
STEP%3%
REMOVE%OLD%THERMOSTAT%
%
STEP%4%
INSTALL%MOUNTING%PLATE%
Remove% the% old% thermostat% from% the% wall,% taking% care% not% to%
allow%the%wiring%to%fall%inside%the%wall.%
%
%
%
If%there%is%space%on%the%wall%that%needs%to%be%covered,%insert%the%Wall%
Plate%between%the%Mounting%Plate%and%the%wall,%and%mount%both%plates%
using%the%same%screws.%
Make%sure%the%wires%run%through%the%center%opening.%
%%%or %%
IN%THE%BOX%YOU%WILL%FIND%THE%FOLLOWING:%
%
%
%
%
%
%
%
Thermostat%with%
Mounting%Plate%
Wall%
Plate%
2%x%Wood%Screws%
2%x%Wall%Anchors%
2%x%Locking%Pins%
Wire%
Labels%
2%x%AA%
Alkaline%
Batteries%
User%
Manual%
Setup%Guide%
YOU%WILL%NEED%THE%FOLLOWING%TOOLS:%
• #1%Phillips%or%flathead%screwdriver%
• Drill%with%3/16”%bit
(only%if%you%cannot%mount%the%thermostat%using%the%existing%
holes)%
Optional%Tools%
• Smartphone%or%digital%camera%to%take%picture%of%wiring%for%later%
reference%
• Screwdriver%to%disconnect%wires%from%old%thermostat%
• Pencil%
!
TIP:%Wrap%the%wire%
ends%around%a%long%
stick% (such% as% a%
pencil)%to% keep%the%
wires% from% falling%
into%the%wall.%
Version(1.6(
STEP%5%
ATTACH%WIRING%
%
STEP%6%
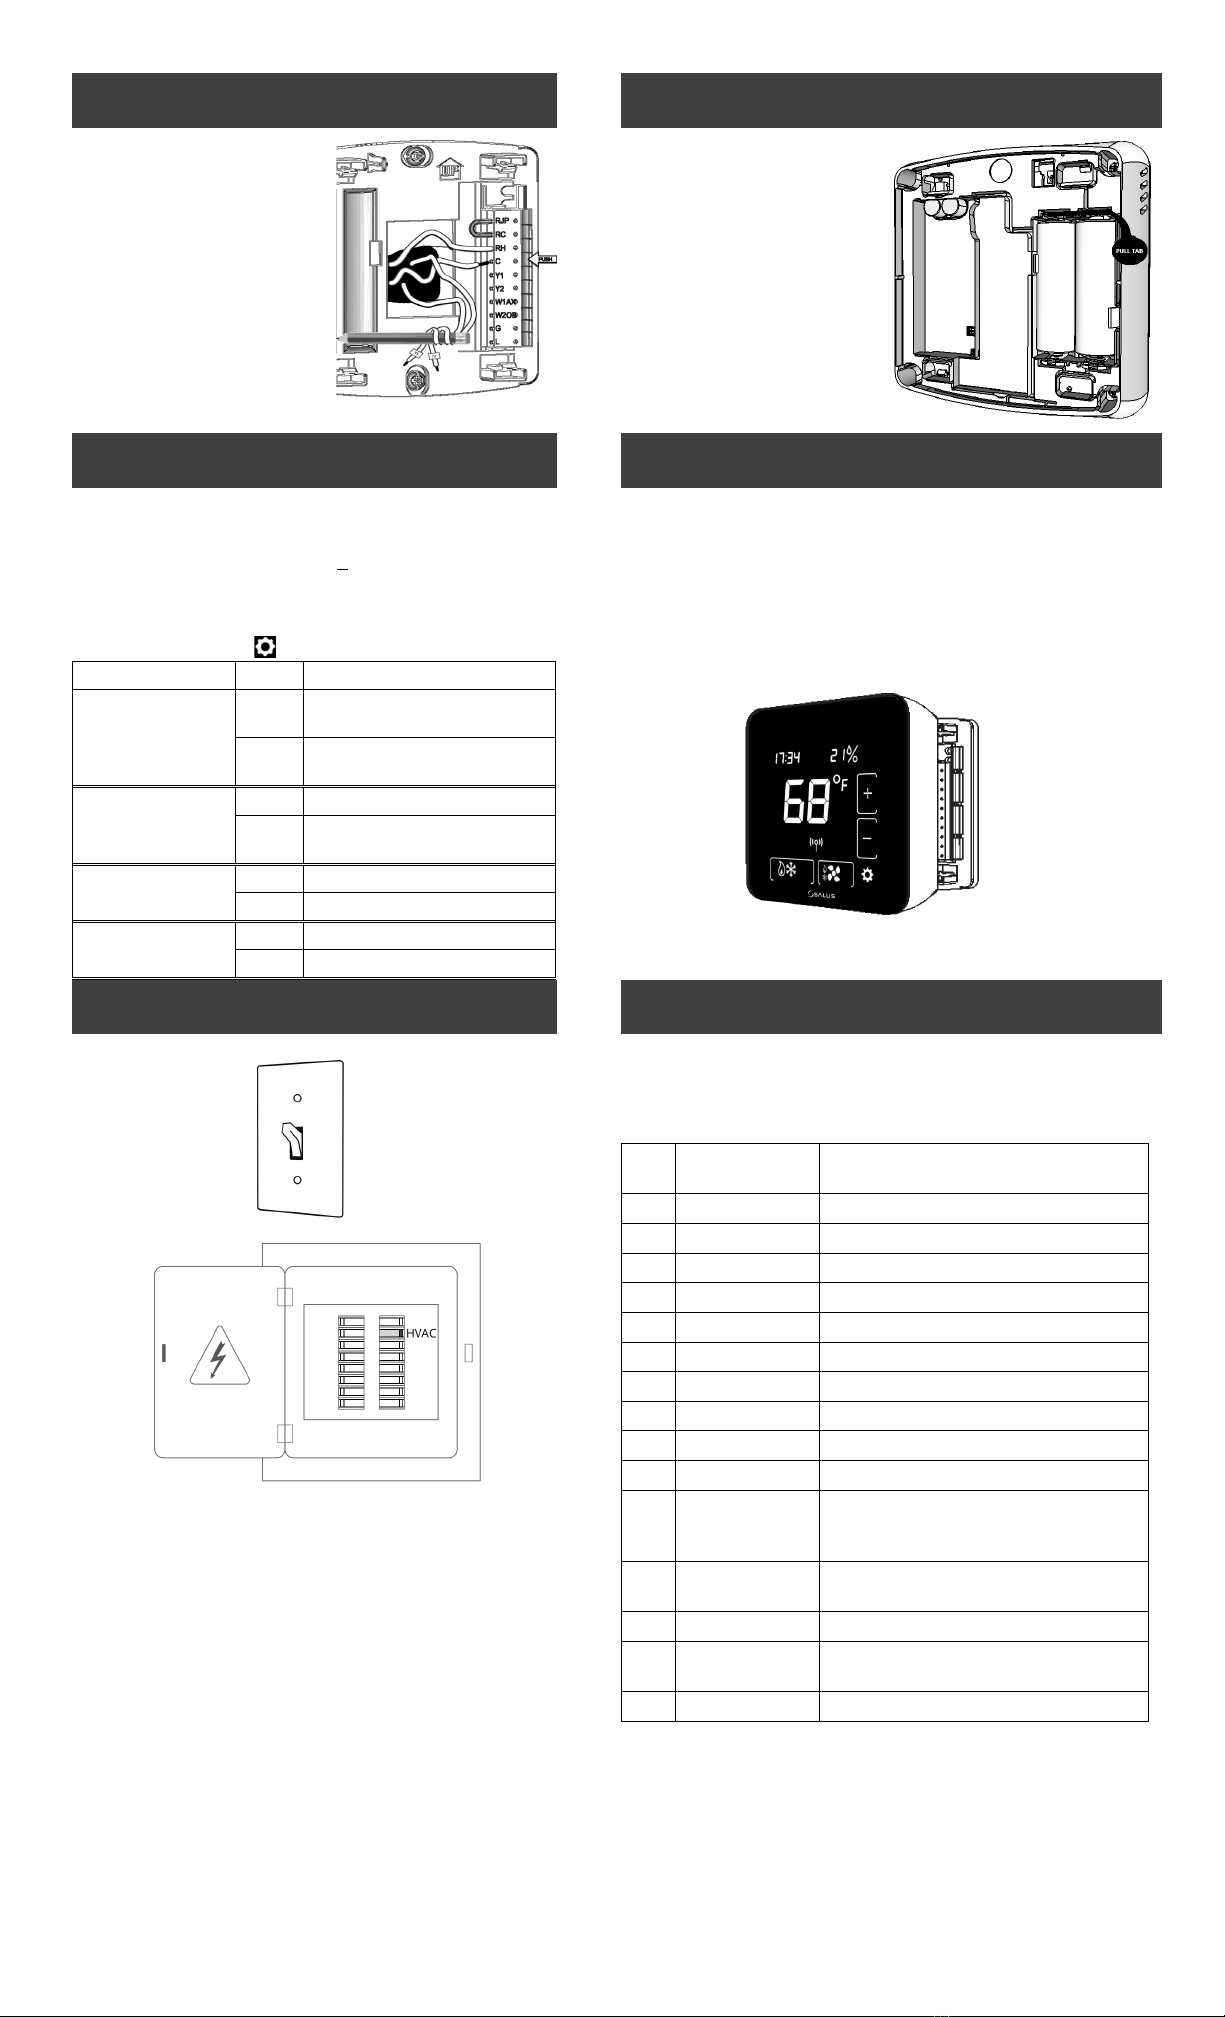
CONNECT%THE%BATTERIES%
• Using% the% labels,% match% the%
wires% to% the% appropriate%
terminal.%
• For% each% wire,% press% the%
terminal% button% and% fully%
insert%the%wire%into%the%side%
hole.%
• Release%the%terminal%button%
to%secure%the%wire.%
• If%you%have%RC%and%RH%wires,%
remove% the% jumper%
betweeen%RC%and%RJP.%
%
Pull% the% battery% tab% from% the%
back% of% the% thermostat% to%
activate%the%batteries.%
• If% the% C% wire% is% connected,%
the% thermostat%will% draw%
power% from% the% AC%
connection%and% use% the%
batteries%as%backup.%
• Battery-only% operation%
typically%lasts%18%months.%
STEP%7%
INITIAL%CONFIGURATION%
%
STEP%8%
ATTACH%THERMOSTAT%TO%MOUNTING%PLATE%
After%initial%power-up,%the%thermostat%will%attempt%to%pair%with%
a%network%for%10%minutes.%You!may!need!to!initiate!scanning!
for! devices! in! your! connected! home! system.%Once% paired,%
canceled%with%the%Down% button%(%X%),%or%timed%out,%the%device%
will%ask%for%the%following%initial%settings.%
Use% the% Up% (+)% or% Down% (–)% buttons% to% display%the% desired%
option,%and%Settings%(%%%%%%)%to%enter%that%option.%
Setting
Options
Description
Region
US
United States – Configures
thermostat for use in the US.
CA
Canada – Configures thermostat for
use in Canada
Equipment Type
HP
Heat Pump
NONHP
Non Heat Pump – Gas, electric, or
oil heat
If HP: Reversing Valve
O
Heat Pump with O reversing valve
B
Heat Pump with B reversing valve
If NONHP: Fan Control
FRNC
Furnace Control (Gas / Oil heat)
TSTAT
Thermostat Control (Electric heat)
!
%
After%the%initial%configuration,% the%home%screen%will% be%displayed%and%
the%thermostat%is%ready%to%be%attached%to%the%Mounting%Plate.%
Align%the%connector%pins%and%the%plastic%retention%posts,%then%push%the%
thermostat%onto%the%Mounting%Plate.%
Make%sure%the%connector%pins%are%not%bent%and%that%the%thermostat!is!
fully!seated%on%the%Mounting%Plate.%
STEP%9%
TURN%POWER%BACK%ON%TO%THE%HVAC%SYSTEM%
%
OPTIONAL%STEP%
CONFIGURE%THE%NEW%THERMOSTAT%
%%%%or%
%
Congratulations%on%installing%and%setting%up%your%new%Optima%S%
thermostat.%
%
As% you% use% the% thermostat,% and% there% are% features% you% would% like% to%
customize,%see%the%“Configuring%the%Thermostat”%section%in%the%Optima'
S'User'Manual%for%more%details.%
Settings%that%can%be%changed%include:%
Item
#
Item Name
Description
1
Temperature Units
Celsius or Fahrenheit
2
Brightness
Display brightness when active
3
Display Mode
Full or Simple display mode
4
Display On Time
Length of time the display stays on
5
Set Point Span
Accuracy of heat/cool set point
6
Frost Protect Point
Set point to call for heat regardless of mode.
7
Offset
Adjustment to temperature reading
8
Language
English, French or Spanish
9
Region
US or Canadian defaults
10
Equipment Type
Heat Pump or Conventional system
11
Fan Control /
Reversing Valve
Additional setting for Equipment Type:
Furnace or thermostat fan control /
O or B reversing valve
12
Clock Format*
12 or 24 hour display format
Only available when paired with a network
13
Identify
Initiate ZigBee IDENTIFY function for 10 minutes
14
Start Pairing
Deletes network settings and attempts to pair
with a network
15
Factory Default
Resets the thermostat to Factory settings
!
%