SATO SK-110TRH-B-EX User manual

Instruction Manual of
Digital Thermohygrometer Model SK-110TRH-B-EX
Read this manual thoroughly before use, and keep it for future reference.
Overview
With a sensor probe connected, this portable thermohygrometer can store
measured data and display them as dry and wet bulb temperatures, relative
humidity, and dew point temperature. Various optional probes are provided to
meet many applications.
Important Notices
Beware of Explosion
SK-110TRH-B is not explosion-proof. Never use it in an atmosphere containing
flammable gases.
Cautions
To use SK-110TRH-B properly, follow the instructions below.
Do not drop or give a shock to the device, as it is a sensitive instrument.
Do not disassemble or customize the device, or it may cause malfunctions.
Do not use the device under direct sunlight or aside a heat source, or it may
lead to a deformation or malfunction.
Do not use the device in an environment with electrical noise or near a device
to emit electromagnetic waves such as televisions or induction heaters. The
display may become unstable or the measurement error may increase.
Do not use the device in dusty, powdery, or salty air, or any other non-
standard atmosphere such as the air exposed to organic solvent, oil mist, or
corrosive gas.
Do not wet the device since it is not waterproof.
Do not use the device out of the declared operation ambient or ranges.

Do not forcibly pull, bend, bundle, heat, or put a heavy thing on the cable.
Otherwise, the cable may get damaged.
Do not touch the sensor element when installing or replacing a sensor filter.
Do not leave the device in a place like an automobile on a fine summer day,
or the extreme heat may damage it.
Do not wash or wipe the device with alcohol, thinner, or other organic solvents.
If the device becomes dirty, wipe it with a tightly-wrung towel that has been
dipped in warm water with neutral detergent.
Be aware of choking with a strap getting caught around the neck.
For repair or calibration, or if the device is broken before use, contact us or a
retailer from which you have purchased.
Disclaimer
We, Sato Keiryoki Mfg. Co., Ltd., have tested the device securely, however we
do not guarantee its operation in all possible situations. We are not responsible
for any damages caused directly or indirectly by use of the device.
What’s Inside
If you find any of the following items missing in the package, contact us or a
retailer from which you have purchased.
1 x Main unit of SK-110TRH-B
2 x AAA alkaline battery
1 x Neck strap
1 x This instruction manual
Names of Sections
Front:
Operation keys Display
Probe connector

Rear:
Display:
MAX = Maximum value
MIN = Minimum value
DP = Dew point
TW = Wet bulb temp.
No. = Recorded data number
FULL = Memory is full
Time clock indicates the current time unless the device is in viewer mode to
show the time when the data is recorded.
Operation Keys:
POWER: Turns on or off the power.
MODE: Confirms the value in a menu,
or turns into a next menu.
INFO: Shows property information.
OUT/: Clears out the recorded data,
or changes the value in a
menu.
MEM/: Records the displayed data during measurement, or navigates in a
menu.
Use this hook to mount on a wall
Strap hole
Battery lid
Low battery
sign
Auto power off is activated when this sign is shown
How to Use
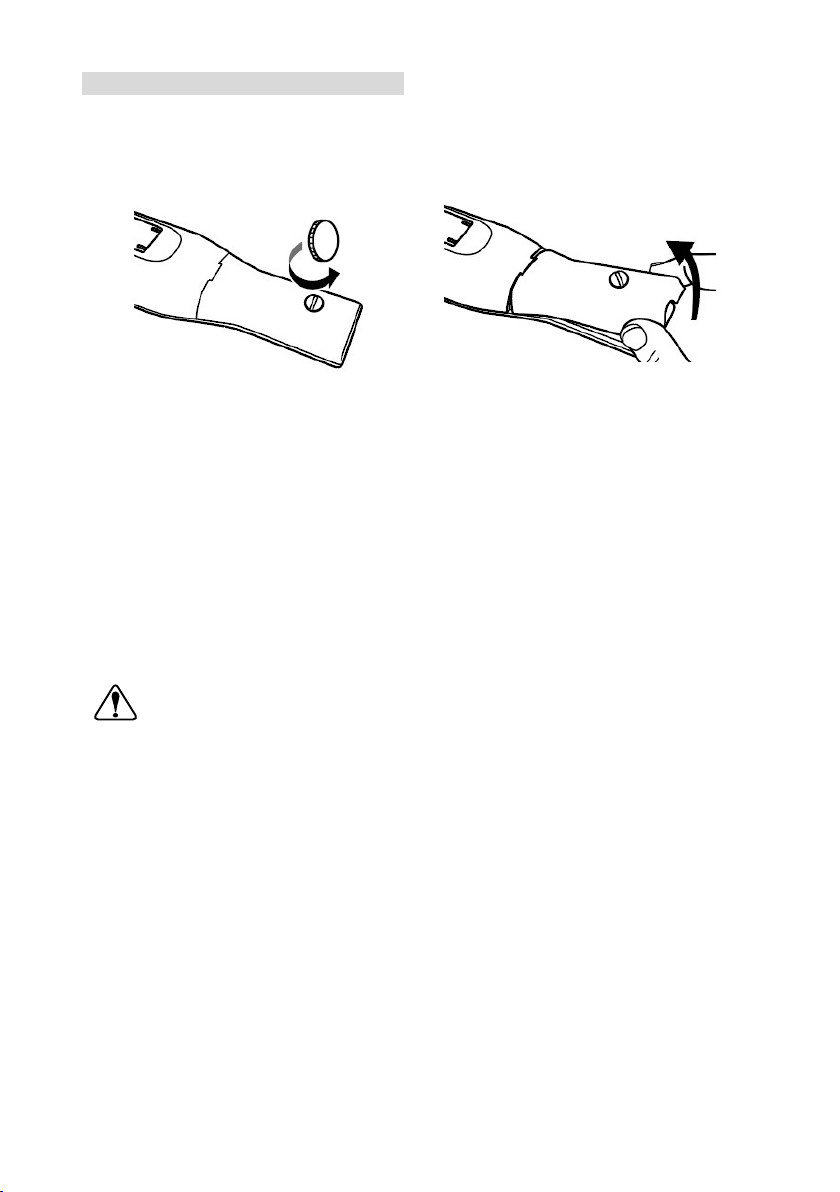
Replacement of Batteries:
To use the device for the first time, or when the low battery sign is displayed,
put new batteries as per described below.
1. Turn the battery lid screw anticlockwise to loosen it and remove the lid. Be
sure not to lose the packing seal on the groove. Note that the screw does
not drop from the lid.
2. Exchange the batteries according to the sign of polarity in the battery box.
3. Confirm that the packing seal is firmly put into the groove, then close the lid
and tighten the screw.
The device is designed to keep the time clock for 2 minutes without batteries.
However, check if the time is correct after replacing the batteries as it may
fail to keep it owing to static electricity or such.
Cautions Related to Batteries
Attach the battery lid firmly to the body with the packing seal put into the
groove so that no water intrudes inside the device, and secure the screw.
Otherwise, the device may result in malfunction, short-circuit, battery leakage,
extreme heat, or explosion.
Replacement batteries must be new and all the same type.
Remove the batteries if not used for a long period.
Do not dispose of batteries in a fire.
Keep batteries out of the reach of children. If they are swallowed accidentally,
consult a doctor immediately.
For environmental conservation purposes, dispose of batteries in compliance
with local rules and regulations.

Attachment of Neck Strap:
Run the thin string of the neck
strap through the strap hole,
and then pass the other side of
the strap through the ring of the
string so that the strap is fixed.
Remove the battery lid temporarily if it is difficult to install the strap.
Connection of Probe:
1. While the device is turned off, insert the connector part of the probe into the
probe connector on the main unit so that an arrow mark on the probe faces
frontward.
2. Turn the nut on the probe clockwise until the probe is fixed. Do not try to
turn other parts.
3. To disconnect the probe, switch off the power, then turn only the nut
anticlockwise and pull the probe straightforward.
Caution
Do not wet or forcibly pull the probe
when connecting or disconnecting it.
Hanging on Wall:
To mount the device on a wall, install a hook screw into the wall and put the
rear side of the device on it. Check if it does not fall carefully.
Measurement:
1. Turn on the device after the probe is connected.
2. Let the device adapt to the ambient atmosphere
well, then read the shown value. To display wet
bulb or due point temperature instead of humidity,
refer to Lower Row Display Switch in this manual.
3. Making idle time is advised if you measure extreme

high temperature after doing extreme low temperature, or vice versa. It also
applies when the temperature varies suddenly.
4. To record the value, press MEM key. Refer to Log Viewer to see the
recorded data. The memory gets full when 200 sets of data are stored.
5. Turn off the device after measurement.
Note that probes are consumables which deteriorate over time. A regular
recalibration and replacement are advised.
Menus and Modes
Below shows the flowchart of the key operations.
Power Off
Property Info. Display
Measurement Mode
Maximum Value Minimum Value
Humidity Wet Bulb Temp. Dew Point Temp.
Log Viewer
°C/°F Switch
Clearing Out of Data
Setting of Year Month Day Hour Minute
Menu Mode
INFO key
MODE key
MODE key
POWER key
key
MEM/ key to record data
INFO key
MODE
MODE
key
MODE
Lower Row Display Switch
MODE
MODE
Time Setting

Menu Mode
Pressing MODE key during measurement navigates to the menu mode. Within
this mode, press MODE key to go to a next menu, or press INFO key to return
to measurement. Keeping the device idle for 1 minute also leads to the
measurement mode.
(1) Maximum Value/Minimum Value:
Press MODE key once during measurement to show the maximum value after
the power is turned on or (2) Lower Row Display Switch is modified. Press
MEM/ key to show the minimum value.
These values can be reset by long press of MEM/ key while either value
is shown.
Maximum Minimum
(2) Lower Row Display Switch:
Press MODE key twice during measurement to open this menu. Then, press
MEM/ key to change the value to be displayed in the lower row from relative
humidity to wet bulb temperature or due point. Finally, press MODE key to
confirm the change and move to the next menu.
Note that the upper row is always for dry bulb temperature.
Relative humidity Wet bulb temp. Dew point

(3) Log Viewer:
Press MODE key for three times during measurement
to view recorded data with a serial number. Press
OUT/ or MEM/ key to browse the data
chronologically from No. 001. Long-press the same
keys to fast-feed the display.
(4) °C/°F Switch:
Press MODE key for four times during measurement to open this menu. Press
MEM/ key to select either Celsius or Fahrenheit, then press MODE key to
confirm it and exit the menu.
(5) Clearing Out of Data:
Press MODE key for five times during measurement to open this menu. Press
MEM/ key to navigate the display to “Yes”, then press OUT/ key to clear
out all data.
This process is essential if “FULL” is indicated in the bottom left, which
means 200 sets of data are already stored, and you wish to record another
datum.
(6) Time Setting:
Press MODE key for six times during measurement to set the current time.
Press OUT/ or MEM/ key to increment or decrement, then press MODE
key to fix each unit of time. When minute is determined, the clock restarts with
00 seconds.
Year Month Day Hour Minute

Property Information Display
Press INFO key during measurement to view some property information. Each
press of INFO key changes the displayed content in the following order.
Keeping the device idle for 1 minute leads to the measurement mode.
Serial No. Recalibrated month Current date Current time
YYMM YYYYMMdd HH:mm:ss
Recalibrated year and month are displayed only after recalibration is
performed by the manufacturer.
Auto Power Off
When auto power off is activated, idling for 60 minutes makes the device turned
off automatically to reduce the loss of battery. To enable it, long-press MEM
key and then long-press POWER key while holding MEM key when the power
is off. The device will be turned on with a sign shown in the upper left corner.
To disable auto power off, do the same key process while the power is off.

Preset Configuration:
Item Value
Recalibrated month (YYMM) - - - -
Time (YYYY.MM.dd HH:mm:ss)
2022.01.01 00:00:00
Recorded data no. 000
Lower Row Display Relative humidity
Temperature unit Celsius
Auto power off Disabled
Recalibrated month is recorded once the device is recalibrated by us.
Error Codes
Recording is unavailable when an error code except Hi or Lo is shown.
Code Definition Solution
Er Measured value is out of
range.
Use within the range.
Hi Measured value exceeds
the display range.
Lo Measured value is below
the display range.
Er0 An error occurs in the
internal IC.
Remove the batteries once, wait for
a while, and put them back to restart.
Exchange batteries if the above
measure does not solve the issue.
Er1 Abnormal signals have
come from the probe.
Turn the power off, confirm the
connection of the probe, and turn it
on again.
Er2 No probe is connected or
detected.
Confirm the connection and then turn
the power on.
If this code remains, the probe may
be in failure. Contact us or the
retailer.
Er6 MEM/ key is pressed
when the memory is full.
Clear out the logged data before
recording more.

Specifications
Product name Digital Thermohygrometer Model SK-110TRH-B-EX
Catalog no. 8138-00
Display range Depends on a probe connected
Refer to the manual attached to each probe.
Display accuracy ±0.2°C (0 to 40°C), ±0.3°C (other)
±0.2°%rh (0 to 40°C), ±0.3°C (other)
Total accuracy depends on a measuring accuracy of a
probe connected. Refer to the manual attached to each
probe.
Resolution 0.1°C
0.1%rh
Sampling rate Approx. 1 second
Display items Auto power off, recorded data number, time clock,
low battery sign, set values in each menu
Operating ambient −10 to 60°C, less than 80%rh without condensing
Storage ambient 10 to 60°C without condensing
Power 2 x AAA alkaline battery
Battery life Approx. 1000 hours
Attached batteries are for test purpose and may last
shorter.
Material PC resin
Dimensions 65 (W) x 168 (H) x 35 (D) mm
Except protrusion
Weight 159 g including batteries
Accessories 2 x AAA alkaline battery, 1 x neck strap
Wet bulb temperature and dew point are calculated from measured dry bulb
temperature and relative humidity.
Specifications and appearance are subject to change without notice.
Visit our website https://www.sksato.co.jp/en/ for the latest information.

Warranty Policy
Our products are warranted to be free from defects in materials and
workmanship for a period of one year from date of delivery. If repair is
necessary and has not been the result of misuse, force majeure, or
transportation arranged by yourself within the one-year period, please return
the products on freight prepaid basis. Correction of the defect will be made
without charges. We alone will determine if the product problem is due to
deviations or customer misuse.
Out-of-warranty products will be repaired for a fee.
Before returning, request for our acknowledgement first.
For details, contact us or a retailer from which you have purchased.
SATO KEIRYOKI MFG. CO., LTD.
3-4, Kanda-kajicho, Chiyoda-ku, Tokyo 101-0045, Japan
https://www.sksato.co.jp/en/
Ver. W.01
As of August 2023
Table of contents
Other SATO Measuring Instrument manuals


