SATO SK-640PH User manual

Instruction manual
for
No. 6422-00 Handy type pH meter
Model SK-640PH
No. 3 Nishi-Fukudacho, Kanda, Chiyodaku, Tokyo 101-0037 Japan
URL: http://www.sksato.co.jp/english/
N.11

11
Introduction
Thank you for purchasing the handy type pH meter Model SK-640PH.
- This product is designed to measure hydrogen ion concentration (pH) and temperature (liquid
temperature). Do not use this instrument for any other purposes.
- Read this instruction manual before using the SK-640PH and keep it in a safe place for future
references.
Important safety instructions
The SK-640PH is not explosion-proof. Never use it for flammable materials.
DANGER
RISK OF EXPLOSION
- Do not use the pH standard solutions for any purposes other than to calibrate pH meters.
The solutions are not for drinking. Never try to drink it. If accidentally ingested, consult a doctor
immediately.
- For any other inquiries, contact the store where you purchased the instrument or our service
network.
Caution
For proper use of the SK-640PH, be sure to observe the followings:
- This is a precision instrument. Be careful not to drop or knock it.
- The operating temperature range for this instrument is 0 to 50°C and a relative humidity of less than
80%. Operating this product outside the temperature range may result in unit malfunctions.
- Avoid using this unit in a place exposed to direct sunlight or near a heat source. Otherwise, the case
may become deformed or malfunction may be caused.
- If this instrument is left in a car in the hot summer sun, it will become extremely hot and may
malfunction. Do not leave the unit in such a place.
- If this unit is used in an environment where electrical noise is generated, the display may become
unstable or the measurement error may increase.
- Never disassemble or modify the unit. Doing so may cause malfunctions.
- Do not use this instrument outside the operating range. Doing so may cause malfunctions.
- This instrument is not waterproof. Do not place it in water or use it where it may be splashed with water.
- When used outdoors, keep the unit out of rain or water splashes. If it becomes wet, the unit may fail.
- If the unit will not be used for a long period of time, always remove the battery. Otherwise, the
battery power may be wasted and the battery fluid may leak, resulting in malfunctions.
- Keep the battery out of reach of children. If a child swallows a battery accidentally, consult a doctor
immediately.
- Do not dispose of used battery in a fire.
- For environmental protection, dispose of used battery in compliance with local rules and regulations.
- Do not wash or wipe this unit with alcohol, thinner, or other solvents. If the unit becomes dirty, wipe
it with a tightly-wrung towel or the like that has been dipped in warm water with a neutral detergent.
- Do not alter, pull forcibly, bend or bind the sensor probe, as doing so may cause a break in the
probe. Also, do not place heavy objects on the cord or heat it, as doing so damage the cord.
- When measuring, do not let the sensor probe come in contact with the human body.
- When the unit is used for the first time or after it has been stored for several days, the pH
measurement response may be slower. In such cases, immerse the sensor probe electrode in

12
either the pH standard solution or water and let it stand for one hour. For more accurate
measurement, immerse it 12 hours at least in the pH 4 standard solution before use. * (Do not turn
on the unit during this immersion time.)
- The sensor probe electrode of this unit may be damaged or its useful life may be shortened if it is
used for liquids such as organic solvents, oils, adhesives, strong acids (pH 0 to pH 2), strong alkalis
(pH 12 to pH 14) and surface-active agents.
- The pH reading may become unstable when pure water is measured.
- If the pH standard solution contacts the skin (hand), immediately wash the contaminated skin with
running water. If the solution gets into the eyes, immediately rinse with water and consult a doctor.
- Keep the pH standard solution out of reach of children. If accidentally ingested, consult a doctor
immediately.
- When using the AC adapter (optional), do not connect or disconnect the power cord with wet hands.
Otherwise, electrical shock or short-circuit may occur.
Overview
The SK-640PH pH meter is easy-to-operate instrument for measuring hydrogen ion concentration
(pH) and liquid temperature.
The meter can be calibrated at three points (pH4, pH7 and pH10) and provides reliable measurements
by using the built-in automatic temperature compensation.
Features
Large LCD for easy reading
The pH value and the temperature are indicated on a large LCD.
Auto Power-Off
The "auto power-off" function turns off the power automatically if the unit is not operated for 20
minutes. This conserves battery life if you forget to turn off the unit.
Auto temperature compensation
Once the PHP-31 sensor probe is connected to your SK-620PH, it will perform automatic
temperature compensation to produce more accurate pH measurements.
Cautions before use
- Check that the product has not been damaged during transport. If damage is found, contact the
store where you purchased the instrument or our service network.
Do not dispose of the carrying case until you have confirmed that the instrument works properly.
The carrying case will be needed when returning the instrument for repair or replacement.
- When the pH of food or drink is to be measured, take a sample (sufficient quantity so that the
sensor tip can be immersed at least 3 cm in the sample) in a separate container for measurement.
Do not ingest the sample after measurement.
- The sensor section is made of glass, so take a great care in handling.
If it is damaged, be careful not to get injured by broken glass.
- The sensor probe is a consumable. It must be replaced with a new one if the electrode is broken,
the performance is degraded or the liquid inside is low. (It is not possible to repair the sensor probe.)
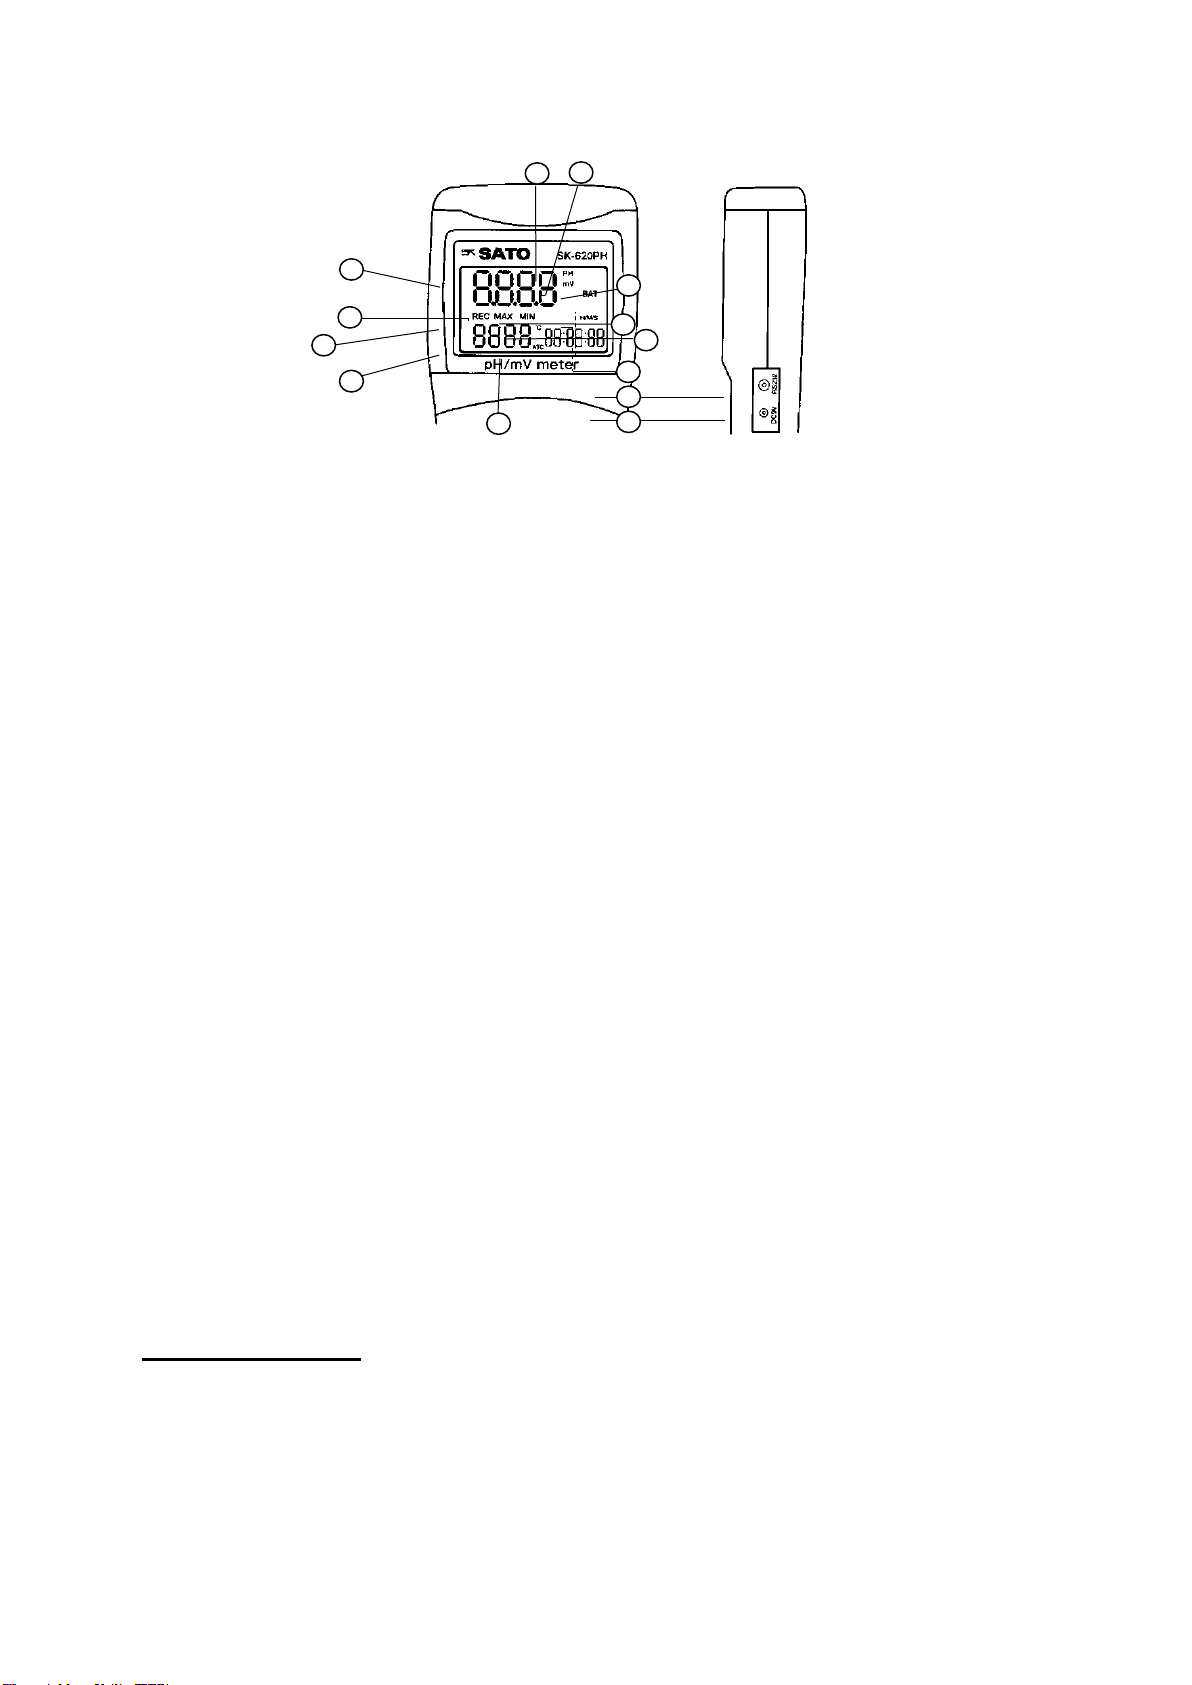
Components names and functions

13
•Main unit
①Display
: Displays measurement readings or status of the unit.
②PWR key
: Press this key to turn on the unit. To turn off the unit, press the key again.
③CAL key
: Enters the calibration mode.
④SKIP key
: Moves the pH set values while in the calibration mode.
Enters the manual temperature setting mode when pressed two seconds or
more after the connecting plug for the temperature sensor is disconnected,
while in the measurement mode, calibration mode or MAX/MIN logging mode.
⑤REC key
: The calibration value for the pH 4, pH 7 or pH 10 is stored in the unit memory,
if pressed while in the calibration mode.
Pressing this key while in the measurement mode will move to the MAX/MIN
logging mode and start logging the MAX value (the highest pH value) and the
MIN value (lowest pH value). Pressing the key again will alternately display the
MAX value and MIN value. The maximum and minimum voltage (mV) can also be
logged. To return to the measurement mode, press the REC key for three
seconds or more while in the MAX/MIN logging mode. Pressing this key while in
the manual temperature setting mode will enable the liquid temperature.
⑥pH/mV key
: Press this key to switch the pH and mV in the upper LCD in measurement
mode. Increases (↑) the pH values to be calibrated in the calibration mode.
Increases (↑) the set temperature value in the manual temperature
measurement mode.
⑦key
(backlight key)
: Press this key to turn on the backlight on the LCD in the measurement mode.
Decreases (↓) the pH values to be calibrated in the calibration mode.
Decreases (↓) the set temperature value in the manual temperature
measurement mode.
⑧Battery cover
⑨Screw for battery cover
•Top face of the case
⑩pH sensor connecting jack: Used to connect the sensor.
This product uses the BNC connector.
⑪Temperature sensor connecting jack: Used to connect the
temperature sensor. This product uses the 2.5-mm diode
plug.
1
2
3
4
5
6
7
8
9
10
11
14
•LCD
⑫Display of pH or mV : Displays pH values or mV values in the measurement mode.
Display the calibration values in the calibration mode.
⑬Display of temperature : Displays temperature values in all modes.
⑭Temperature unit : Indicates the unit (°C) of temperature measured.
⑮pH unit : Indicates the unit (pH) of hydrogen ion concentration measured.
⑯Voltage unit : Indicates the unit (mV) of voltage measured.
⑰REC : Lights up when the maximum and minimum pH values or the maximum
and minimum voltage values are being logged. (MAX/MIN logging mode)
⑱MAX : Lights up when the maximum pH or voltage value is displayed.
⑲MIN : Lights up when the minimum pH or voltage value is displayed.
⑳BAT : Lights up when battery power is insufficient.
㉑ATC : Lights up when the temperature sensor is connected.
㉒Display of time/voltage : Indicates the time elapsed since logging (REC) started while in the
MAX/MIN logging mode. Displays "CA" and voltage in the calibration mode.
㉓Jack for the RS-232C cable
: The RS-232C cable is plugged into the jack.
㉔Jack for the AC adapter: Connects to the AC adapter provided with this product.
Before measurement
1. Installing and replacing battery
①Install the battery before connecting the probe to the unit.
Remove the probe from the unit before when replacing battery,
②Remove the screw holding the battery cover by turning it counterclockwise with a Phillips
screwdriver (be careful not to be missing the screw).
12
14
13
15
16
17
18
19
20
21
22
23
24

15
③When replacing the battery, remove the old battery (6F22, 006P).
④Install a new 9V battery (6F22, 006P) by referring to the polarity marks (+ and -) on the battery
compartment.
⑤Place the battery cover on the unit and secure it to the unit with the screw.
Note: When "BAT" is lit on the LCD, immediately replace all the battery with new ones.
Otherwise the measurement accuracy may be affected or malfunction may occur.
2. Installing a Vinyl Cover on the Unit
To protect the SK-640PH main unit from water splashes, we recommend putting the vinyl cover on
the unit before use. The cover also prevents the unit from becoming dirty.
①Open the cover mouth and place the unit inside. When the unit is in the cover, its back side should
be aligned with the Velcro closure side on the vinyl cover.
②Pass the pH sensor connecting jack (BNC connecter) through the mouth of the vinyl cover, and
then close the Velcro closure.
③When removing the vinyl cover, disconnect the sensor probe first, and then remove in the reverse
order of installation.
Note: * The vinyl cover is not waterproof (splash-proof) according to the Japanese Industrial Standard
* When the unit is contained in the vinyl cover, static electricity could build up on the vinyl cover
and cause pH readings to become unstable. In such cases, remove the cover before use.
3. Connection of probe
Before use, please connect the sensor probe following to the instruction manual of the probe.
•Connect probe to the main unit
①Connect the pH connecting terminal of sensor probe to the sensor connecting jack on top of
the main unit t. Check that the pins of the jack are matched the groove of pH pH connecting
terminal of sensor probe
Connect the
4. Auto power-off function
The unit is turned off by the auto power-off function if no key is operated for 20 minutes. Turn off the
auto power-off beforehand if measurement is to be done continuously.
* Release the Auto power-off function
①Press the PWR key while pressing the CAL key at the same time to turn on the unit, and then
release the PWR key.

16
②When the "n" character appears on the display, release the CAL key.
This cancels the auto power-off.
Note: Auto power-off is no longer cancelled once the unit is turned off. Perform the auto power-off
canceling each time as necessary.
Glass electrode protection bottle
To prevent the glass electrode from becoming dry, the PHP-31 sensor probe is equipped with a glass
electrode protection bottle which contains the phthalate pH standard solution. Remove the protection
bottle before measuring. Reinstall the protection bottle after measurement.
1. Removing the glass electrode protection bottle
1-1.Hold the sensor probe upright so as not to spill the
standard solution in the protection bottle. Turn the
protection bottle counterclockwise while pressing the
cap.
1-2.Slide the cap to take it out from the sensor probe as shown in the
figure
on the right.
2. Installing the glass electrode protection bottle
2-1.Install the protection bottle to the sensor probe in the reverse order of
removal.
2-2.Hold the sensor probe upright so as not to spill the standard solution in
the protection bottle. Turn the protection bottle clockwise while pressing
the cap.
2-3.After installing the protection bottle, push in the sensor probe until its tip hits the bottom of
the protection bottle.
Note: * When installing or removing the glass electrode protection bottle, pay attention not to spill the
standard solution in the bottle. If the standard solution comes in contact with the skin (hand),
immediately wash the contaminated skin with running water. If the solution gets into the
eyes, immediately rinse with water and consult a doctor.
* If the standard solution in the bottle is spilled, replenish the bottle with the phthalate pH
standard
solution to protect the glass electrode from becoming dry. Adding distilled water, pure water or
tap
water before storing is recommended.
cap
protection bottle

17
Before measuring
(1) Connect the PHP-31 sensor probe to the main unit.
(2) Press the PWR key. The whole LCD lights up for three seconds to indicate that the unit has been
turned on.
When the temperature of the sample liquid is known, disconnect the temperature sensor
connecting plug and press the SKIP key for two seconds or more to enter the manual temperature
setting mode. Set the temperature to the desired reading by using the pH/mV key (↑) or the
key (↓). Press the REC key to confirm.
(3) Perform the pH calibration after changing the battery or when a very accurate pH measurement is
necessary.
Calibration mode
By performing the 3-point calibration, this instrument can accurately measure the pH. Perform the pH
calibration in the following cases:
a) After replacing the sensor probe
b) After replacing the battery
c) When very accurate measurement is necessary
For more accurate measurement, calibration of about once a day is recommended.
For calibrating the SK-620PH, prepare the following items.
pH 4 standard solution (phthalate solution): pH 4.01 (at 25°C)
pH 7 standard solution (neutral phosphate solution): pH 6.86 (at 25°C)
pH 10 standard solution (carbonate solution): pH 10.01 (at 25°C)
Distilled water, pure water or tap water
Four beakers (each beaker to contain one type of standard solution or water (distilled, pure or tap
water)
To ensure accuracy, perform calibration at the same temperature as the material to be measured.
The pH standard solution bottle which comes with the instrument can be used as a substitute for a
beaker.
How to calibrate the SK-620PH series pH meter
(1) Connect the PHP-31 sensor probe to the main unit.
(2) Press the PWR key to turn on the unit. The unit enters the measurement mode. Remove the glass
electrode protection bottle from the sensor probe.

18
(3) Thoroughly wash the glass electrode with water (distilled, pure or tap water).
(4) Absorb the water on the glass electrode, and then press the CAL key to enter the calibration mode.
Check that [4.00] is displayed on the LCD and "CA: Voltage" appears on the display.
Note: "Err" is displayed on the voltage section of the LCD, if the sensor probe is not
connected to the unit or the glass electrode is dry. To reset the display to the
voltage, place the glass electrode in the pH standard solution. If the reset fails,
the sensor probe or the standard solution may be faulty. Refer to the
troubleshooting section.
(5) Immerse the glass electrode into the pH 4 standard solution. Slowly stir the solution with the
electrode, and then hold the sensor probe still until the voltage reading becomes stable.
(6) When the voltage reading becomes stable, set the calibration value to "4.01" by
pressing the pH/mV or key.
The pH value of the standard solution at 25°C is "4.01".
For the relation between the pH value of standard solution and the temperature, refer
to the section "Relation between the pH value and temperature" on page 20.
For example, when the pH standard solution is 40°C, the pH calibration value is "4.04".
(7) Press the REC key to store the calibration value in the unit memory.
“SA” is displayed on the LCD to indicate that the calibration data has been stored in
the unit memory. Now the pH 4 calibration is complete.
(8) The unit automatically proceeds to the pH 7 calibration. Wash the glass electrode
with water (distilled, pure or tap water).
(9) After washing, use clean filter paper, cotton swabs or tissue paper to absorb the water on the
glass electrode. When wiping the glass electrode to absorb water, be careful not to rub the glass
electrode. Otherwise static electricity will build up and the pH readings will become unstable.
(10) Perform calibration on pH 7 and pH 10 by using the same procedure as for pH 4.
The figure above shows the case The figure above shows the case
when the pH 7 standard solution is 26.3°C. when the pH 10 standard solution is
26.3°C
Every data for each pH calibration must be stored in the unit memory by pressing the REC key.
(11) After approx. 3 seconds, the unit returns to the measurement mode.
When the pH 10 calibration is complete, "End" is displayed on the LCD.
An accurate pH measurement is possible with the procedures described above.
Note: While in the calibration mode, "CA" and the voltage are displayed on the LCD. When an
acid
solution is measured, the voltage value is positive. When an alkaline solution is measured,

19
the
voltage value is negative. Note that in the LCD, the symbol for minus is not displayed. Also,
the
values displayed are 4-digit numbers; the voltage is displayed such as XXX.X mV.
Note: The table below shows the pH value range to be entered for calibration.
Calibration point
pH value range
pH 4
3.50 to 4.50
pH 7
6.50 to 7.50
pH 10
9.50 to 10.50
Note that it is not possible to perform calibration using the oxalate standard
solution
(pH 1.68 at 25°C) or borate standard solution (pH 9.18 at 25°C)
CAL key REC key REC Key REC Key
Measurement mode Calibration pH4 Calibration pH7 Calibration pH10
Calibration mode
Auto-return (after three seconds)
Note: The set temperature values are not displayed if an error code (E1 or E2) is displayed in the pH
display section (mV display). Once the error code is reset or the unit is turned off and on again,
the set temperature value will be displayed. For details of the error codes, refer to
"Troubleshooting".

20
Relation between pH value and temperature
When performing calibration, set the pH value according to the temperature of the standard solution
as follows;
Standard solution
Name of solution
Temp.
pH value
Temp.
pH value
pH 4
Phthalate solution
0 ℃
4.00
30℃
4.02
5 ℃
4.00
35℃
4.02
10℃
4.00
40℃
4.04
15℃
4.00
45℃
4.05
20℃
4.00
50℃
4.06
25℃
4.01
-
-
pH 7
Neutral
phosphate solution
0 ℃
6.98
30℃
6.85
5 ℃
6.95
35℃
6.84
10℃
6.92
40℃
6.84
15℃
6.90
45℃
6.83
20℃
6.88
50℃
6.83
25℃
6.86
-
-
pH 10
Carbonate solution
0 ℃
10.32
30℃
9.97
5 ℃
10.24
35℃
9.92
10℃
10.18
40℃
9.89
15℃
10.12
45℃
9.86
20℃
10.06
50℃
9.83
25℃
10.01
-
-
JIS Z 8802-2011
Measuring procedure
(1) Connect the sensor probe to the main unit. When the PHP-31 sensor, which is capable of
measuring both pH and temperature, is used, connect both the BNC plug (pH) and the diode plug
(temperature).
(2) Press the PWR key to turn on the unit. The whole LCD lights up for approximately three seconds.
The unit enters the measurement mode.
(3) Remove the glass electrode protection bottle from the sensor probe.
(4) Immerse the sensor probe at least 3 cm deep into the material to be measured.
(5) Read the pH value when the reading becomes stable.
(6) To display the voltage, press the pH/mV key. The voltage detected by the sensor probe is
displayed.
(7) To end the measurement, press the PWR key to turn off the unit.
Wash the glass electrode with water (distilled, pure or tap water), install the glass electrode
protection bottle and store the instrument.
Note:For how to install or remove the glass electrode protection bottle, refer to "Glass electrode
protection bottle".

21

22
About the glass electrode
(1) Storage
If left unused for a long time, the glass electrode becomes too dry to measure the pH accurately.
The pH electrode works best and shows accurate readings when used with moderate moisture.
When using the instrument for the first time after purchasing or a long storage period, we
recommend placing the glass electrode in water (distilled, pure or tap water) or the pH standard
solution for at least 12 hours and performing calibration before measuring. For everyday storage,
fit the glass electrode protection bottle to the sensor probe. The glass electrode protection bottle is
filled with the phthalate standard solution (pH 4) at the factory.
(2) Inspection and calibration
For an accurate pH measurement, perform calibration using the pH standard solution.
If there is a deviation from the expected value, adjust it before performing a pH measurement.
Note that there are cases where the pH value of the standard solution has changed from its
original value. This can happen if the pH standard solution is dirty or if storing the solution for a
long time. It is advisable to use a new pH standard solution, where applicable.
(3) Washing
Be sure to wash the pH electrode after each pH calibration or measurement with water (distilled,
pure or tap water). If left unwashed, the liquid measured tends to form a film on the surface of the
electrode, causing measurement errors. Always wash the pH electrode every time after use.
Washing can be done with water (distilled, pure or tap water) in most cases, but if there is a
stubborn stain, use neutral detergent diluted in water to wash only the glass electrode section
(spherical part). After using neutral detergent, thoroughly rinse the electrode with water (distilled,
pure or tap water) to remove the neutral detergent, and then immerse the electrode in the pH
standard solution (pH 4) before measurement.
Note that neutral detergent cannot be used on the liquid junction of the sensor probe. Otherwise,
the performance of the inner solution could be damaged if the neutral detergent penetrates inside
the sensor.
(4) Useful life
It is not possible to replenish or repair the inner solution of the sensor probe.
The pH electrode is a consumable. Its useful life varies depending on the liquid to be measured,
pH value or temperature.
(5) Deposit of white potassium chloride crystals
A deposit of white crystals is sometimes found on the tip of the electrode or protection bottle; this
does not pose a problem when using the instrument. The deposit is easily washed off with tap
water.
If it does not come off with tap water, soak the electrode in warm water to remove it.
Do not lick or swallow the potassium chloride crystals. If the eyes or skin becomes contaminated
with the crystals, immediately consult a doctor.

23
Backlight function
This instrument is provided with a backlight function. Pressing the key lights the LCD in green.
This permits the pH readings on the LCD to be read easily even in a dark place.
The backlight is automatically turned off approx. 20 seconds after it is turned on. This prevents the
battery power from being consumed due to continuous use.
About the AC adapter
If the unit will be used for a long period of time, use of the AC adapter is recommended.
Insert the AC adapter plug into the AC adapter jack on the unit. If an AC adapter other than the one
provided by us is used, choose one that meets the specifications described below.
<Primary output>
Voltage : 9VDC
Current capacity : 500mA
Polarity :
Diameter of jack : Ø 3.4mm (D’DIA Ø1.35)
About the RS-232C output
⚫RS-232C output
This instrument outputs data in real time on the pH, voltage and temperature while in the
measurement mode or the MAX/MIN logging mode.
When the unit is connected with a computer, data on the pH (or voltage) and the temperature
can be imported into the computer for analyzing or saving.
Note:The RS-232C cannot be used for output data while in the calibration mode or in the manual
temperature setting mode.
⚫Connecting the cables
Use the RS-232C communication cable dedicated to this product.
(The cable is available as an option.)
(1) Insert the plug of the optional RS-232C cable all the way into the RS-232C jack on the
SK-620PH.
(2) Next, connect the other side of the cable to the serial port on the computer.
⚫Communication standard and Communications protocol
Transmission speed : 2400bps
Data bit : 8 bits
Stop bit : 1 bit
Parity check : non
* Communications protocol
(1) pH display and the temperature (positive) display:
―
+

24
(2) pH display and the temperature (negative) display:
(3) mV display (positive voltage) and the temperature (positive) display
(4) mV display (negative voltage) and the temperature (positive) display
(5) mV display (resolution: 1 mV) and the temperature (positive) display
(6) The sensor probe is not connected (pH display: error, temperature display: 25.0)
Example) When the pH is 7.55 and the temperature is 25.2°C, the RS-232C output is as follows.
Troubleshooting (error codes)
Some of the following phenomena may not be considered defective. The symbol "-->" indicates the
reference clauses.
Problem
Possible cause
Action
The power is not turned
on.
The battery has run out its power.
Replace with new battery (-->Installing and
replacing battery)
The power to the unit is
turned off.
The auto power-off is turned on.
Cancel the auto power-off on the main unit.
(-->Before measuring)
Error code
pH display section
The sensor probe is not connected
to the main unit.
Connect the sensor probe to the main unit.
Securely lock the BNC connector in place.
The glass electrode of the sensor
probe is dirty or dry.
Wash the glass electrode of the sensor probe.
(-->About the glass electrode)
If the problem remains after checking the connection between the main unit and the
sensor and after washing the glass electrode, the sample to be measured may be pH
0 or lower.
Error code
The sensor probe is not connected
to the main unit.
Connect the sensor probe to the main unit.
Securely lock the BNC connector in place.
The glass electrode of the sensor
probe is dirty or dry.
Wash the glass electrode of the sensor probe.
(-->About the glass electrode)
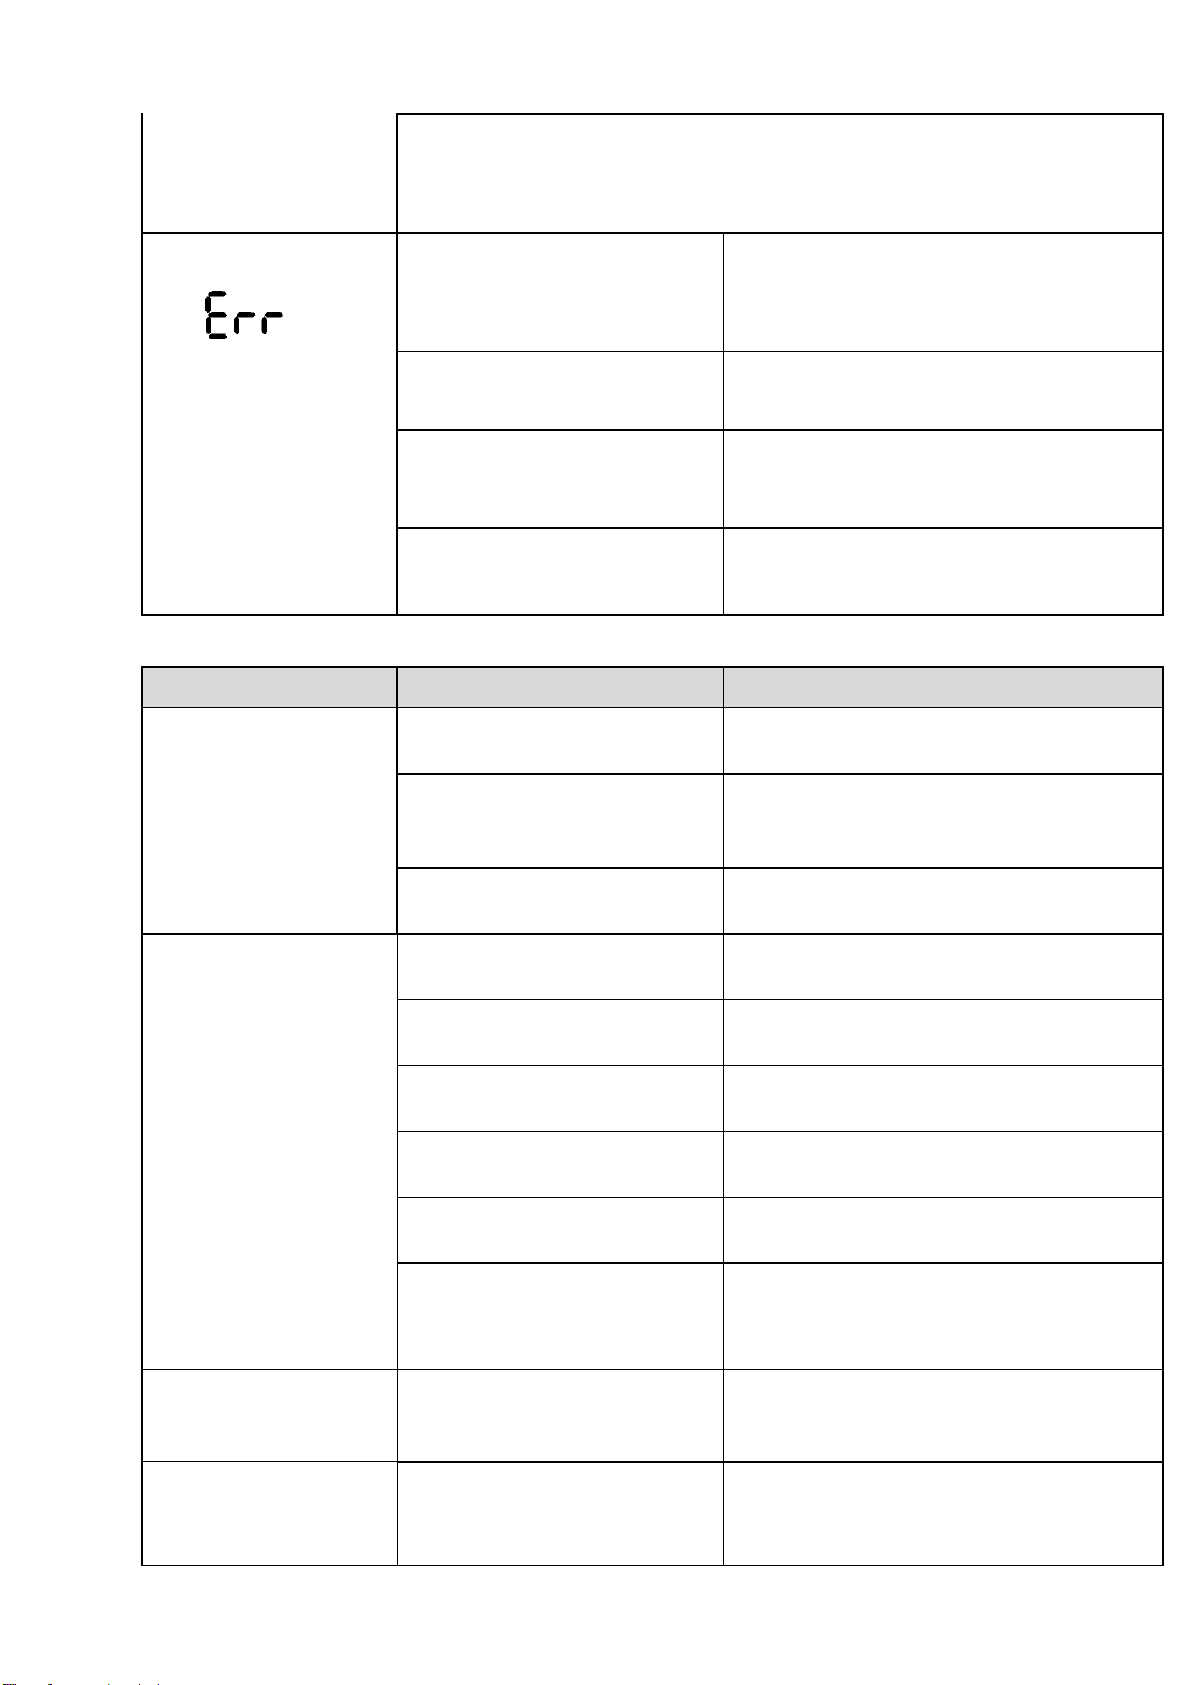
25
pH display section
If the problem remains after checking the connection between the main unit and the
sensor and after washing the glass electrode, the sample to be measured may be pH
14 or higher.
Error code
Time and voltage display
section
Calibration is not possible.
The pH value set in the calibration
mode and the standard solution pH
value are not same.
Set the same value for the calibration value and
the pH standard solution value (--> Calibration
mode) or wash the glass electrode. (-->About
the glass electrode)
The sensor probe may be
damaged.
Replace the sensor probe with a new one.
The sensor probe is not connected
to the main unit, or the connection
is faulty.
Connect the sensor probe to the main unit.
Securely lock the BNC connector in place.
The pH standard solution is
deteriorated.
Replace the pH standard solution with new
solution.
Problem
Possible cause
Action
Readings are unstable.
The sensor is not properly
contacting the sample.
Immerse the sensor probe at least 3 cm from
the tip into the sample solution.
The sample being measured is
pure water with a low electric
conductivity.
For stable pH measurement, choose samples
with an electric conductivity of approx. 100
μS/cm or more.
The temperature of the sample
largely fluctuated.
Make the sample temperature stable. The pH
values change with temperature.
Readings are abnormal
The battery have run out.
Replace with new battery. (-->Installing and
replacing battery)
The glass electrode of the sensor
probe is dirty.
Wash the glass electrode. (--> About the glass
electrode)
The glass electrode surface of the
sensor probe is dry.
Wash the glass electrode. (-->About the glass
electrode) See also "Storage".
Calibration has not been
performed.
Perform calibration before measurement.
(-->Before measuring) (-->, Calibration mode)
The sensor is not properly
contacting the sample.
Immerse the sensor probe at least 3 cm from
the tip into the sample solution.
The difference between the sample
temperature and the calibration
temperature is too large.
Perform calibration with a temperature close to
the sample temperature (preferably within
±3°C).
The voltage reading
varies.
The sensor probe is not
connected, or the connection is
faulty.
Connect the sensor probe to the main unit.
Securely lock the BNC connector in place.
The backlight cannot be
turned off.
Once the backlight is turned on, it
cannot be turned off for at least 20
seconds.
The backlight is automatically turned off after 20
seconds. Or, the backlight goes out when the
unit is turned off and on again.

26
RS-232C communication
is not possible.
The communication conditions or
protocols are not correct.
Check the communication conditions or
protocols. (-->About the RS-232C output)
The serial port on the computer is
not open.
Check that the serial port is open by referring to
the computer's operation manual.

27
Specifications
Cat. No.
6400-00 Handy type pH meter
Model
SK-620PH
Measuring factors
Hydrogen ion concentration (pH), Voltage, Temperature (liquid temp.)
pH
Voltage
Temperature
Display Range
(Main unit)
0.00 to 14.00pH
-499 to 499mV
-6.9 to 92.4℃
Accuracy
(Main unit) *2
±0.02pH
±1mV (±0.1 to 195mV)
±2mV (±185 to 499mV)
±0.1℃(at 10 to 40℃)
±0.2℃(at 0 to 10℃, 40 to 50℃)
Measuring Range
(Main unit w/probe)
0.00 to 14.00pH
-499 to 499mV
0 to 50℃
Accuracy
(Main unit w/probe) *3
±(0.3+1 digit) pH (0 to 2pH)
±(0.1+1 digit) pH(2 to 12pH)
±(0.4+1 digit) PH(12 to 14pH)
-----------
±0.5℃(at 20 to 30℃)
±0.7℃(at 0 to 20℃, 30 to 50℃)
Resolution
0.01pH
0.1mV (±0.1~195mV)
1mV (±185~499mV)
0.1℃
Elements
Glass electrode 3IN1
Thermistor
Functions
Three point Calibration (pH4.01, pH6.86, pH10.01) at 25 ℃,Back light,
Auto power-Off, Min-Max memory data, manually temperature setting.
Power Requirement
9VDC Battery 6F22(006P) x 1pc.
Operation ambient
Temperature: 0 to 50℃Humidity: lower than 80%rh no condensing
Battery Life
About 20 hours continuous
Materials
Case: ABS resin Electrode: Glass Probe: Epoxy resin
Dimensions
Main unit: (W)72×(H)182×(D)31.5mm
Probe: Ø12 x 135mm(L) (cord length: 1m)
Weight
About 220g (inclusive of battery)
Standard accessories
Instruction manual, Carrying case, Vinyl cover, Battery 6F22 (006P) x 1 pc.
Electrode protection bottle, a set of pH standard solution (pH4, pH7, pH10) : about 23ml
1. All specifications subject to change with or without notice
2. Depending on the direction of change of input voltage, the measuring accuracy and resolution
may be little
different since it has hysteresis
3. At the temperature of the pH standard solution is ±3℃.
Accuracy (Temperature: PHP-31 Probe)
Options/Consumables
Cat. No.
Model
Name
Remarks
6400-00
SK-620PH
pH meter
Main unit, PHP-31 probe, Accessories
6400-30
PHP-31
3 in one probe
Probe, Case, Electrode protection bottle
6400-44
PH44
Vinyl cover
6400-52
PH30
AC adapter
100VAC use
6400-33
PH33
RS232C cable
±0.7℃
±0.5℃
±0.7℃
0
10
20
30
40
50
Temperature (℃)

28
6400-40
PH40
Carrying case
6400-50
PH50
Electrode protection bottle
Other SATO Measuring Instrument manuals

SATO
SATO SK-110TRH-B-EX User manual

SATO
SATO SK-960A User manual

SATO
SATO TH-100 User manual

SATO
SATO TH-300 User manual

SATO
SATO SK-150GT User manual

SATO
SATO SK-940A User manual

SATO
SATO SK-180GT User manual

SATO
SATO SK-L754 Series User manual

SATO
SATO SK-110TRH Use and care manual

SATO
SATO SK-73D User manual


Popular Measuring Instrument manuals by other brands


Powerfix Profi
Powerfix Profi KH3301 operating instructions

Major tech
Major tech MT720 instruction manual

Sequoia
Sequoia LISST-100X user manual

AGS
AGS MERLIN CO2-TFT Installation, operation & maintenance manual

Raptor
Raptor R00188 user manual

Agilent Technologies
Agilent Technologies PNA Series User and Programming Guide


