Savi W430-M User manual

Savi®W430-M
Wireless Headset System
User Guide
TM

Plantronics Savi User Guide
Welcome
Congratulations on purchasing your new Plantronics product. This user guide contains instructions for setting up and using your Savi
W430-M (D100-M USB Adapter + WH210 Headset) Wireless Headset System.
Please refer to the separate safety instructions for important product safety information prior to installation or use of the product.
The enclosed DECT 6.0 wireless product uses restricted wireless radio frequencies which vary by country. DECT 6.0 devices are
generally authorized for use in The Americas. Use of this DECT 6.0 product in unauthorized countries is a violation of law, may disrupt
telecommunications networks and devices, and can subject you to fines and penalties by regulatory agencies. For specific countries in
which DECT 6.0 devices may be lawfully used, please consult the following:
http://www.dect.org/content.aspx?id=28

Contents
Plantronics Savi User Guide
1 Package Contents and Features.................................4
1.1 USB Adapter............................................................ 4
1.2 Headset ................................................................... 4
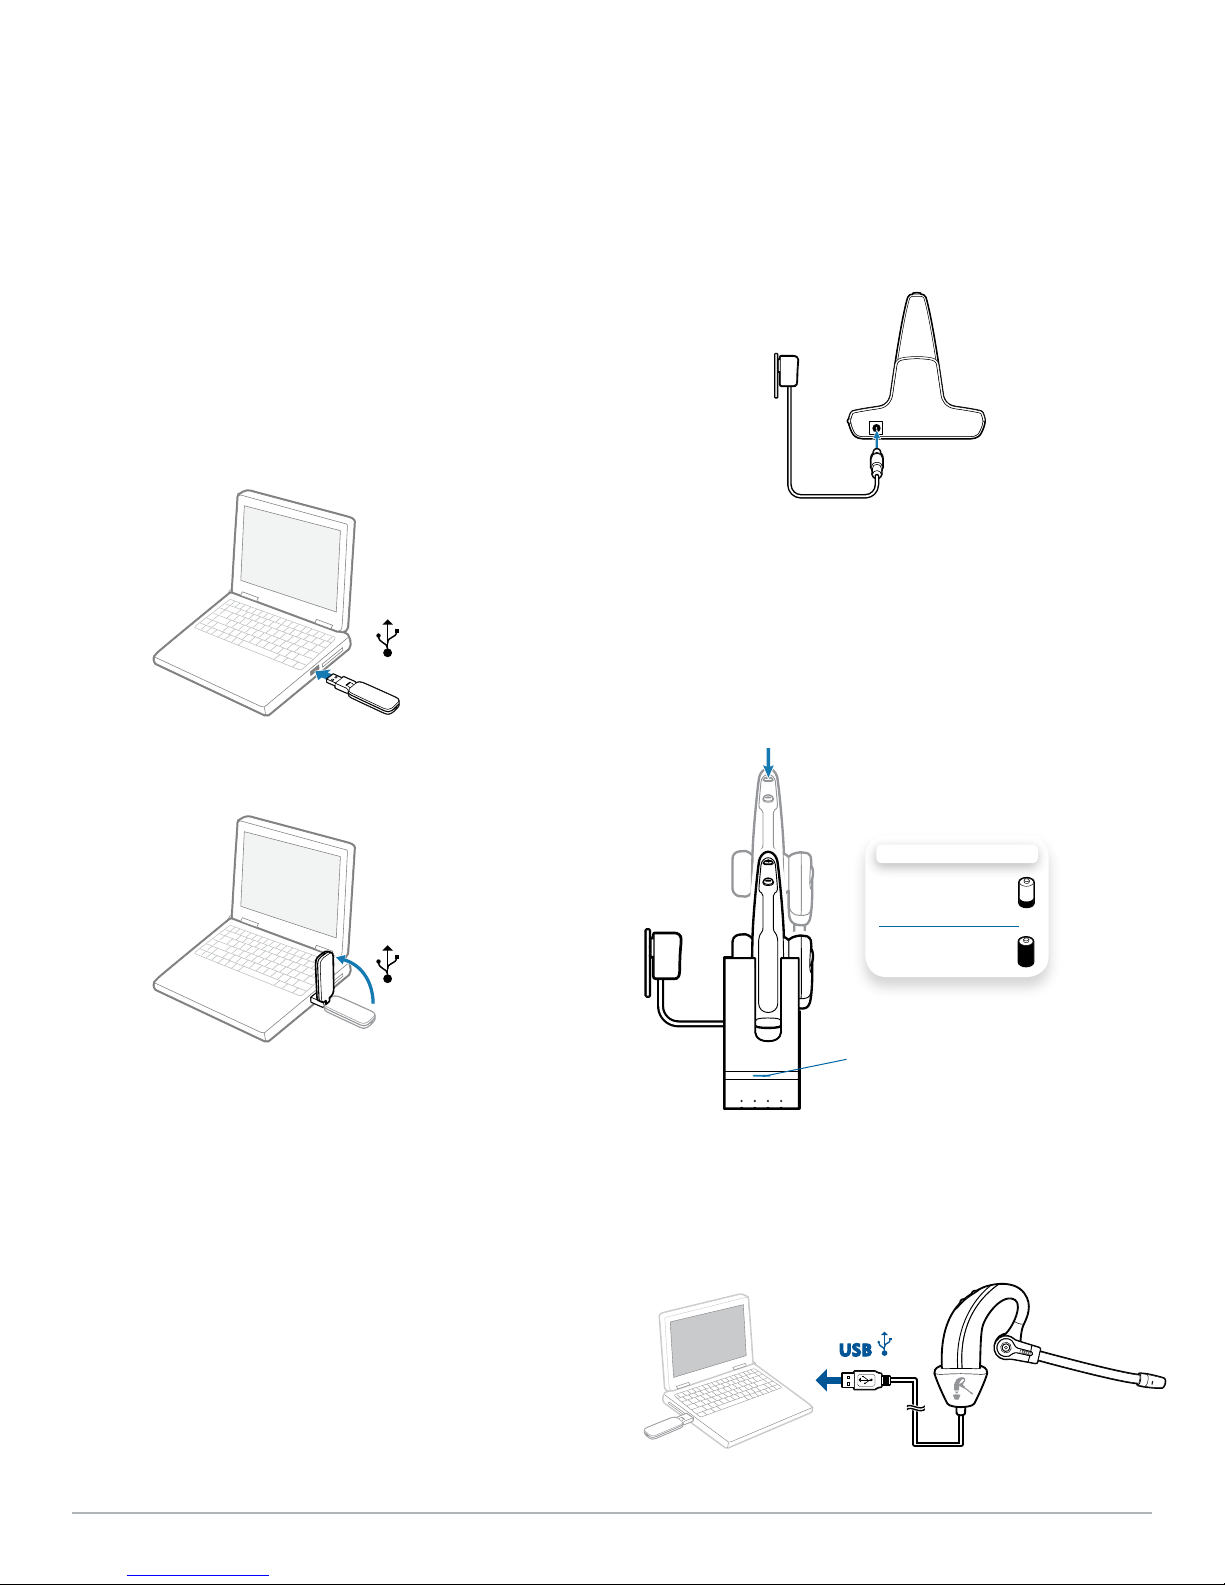
2 Set Up .........................................................................6
2.1 Connecting USB Adapter to PC .............................. 6
2.2 Connecting Power Supply to
Charger Base ................................................................. 6
2.3 Docking and Charging Headset............................... 6
2.4 Fitting Headset ........................................................ 7
3 Using Your Headset System with
Microsoft Lync/Office Communicator .........................8
Powering Up Headset.................................................... 8
Placing, Answering and Ending Calls with
Microsoft Lync/Office Communicator............................ 8
4 Listening to Other PC Audio ........................................... 9
5 System Information ........................................................ 10
USB Adapter Indicator Light........................................ 10
Muting a Headset Call ................................................. 10
Subscribing a Master Headset .................................... 11
Conferencing In Up to Three Additional Headsets ...... 11
Switching Between Wideband and Narrowband
Audio............................................................................ 11
Setting the Range ........................................................ 11
Ending Subscription .................................................... 11
Placing the Headset in Sleep Mode ............................ 11
Talk Time...................................................................... 12
Headset Button Functions........................................... 12
Headset Indicator Light ............................................... 12
Toggling On/Off Headset In-Use Indicator Light ......... 12
Headset Tones ............................................................. 12
Out of Range Warning ................................................. 12
Low Battery Warning ................................................... 12
Mute Warning .............................................................. 12
6 Plantronics Software Platform...................................13
Softphone Support .................................................13
Plantronics Update Manager....................................... 13
Plantronics Control Panel ........................................14
Battery Life ............................................................14
Devices Tab ................................................................. 14
Applications Tab .....................................................15
Preferences Tab......................................................16
About Tab ..............................................................16
Help for Device Settings - USB Adapter ..................... 17
Help for Device Settings - Advanced .......................... 17
7 Troubleshooting and Common Questions.................18

Plantronics Savi User Guide 4
1.1 Savi W430-M USB Adapter and Charger
USB Adapter
1 Package Contents and Features
USB Charging
Cable
Base Power Supply
Charger Base
1.2 Savi WH210 Headset
Extra Eartips
Headset with Pre-Installed Eartip

Plantronics Savi User Guide 5
Savi USB Adapter Features
Savi WH210 Headset Features
Subscription Button
Indicator Light
Indicator Light
Microphone
Call Control Button
Volume Down Button
(also controls mute)
Volume Up Button

Plantronics Savi User Guide 6
2.3 Docking and Charging Headset
1Gently push the headset into the charge cradle.
The charging indicator light on the charger base will flash
green to indicate that the headset battery is charging.
2Charge for at least 20 minutes prior to the first use.
A full charge takes 3 hours. The indicator light will turn solid
green.
CHARGING TIME
20 min .....................
Minimum charge
before first use
3 hours ...................
Full charge
Charging
Indicator Light
NOTE The USB charging cable can also be used to charge the
headset. To successfully charge your headset with the USB cable
the PC must be on and in an active state (not standby). The
charging time will vary according to the number of other devices
drawing power from the PC’s USB port(s).
2 Set Up
2.1 Connecting USB Adapter to PC
1Insert the USB adapter into USB Port on PC. The indicator
light on the USB adapter will be solid red to indicate the USB
adapter is powered on and will turn solid green when it finds
the headset.
NOTE The headset may have to be charged before the USB
adapter can find it.
2The USB adapter can be folded as shown.
IMPORTANT NOTE For best performance it is recommended
that Windows is updated with Service Pack levels listed below:
Microsoft Windows®XP Service Pack 3 (SP3) or later
Microsoft Windows Vista®Service Pack 1 (SP1) or later
2.2 Connecting Power Supply to Charger
Base
1Connect the base power supply into the power jack on
the charger base.
2Connect the power supply to the outlet. The charging
indicator light will be solid green.

Plantronics Savi User Guide 7
2.4 Fitting Headset
The headset comes with a pre-installed medium eartip. To install a
different eartip see the following:
1Remove the pre-installed eartip by pushing in and
turning the eartip CLOCKwise, then pull firmly.
2Choose the size and style of eartip that fits most
comfortably. Align eartip tabs with notches in headset.
Push in firmly and twist COUNTER clockwise.
3Slide the headset over and behind your ear, then press
gently toward your ear.
4Rotate the microphone boom until it is pointed toward
your mouth.
5The headset can be converted for wearing on left ear as
follows:
a. Rotate the microphone boom up.
b. Turn microphone boom around.
c. Rotate microphone boom down.
`
NOTE When installing a gel tip ensure the raised part of the
eartip is pointed toward the curved section of the headset as
shown.

Plantronics Savi User Guide 8
Powering Up Headset
If the headset battery is charged the headset is automatically on.
The headset does not have an on/off button.
3 Using Your Headset System with
Microsoft Lync/Office Communicator
Placing, Answering, and Ending Calls with Microsoft Lync/Office Communicator
To place a call Short press call control button on headset. Dial number using Microsoft Lync/Office
Communicator.*
To answer a call on the headset Short press call control button on headset.
To end a call on the headset Short press call control button on headset.
*Consult Microsoft Lync/Office Communicator Help for more information on how to place a call.
NOTE You can also answer calls directly from Microsoft Lync/Office Communicator by clicking on the Call Alert that appears on your PC
screen. In this case the call will be directed to the default speakerphone which may not be your headset. Consult Microsoft Lync/Office
Communicator Help for more information.
For your safety, do not use headset at high volumes for extended periods of time. Doing so can cause hearing loss. Always listen at
moderate levels. For more information on headsets and hearing visit: plantronics.com/healthandsafety.
Call Control Button
Indicator Light

Plantronics Savi User Guide 9
4 Listening to Other PC Audio
Ensure the PC audio you are trying to listen to is being routed to
your Savi W430-M device.
1Go to “Control Panel” and open “Sounds and Audio
Devices”.
2In the “Audio” tab select your Savi 430-M under “Sound
Playback”.
3Launch the application that contains the PC audio and
hit play.

Plantronics Savi User Guide 10
Muting a Headset During a Call
To mute/unmute a call, press and hold the volume down button
for at least 1½ seconds.
USB Adapter Indicator Light
USB Adapter Status Indicator Light
Headset in talk mode Flashes green
Headset is muted Flashes red
Incoming call Flashes red and yellow
Adapter and headset subscribing Flashes red and green
Headset subscribed, no activity Solid green
Powered on - headset not subscribed Solid red
USB adapter is in conference mode subscription Flashes green and yellow
On a conference call with one or more guest headsets
subscribed
Flashes yellow
Volume Down
Button
5 System Information

Plantronics Savi User Guide 11
Subscribing a Master Headset
The headset and USB adapter that are supplied are subscribed
to each other. However, if you wish to use a new master headset
with your existing USB adapter, the units can be subscribed to
each other by the following method:
1Ensure your replacement headset is charged.
2Double press the subscription button on the USB
adapter. The USB adapter will flash red and green.
3Press the volume up button on the headset for three
seconds until the headset indicator light turns solid
green.
4When the indicator light on the USB adapter goes solid
green, the headset and the USB adapter are subscribed
to one another.
NOTE If the subscription process times out after two minutes or if
the subscription process fails, the USB adapter indicator light will
become solid red for four seconds and then return to its previous
state. If this occurs, try to re-subscribe the headset again.
Conferencing In Up to Three Additional
Headsets
While on a call you can subscribe up to three additional headsets
to your USB adapter for conferencing. As you add headsets
to the adapter an additional headset icon will appear in the
Plantronics software screen with a number from 1 to 3 indicating
the number of additional headset subscribed to the adapter.
Guests may conference in as described below:
1While you are on a call, place the guest’s headset into
subscription mode by pushing the headset volume up
button for three seconds until the headset indicator light
becomes solid green.
2Short press (less than one second) the subscription
button on the USB adapter. The USB adapter light will flash
yellow and green.
3 The USB adapter light will then turn solid yellow and you
will hear a tone in the master headset indicating a guest
wishes to join the call.
4If you press the call control button on the master headset
within five seconds, the guest is joined to the call.
If you do not press the call control button within five seconds,
the request to join the call is rejected and the guest will hear an
error tone in their headset.
5Guests may leave the conference call by pressing their
call control button.
When they do you will hear a single tone in the master headset
as each guest leaves the call.
To see how many headsets are subscribed to the adapter,
refer to the lower left corner of the Plantronics Control Panel
software screen. The first headset is the master headset and the
number inside the next headset is the number of guest headsets
subscribed to the adapter. The examples below show 1, then 2,
then 3, guest headsets subscribed to the adapter in addition to the
master headset.
Switching Between Wideband and
Narrowband Audio
The Savi W430-M ships with wideband audio as the default. You
can toggle between narrowband and wideband audio by doing a
short press (less than one second) followed by a long press (more
than three seconds) of the USB adapter subscription button while
it is in an idle state. The USB adapter light will flash red for four
seconds upon entering narrowband mode and flash green four
seconds upon entering wideband mode.
Setting the Range
The Savi W430-M ships with high range set as the default. You
can change the range setting by holding in the subscription
button of the USB adapter for three seconds while it is in an idle
state. The USB adapter light will flash green for high range, yellow
for medium range, and red for low range.
Ending Subscription
If the USB adapter is in subscription mode, and you want to end
the adapter from searching for a headset, press the subscription
button again. The subscription light will turn solid red for four
seconds and then go to its previous state.
Placing the Headset in Sleep Mode
If you won’t be using the headset for a long duration and the
headset will not be in the charge cradle, you can put the headset
in sleep mode by pressing the call control button for three
seconds while in an idle state. To exit sleep mode, press the
headset call control button again for three seconds.
123

Plantronics Savi User Guide 12
Headset
Status
When Used with
Charger Base
When Used with
USB Charging Cable
Headset charging Off Flashes green
Headset fully
charged
Off Solid green
Headset in-use Flashes green Flashes green
Subscribing Solid green Solid green
Headset Indicator Light
Toggling On/Off Headset In-Use Indicator Light
If you are not on a call, you can toggle the headset in-use
indicator light on and off by pressing the headset volume down
button for three seconds.
Headset Tones
Out of Range Warning
If you are on a call and go out of the operating range, you will
hear three low tones. You will hear a single mid tone when you are
back in range.
If you stay out of range, active calls will be suspended. Calls will
be re-established upon walking back into range. If you remain out
of range for more than 5 minutes the system will drop the call.
If you are not on a call and go out of the operating range and
press the call control button, you will hear a single tone for the
button press and three low tones for the failure to make a link.
Low Battery Warning
If you are on a call, you will hear a repeating single low tone every
15 seconds indicating the battery is low. You should recharge the
headset immediately.
If you are not on a call and press the call control button, you will
hear three lows tones indicating the battery is low. You should
recharge the headset immediately.
Mute Warning
When mute is activated, you will hear three high tones. These
tones will repeat every 15 seconds while mute is active.
When unmuted you will hear three low tones.
Headset Button Functions
Talk Time
The Savi W430-M will provide up to 6 hours of talk time. Talk time
will be reduced when operating in wideband mode and/or if the
headset is used consistently at a far distance from the adapter.
Type of Press Function
Short press Places, answers, or ends calls
Short press volume up Increases volume
Short press volume down Decreases volume
While in a link, long press
volume up (at least 1½
seconds)
Flashes between calls
While in a link, long press
volume down (at least 1½
seconds)
Mutes or unmutes headset
While not in a link, long
press volume up (at least 3
seconds)
Places headset in subscription
mode
While not in a link, long press
volume down (at least 3
seconds)
Enables and disables headset
in-use indicator light

Plantronics Savi User Guide 13
6 Plantronics Software Platform
Softphone Support
Download Plantronics software for remote call answer/end with
supported softphones at plantronics.com/software.
Remote call answer/end from the Savi headset is available for all
softphones with no additional steps by the user except Skype™.
For a list of supported softphones visit plantronics.com/software.
For Skype support, please follow these steps:
1Skype will display the following message during the install of
Plantronics Unified Runtime Engine “PlantronicsURE.exe wants
to use Skype”. Choose “Allow Access” to connect.
2You can also check Savi W430-M Skype connection status by
going to Skype and checking the Tools>Options>
Advanced>Advanced Settings>”Manage Other Programs
Access” setting.
Plantronics Update Manager
All required software for Savi W430-M can be remotely updated
when updates are available. Start Plantronics Update Manager
from Windows Start Programs menu to change settings such as
automatic or manual check for updates.
Check for Updates Automatically: By enabling this check box,
you will activate a periodic automatic check for available software
updates.
Check for Updates Now: You can choose to check for available
software updates at any time by clicking on the Check For
Updates Now button in Update Manager: From the Start menu,
click Programs, then Plantronics, then open Plantronics Update
Manager.
Install Checked Updates: Following an automatic or manual
check for updates, this field will be populated with any applicable
software updates and the install checked updates will begin
installation.

Plantronics Savi User Guide 14
Plantronics Control Panel
User preferences and various device settings can be changed using the Plantronics Control Panel. To start this program, click
Start>Programs>Plantronics then open Plantronics Control Panel.
Battery Life
At the lower left corner of the screen (and for all software screens), you will see one of the following icons indicating the approximate charge
left in the headset battery.
Devices Tab
To configure your settings, select Plantronics D100 from the pull down menu and click the Device Settings box. Below are the setting
options and defaults for the USB adapter and headset.
NOTE Some parameters that do not apply to a particular Plantronics device may appear grayed out.
Feature Settings Default
General Mute Tone Standard/Low/Off Standard
Ringtone Sound 1/Sound 2/Sound 3 Sound 2
PC Volume Standard/Low/Off Standard
System Tones Standard/Low/Off Standard
Second Inbound Call Ring Continuously/Ring Once/Ignore Ring Continuously
Device Settings – Headset
Device Settings – USB Adapter
Feature Settings Default
General Range High/Med/Low High
Auto Answer Selected/Not selected Not selected
Audio PC Audio Bandwidth* Wideband/Narrowband Wideband
Feature Set Lock (See Device Settings - Security)
*The system will support both narrowband and wideband audio from the PC. Wideband audio delivers heightened speech clarity and life-
like fidelity. However, wideband audio consumes more battery power and has more stringent access criteria which reduces the number of
systems that can be deployed in a small area.
All PCs support wideband audio.
When switching between narrowband and wideband audio, you must re-establish the audio link for the changes to take effect.
100% 75% 50% 25% 0%

Plantronics Savi User Guide 15
Applications Tab
The Applications Tab displays the status of Plantronics support for
various applications such as softphones and media players. The
status will only show as “enabled and running” for softphones and
media players installed and running.
Device Settings – Security
The Plantronics software allows some of the device parameters
settings to be locked by the IT staff and prevent end users
from changing them. The ability to lock/unlock these parameter
settings requires the creation of a password. In order to lock/
unlock any parameter setting follow these steps:
Feature Set Lock
1 From the Security screen, create and confirm your
new password and press Set. This will store the password
directly in the device.
2In order to lock/unlock some parameter, go to the USB
Adapter or the Advanced tabs of Device Settings and
enter the password that you stored in the device.
3Select your settings from the USB Adapter/Advanced
settings page and lock/unlock each feature as desired.
Change Password
1You can always change the old password to a new one
in the Change Password section. If a password is not
stored in the device, the only way to store a password in the
device is to use Feature Set Lock. You will only able to change
a password if there is a previous password set in the device.
NOTE In case you forget your password, you will need to call
your local Plantronics Technical Support for assistance.
Feature Settings Default
Audio Protection Anti-Startle Selected/Not selected Not selected
G616 Selected/Not selected Not selected
Audio Limiting 80 dB/85dB/Off Off
Feature Set Lock (See Device Settings - Security)
Device Settings – Advanced

Plantronics Savi User Guide 16
Feature Settings Default
Media Player Action to Media Player
– When a call begins
– When a call ends
Mute/pause/do nothing0
Unmute/Play/do nothing
Pause
Play
General Launch audio devices control panel (Provides a shortcut to the Windows Sounds and Audio Devices
control panel.)
Default Softphone (Displays the default softphone.)
Ring Both Headset and PC Selected/Not selected Not Selected
Microsoft Lync/Office Communicator Dial-tone
Enabled
Selected/Not selected Selected
Audio Sensing Enabled Selected/Not selected Selected
Maintain Headset to PC Link Selected/Not selected Not selected
Preferences Tab
The Preferences Tab allows you to set preferences for the media player as well as other general settings.
Ring Both Headset and PC
This parameter gives you the option to have the PC ringtone
played on both the headset as well as the PC speaker.
When this parameter is selected, the PC ringtone will be heard
on both the PC speaker as well as the headset.
When this parameter is not selected, the PC ringtone will only
be heard on either the headset or the PC speaker based on how
the PC audio has been set up.
Microsoft Lync/Office Communicator Certified product:
Default Setting = Not Selected
Standard product: Default Setting = Selected
Microsoft Lync/Office Communicator Dial-tone Enabled
If this feature is selected, when a PC radio link is established,
Microsoft Lync/Office Communicator will assume the user is
trying to place a VoIP call and provide a dial tone.
If this feature is not selected, when a PC radio link is established,
Microsoft Lync/Office Communicator will sit idle.
“Microsoft Lync/Office Communicator Dial-tone Enabled” can be
set selected or not selected.
Microsoft Lync/Office Communicator Certified product:
Default Setting = Selected
Standard product: Default Setting = Not selected
Audio Sensing Enabled
Audio Sensing is a special feature supported by Plantronics
wireless devices that can detect an audio signal at the USB
port and automatically establish a PC radio link between the
USB adapter and wireless headset without the user having to
press the PC call control button. If the parameter “Microsoft
Lync/Office Communicator Dial-tone Enabled” is selected, then
every time a PC radio link is established the Microsoft Lync/Office
Communicator dial tone will be heard. However, the user may
have pressed the PC call control button to listen to music, etc.,
and does not want to hear the dial-tone. In this case, if the user
selects the “Audio Sensing Enabled” parameter, the radio link will
be established automatically when any PC audio is detected at
the USB port, thus eliminating the need for the user to press the
PC call control button.
“Audio Sensing Enabled” can be set to selected or not selected.
Microsoft Lync/Office Communicator Certified product:
Default Setting = Selected
Standard product: Default Setting = Not selected
Maintain Headset to PC Link
This parameter forces the radio link to the PC to stay active
even after the call has ended. This can eliminate the need to
re-establish the radio link when switching between PC audio
applications.
Default Setting = Not selected
About Tab
The About Tab provides on-line access to this printable user guide
and also includes Plantronics contact information. The current
version of software and firmware currently running on your system
is also shown here.

Plantronics Savi User Guide 17
Help for Device Settings - USB Adapter
Help for Device Settings - Advanced
Range Range can be minimized to help with PC buzzing, improve user density, or restrict range
of users.
When Range is set to HIGH a user will have up to 300 feet of range.
When Range is set to MEDIUM a user will have up to 150 feet of range.
When Range is set to LOW a user will have up to 50 feet of range.
High
Auto Answer Auto answer saves the user a button press to establish the radio link between headset and adapter.
When auto answer is set to OFF you must press the headset call control button to answer an incoming
call.*
When Auto Answer is set to ON an incoming call will be answered when the headset is removed from the
charge cradle.*
Not
Selected
PC Audio
Bandwidth
The system will support both narrowband and wideband audio from the PC.
Wideband audio delivers heightened speech clarity and life-like fidelity. However, wideband audio
consumes more battery power and has more stringent access criteria which reduces the number of
systems that can be deployed in a small area.
All PCs support wideband audio.
When switching between narrowband and wideband audio, you must re-establish the audio link for the
changes to take effect.
Wideband
*Assumes use of a softphone that is supported by Plantronics software.
Anti-Startle Anti-startle provides advanced hearing protection against sudden loud sounds. When Anti-startle is
set to ON, the system identifies and eliminates sudden loud sounds and rapidly reduces them to a
comfortable level. When Anti-startle is set to OFF, the headset caps sound levels at 118 dBA to protect
your hearing.
Off
G616* G616 Acoustic Limiting provides additional hearing protection against acoustic shock. When G616
Acoustic Limiting is set to ON, the system provides additional acoustic shock protection. Sound
levels are limited to 102 dBA as recommended in the G616:2006 guideline issued by the Australian
Communications Industry Forum (ACIF).* When G616 Audio-Limiting is set to OFF, the headset caps
sound levels at 118 dBA to protect your hearing.
Off
Audio Limiting* Audio Limiting provides advanced hearing protection for daily noise exposure. When Audio-Limiting is
turned ON, the system monitors and controls sound to ensure action levels do not exceed 80 dBA or 85
dBA (whichever is selected) specified by current and imminent EU legislation*. When Audio-Limiting is set
to OFF, the headset caps sound levels at 118 dBA to protect your hearing.
Off
*The noise monitoring and G616 limiting features are based on a typical headset and recommended acoustic coupling between the headset
and the ear. Please follow the instructions for optimal wearing position on page 7.

Plantronics Savi User Guide 18
My headset doesn’t work
with Microsoft Lync/Office
Communicator.
Make sure your headset is charged.
Make sure your headset is subscribed to the USB adapter.
Press the call control button on your headset.
Fine tune the listening volume on the headset using the volume up and down button.
If the volume is still too low, adjust the listening volume on the PC using Microsoft Lync/Office
Communicator*.
The sound is distorted or I hear
an echo in the headset.
Reduce speaking and/or listening volume on the PC using Microsoft Lync/Office Communicator*.
Point microphone towards your chin.
If the distortion is still present, lower the volume on the headset using the volume down button.
Talk time performance is
significantly degraded even
after a full recharge.
Battery is wearing out. Contact plantronics.com/support for factory service information.
7 Troubleshooting and Common Questions
* Consult Microsoft Lync/Office Communicator Help for more information

Plantronics, Inc.
345 Encinal Street
Santa Cruz, CA 95060
United States
plantronics.com
For product support contact us at plantronics.com/support or call 1-800-544-4660.
©2010 Plantronics, Inc. All rights reserved. Plantronics, the logo design, Savi, W430-M, and Sound Innovation are trademarks or registered
trademarks of Plantronics, Inc. Microsoft, Windows and Vista are trademarks or registered trademarks of Microsoft Corporation. Skype is a
trademark of Skype Limited or other related Skype companies.
Patents US 5,210,791; D539,266; D535,980; D589031; China ZL 200630123311.3; ZL 200630123312.8; CN301013095D; EM 000543798-
0001; 000543798-0002; 000873823-0002; Taiwan D117516; D117332; D127399
82621-16 (07.13)
Other manuals for W430-M
1
Table of contents
Other Savi Headset manuals