0
15
30
45
SawStop
10” Contractor Saw
!
WARNING
!
ADVERTENCIA
!
AVERTISSEMENT
Parasupropiaseguridad,lea el manual de
instrucciónantesde usar la sierra.
1.Use las gafas de seguridad.
2.Use el dispositivo de seguridad de la
cuchillay
separadorparacualquier operación para la
cual
peudaserutilizada incluyendo todas las
operacionesdeserrar completo o a través.
3.Mantenga las manos fuera de la trayectoria
de
lacuchillade la sierra.
4.Utilice una vara de empujar cuando está
necesario.
5.Sepa reducir el riesgo del retroceso.
6.No realice ninguna operación a mano
alzada.
7.No ponga la mano alrededor o detrás de la
cuchilla.
8.Nunca trate de experimentar con el sistema
de
frenos.
9.Nunca ajuste la posición del cartucho del
freno
mientrasquela cuchilla está girando.
10.Notratede desconectar el sistema de
frenos.
11.Siempredesenchufela sierra antes de
cambiar
lacuchilla,el cartucho del freno, o de
mantenerla.
12.Noconecteel motor directamente con un
abastecimiento.
13.Utiliceelinterruptor del bypass solamente
cuandoestánecesario.
14.Noexpongaa la lluvia o al uso en
localizacioneshúmedas.
15.Nopongalas manos
Pourvotre propre sécurité, lisez le manuel
d’instructionavantd’utiliser la scie.
1.Portez des lunettes de sécurité.
2.Utilisez le protecteur de lame quel
quesoitle
typed'opération.
3.Gardez les mains à l’écart de la
lamelorsqu’elletourne.
4.Utilisez un poussoir de fin de
passesi
nécessaire.
5.Limitez au maximum le risque de
rejet.
6.Ne travaillez pas à la volée.
7.Ne passez pas votre bras
par-dessusouautourde la lame.
8.N’essayez jamais d'effectuer un
essaiducircuitde freinage.
9.N’ajustez jamais la position de la
cartouchedefreinlorsque la lame
tourne.
10.N’essayezpasde neutraliser le
circuitde
freinage.
11.Débranchezlascie avant de
changerlalame,la cartouche de frein,
oud’enfairel’entretien.
12.Nebranchezpas directement le
moteuràuneprise de courant.
13.N'utilisezl’interrupteurde by-pass
qu'encasdenécessité.
14.Nepasexposer a la pluie et ne pas
utiliserdanslesemplacements
humides.
15.Nemettezpas les mains à
l’intérieuron
au-dessousdecabinet lorsque la
lametourne.
Foryourown safety,read the instruction
manualbeforeoperating this saw.
1.Wear eye protection.
2.Use the blade guard and spreader
forevery
operationfor which it can be used,
includingallhroughsawing.
3.Keep hands out of the line of the
sawblade.
4.Use a push-stick when required.
5.Know how to reduce the risk of
kickback.
6.Do not perform any operation
freehand.
7.Never reach around or over the
sawblade.
8.Never try to test fire the brake
system.
9.Never adjust the position of the
brakecartridgewhilethe blade is
spinning.
10.Donottry to disable the brake
system.
11.Unplugthesaw before changing
theblade,
changingthebrake cartridge or
servicing.
12.Donotconnect the motor directly
toa powersupply.
13.Usethebypass switch only when
necessary.
14.Donotexpose to rain or use in
damplocations.
15.Donotput your hands inside or
underneaththecabinetwhile the
MadeinTaiwan
SawStop,LLC
www.sawstop.com
TCP
10¨Contractor Saw
SawStop
®
ModelNo.CNS175
SerialNo.C074012345
Electrical/Electricidad/ Électricité
115/230Volts,60Hz
15/7.5Amps
1Phase
1.75HP
3500RPM
®
cUS
175370
SawStop
SawStop
0
15
30
45
SawStop
10” Contractor Saw
!
WARNING
!
ADVERTENCIA
!
AVERTISSEMENT
Parasupropiaseguridad,leaelmanualde
instrucciónantesdeusarla sierra.
1.Use las gafas de seguridad.
2.Use el dispositivo de seguridad de la
cuchillay
separadorparacualquier operación para la
cual
peudaserutilizada incluyendo todas las
operacionesdeserrar completo o a través.
3.Mantenga las manos fuera de la trayectoria
de
lacuchillade la sierra.
4.Utilice una vara de empujar cuando está
necesario.
5.Sepa reducir el riesgo del retroceso.
6.No realice ninguna operación a mano
alzada.
7.No ponga la mano alrededor o detrás de la
cuchilla.
8.Nunca trate de experimentar con el sistema
de
frenos.
9.Nunca ajuste la posición del cartucho del
freno
mientrasquela cuchilla está girando.
10.Notratede desconectar el sistema de
frenos.
11.Siempredesenchufela sierra antes de
cambiar
lacuchilla,el cartucho del freno, o de
mantenerla.
12.Noconecteel motor directamente con un
abastecimiento.
13.Utiliceelinterruptor del bypass solamente
cuandoestánecesario.
14.Noexpongaa la lluvia o al uso en
localizacioneshúmedas.
15.Nopongalas manos
Pourvotre propre sécurité, lisez le manuel
d’instruction avant d’utiliser la scie.
1.Portez des lunettes de sécurité.
2.Utilisez le protecteur de lame quel
quesoitle
typed'opération.
3.Gardez les mains à l’écart de la
lamelorsqu’elletourne.
4.Utilisez un poussoir de fin de
passesi
nécessaire.
5.Limitez au maximum le risque de
rejet.
6.Ne travaillez pas à la volée.
7.Ne passez pas votre bras
par-dessusouautourde la lame.
8.N’essayez jamais d'effectuer un
essaiducircuitde freinage.
9.N’ajustez jamais la position de la
cartouchedefreinlorsque la lame
tourne.
10.N’essayezpasde neutraliser le
circuitde
freinage.
11.Débranchezlascie avant de
changerlalame,la cartouche de frein,
oud’enfairel’entretien.
12.Nebranchezpas directement le
moteuràuneprise de courant.
13.N'utilisezl’interrupteurde by-pass
qu'encasdenécessité.
14.Nepasexposer a la pluie et ne
pasutiliserdansles emplacements
humides.
15.Nemettezpas les mains à
l’intérieuron
au-dessousdecabinet lorsque la
lametourne.
Foryour own sa fety,read the instruction
manualbefore operating this s aw.
1.Wear eye protection.
2.Use the blade guard and spreader
forevery
operationfor which it can be used,
includingallhroughsawing.
3.Keep hands out of the line of the
sawblade.
4.Use a push-stick when required.
5.Know how to reduce the risk of
kickback.
6.Do not perform any operation
freehand.
7.Never reach around or over the
sawblade.
8.Never try to test fire the brake
system.
9.Never adjust the position of the
brakecartridgewhilethe blade is
spinning.
10.Donottry to disable the brake
system.
11.Unplugthesaw before changing
theblade,
changingthebrake cartridge or
servicing.
12.Donotconnect the motor directly
toa powersupply.
13.Usethebypass switch only when
necessary.
14.Donotexpose to rain or use in
damplocations.
15.Donotput your hands inside or
underneaththecabinetwhile the
MadeinTaiwan
SawStop,LLC
www.sawstop.com
TCP
10¨Contractor Saw
SawStop
®
ModelNo.CNS175
SerialNo.C074012345
Electrical/Electricidad/ Électricité
115/230Volts,60Hz
15/7.5Amps
1Phase
1.75HP
3500RPM
®
c
US
175370
SawStop
SawStop
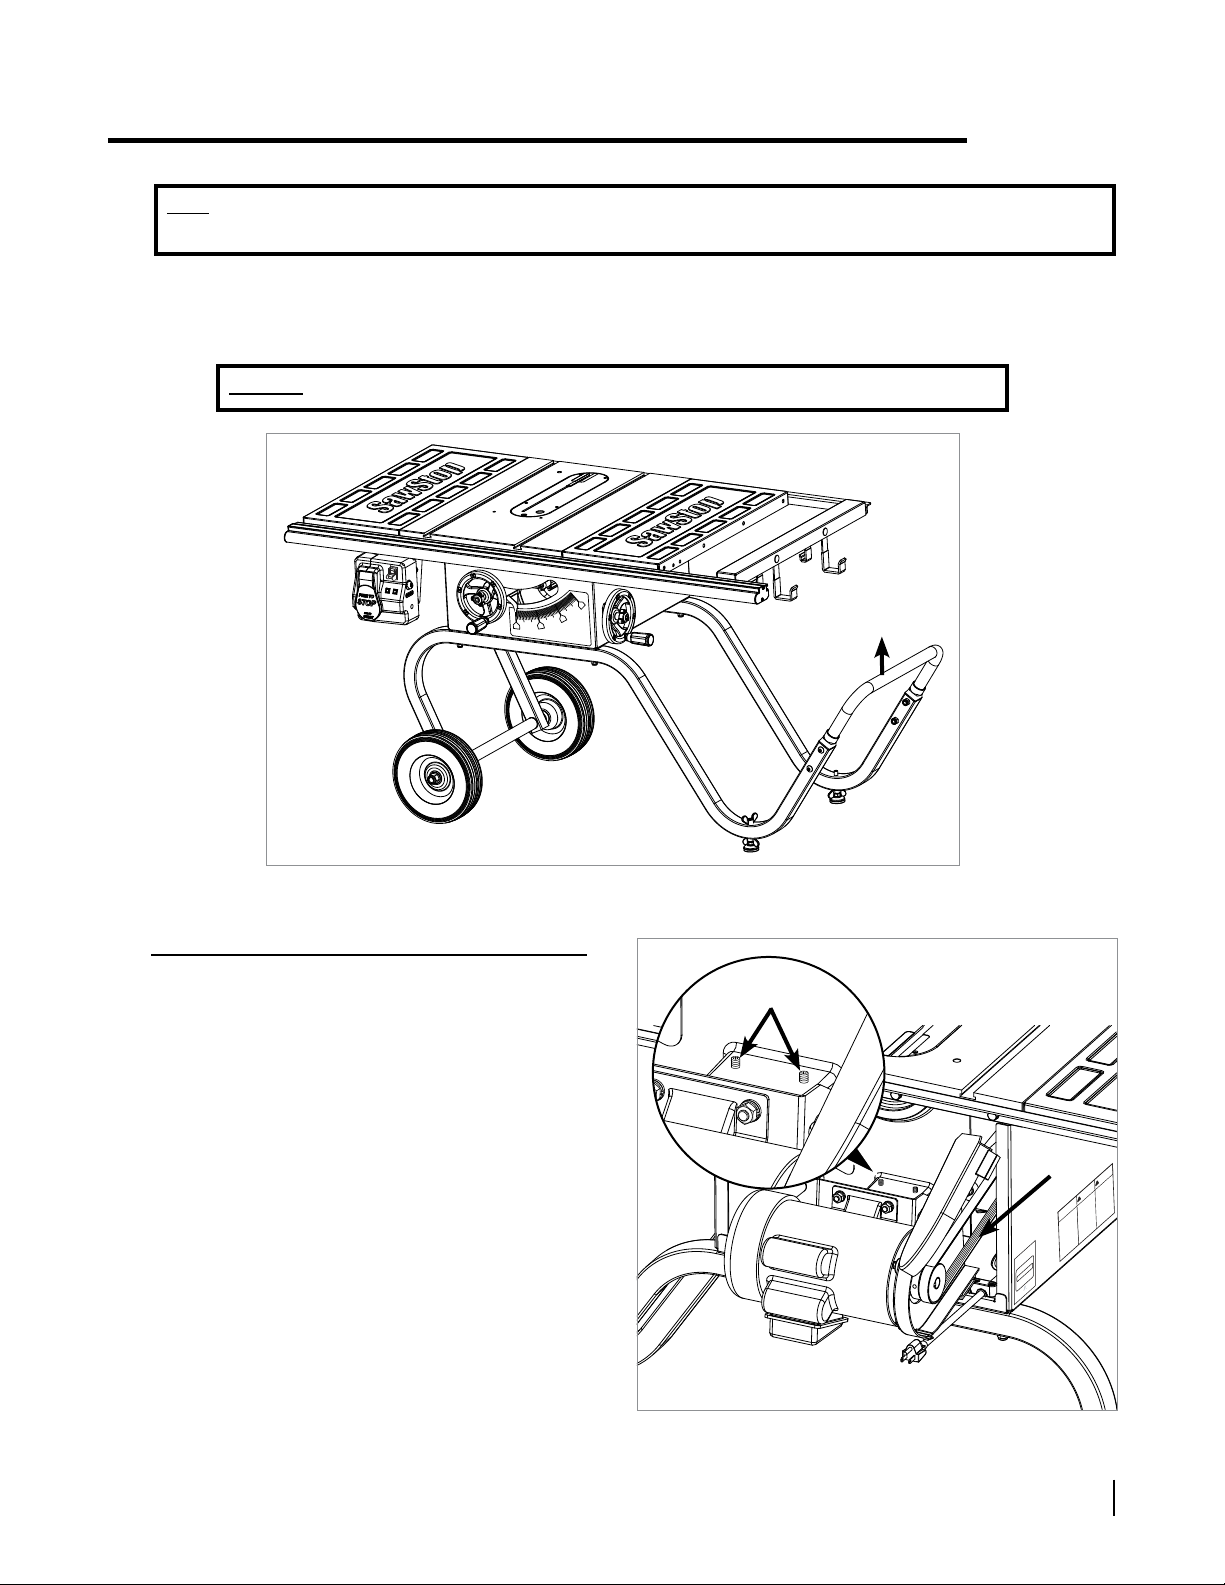
8SawStop®Contractor Saw Mobile Cart
Assembling Your Contractor Saw Mobile Cart
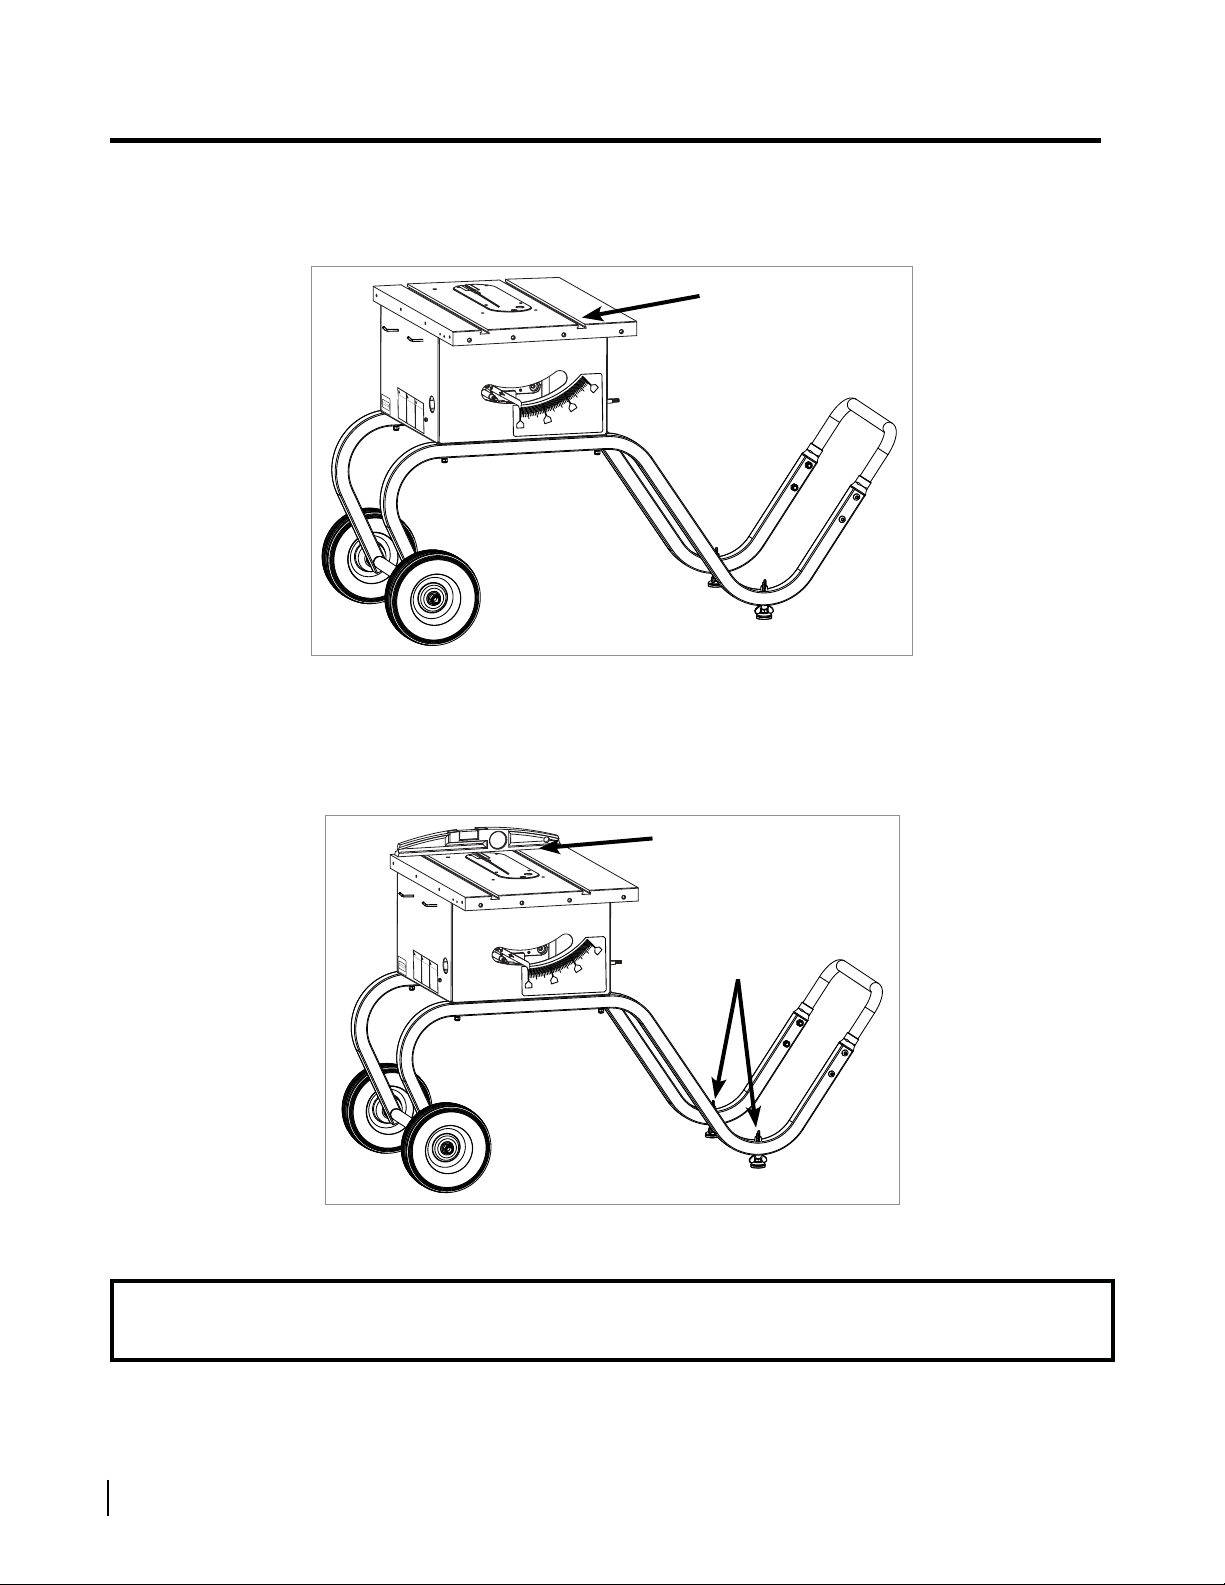
Fig. 12
12. If your saw is new, remove the plastic covering from the cast iron table top and remove the yellow label from
the top of the table insert. Wipe the oil o the table top with a soft, clean cloth (see Fig. 12). The table top is
shipped with a coating of oil to prevent the cast iron from rusting.
Fig. 13
Congratulations, your mobile cart is now assembled. If your saw is new, proceed to step 15 in
your contractor saw assembly instructions to complete the assembly of your saw.
13. Place a level across the table top and adjust the two leveling feet of the mobile cart by turning the lower wing
nuts until the table top is level (you may need to loosen the upper wing nuts). When the saw is level, tighten
the four wing nuts by hand (see Fig. 13).
wipe the table top with
a soft, clean cloth
level the table top
tighten the wing
nuts in the feet